• Please visit and share your knowledge at our sister communities:
  • If you have not, please join our official Homebrewing Facebook Group!

    Homebrewing Facebook Group

Counterflow Chiller Tutorial

Homebrew Talk

Help Support Homebrew Talk:

This site may earn a commission from merchant affiliate links, including eBay, Amazon, and others.
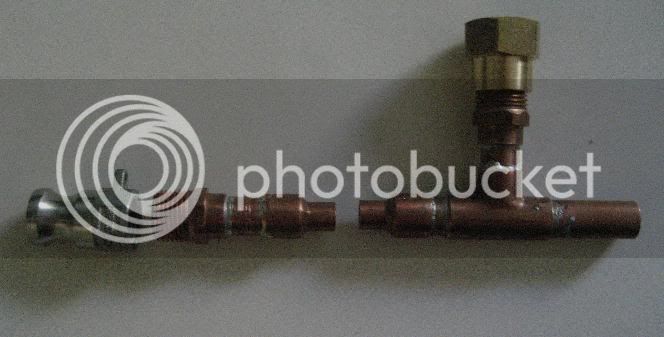
What was the problem with soldering the reducer?

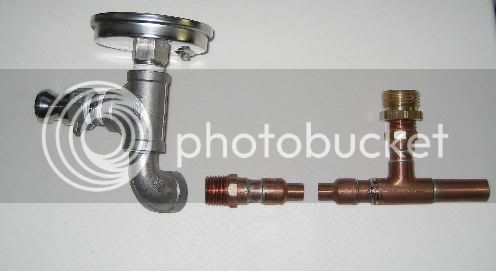
for me it was very difficult to push that 3/8" copper through the reducer it was a very very very tight fit and once its all assembled with the hose to deal with it was a PITA. if i were to make another one i'd

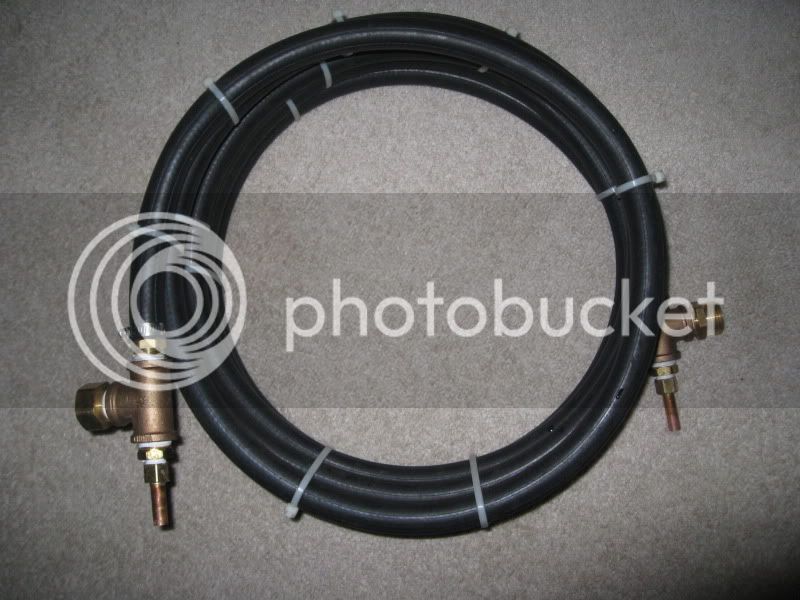
roll the hose and copper out straight
slide the reduce on the 3/8" copper first then solder it all up
then wrap around the corny keg for a perfect circle

doing those two things makes this no harder than making a IC chiller


-=Jason=-
 
would using 1/2" tubing and a clamp on the end of my 3/8" CFC work? or should I step back up to 1/2" using another reducer and attach a male or female adapter ?


kinda what Captain_Bigalow did here

I am half way through building mine (also my first time soldering). Just waiting on the soft copper to deliver. I used another 1/2" to 1/4" reducing coupling, about an inch of 1/2" straight pipe then a 1/2" threaded fitting. This enables me to use my PFD QD's.

Wort in...
cfcconnection1.jpg


Wort out (0-100f thermometer attached)...
cfcconnection2.jpg


The second one I am making will be the conventional one featured on this thread. PM me if you are interested in it.


-=Jason=-
 
The soldering aint pretty (first time doing this), but this project is under way over here. Just need a couple more 1/2" x 1/4" reducers

fittings...
1846-diy-cfc-fittings.jpg


Nearly done (no leaks!!), just need fittings for the wort...
1849-1000003109.jpg
 
Used mine for the first itme this weekend and it chilled great. Only problem I have is the flow is too low to whirlpool when going through it. I was going to recirculate through it to chill in the kettle and whirlpool at the same time. I will now jsut swap a hose after it is chilled and whirlpool. Not a big deal and it sure beats putting the immersion chiller in.

As for the flow, it is the CFC and not the rest of the system. I am using a LG pump, cam-locks with street elbows and 1/2" silicon hose. I can whirlpool just fine with the CFC not in the loop. I was trying to use this beyond its design, so it is not an issue with the chiller either.

I may look into a high-flow chiller, but I am thinking that process change is better than equipment change at this point.
 
so I added to my CFC got a street male adapter and another 1/2x1/4 reducer I am thinking I might want a 1/4" 90 to have the hose and copper both facing the same direction.

the male adapter is not soldered to the cfc so I can add a 90 if I want.

IMG_20110105_185733.jpg


-=Jason=-
 
Made my chiller after reading this thread. I really liked the connections that AHB sells, but didn't like their price so I built my own. Cost me about 60.00, but I didn't shop around for deals at all, and took about 15min to put together. Thanks for the great ideas Bobby.

IMG_2065.jpg


IMG_2067.jpg
 
I built mine one evening last week. I used 20' of 3/8 copper. Used it to brew a batch yesterday. In Wisconsin in January, our tap water is pretty cold, but the wort still came out a tad too warm. 25' might be the sweet spot.

One question - how do you get the rubber to clamp tightly to the smooth copper? I had a couple leaks I couldn't resolve by tightening the clamps. Just curious if there's a tip/trick people use to seal these up better.

Great thread - thanks to Bobby and others for contributions to make this a risk-free undertaking.
 
I brewed today... CFC worked flawlessly.

I used mine with my chugger pump and did a CFC back to BK for whirlpool. it took a little longer and whirlpool probably wasn't needed because the wort returning back into the BK was the same temp as the tap water 70ish.

anyways it worked perfect

@Lacrossebrewer i soldered my fittings on an used Cam lock fittings. I had no leeks at all.

-=Jason=-
 
@Lacrossebrewer i soldered my fittings on an used Cam lock fittings. I had no leeks at all.

-=Jason=-

I soldered a connector on the wort-in tube to use my McMaster QC, and that worked great. On the wort-out i just used a normal hose to go into the carboy. The leaks were all on the garden hose where I just had those clamped onto the 1/2" brass tubing. Maybe I'll pursue a soldered solution there, too, as I have seen a couple others do with their pics. Thanks.
 
This went together pretty easy and carefully coiled it around a 5 gal bucket. How much resistance should there be when i blow through the 3/8 tubing? Feels like it gained some.
 
I'm working on a parts list for one of these builds and found out that Copper Tubing Sales (.com) started carying 25' lengths of the copper coils. No longer do we have to think what we'd do with all that extra copper tubing.
3/8" OD tubing
 
Well I got all the stuff to make this today I may have overpaid a little on the copper but the grand total for this build came to around 65 dollars and I'm sure mine/bobby m's chiller will be much better thanks Chopps
 
Keith_Mahoney said:
I have the same problem. I have checked Home Depot, Lowes and Ace and still no luck.

If u read some of the other post on this thread. Some guys just used 1/2 caps and drilled holes in them. I would go that route if u can't find them.
 
I got mine at Lowes but of course it seems like they only get a new delivery of fittings once ever five years. Listen to Joeychopps. Drill a 1/4" or 5/16" hole in a tubing cap, put the flat side down over something with a hole (1/2" socket for example) then use a tapered punch to open the hole so the 3/8" tubing slips in tight. Sure, you can drill it right to 3/8" if you want but that doesn't make for a very sturdy solder joint.
 
I found them at Lowes too. They were really dusty. Probably there since the store opened.
 
McMaster has the 1/2 x 1/4 reducing coupling for $1.05 ea. http://www.mcmaster.com/#wrot-copper-tube-fittings/=dkbmjr

Grainger has several NIBCO reducing couplings, but, for one, they cost more than McMaster. The other thing is that it's not clear whether these are the right couplings.

5P186 - nominal 1/2 x 1/4, OD 5/8 x 3/8, female-female solder cup (http://www.grainger.com/Grainger/NI...m_sp=IO-_-IDP-_-BTM_BTB05209020&cm_vc=IDPBBZ2)

5P197 - nominal 1/2 x 1/4, OD 5/8 x 3/8, female-male solder (http://www.grainger.com/Grainger/NI...m_sp=IO-_-IDP-_-BTM_BTB05209020&cm_vc=IDPBBZ2).

Despite the difference in how pipe and tubing are labeled differently, Grainger lists others that might fit the bill.

5P187 - nominal 1/2 x 3/8, OD 5/8 x 1/2, female-female solder cup (http://www.grainger.com/Grainger/NI...m_sp=IO-_-IDP-_-BTM_BTB05209020&cm_vc=IDPBBZ2)

5P198 - nominal 1/2 x 3/8, OD 5/8 x 1/2, female-male solder (http://www.grainger.com/Grainger/NI...m_sp=IO-_-IDP-_-BTM_BTB05209020&cm_vc=IDPBBZ2)
 
Bobby_M said:
I got mine at Lowes but of course it seems like they only get a new delivery of fittings once ever five years. Listen to Joeychopps. Drill a 1/4" or 5/16" hole in a tubing cap, put the flat side down over something with a hole (1/2" socket for example) then use a tapered punch to open the hole so the 3/8" tubing slips in tight. Sure, you can drill it right to 3/8" if you want but that doesn't make for a very sturdy solder joint.

Whoa careful tell anyone to listen to Joey Chopps I don't want to get a huge ego! Haha
 
I have quite a bit of 1/2" soft copper at my disposal... any chance of using this instead of the 3/8"?
 
I was thinking that too but I don't know if the rubber hose is as readily available in sizes greater than 5/8" and I'm not sure if the 1/2" copper will fit if it's not.
 
Finished my CFC two nights ago, other than the hose clamps. Can't wait to give it a whirl. Cost me about $52 to build it.

CFC.jpg
 
Thanks Bobby. I built mine a few weeks ago but have been too busy to brew, I hope to brew this weekend. I just had a question about cleaning out the system. I have this new CFC, a new pump and new cam locks/hoses. What should I use to make sure the whole system is clean and ready to brew. It is plumbed to recirculate to the brew kettle so I could make a solution and let it circulate for a while. Any help would be appreciated.
 
I just went back and read a few of the early posts that suggest to run a mixture of white vinegar and water to clean out a new system. Is this good enough? It's cheap and easy, so I like it.
 
Ok I made one of these this past weekend, but I mistakenly bought 3/8 copper tubing (1/2" OD), I even managed to get it into the 5/8" rubber hose. :eek: 
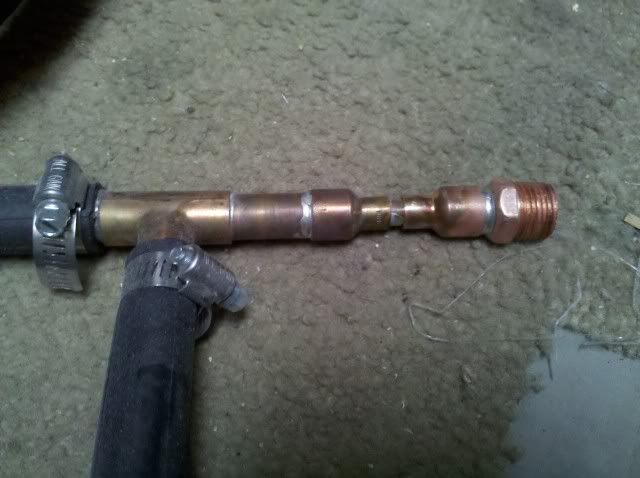
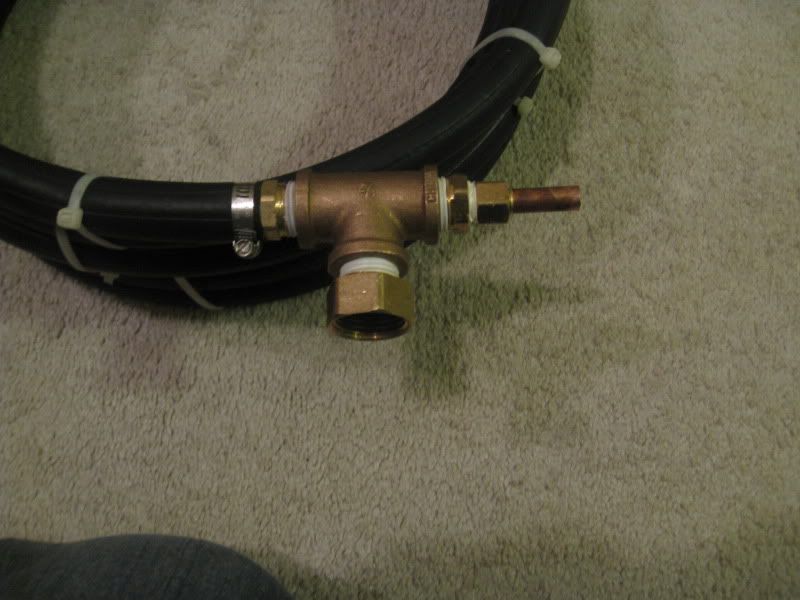
and all soldered up. Since I went with a larger tube than the OP designed, it would have to cut down the amount of chilled water flowing through the hose. Will it still work, should I start over with the correct size tubing? I'm worried there may not be enough water to cool the wort and overheating the rubber hose (melting). Although, the increased flow of the wort with the larger tube may yield better cooling..... I'm giving myself a headache, anyone else done it this way? Did it work?
 

Latest posts

Back
Top