Cork & Cap Bottling Method

Homebrew Talk - Beer, Wine, Mead, & Cider Brewing Discussion Forum

Help Support Homebrew Talk - Beer, Wine, Mead, & Cider Brewing Discussion Forum:

This site may earn a commission from merchant affiliate links, including eBay, Amazon, and others.

SourLover

Well-Known Member
Joined
Dec 4, 2019
Messages
282
Reaction score
1,535
Location
Southern California
The only information on this method I could find on the subject, on this site, was a thread from 2012, so I figured there must be some more up to date information out there.

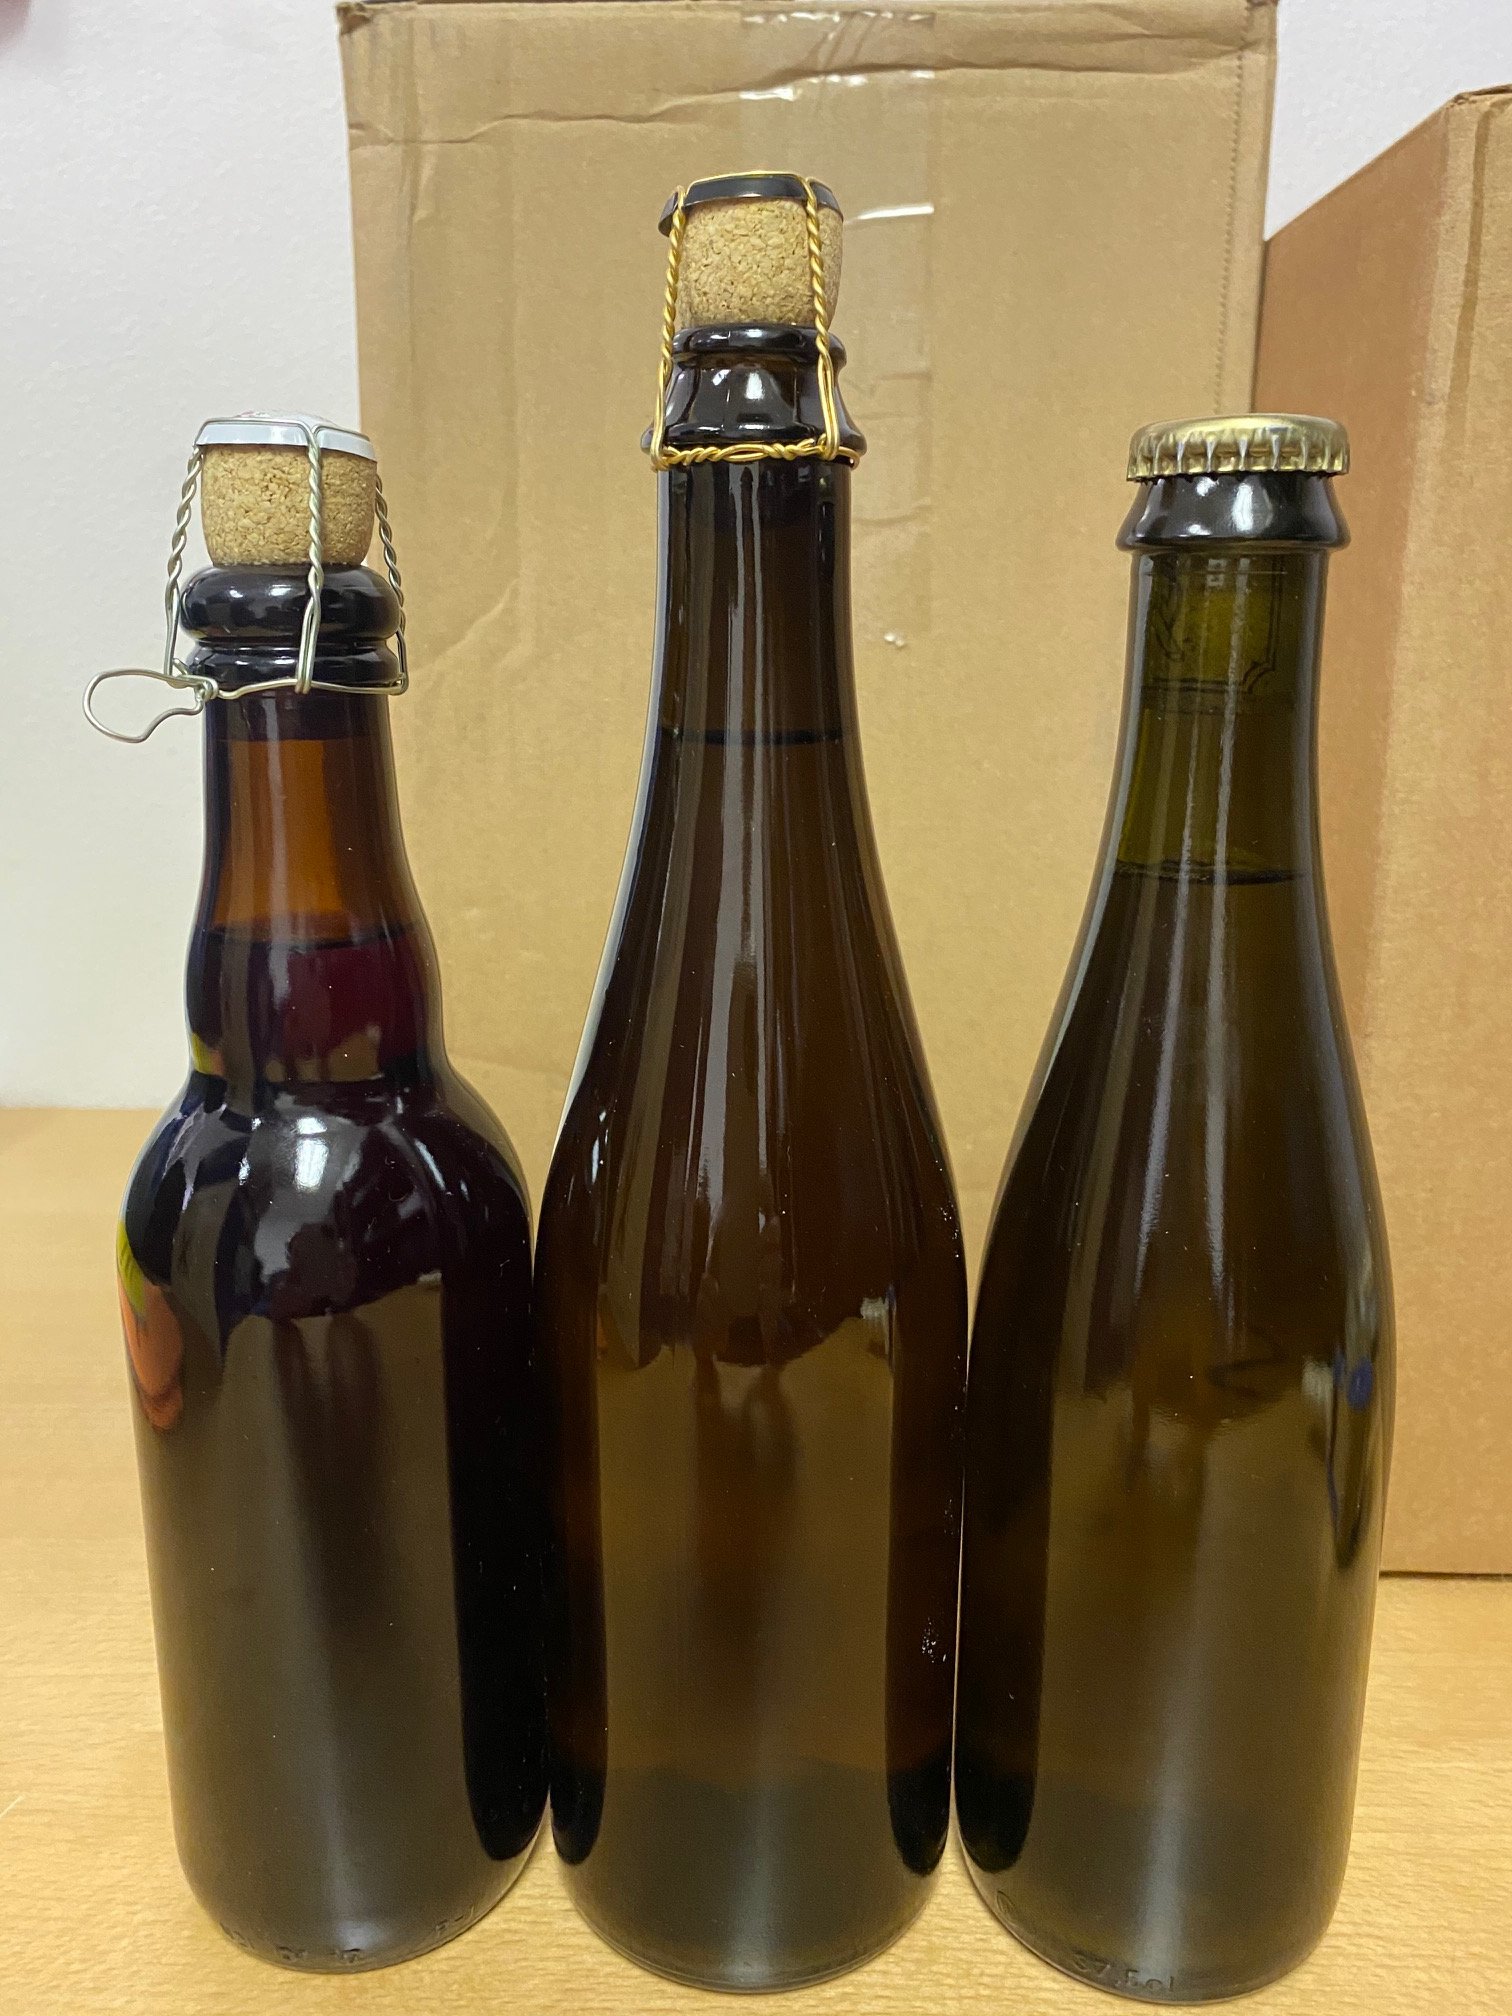
I've been bottling some beers in the 3.0 - 4.0 volumes range, and although I'm comfortable with the bottles, I'm feeling the weak link could eventually be the caps. I've seen quite a few commercial beers lately that are corked and capped, and I'd like to do something similar to this on future beers that I will be aging. It seems like this process would be a little easier than the cork and cage method, but maybe not? I'm currently using the standard red bottle capper, with 26mm & 29mm caps, that comes in most starter kits.

Is anyone using the cork and cap technique? If so, is there specific equipment that you are having success with?

If there's anyone out there doing the cork and cage method, I'd love to hear why you are doing that, what you feel the advantages are, and what equipment you are having success with.
 
I do the cork and cage on Belgian bottles designed for it. Mainly for the "cool factor" and because they can hold a higher pressure and I like that in my Belgian beers. I got a deal on an Italian floor corker when I bought out another homebrewer getting out of the hobby, it had likely never been used or only briefly at best. I have 5-6 cases of the 750ml bottles.

I don't have any of the bottles suitable for the cork and cap, although I'd like to find some at the right price. If I had some, I would do it as well. It can be done with regular beer bottles, but one has to use the smaller corks, suitable for the neck size of the bottle, and you would really need to make sure that you had the heavier glass bottles capable of handling the higher pressures, if that was your plan.

I have a bottle of beer that was given to me that is packaged with a cork and cap. According to the person that I got it from, it was bottled in 2003 and was a club project then, and they referred to it as "the worlds strongest beer". I suspect that Sam Adams Utopia is much stronger, but that's what they called it/referred to it then.
 
Is anyone using the cork and cap technique? If so, is there specific equipment that you are having success with?

If there's anyone out there doing the cork and cage method, I'd love to hear why you are doing that, what you feel the advantages are, and what equipment you are having success with.

For the first questions, cork and cap takes special bottles that are generally 29mm caps which are a bit harder to find. I do hang onto my 750 and 375 corked bottles, generally. Bottles like Cantillon and De Garde are cork + capped, so they are good to go. These do NOT use a belgian beer cork, they use a wine cork, typically a #9. So the only special equipment would be the 29mm bell, the corker doesn't need anything special. This is probably the best way to package a beer for longevity, but folks like 3F use the cork and cage and advertise a "Enjoy by" 2035 date, so I tend to think they feel good about their corks.

Is anyone using the cork and cap technique? If so, is there specific equipment that you are having success with?

As for cork and cage, there is much more of a learning curve as more can go wrong, in my opinion. First of all, you have to learn how much cork to leave up above, and the cages are an added cost (about $.30-.60 each), but to me there is no better presentation, and you get the bonus of being able to serve the beer with no special tools, no risk of shredding cork with your corkscrew.

To that end, if you want a proper belgian presentation and ease of removing the cork, the technique looks like this:

  1. Insert cork into corker (I dip them in starsan for the lubrication), depress until jaws pre-squeeze but do not push in.
  2. Fill bottle.
  3. Lift handle, push bottle down against the spring.
  4. Insert about half of the cork into bottle - the smooth rounded bottle lip and pre-squeeze should make this easy.
  5. Lift up the handle just enough to unlock the spring, push it down so bottle is dangling.
  6. The remaining ~25mm is now "choked" at the aperture, as it's wider than that hole, so you have to carefully wiggle it out.
    I've found wiggling is better than twisting. It will take some practice not shredding the cork top. This is why I like starsan and pre-squishing the cork.
    Someday, I'll make a little tool or insert that I can just put on the end of the punch to just drive the remaining cork out. Maybe a little wood block that slides in and out. I digress.
  7. Place the cage on the cork, move it to your capper (yes, your capper), and press down to "mushroom" the cork. It should compress that ~25mm down to about 10mm, and the tie wire will sit below the collar of the bottle, so you can wind the cage with one hand (a winder helps), and hold the capper down with the other.
This sounds like a lot, but I can do all of this in about 25 seconds or less per bottle, plus fill time. And I'm never doing more than 40-50 bottles. Sanitizing, filling, adding yeast or sugar are always the time consuming parts. The cork/cage is actually kind of fun, like putting a ribbon on a gift.
 
I do the cork and cage on Belgian bottles designed for it. Mainly for the "cool factor" and because they can hold a higher pressure and I like that in my Belgian beers. I got a deal on an Italian floor corker when I bought out another homebrewer getting out of the hobby, it had likely never been used or only briefly at best. I have 5-6 cases of the 750ml bottles.

I don't have any of the bottles suitable for the cork and cap, although I'd like to find some at the right price. If I had some, I would do it as well. It can be done with regular beer bottles, but one has to use the smaller corks, suitable for the neck size of the bottle, and you would really need to make sure that you had the heavier glass bottles capable of handling the higher pressures, if that was your plan.

I have a bottle of beer that was given to me that is packaged with a cork and cap. According to the person that I got it from, it was bottled in 2003 and was a club project then, and they referred to it as "the worlds strongest beer". I suspect that Sam Adams Utopia is much stronger, but that's what they called it/referred to it then.

Dr. Jeff, Thanks for the information.

For the first questions, cork and cap takes special bottles that are generally 29mm caps which are a bit harder to find. I do hang onto my 750 and 375 corked bottles, generally. Bottles like Cantillon and De Garde are cork + capped, so they are good to go. These do NOT use a belgian beer cork, they use a wine cork, typically a #9. So the only special equipment would be the 29mm bell, the corker doesn't need anything special. This is probably the best way to package a beer for longevity, but folks like 3F use the cork and cage and advertise a "Enjoy by" 2035 date, so I tend to think they feel good about their corks.


As for cork and cage, there is much more of a learning curve as more can go wrong, in my opinion. First of all, you have to learn how much cork to leave up above, and the cages are an added cost (about $.30-.60 each), but to me there is no better presentation, and you get the bonus of being able to serve the beer with no special tools, no risk of shredding cork with your corkscrew.

To that end, if you want a proper belgian presentation and ease of removing the cork, the technique looks like this:

  1. Insert cork into corker (I dip them in starsan for the lubrication), depress until jaws pre-squeeze but do not push in.
  2. Fill bottle.
  3. Lift handle, push bottle down against the spring.
  4. Insert about half of the cork into bottle - the smooth rounded bottle lip and pre-squeeze should make this easy.
  5. Lift up the handle just enough to unlock the spring, push it down so bottle is dangling.
  6. The remaining ~25mm is now "choked" at the aperture, as it's wider than that hole, so you have to carefully wiggle it out.
    I've found wiggling is better than twisting. It will take some practice not shredding the cork top. This is why I like starsan and pre-squishing the cork.
    Someday, I'll make a little tool or insert that I can just put on the end of the punch to just drive the remaining cork out. Maybe a little wood block that slides in and out. I digress.
  7. Place the cage on the cork, move it to your capper (yes, your capper), and press down to "mushroom" the cork. It should compress that ~25mm down to about 10mm, and the tie wire will sit below the collar of the bottle, so you can wind the cage with one hand (a winder helps), and hold the capper down with the other.
This sounds like a lot, but I can do all of this in about 25 seconds or less per bottle, plus fill time. And I'm never doing more than 40-50 bottles. Sanitizing, filling, adding yeast or sugar are always the time consuming parts. The cork/cage is actually kind of fun, like putting a ribbon on a gift.


goodolarchie thanks for the information.

The cork and cage doesn't seem too bad, and like you said, its the smaller part of the entire bottling process. I've been saving cages for a while now, so I've got a pretty good stock of those with their corresponding bottles. I just need the corks, which are easy enough to find. This is definitely worth trying out. I'll probably start out on some empty bottles for practice.

I'm a member of a few beer clubs, and most of their bottles have 29mm caps, so I have a fairly decent supply of those bottles. I'm already set up with a 29mm capper, although I think I need something better than what I have. I think I'll measure a few bottles to confirm the same inside dimension, and then bring a sample to my LHBS and get the corks that I need.

This is probably a stupid question, but what do you do about leaving headspace in the bottle? If I use my bottle filler like I normally do, the headspace will be taken up by the cork. I'm guessing I'd just eye it and stop filling at a certain point to account for the difference in headspace? Is there a better way than what I've mentioned?
 
This is probably a stupid question, but what do you do about leaving headspace in the bottle? If I use my bottle filler like I normally do, the headspace will be taken up by the cork. I'm guessing I'd just eye it and stop filling at a certain point to account for the difference in headspace? Is there a better way than what I've mentioned?


Not stupid. Headspace is important in beer and so you want a little bit in there, around 3/4 inch per 375ml. The cork isn't displacing very much of that at all though, especially if you're doing cork and cage. My wand ends up being the same fill whether I am corking or capping, for what it's worth.
 
Not stupid. Headspace is important in beer and so you want a little bit in there, around 3/4 inch per 375ml. The cork isn't displacing very much of that at all though, especially if you're doing cork and cage. My wand ends up being the same fill whether I am corking or capping, for what it's worth.

What do you do for headspace on 500ml & 750ml? I just checked a Beachwood Blendery 500ml bottle and it has 1-1/4" of headspace, and then checked a 750ml bottle from Fantome that has 3/4" of headspace. I'm guessing anywhere from 3/4" to 1-1/4" on any size bottle is probably going to be ok?

I got all of my corking stuff yesterday, and I'm not sure why I didn't go to cork and cap a while ago. This is going to be very simple.

I do have one more question on the cork and cage method though. In the photo below it says the corks are "Pre-Sanitized". You did mention Star-San in Step 6 of your prior post. I don't think I'd put these corks in without some Star-San. Is 15-30 seconds too long of a soak?
 

Attachments

  • IMG_4041 (2).jpg
    IMG_4041 (2).jpg
    2.1 MB · Views: 12
What do you do for headspace on 500ml & 750ml? I just checked a Beachwood Blendery 500ml bottle and it has 1-1/4" of headspace, and then checked a 750ml bottle from Fantome that has 3/4" of headspace. I'm guessing anywhere from 3/4" to 1-1/4" on any size bottle is probably going to be ok?

Yeah, when I said 3/4" per 375 I meant somewhere around 1" for a 500 and between 1 1/4 and 1 1/2" for a 750. The easiest answer is "you fill it up 500ml and the headspace is the headspace!" ...which you can measure if you know your specific gravity and weigh the fill in grams. Or just fill them with water and take note of the level, then obviously sanitize.

Again, the cork displacement isn't significant in any of these bottles, it's not so different from bottling to cap (a little moreso in a 375). You want enough of a "pop" that makes uncorking fun, but not so much headspace that it's a low pour or exposes too much oxygen.

I do have one more question on the cork and cage method though. In the photo below it says the corks are "Pre-Sanitized". You did mention Star-San in Step 6 of your prior post. I don't think I'd put these corks in without some Star-San. Is 15-30 seconds too long of a soak?

Yeah so I've used those same BSG corks you have there. I know they give that guidance, but go ahead and try them dry and let me know how it goes. I always find there's shredding of the cork. I don't soak them, it's just a quick dip or spray. Maybe soaking them would compromise the seal, but I doubt it. There are a number of folks on MTF that do this too. Since the corks are pre-sanitized, you're just looking for lubrication coverage, not sanitization.
 
One final thought to reinforce my point above...

The easiest answer is "you fill it up 500ml and the headspace is the headspace!"

Take a look at these two bottles. Both are from world class corkers. The beer aint bad either.

2020-12-10.jpg


The levels are identical, but Cantillon corks and caps. There's very little headspace there. 3F corks and cages so there's a lot more. The bottle/neck design is different too. So there's no "right or wrong" way to do it. I think if you're corking and caging, 3/4 per 375ml is a good guideline if you want that signature cathartic "pop."
 
Thanks for the advice. That's a great photo showing the beer levels. You are correct, the beers are not bad either!
I just checked a couple of my 750's that are conditioning at my office, and the headspace, if I put a cork in, would be similar to the Cantillon.
We'll see how this goes. I'm going to be bottling some beers later this month.
Thanks again for the advice!
 
No prob, post back with the results in a few months when you open one!

Here's some photos of a couple of different recent bottlings.
The easiest ones to use are definitely the bottles with the 29mm cap size. The corks slide in all the way very easily, and with the proper capper, they cap perfectly.
The cork and cage are a bit more challenging, but I think I did pretty well for the first few go arounds. A few corks definitely hit the trash can. Like you said though, you definitely want to wiggle those instead of twisting.
These different processes actually made the bottling somewhat enjoyable.
Thanks again for the help on this!
 

Attachments

  • IMG_4126.jpg
    IMG_4126.jpg
    481.4 KB · Views: 19
  • IMG_4127.jpg
    IMG_4127.jpg
    376.6 KB · Views: 20
  • IMG_4128.jpg
    IMG_4128.jpg
    381.2 KB · Views: 14
The cork and cage are a bit more challenging, but I think I did pretty well for the first few go arounds. A few corks definitely hit the trash can. Like you said though, you definitely want to wiggle those instead of twisting.
These different processes actually made the bottling somewhat enjoyable.
Thanks again for the help on this!

Those couple of shots look good. Only suggestion I'd have is to now "mushroom" those corks and get the hoods tight(er). I highlighted this in step 7 above, it really helps the removal of the cork and apparently helps make a tighter seal... the latter claim I've never seen any evidence or studies to support. You'll see what I mean when you try to uncage and yank those straight-in corks out of there, mushrooming is absolutely critical to the process. You may need to leave a little bit more cork out to get a nice shroom.
 
Those couple of shots look good. Only suggestion I'd have is to now "mushroom" those corks and get the hoods tight(er). I highlighted this in step 7 above, it really helps the removal of the cork and apparently helps make a tighter seal... the latter claim I've never seen any evidence or studies to support. You'll see what I mean when you try to uncage and yank those straight-in corks out of there, mushrooming is absolutely critical to the process. You may need to leave a little bit more cork out to get a nice shroom.

Yep, I missed #7. Thanks for pointing that out. I’ll try a few samples this weekend to see if I can get it done a little better. This way I’ll be better prepared for my next sour bottling.
 
Well good news is it's not too late to mushroom those corks. You could do it a year from now. You just have to get it under a capper and re-cinch the hood/cages.
 

Latest posts

Back
Top