• Please visit and share your knowledge at our sister communities:
  • If you have not, please join our official Homebrewing Facebook Group!

    Homebrewing Facebook Group

Control power on 2250 watt 120v element

Homebrew Talk

Help Support Homebrew Talk:

This site may earn a commission from merchant affiliate links, including eBay, Amazon, and others.

Ridenour64

Well-Known Member
Joined
Sep 29, 2012
Messages
603
Reaction score
249
Hey everyone,

I have made wines, ciders ETC but have not made any beer yet because I lack the extra equipment. I am ready to purchase some equipment but I want to make sure I do it right the first time. I’m looking at a 10 gallon spike kettle because I want it to have TC fittings. On brewhardware.com I see they sell a 2250 watt 20amp 120 TC element. My question is, how can I control the amount of power that is going to this element (without going crazy of course. Im not very experienced with electrical, nor do I have knowledge on these controller builds I’m seeing on here, I also do not want to spend a lot of money building a controller) the kettle will have an analog temperature gauge on it, and I’m not really concerned about any auto turning on or off at certain temperatures. Essentially, I’m just looking to have the control over energy output like a propane burner. I also am not going to run a pump. At the very least, I’d like to have a single switch just to shut it off. I feel like that would be better than just plugging and unplugging it? I only plan on doing 5 gallon batches, maybe less occasionally.


Edit: I didn’t put in there that I plan on BIAB all in my kettle.
 
Last edited:
still dragon controller is the cheapest simplest method however with such a small element you can just plug it in the wall or build a box with a 20a switch to control it and go 100% on or off and use it that way since the boil will not be overpowering at 100%.
 
still dragon controller is the cheapest simplest method however with such a small element you can just plug it in the wall or build a box with a 20a switch to control it and go 100% on or off and use it that way since the boil will not be overpowering at 100%.

Thanks for the info! Yeah I think for now I’ll just buy and make an on and off switch. I appreciate it!
 
Buy a 240 volt element of the same wattage, a three way switch (SPDT), a regular switch (SPST) and a diode. Connect the diode between the terminals of the SPST switch. Connect one side of that to Red (+120V) in a 240 V circuit. Connect the other side to one side of the heater. Connect the other side of the heater to the center terminal of the SPDT switch. Connect the other terminals to, respectively, Black (-120V) and White (neutral). When Black is selected 240V are applied to the heater and, with the second switch turned on (so that the diode is shorted) its rated output is produced. When the SPDT switch is flipped to White 120 V is applied and the heat output drops to 1/4 of the rating. Turning the SPST off forces current to go through the diode which it only does on alternate half cycles so the power drops in half. Thus you have full, 1/2, 1/4 and 1/8 power available for the cost of two switches and a diode.
 
All good discussion but I feel it important to mention that a single 2250w element in a 10 gallon kettle is not going to be a satisfactory boil for 6-7 gallons so all this control talk is moot.

You either need to explore getting a 30 amp circuit for a 5500 watt element or consider a PAIR of 1650w elements. The latter option has the benefit of not needing an expensive controller. I know you said you wanted TC ports on everything, but why?

Something like this will do it.. https://www.brewhardware.com/product_p/biabpackage5elec120.htm
 
Will be if some sort of insulation is used. Also covering until the boil is reached helps. Not disagreeing that more power would be better though.
I have at least a dozen customers that had me build 2250w, 10 gallon kettles or built them using parts that were positive it would be fine. 2 months later.. "OK tell me you told me so and help me put another element in".
I'll concede that with insulation the boil is almost good enough but I like building better than that. I also value time to ramp.
 
Are you going to be using this on a kitchen stove, or on a propane turkey-fryer burner, or is the electric element supplying all the heat? 2250W is not enough, but 2250W plus bottom heat from a stove should be okay for 5 or 6 gallon batches. I use 1650W plus a stove to do 4 gallons
 
Hey guys,

Ajdelange, I barely understood what any of that meant lol. I’ll have to do some research.

Bobby, I think it’s cool you run the store but are also active and helping customers here, that’s great. I was considering the 2250 element on your site because the description says it’s minimum power needed for a real boil on 5/6-7 gallons. It said record time wouldn’t be reached, but I was ok with that. If it wont be a sufficient boil, I’ll have to consider other options.

I’ve decided on going with a 15 gal spike kettle. After reading in the BIAB section for a while, most users are recommending 15 gal for the extra grain.

20 amp is very doable because most of my circuits are already 20 amp, and all of the wire is 12 gauge. So a simple outlet replacement was easy enough wherever I wanted to brew. I can get help running a 240 line, that’s not an issue, but then I’m confined to that one space (not a huge deal breaker) but then I have to build a controller as well. Which at this time, I know nothing about, but I learn pretty quick. I don’t want to pay a huge amount for a controller though.

I have considered doing the boil on the stove as well but the problems with that are I have a hood vent above my stove. The 15 gal, and even the 10 gal are pretty big and only give me a few inches of working room under that hood. So stirring becomes a pain, and I would need to take the kettle off of the stove to deal with the bag to any extent. I was also worried about heat coming from the edge and messing with the element and wiring. I understand I can make some sort of a heat shield for this. This stove option can definitely be done, and if all else fails, I might’ve t go with a smaller element supplemented with the stove. I was hoping 2250 would be good enough though.
 
Look at Brewhardware's "Hot Rod" heat stick. (that's what I'm using, with a 1650W stainless steel heating element I bought on Amazon) You don't need a hole in your kettle, and you can lift it out of the way when you are mashing.

An 8 gallon kettle might fit on your stove better, but it will take some juggling to do 5 gallon batches.
They have been out of stock for a while from what was told in another thread. (not sure how true that is though)
 
They have been out of stock for a while from what was told in another thread. (not sure how true that is though)

I've been waiting over a month. So yeah, still not in stock yet, at least for the regular length one. The XL one is in stock but it brings the connector close down near the bottom, which I don't want since I'm going to go electric combined with gas on stovetop.


Rev.
 
All good discussion but I feel it important to mention that a single 2250w element in a 10 gallon kettle is not going to be a satisfactory boil for 6-7 gallons so all this control talk is moot.

I boil 6 gallons in a Robobrew v3 and that only has 1500w total. Boil off is low though at only a half gallon an hour which is one of the reasons I want to go with one of your Hotrod Heatstick's and gas on stovetop. I know the robobrew is narrower in diameter and taller which helps keeps the heat a bit better but I can't imagine 2250w not being enough to boil 6-7 gallons in a normal kettle. Sure it will be slow like all 120v single circuit brewing, and the boil may not be really aggressive, but it should still work.


Rev.
I have a robo too and I'm probably just jaded on what I think a boil is. Boil bubbles are formed on the element and they float to the surface but it remains at 208F for me. Dual 1650 gets you a rolling boil where the whole pot of wort is at boiling temp.

When I said a dozen customers were disappointed with 2250, I wasn't being hyperbolic. It really happened and I did in fact tell them so. Something about the coffee urn tall skinny profile is just better at fooling you into seeing a boil. When you go to a square dimension pot, the illusion breaks.
 
I have a robo too and I'm probably just jaded on what I think a boil is. Boil bubbles are formed on the element and they float to the surface but it remains at 208F for me. Dual 1650 gets you a rolling boil where the whole pot of wort is at boiling temp.

Mine boils at 212 fine, I've measured it over several brews with two different thermometers. Are you setting the temperature on the Robobrew several degrees past boiling? I set mine to something like 218. I've read that setting it to 212 is bad because the sensor temp isn't always accurate and it can lead the Robobrew to shutoff one of the elements. Mine provides a rolling boil but yes it is a weak rolling boil, not like when I was on propane in the backyard with a Blichmann Boilermaker. It is not however a simmer, it is indeed a boil.

Regardless, I've made several brews with it that I've made many times in the past and outside of 3-5 efficiency points less on average the beers still came out tasting basically the same as when I had a vigorous rolling boil on a propane burner.

PS. When the heck will I be able to buy? https://www.brewhardware.com/product_p/hotrodrtu.htm
:)


Rev.
 
Does anyone have a link to a controller build that I can put together that allows me to control power to a 30 amp element? Something basic. No pumps or anything. Just to control element. I can’t seem to find one on HBT.
 
I have a robo too and I'm probably just jaded on what I think a boil is. Boil bubbles are formed on the element and they float to the surface but it remains at 208F for me. Dual 1650 gets you a rolling boil where the whole pot of wort is at boiling temp.

When I said a dozen customers were disappointed with 2250, I wasn't being hyperbolic. It really happened and I did in fact tell them so. Something about the coffee urn tall skinny profile is just better at fooling you into seeing a boil. When you go to a square dimension pot, the illusion breaks.

Is something as simple as this able to control power to a 30 amp element?

http://stilldragon.com/index.php/diy-small-controller.html

If so, I am willing to go that route.
 
Last edited:
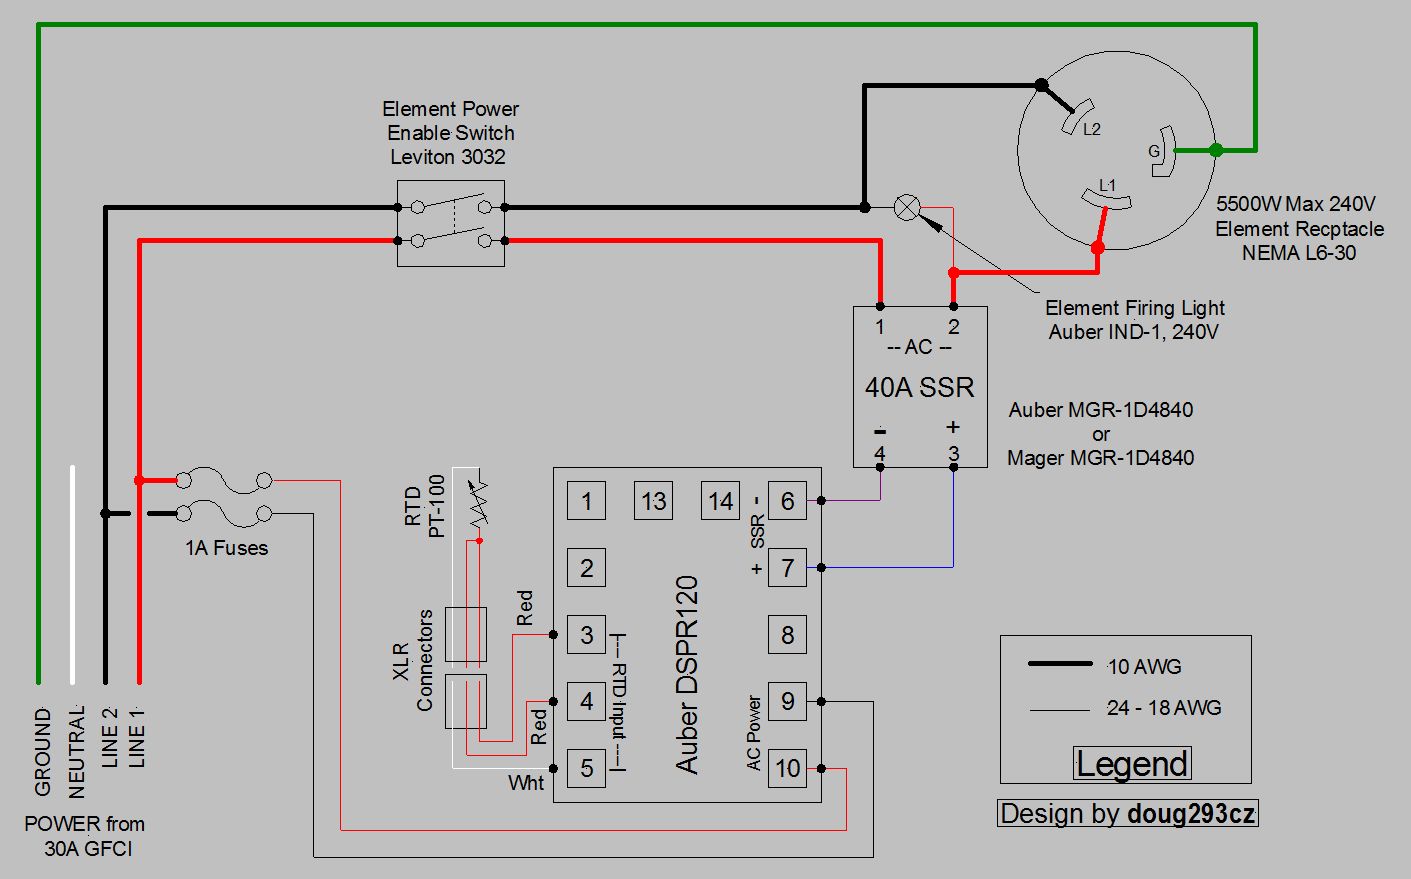
This is a little more complex than the StillDragon controller, but has the advantage of being able to hold a set strike temp, as well as control boil power with repeatable settings. You wouldn't really want to try to hole mash temp with it without recirculation. Also, the StillDragon has no way to disconnect the voltage from the element other than unplugging either the control box or the element. SSR's and SSVR's are current switches, not voltage switches, so voltage remains on the control box output, even when the SSVR is off. The off voltage is low with the element connected, but is 240V with the element disconnected, This is why I always include a 2 pole, single throw mechanical switch (either manual or contactor) in my designs.

Here is about the simplest design that I would feel comforatable using myself.

DSPR120 1-Element  240V only.PNG


Brew on :mug:
 
The still dragon will still give you more control than a flame but a temp controller gives you actual temp consistency if you wish for strike and sparge temps... the latter is more complx requiring a temp probe as well. All depends on your wants.
 
I am almost in the same stage planning my first ekettle. Here is what i am thinking of putting together to boil up to 10 gallons of water for BIAB.

15 gal kettle with 2ea- 1650w ULWD elements and one plugged into a temp controller. This will be on two 15amp circuits. Will this have enough power to boil 10 gallons?

Two controller options i am looking at, anyone think one is better than the other. They both are about the same price so what else sets them appart.

#1.) UNI-STAT III TEMPERATURE CONTROLLER
#2.) Inkbird IPB-16
 
Thanks for sending that Doug. All of that makes clear sense until it gets to the xlr connectors, and the temp probe. I’m sure it would make sense if I had the parts in front of me. I’ll have to price all the parts out and see what it comes to. If it’s reasonably close, maybe I’ll just go that route.

At this point, I’ve ordered my kettle, I went with a 15 gal custom spike kettle. I’ll be making a decision on the other items soon. I went with 4 ports on the kettle so I have room to upgrade. In the future I may want to recirculate. I think I’ll try a few without though.
That drawing is for 240V, but it will work on 120V as well. For 120V the black wires are for neutral, and the red wires for the hot. You should also swap out the 240V indicator lamp for a 120V indicator lamp (the 240V would work but be dimmer than it should be.) And, you could leave out the 1A fuse on the black wire that powers the EZBoil (however including that fuse keeps the control panel 240V ready.)

The temp probes are platinum resistance thermometers (Pt100 - RTD). They are a nominal 100 ohm resistor that changes value with temperature in a very precisely known way. The controller measures temp by measuring the resistance of the Pt100-RTD. Since 100 ohms is a fairly small resistance, the resistance of the lead wires are enough to add significant error to the resistance (temperature) measurement. Using 3 wires to connect to the Pt100-RTD allows the controller to compensate for the resistance of the lead wires, and thus get a more accurate temperature reading. The wires are not always red and white, but you will always have two of one color (treat as red for connections) and one of another color (treat as white.) The XLR connectors are basically microphone connectors that are used in this application to allow the RTD cable to be disconnected from the control panel, which is a huge convenience. One side of the XLR pair goes on the end of the RTC cable, and the other side mounts on the side/bottom of the control panel enclosure. The panel half of the XLR pair is then wired to the PID/EZBoil. It is important that the same type (but not color), and length of wire is used to connect all three leads from the panel XLR to the control unit, in order to get the most accurate lead resistance compensation.

Let me know if you have other questions.

Brew on :mug:
 
I have made the decision to go 240, seems like the easier route. I only have one more question. Does that diagram include all of the parts necessary for the controller? (Minus the enclosure of course) I will need a heatsink as well? Any other items.
 
I have made the decision to go 240, seems like the easier route. I only have one more question. Does that diagram include all of the parts necessary for the controller? (Minus the enclosure of course) I will need a heatsink as well? Any other items.
No, the diagram is just a schematic that shows how things are connected together electrically. It is not a complete bill of materials, nor does it necessarily show the actual wire routing (just what has to connect to what.) Things not included are terminal strips (if you want to use them), strain relief glands for wire entries to the enclosure, plugs/receptacles (if you want them as part of the enclosure), fuse holders, enclosure back panel, crimp terminals, screws/bolts/nuts, etc.

The schematic also does not show all of the grounding that should be done. The enclosure needs to be grounded, if metal, and both the body and the door need ground connections (can't depend on the hinges for a good ground.) The heat sink and metal base plate of the SSR should also be grounded, as well as the 3032 switch body. Basically ground anything metal, or any component that has a dedicated ground connection point. Screwed/bolted contact points between paint free surfaces will provide grounding to the enclosure.

Brew on :mug:
 
Can that diagram be ran without the rtd inputs, and just use the ezboil for element output? Or does it require the rtd to run properly? I’m not interested in maintaining a temp right now, but would like the system to be upgradable in the future. Also, is the auber dspr120 able to be swapped for any other PID, such as an inkbird, or is that not even the same thing? (Cheaper on Amazon)
 
It looks like a pid will only measure temp to kick on and off, but not scale back power to the element.


Edit.

I see now on aubers web site that a power regulator is different than a PID.
 
Last edited:
It looks like a pid will only measure temp to kick on and off, but not scale back power to the element.


Edit.

I see now on aubers web site that a power regulator is different than a PID.

That's correct. A PID, at least the type generally used for e-Brewing, only turn the element 100% on or off. As the set point is reached you will see it cycle on and off frequently. There is another form of ssr called an ssvr that can be used for controlling power to the element. That is probably what the Aubers power regulator uses.
 
Last edited:
Back
Top