• Please visit and share your knowledge at our sister communities:
  • If you have not, please join our official Homebrewing Facebook Group!

    Homebrewing Facebook Group

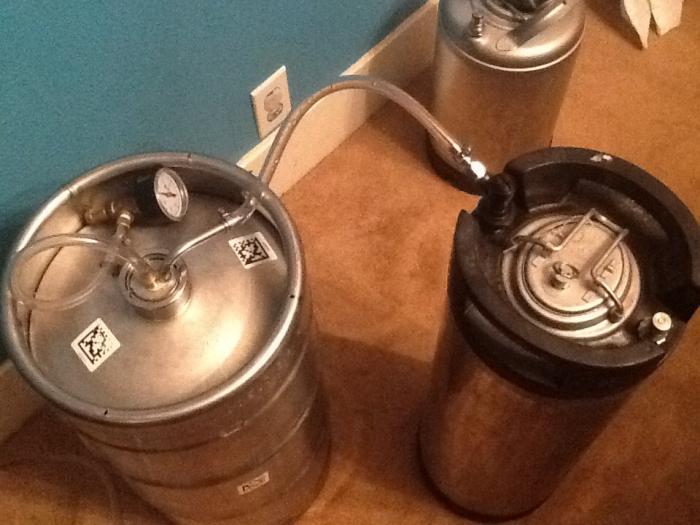
Cheap Sanke Keg fermenter Conversion kit (Completed!)

Homebrew Talk

Help Support Homebrew Talk:

This site may earn a commission from merchant affiliate links, including eBay, Amazon, and others.
I gotta ask how would you dry hop this thing? Interesting build BTW. I am thinking of something like this for myself, and like you dont want to spend big bucks for it.
 
Do you know what NPT thread will match up with a corney keg fitting?

I THINK it's 1/4" but I'm not 100% sure...

I'm totally going to copy this amazing design. Hope you won't mind...

Not at all. That's why I posted it. I hope it works out for you. Post it up when you get it done or if you make any changes.
 
I gotta ask how would you dry hop this thing? Interesting build BTW. I am thinking of something like this for myself, and like you dont want to spend big bucks for it.

I would guess - just remove the complete "fitting" drop the hop bag/sack/ball/stocking/etc. in (and tie it off to one of the inside "loops" on the fitting for easier removal)
 
I gotta ask how would you dry hop this thing? Interesting build BTW. I am thinking of something like this for myself, and like you dont want to spend big bucks for it.

I want to keep everything under pressure from the time I pitch until it hits the glass. I plan to ferment in this keg. Then force transfer to a sealed corney keg that has a dry hopper inside of it. Then I can force transfer to the serving keg.
 
I applaud you!
CHEERS!

2 things

First, Can you let this thing sit overnight to verify it will actually hold pressure.

Second, can you put together a list of components or a Bill of Material.

I will do both... I already had the 10 psi holding for 30 minute before I released it to put things away, but I'll pressurize it again and sleep on it. I honestly think the spunding valve will leak before this thing haha...

After dinner I'll edit the original posting to include the info/build list.
 
Nice. I use the stock spear and a sankey coupler to do the same thing. Got lucky and scored a box of sankey couplers for next to nothing. If I didn't have the couplers, I'd probably look at doing something like this.

How are you capping the racking cane so that it holds 10psi?
 
Nice. I use the stock spear and a sankey coupler to do the same thing.

How are you capping the racking cane so that it holds 10psi?

Ya, I have a few sankey couplers. I was looking at using them, but they're way too bulky for my operation. I need my kegs to fit into my fermentation chamber, so the low profile is a must.

For the test, I put my spunding valve on the co2 barb. I put the co2 on the racking cane. However, I'm going to try to get a compression fitting for the racking cane and add a ball lock connector to it. That way it will be sealed during fermentation. Then I can quick connect a picnic spout to blow off any yeast. Then quick connect my transfer hose to force transfer to my corny keg. I'll also add a quick connect to my spunding valve, the co2 side and my co2 cylinder.
 
Can you let this thing sit overnight to verify it will actually hold pressure.

Well I'm 100% satisfied with the results. It's still at 10psi holding strong.

Funny thing ... I did have a leak in my spunding valve, so I wrapped the ball with plumbers tape. That seemed to do the trick (I need to get a plastic ball for it). Anyway, the needle hasn't moved since...

I have to stress the fact that the size of the holes in the stopper is extremely important. It needs to be very snug.

I'm confident this will work for fermenting, but I have some ideas to make it more ridgid for adding ball locks to it. I think this same set up can convert a sankey to a ball lock for serving or for fermenting as well...the parts will cost more over all though.

I'm thinking about using two of these
CI-150600-EA_1.jpg


They will go through the stopper. On the top is a washer and nut and on the bottom is a SS washer and SS nut. This will "sandwich" stopper and make the connectors more ridgid. The inside can connect a dip tube via compression the too can connect a ball lock connector... I think it will work very well.

Well... I call this an absolute success. Now I'm off to Home Depot to get the supplies for quick connect and to make several more of these for my other kegs.

I'm brewing tomorrow or Friday... :rockin:
 
Hey insanim8ter...
I'm not getting a picture to show up in your last post there you said you were going to "get 2 of these". It looks like something from airgas maybe?
Could you provide a link?
 
Hey insanim8er...
I'm not getting a picture to show up in your last post there you said you were going to "get 2 of these". It looks like something from airgas maybe?
Could you provide a link?

I changed the pix. It's a 1/4" nipple. I think 1 1/2" long will do it.
 

Not really, seems like they are all UN (UNF?) threads and none really match up to an NPT/BSP thread at all. I think I saw somewhere that someone had basically just used a metric ass-load of thread tape to get one to seal to a NPT thread but I don't know how that would hold up to pressure :(
 
So I went to Home Depot and got all sorts of other parts for the compression fitting, but it wouldn't fit over the racking cane. The hole and the cane were exactly the same size. I could've widen the hole a hair, but it didn't make sense. It cost more money and really wouldn't have achieved anything better than what I ended up doing, so I bagged that idea and simply attached a liquid out ball lock coupler to the racking cane.

I'm not sure what to expect as far as wort coming up the tube during fermentation. I ferment in a dark chamber, and that wort will get blown off regardless. But I'll find out soon. I think it'll be fine.

So the plan is to ferment with the coupler on to keep pressure. Once I'm ready to transfer, I'll just push the pin and blow off any yeast. Once the liquid runs clear, I'll attach it to my corny keg liquid side and transfer. If I get an extra ball lock fitting, maybe I can make a QD picnic tap to make the blow off of the yeast easier. But for now this should work.

I still need to find some parts to do the QD for the sunding valve and co2. I plan on using air hose connections, but finding a barbed male is the problem. If I can't find any local, ill order then on line.

image.jpg
 
How possible would it be to put a racking cane on the bottom of the sankey and replace the hole in the bung with a large barb or some other fitting for adding yeast?

I know it would be a bit more expensive, but it might be a nice option. I have seen this set up somewhere before. I think https://brewmagic.com/product/brew-magic-fermenter/ has a picture there.

Just wondering how difficult it would be to make one of these instead of buying one for 600 usd.

Thoughts,, comments??
 
Nice.
I like the idea of transferring under pressure. The addition of the liquid qd is awesome. So why not just put a gas QD on the spunding setup. That way you can place it on the gas post of the keg and control your pressure and run rate into the keg.
One thing I am having a hard time understanding... How are you going to know when you have a full keg if you can't see into it?
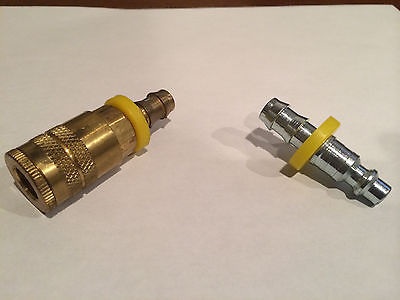

Ya I'm looking to add QD to the gas/spunding side. Home Depot didn't have what I needed. I want barbed air hose connections. They don't have the male side barbed. I don't want to make it because it adds seams that can fail. I'll find some or order them line. I'm looking for whats in the photo.

To know your wort volume in your keg, use a bathroom scale and go off weight. Or you can use your sight on your boil kettle. I have a blichmann boiler maker, so it has a nice sight guage. But weight is your best bet.

image.jpg
 
How possible would it be to put a racking cane on the bottom of the sankey and replace the hole in the bung with a large barb or some other fitting for adding yeast?

I'm not quite following? There is a racking cane at the bottom. That's how the beer is transferred.

I don't see a reason to force yeast through, but it can be done with this system as is.

Here's an idea... Make a yeast starter in a mason jar. Make a gas in/liquid out set-up on the mason jar lid. Connect the liquid out to the liquid out cane on the fermenter. Add gas to the jar and force the yeast through the cane. You'll need the fermenter to release pressure via the gas in barb.

Again not really sure of the benefit, but that should do it.
 
This is such a bad ass thread. Great idea!

Thanks man... I'm pretty happy with the end results. And I'm still amazed at the simplicity/low cost and over all results. I'll be brewing today, and plan on building 4 more while I wait for the mash and boil.
 
Very nice and inexpensive setup!

Thanks... I don't spend more than $25/keg so that was the bulk of it

The washer was ¢33
The bung was ¢95
The barb was $2.80 (lead free brass)

I had the racking cane, but those are ~ $10
I also had the gas connect. Those are about $5/8
And I had the hose clams and hoses, but another few bucks there.

So it can be done for under $50 for everything. That means you can have a bad ass fermenter for less than the sankey converter offered on the internet. Not bad!

I'm brewing today. I just got my water on the burner. I need to start working on another one now since I'm doing 10gal of but brown. :rockin:
 
Back
Top