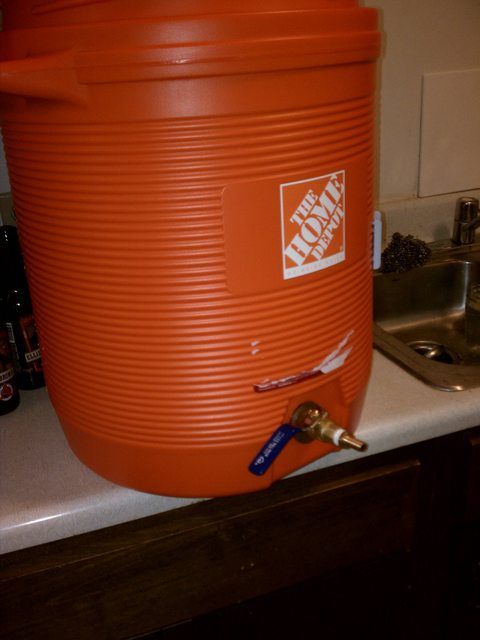
Cheap & Easy 10 Gallon Rubbermaid MLT Conversion

Homebrew Talk - Beer, Wine, Mead, & Cider Brewing Discussion Forum

Help Support Homebrew Talk - Beer, Wine, Mead, & Cider Brewing Discussion Forum:

This site may earn a commission from merchant affiliate links, including eBay, Amazon, and others.
Would hot-dip galvanized washers leech toxins if they were used on the inside of the MLT? I can't find SS 5/8" fender OR flat washers anywhere. :(
 
Just gathered all the stuff to make this! Looking forward to doing my first all grain batch next weekend. Thanks for the great instructions!
 
Would hot-dip galvanized washers leech toxins if they were used on the inside of the MLT? I can't find SS 5/8" fender OR flat washers anywhere. :(


Yes, do not use galvanized. Seriously, if you can't find any SS I will pick you up some and send them to you. But by no means do you want to use galvanized.
 
I've got a problem here. I built my Mash tun and it's all good to go with a brass valve and a false bottom. Now I have a third keggle that I want to use to build a herms system. Should I go with the keggle and sell my Cooler, or just upgrade my cooler to a 1/2" valve and use it?
 
Is the dimension of all the parts different when converting an older Igloo 48 qt cooler? I bought all the parts from the original post of this thread (lots of 3/8" parts), the build-a-bolt kit with 4 SS 5/8" fender washers, etc. It seems like the whole contraption it going to be pretty loose. Then again, I only finger-tightened. The wall is relatively thin at the spigot hole too. Perhaps I should aim for a shorter brass nipple (maybe 1" rather than the 1.5")

Here's a quick iPhone vid I took to show the removed spigot versus the 3/8 brass...
 
Last edited by a moderator:
Went to my local Fastenal shop and they had no 5/8 SS washer. All they had were 1/2 inch and 3/8...said they'd have to special order a 5/8. Guess I'll look on ebay or something, don't really want to purchase 10 of them elsewhere when I only need one.
 
I found a 5/8 Create a bolt set at Home Depot. Includes 4 SS 5/8 washers. you can use the extras on the outside in place of the other fender washers
 
So funny how much expense and detail goes into draining wort from insulated vessels... why not tubing, through a bung, throttled with a simple clamp or inline throttle? Ball valves and all that nonsense... the same results can be accomplished for about $12. Silliness, says I!
 
I decided to go with the bargain fittings and a rubbermaid 10 gallon. I wanted to go all stainless to avoid leaching. I also did not want to run around to ten stores to find all the necessary parts. I would rather spend that time brewing.

I just put together my tun. I know that if the coupling to the valve is too tight it can leak. I was wondering how loose it can be though. I have tightened mine but i can still spin the valve around somewhat easily. It does not seem to be leaking though. Is that good?
 
chask31 said:
I decided to go with the bargain fittings and a rubbermaid 10 gallon. I wanted to go all stainless to avoid leaching. I also did not want to run around to ten stores to find all the necessary parts. I would rather spend that time brewing.

I just put together my tun. I know that if the coupling to the valve is too tight it can leak. I was wondering how loose it can be though. I have tightened mine but i can still spin the valve around somewhat easily. It does not seem to be leaking though. Is that good?

Totally normal.... So long as it doesn't leak
 
Thanks for the great instructions & parts list. A bit more expensive than I anticipated, but very easy assembly. My total came in at $86.04 at Lowes. I was able to find the SS 5/8" washers at a local Aubuchon Hardware.

- Rubbermaid 10 gallon round beverage cooler - $47.97
- all stainless steel ¼” hose clamps x 2 - $1.03
- brass square head plug (Watts A-737) - $1.94
- ½” x 12” (or larger) braided stainless steel supply hose - $12.97 (5 feet)
- 3/8” female barb adapter (Watts A-298) - $2.68
- 5/8” stainless steel fender washer (sometimes hard to find, but try Fastenal or read this thread if you are stuck) - $2.60 (4)
- 3/8” MIP x 1-1/2” brass nipple (Watts A-786) - $2.89
- seal from plastic spigot of cooler (shown below)
- Teflon tape (note: everything to the left of the tape in the picture above goes inside the cooler, and everything to the right goes outside)
- 5/8” O-ring (preferably heat resistant, if you can find one) - $1.97 (12)
- 3 x 5/8” fender washers - $1.40 (4)
- 3/8” threaded ball valve - $7.61
- 3/8” male barb adapter (Watts A-294) - $2.98
 
Thanks for the guide.
I decided to go all stainless. The below item list is in order from inside to outside. Please note, these prices don't include shipping.

Rubbermaid Cooler - $40 - Home Depot
Stainless Steel Mash Braid 1/2" NPT Female (already assembled) - 12.99 - Bargain Fittings
Stainless Steel Bushing ½” x 3/8” – $2.18 – plumbingsupply.com
Stainless Washer - $7 for 10 – Fastenal
Stainless Steel Nipple 3/8” x 1 1/2” – $2.24 – plumbingsupply.com
Silicone O-ring - .23 – Bargain Fittings
Stainless Washer - $0 Already in price list – Fastenal
Stainless Ball Valve 3/8” – 12.99 – Northern Brewer
Stainless 3/8” NPT x ½” Hose Barb – 6.50 – Bargain Fittings
Price $84.13

Plumbing Supply shipping = $8.95
Bargain Fittings = $5
 
+1 bargain fittings...

just revisted this thread, been awhile, all parts from bargain fittings still work. the guy was so patient and answered all my dumb questions, even after I purchased it. I did all the running around first, what a waste....
 
Just found out I had a plastic supply line instead of stainless steel, it was definitely labeled as stainless when I got it at home depot. Well at least now I know why my run offs took forever to collect.
 
Just went to my local more beer and bought everything. I got 6 washers was hoping 3 would cover MT and 3 would cover HLT. When i got home and looked at my receipt.... $3.95 per washer $25 for 6 washers did not even know what to say to that one. Added to that unfortunate event I have a 12 mile to the gallon vehicle and more beer is 25 miles away each way. Its my own fault I guess though , I should have payed more attention. There is a fastenal 3 blocks from my house.
 
So he I am at the end. This is my first build and it is driving me insane. I have stuck to the plans and proceeded through the steps. Below is the photo of where I am stuck, I can not get this thing to pull together tightly like Flyguy. I currently have 3 stainless on the front and one stainless on the inside. Any suggestions? This is quickly
photo2.jpg
[/IMG]becoming a PITA build. Thanks for any help.
 
I ended up returning most of the 3/8" parts and went with 1/2" instead given the diameter of the hole in the cooler once the spigot was removed. I also found a shorter brass nipple so i don't need as many fender washers to take up space.

The thing is, I couldn't find a stainless fender washer big enough for the 1/2" nipple. The 5/8" SS create-a-bolt set's washers inside diameter is too small to fit around the 1/2 nipple. Can I get away with just the plastic seal and rubber washer from the inside of the original spigot and use the reg fender washers (3/4") on the outside of the cooler to fill space and tighten?
 
here are a couple shots of the parts loosely put together. note the white plastic and black rubber washer from the original spigot setup. the only thing missing in these pics is the O ring that will go between the fender washer and the outer wall of the cooler. thinking I will screw everything together, teflon tape, etc. and dump in some hot water to see if I get any leaks. If I get a leak I may need to search for a large (3/4") stainless or brass fender washer for the inside.
inside_cooler.JPG


outside_cooler.JPG
 
here's the shot with the rubber washer (original from the cooler) on the correct side. Using the cooler's existing plastic "washer" (seeing that I don't have a fender washer that fits yet) between rubber washer and the brass fitting. Going to tighten this thing up later this weekend and test for leaks. If it leaks I'll need to find a SS or brass fender washer big enough to fit over the 1/2 nipple.

inside_cooler2.JPG
 
Thanks FlyGuy!

I have read this entire thread on and off for the past 3 days but I knew from the start I wanted to do this and get into all grain.

I picked up all the fittings for around $27 bucks and am using some Amazon credit I had left to get the Rubbermaid 10 gallon cooler shipped to me overnight for around $4 total.

So tomorrow for a little more than $30 from my pocket I should have one of these bad boys ready to go.

I am using all the parts recommended in the original post with the exception of an additional barb with a plug at the end for the stainless braid. I didn't have any problems finding all the parts...all fittings from Lowe's (awesome having the part numbers!), the stainless fender washer from a local bolt shop for 50 cents, the lhbs had all stainless worm clamps for 1.50 ea and I picked up a couple o-rings for free at the local o-ring store!

Woo-Hoo! If all goes well I will be brewing my first all-grainer on Friday! Thanks again!
 
What would be the best way to clean this converted mash tun? I used hot soapy water thus far and it seemed like it was working fine.. I haven't done an all ag in about a month and we're gearing up to brew tomorrow night, I opened my cooler and WHOOMF! Big sour smell to the face!

It looks clean, I scrubbed it out the last time we used it, I sanitized afterwards... Is there an additional step I'm missing here? Any recommendations on what I could soak in this overnight to help remove that sour smell?
 
Ok, I've gone thru all 100+ pages on my phone and need a verdict. Besides zip ties, what are some other specific methods that have been used successfully to secure the SS mesh to the "tube" or pipe. I've seen reference to marine grade SS clamps. Would a place like West Marine have these? Any idea about automotive type clamps?
 
Jsmith82 said:
What would be the best way to clean this converted mash tun? I used hot soapy water thus far and it seemed like it was working fine.. I haven't done an all ag in about a month and we're gearing up to brew tomorrow night, I opened my cooler and WHOOMF! Big sour smell to the face!

It looks clean, I scrubbed it out the last time we used it, I sanitized afterwards... Is there an additional step I'm missing here? Any recommendations on what I could soak in this overnight to help remove that sour smell?

I would try baking soda. Also, I just use dish detergent to clean my cooler after a brew session. I've noticed musty smells sometimes from my tun, but I keep it in the garage where it can easily reach over 120F. If it stinks before a brew session, I just wash it again and put a baking soda solution in there the night before and thoroughly rinse it out prior to mashing. Always has worked for me.
 
Guidry said:
Ok, I've gone thru all 100+ pages on my phone and need a verdict. Besides zip ties, what are some other specific methods that have been used successfully to secure the SS mesh to the "tube" or pipe. I've seen reference to marine grade SS clamps. Would a place like West Marine have these? Any idea about automotive type clamps?

Worm clamps work very well. Here's whatvthey are called at WM: BREEZE BOOSTER
300-Series Stainless Steel Hose Clamps
 
What would be the best way to clean this converted mash tun? I used hot soapy water thus far and it seemed like it was working fine.. I haven't done an all ag in about a month and we're gearing up to brew tomorrow night, I opened my cooler and WHOOMF! Big sour smell to the face!

It looks clean, I scrubbed it out the last time we used it, I sanitized afterwards... Is there an additional step I'm missing here? Any recommendations on what I could soak in this overnight to help remove that sour smell?
I used bleach/water, took the smell out right away. The trick to never letting this happen again: let the mash tun air dry overnight, open, upside-down. You have to store it bone dry or else the nasties will return.
 
Just put mine together...no leaks yet! It took about 30 minutes...I did have a hard time taking the tubing out of the ss braid. I pushed and pushed with some needle nose pliers to no avail. Ended up soaking it in a bowl of boiling water for about 3 minutes...I was able to pull it off quite easily (while pushing against the pliers to keep the braid compressed.) If I didn't have the trouble with the braid this thing would have been together in 5-10 minutes tops. Thanks again and I can't wait to do my first all grain batch tomorrow!
 
I would try baking soda. Also, I just use dish detergent to clean my cooler after a brew session. I've noticed musty smells sometimes from my tun, but I keep it in the garage where it can easily reach over 120F. If it stinks before a brew session, I just wash it again and put a baking soda solution in there the night before and thoroughly rinse it out prior to mashing. Always has worked for me.

I scrubbed it out again last night, rinsed, then dumped in some baking soda and filled it about half way up with hot water, ran a bit through the spout, then put the lid on and went to bed.

Got up this morning, dumped the water out and stuck my head in for a big whiff, smelled fine, faintly sweet like malt haha.. Got it sitting lid off upside down on a towel propped up an inch in my kitchen drying out today, looks like all is good for tonight.

Thanks for the advice guys, appreciate it! :mug:
 
Sorry I didn't read through the thread and this has probably been answered, but if I'm using a false bottom, are all the parts the same? (with the exception of the braid of course).
 
bwomp313 said:
Sorry I didn't read through the thread and this has probably been answered, but if I'm using a false bottom, are all the parts the same? (with the exception of the braid of course).

Im waiting to see the answer too, I have my cooler on order, and I've settled on a false bottom rather than messing with the braid based on people feedback about the braid not lasting
 
So I just made this today. Had some issues with leaking even though I followed the directions to the T. Ended up adding like 4 O-rings to the outside in between the washers and cooler and removing the washer on the inside and adding an O-ring in between the cooler seal and the barb adapter and it seemed to solve the problem.

Only thing is I am scared to use it in case for some reason its not leaking due to some fluke. I'm afraid it will start leaking as soon as I start mashing. Would it be a good idea to get some of that silicone caulking to caulk up the area around the outside where the seal is?
 
Mine had leaking issues too, so I slathered it with the silicone caulk both inside and out. I see no reason why you shouldn't, simply for peace of mind.
 
any particular type of caulk?? I just tested mine, and sure nuff got a leak. Granted, I tried using the existing rubber gasket that was in the cooler (the cooler is ancient) with it between the SS fender washer and the inner wall. Probably should have used a newer washer. When I pull it apart, I suppose I should use some caulk too, just to be safe.
SSwasher.JPG


removed the inside brass bard from the nipple. The rubber gasket from the cooler appears to be still in good shape. I applied GE Silicone II bioseal (100% silicone, not for surfaces exceeding 400° F) to the nipple, innder and outer walls of the cooler, the gasket, and tightened. Wait and see.
 
What kind of caulk do you use? Is there like a heat resistant, food save caulk? And also, if I'm going to use a false bottom, do I get all the same parts listed minus the braid?
 
Yeah, I guess I jumped the gun before researching food grade options. Letting mine cure now, but curious if I need to dismantle again and remove any of the GE silicone I can.

Do a search for "food grade silicone". I quickly saw one that was high temp (500°) so I'm guessing there are probably more options

http://www.etundra.com/Red_High_Tem..._product&cvsfa=2832&cvsfe=2&cvsfhu=3336353037

But if you go to that link and click on "Learn More" downloading the info sheet, there's still a lot of questionable things listed, so perhaps someone in the know can chime in here
 
I dismantled everything, removed the remnants of the yellow teflon tape (oops, gas line tape?) and scraped/cleaned off as much of the silicone as I could. Looked like I got it all.

Used the white (red container) teflon tape, wrapped it around the threads 3 times (didn't use much the first time). Also, I found the white plastic piece that covered the original rubber gasket in the cooler. So now the inside has the gasket agains the cooler wall, the plastic cover over the gasket (protecting it from over tightening against the rubber with the SS washer), and then the SS washer. Also used the proper brass nipple (I had originally used a shorter one, and only one fender washer on the outside), and added two more fender washers to the outside to fit. Re-assembled and presto... no leaks!!

Hopefully brewing my first AG batch this weekend!
 
Back
Top