• Please visit and share your knowledge at our sister communities:
  • If you have not, please join our official Homebrewing Facebook Group!

    Homebrewing Facebook Group

Cheap & Easy 10 Gallon Rubbermaid MLT Conversion

Homebrew Talk

Help Support Homebrew Talk:

This site may earn a commission from merchant affiliate links, including eBay, Amazon, and others.
No, I was being sarcastic. :/
I don't think they'll miss a couple of nipples.

I inadvertantly got some washers for free. I had 2 items on the parts bag, but was only charged for the cheapo nylon washers and not the $2 worth of steel. It was only the one bag too... I'd have noticed in store, but I was in a rush that afternoon (didn't want to be late for kid pick-up).
 
Thanks, FlyGuy, for putting together such a fantastic write-up.

A few notes for anyone interested:

  1. For peace of mind I went the stainless route (300 series) and sourced my parts from Amazon, More Beer, and reputable ebay sellers. I couldn't find a FPT SS 3/8" hose barb for the life of me, so I bought another male and added a 3/8" coupling between the nipple and the interior hose barb. In total, I paid only $11.46 more (including shipping) than I would have paid for brass, with which I'm sure I would have been perfectly safe but now I'll never have to think twice about it.
  2. The 10 gallon rubbermaid cooler is available for $39.96 from Home Depot BUT Lowe's will beat any competitor's price by 10%. I printed the Home Depot web page with the price quote as well as the web page showing that my local store had it in stock, took it into Lowe's and saved four bucks.
  3. I didn't bother with the Fender washers. Instead, I purchased eight total 5/8" x 2" flat washers: one for inside and seven for outside which fit perfectly in the well around the spout to fill out the needed space. While my original motive was to avoid the availability issues with fender washers, I prefer the flat washer arrangement to the void that would otherwise exist around the spout behind the larger fender washers.
  4. I did pick up a rubber 5/8" washer to interface between the cooler and the external flat washers. I thought the rubber might better distribute the force of the flat washer across the plastic cooler surface and provide yet another water barrier. It was an additional 79 cents and I trimmed it down by placing the 5/8" x 2" flat washer on top of it and cutting off the over hanging rubber.

I've had my brand spanking new 10 gallon MLT full with water to the brim for over 14 hours now and have not lost a single drop. :ban:

IMG_4290.JPG
 
I just built my water cooler mash tun today. Here's what it cost me to buy nearly all of the equipment at Home Depot in $US:
- Rubbermaid 10 gallon round beverage cooler - $39.96
- all stainless steel ¼” hose clamps x 2 - $.85 each=$1.70
- brass square head plug (Watts A-737) - $1.93
- ½” x 12” (or larger) braided stainless steel supply hose - $4.27
- 3/8” female barb adapter (Watts A-298) - $2.98
- 5/8” stainless steel fender washer - purchased at another store - $.40
- 3/8” MIP x 1-1/2” brass nipple (Watts A-786) - $2.89
- seal from plastic spigot of cooler (shown below)
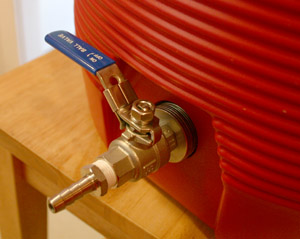
- Teflon tape (note: everything to the left of the tape in the picture above goes inside the cooler, and everything to the right goes outside) - $.98
- 5/8” O-ring (preferably heat resistant, if you can find one) -pack of 12 - $2.97
- 3 x 5/8” fender washers - $.33 each=$.99
- 3/8” threaded ball valve - $8.21
- 3/8” male barb adapter (Watts A-294) - $2.68
Subtotal = $76.60
Tax = $7.12
Total = $83.32


Exact same prices here in SoCal (in April) except I was able to get the SS washer as part of the build-a-bolt kit. It was $4 and came with a few washers, but the gas savings was probably worth not driving to the Fastenall place.
 
While looking around on the internet for 10 gallon Rubbermaid coolers I came across an auction for 204 of them and got a good laugh out of it.....hehe

I just need 1 and I don't need that many!

The link wouldn't allow linking but its over on govliquidation.com "Lot Details — Event Id 2074 — Lot Number 7."

No financial interests in any of this I just thought it was kind of funny.

@rat - I'll take 2 of them off your hands (and I'll even cross the lake to get them from you). I say go for it. :)
 
Exact same prices here in SoCal (in April) except I was able to get the SS washer as part of the build-a-bolt kit. It was $4 and came with a few washers, but the gas savings was probably worth not driving to the Fastenall place.

I just built one of these last weekend for going AG. I got lucky in a local Ace Hardware and found SS cut washers that were plenty big enough for this setup. Can't wait to try it out!
 
I'm brand new to the site, but wanted to add that this thread has been great. I built my mash-tun this past week-end and am ready for my first ever all grain. Not sure why it seems like such a mental hurdle to move from extract brewing!

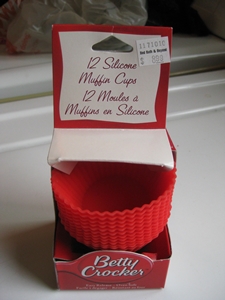
One idea for the inside of the mash tun I used which worked great. I created my own washers to seal the inside of the hole using silicone material from Bed Bath and Beyond. I cut the bottom out of silicone cup cake holders of all things 12 for $9. I used a nylon wash to hold them against the wall of the cooler.

They're tough little buggers too - they handle heat to 500 F, they're flexible, food grade with no smell, or off taste from them. Lastly, I didn't have to wait 24 + hrs to see if the seal worked if I used a silicone sealant.

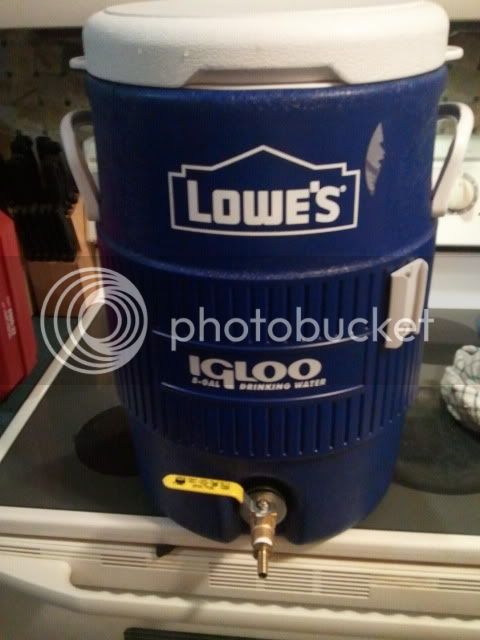
I bought an Igloo "Island Breeze" 28 qt cooler with no drain hole. Oddly my math calculated that the cooler should hold 7 gallons, but the thing actually holds 6 gallons. I assume that shouldn't be an issue since I'm sticking to 5 gallon batches (for now).

Paul

Muffin.JPG
 
Did you guys have trouble keeping your screen on the outlet hardware? I did mine for the first time on Sat and part way through the Batch sparge the whole thing came off and grain clogged my valve.
 
Brewindenver, awesome stuff! I, like DrawTap88, am in the process of getting a keggle going and if I can use those and they are good up to 500*F it should be far easier than I expected.

Thanks for the info. The ingenuity of the users on here never ceases to amaze me, from the extra complicated rigs to the simple solutions.
 
Did you guys have trouble keeping your screen on the outlet hardware? I did mine for the first time on Sat and part way through the Batch sparge the whole thing came off and grain clogged my valve.

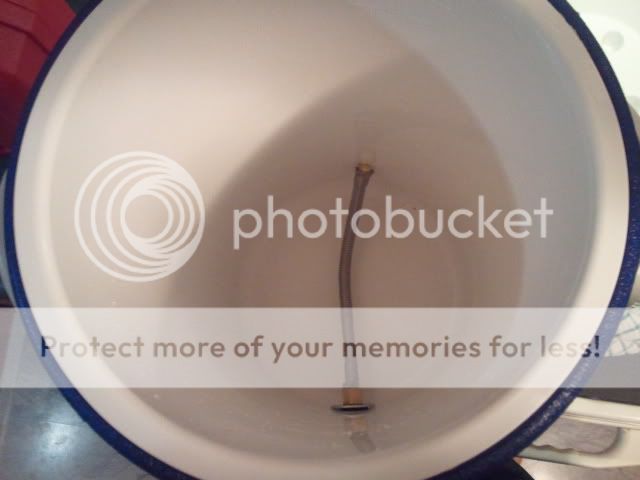
What I did was cut off about an inch of 3/8" tubing (i.e. bottling tube) and shoved that guy on the male barb inside the cooler. Then I slipped the SS manifold over the tubing and used a snake clamp to tighten it. The benefit of the tubing is that it is compressible and thus gives the clamp a better grip.

Hope that helps!

Snake clamp? Is that like a hose clamp (with the screw that tightens it up)?
 
Built it last night:

2011-04-28220259.jpg


2011-04-28220232.jpg


I found everything BUT the stainless steel 5/8 fender washers! Those things just don't exist around me, went to Lowes, Branecky, Home Depot, True Value, Ace, AND a couple of department stores on a whim, nothing. I ended up using 5/8 inch steel flat washers and it held water *pretty* well... I had a drip about every 5 minutes...

I going for my first all ag tonight so if I drip a couple times, no biggy. Turning to the good ol' interwebs for the fender washers today, somebody out there has them in stock :p

Great topic and instructions!
 
It looks like you have a pretty sizable gap between the interior wall and washer. If you can compress the spigot seal against the wall a bit, your leaks should stop. (See the fourth post in this thread for an example.) If you need to fill out space to accomplish this, a couple more flat washers will work fine and save you the effort of finding fender washers. With the 10 gallon rubbermaid coolers, there is a 2" diameter recess around the spigot; using fender washers allows one to avoid having to fill in the recess with about four or five flat washers, but for the trouble, I found the flat washers to be preferable. In your case, there does not appear to be a recess; you might be as well or better served by sticking to flat washers.
 
Thanks.. I'll probably add some washers next week, I added a rubber washer on the seal outside and it seemed to help also. First all ag last night went PERFECT, truly a brewers dream.. Haha. Nothing went wrong and for the first time in brewing I hit the exact OG I was looking for.

Round of applause for this instructional. :mug:


I did the same cooler a few months back:

https://www.homebrewtalk.com/f51/ch...lt-conversion-23008/index147.html#post2650066


The grommet helps a lot.
 
Thanks for the tip! I'll definitely look into a grommet, your picture looked like it fit like a glove
 
I just put mine together using the standard BargainFittings.com cooler kit. I haven't tested it on a brew yet, but I filled it with 5gal of water last night and checked for leaks this morning... dry.

I was really surprised at how much I'd have to crank down with the wrenches to get a tight fit. The only thing I would change about the system is to maybe add one more washer to the kit. It comes with two, but a third would have been nice so I wouldn't have to tighten all the way to the end of the nipple threads and so the handle would have just a little bit more clearance. Also - the whole kit rotates in the hole, but it seems the seal is tight enough that it doesn't allow any water to come through. Any contorting is also probably due to the sidewall being flexible.
 
Built mine this past Friday night. Thanks again for the write up. I used some spare parts instead of the hex bolt and put 4 washers on both the inside and outside of the cooler. Then tightened the hell out of it. I brewed my first AG after stopping by a local Brew Out on Saturday. Not a single drop of water leaked and the lever is very sturdy. The cooler only lost 2 degrees after holding the grains for an hour. FNA.
 
Question for those using brass parts: How often do you clean the brass with the vinegar/hydrogen peroxide solution? Is this a one-time thing, or do you need to do it regularly?

I've been wringing my hands over going all SS, but it looks like such a hassle to track down all those parts (especially in Canada) that I figure if so many of you are using brass, it can't be all that bad. Please help me clear my paranoia.
 
Question for those using brass parts: How often do you clean the brass with the vinegar/hydrogen peroxide solution? Is this a one-time thing, or do you need to do it regularly?

Oh, I was supposed to do that?

How's your paranoia?
 
That treatment is for the lead on the surface of the brass. Running a few batches will also strip the lead off the surface, which is how I removed mine. Then, I drank it.
 
Thanks for the instructions and the parts list. I went to Home Depot and got everything I needed there, spent about $75.

I put everything together but it is really loose when everything is tightened up. Anyone have any ideas? I am thinking about adding another washer or two to try and fix it.

Thanks
 
Built mine the other day with parts from lowes mostly. Got the cooler from HD for $40. Total was about $70.. I also had to add a couple extra washers to the outside but everything went together very easily. Thanks for the parts list!
 
Back
Top