But, Honey, the Fridge was *FREE!* (Side-by-side build)

Homebrew Talk - Beer, Wine, Mead, & Cider Brewing Discussion Forum

Help Support Homebrew Talk - Beer, Wine, Mead, & Cider Brewing Discussion Forum:

This site may earn a commission from merchant affiliate links, including eBay, Amazon, and others.

arfenarf

Member
Joined
Feb 2, 2016
Messages
13
Reaction score
8
So, the fridge was just down the street, and we could have it for free! DH and I wandered down to get it and pushed this 1989 side-by-side Frigidaire back up the road. Michigan potholes and little fridge wheels don't get on so well: we broke or lost three of four axles before we got it home. Good thing bolts swap in just fine.

IMG_1530_zpsyfh4yshz.jpg


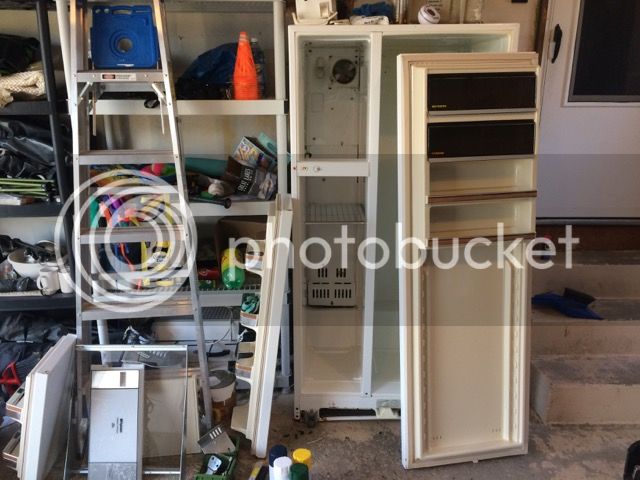
Then we had a good look. Oh, yikes. Mold, rust, food residue, and mouse droppings. Euuch. It also had an Interesting Feature - the freezer side had two small doors. A bonus was its lack of icemaker and primitive electronics. But, thanks to all of you, I just blindly started taking it apart.

And ordered a couple of STC-1000s, computer fans, a little heater, a pair of duct dampers, some insulating foam, wire, and new fittings for my Dremel tool. Good thing the fridge was free.

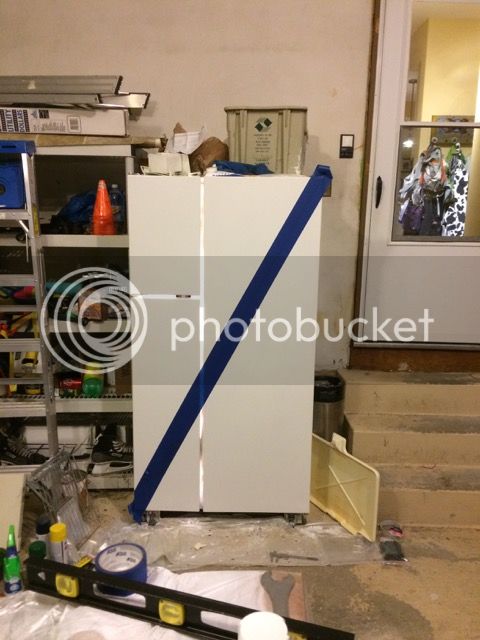
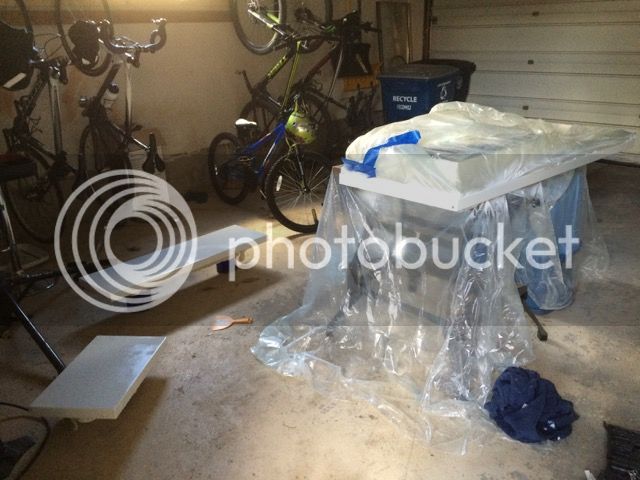
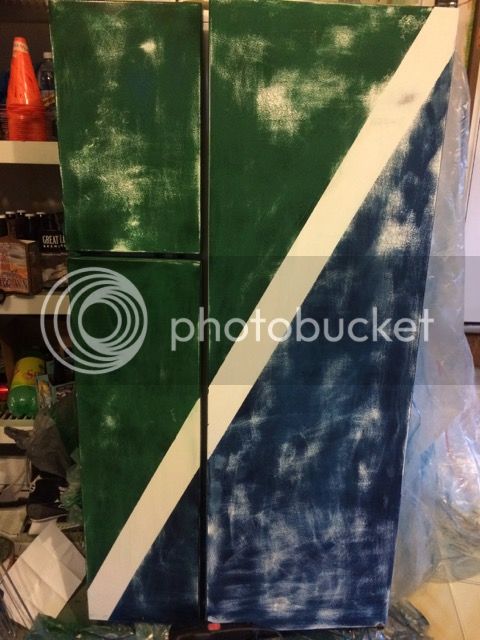
I learned lots of stuff. I learned that 14-gauge wire is overkill. And I learned that fridge walls are made of tough stuff. I learned that no matter how carefully you think you're masking, if you rush the rustoleum job, you're going to have to clean up a mess. And after hours of chipping away at the stoopid thing, I learned to check in the cupboard to see if I might have forgotten that I own a jigsaw.

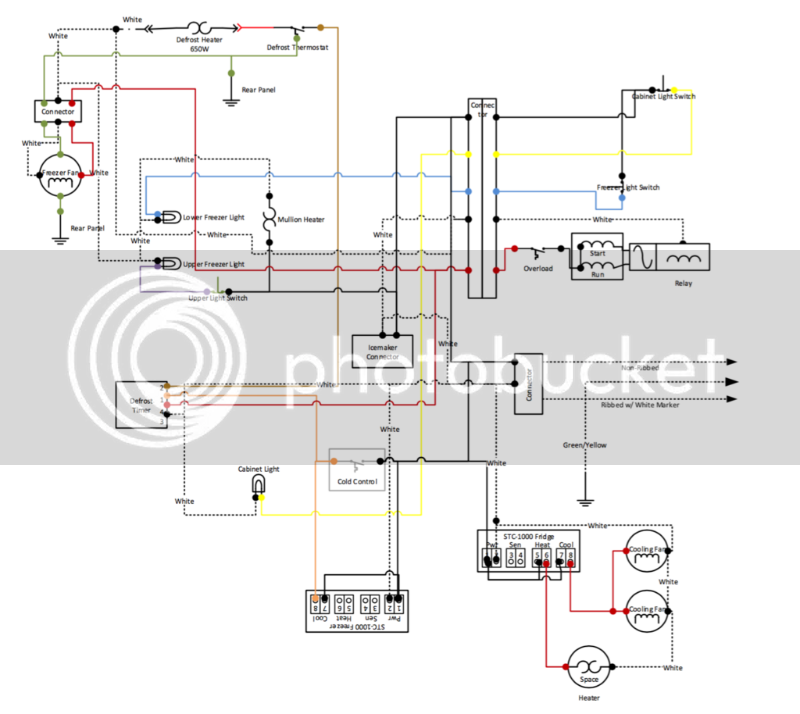
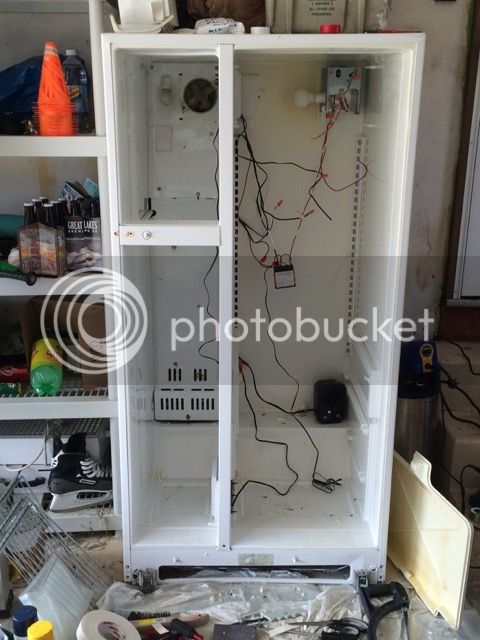
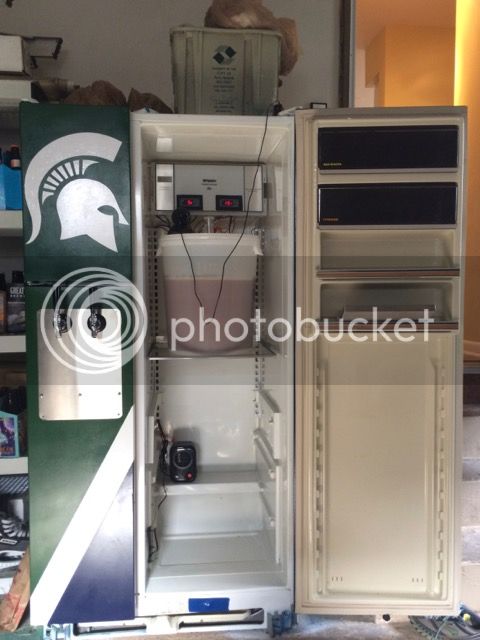
I pulled the thermostat out and started wiring. The wiring wasn't that hard after I figured out how to parse the ancient, stained diagram on the back of the fridge. At the moment, it's a bit of a rat's nest with screw-on connectors, because I wanted to be able to troubleshoot easily. Now that it's running well and proven, I'll redo some of the wiring with tidier, more permanent junctions, particularly on the neutral wire.

029024f0-f773-4622-9789-2a4affa16e9b_zpsjmg0s7ym.png


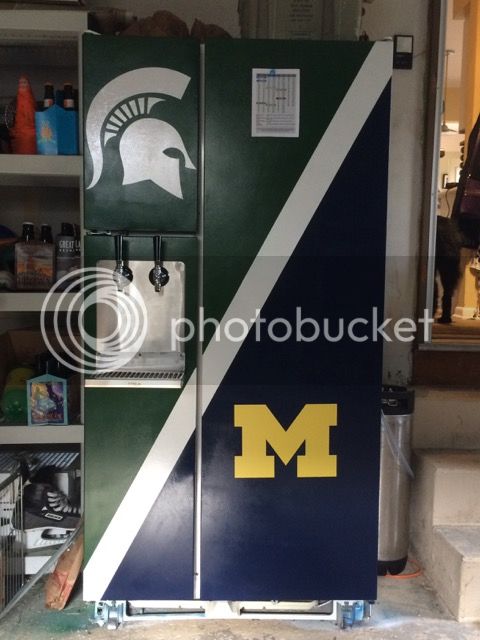
Many of you built outlets into your fridge: I chose to hardwire. I also opted to mount the controllers inside the fridge for now, because I think they'll be swapped for a brewpi or the like before too long, and I didn't want to make more holes in the doors than I needed to.

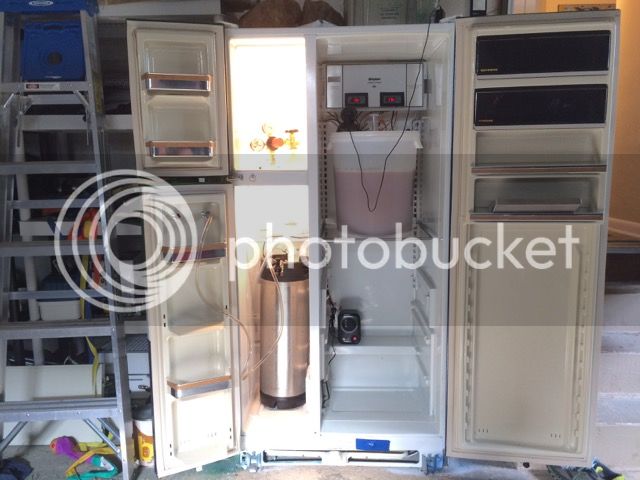
The upper damper was replaced with a fan blowing into the fridge compartment. The lower hole by the crisper drawer was replaced with a fan blowing into the freezer compartment. Both were wired into the fridge-side STC-1000's cooling circuit. The little space heater went into its heating circuit. Each fan has a one-way damper (like the ones on dryer ducts) to try to keep the sides a little separated. On the freezer side, I just moved the fridge's thermostat circuit onto the cold side of the second STC-1000.

This photo was taken at what was probably the low point from the refrigerator's point of view. Wires all ahoo, shrouding off, doors off, and no end in sight. DH really loves me and said not one single word about the ongoing state of our garage.

IMG_1537_zpsynlm68gf.jpg
 
I thought this part was going to be easy. I decided to take the awful faux-wood handles off, sand everything, and repaint with rustoleum. DH and I are loyal to rival universities, so I thought it would be fun to give the fridge a nice paint job besides the white rust-stopper. Here's the beginning of us marking off the stripe:

IMG_1540_zpshtkqtdrr.jpg


So I bought a bunch of Rustoleum and sandpaper. Good thing the fridge was free. Before I started painting, I had to get a bunch of trim adhesive off, so I cleaned it up with GooGone.

BIG MISTAKE BIG MISTAKE.

GooGone prevents anything ever again sticking to it at all ever. Including, and perhaps especially, paint.

IMG_1532_zps7o6gmjfb.jpg


I didn't know this yet, so blindly, blondely, blithely went ahead and masked, sanded, and primed the doors in the garage. It was cold and horrible out, so I kept the big door closed. When I staggered in that afternoon, DH looked me up and down and said, in effect, that I was supposed to be making a house for the beer, not drinking all the beer. I was completely stoned on paint fumes and had to spend several days detoxing. Then I had to wait more days for it to be warm enough to paint with the garage door open. But lo, the sun shone, and I painted the colors on top.

But within minutes of hitting the door, the color coats shrivelled into orange-peel and no amount of sanding and cleaning seemed to make it better. The Goo Gone had wrecked the finish. I wanted to cry then, but DH said big girls who wire their own fridges may not cry about paint jobs gone wrong.

IMG_1549_zpsjefyumcx.jpg


Oh, but it was so sad. DH took pity on me and called a sandblaster to see if he'd strip the doors and powder-coat them. Sandblaster declined, saying fridge metal was too thin and he'd wreck the doors. But he explained what we had to do.

So I went and bought spray cans of automotive paint, more sandpaper, a bag of rags, heavy gloves, a respirator, and a gallon of acetone. Good thing the fridge was free.

...and started over. I dissolved the bad finish with acetone, scraped and sanded to almost bare metal, and then, following the instructions meticulously, primed three coats and painted four of each color.
 
I am pleased to say the second paint job stuck and was great. So I went out and bought a pair of taps, a drip tray, two more kegs, another CO2 cylinder and regulator, and asked a friend to make a stainless backplate.

Good thing the fridge was free.

The controllers work like a hot damn - I've been fermenting a batch of wheat beer at 68F on the right and cold-crashing a saison on the left. It's going to let us start playing with lagers this summer and I'm absolutely delighted.

We have a little webcam on the airlock (yes, I know, airlock activity does not necessarily tell you anything about fermentation but we're geeks and we like to do things like this). DH is an astronomer and applied his difference-imaging skills to have the camera write a line in a log file every time it detects motion in the airlock. I pick up the log, crunch the numbers in R, and post a nice little fermentation graph to our internal server.

Future development probably includes migrating to a BrewPi and/or a Brewometer. Despite all the paint heartache, the build itself was fun and rewarding. I love having a project and this was an absolute blast.

And free! Did I mention the fridge was free?!

I present: Fridgenstein - the Michigander Edition

p.s. I'm the Spartan. I built it, I got to decide.

IMG_1724_zpsrihdwspx.jpg


IMG_1723_zps8bc2pdn1.jpg


IMG_1721_zpslkqyjeqj.jpg
 
Nice build!! You can control beer temps and fermentation temps independently?
 
Nice build!! You can control beer temps and fermentation temps independently?

Thanks!

Yes, I have separate control over the two chambers.

So far I've successfully had the keg side running at 38F and the fermenter at 68F with no apparent war between the two. The energy bill for the thing is amazingly low considering its vintage.
 
Thanks!

Yes, I have separate control over the two chambers.

So far I've successfully had the keg side running at 38F and the fermenter at 68F with no apparent war between the two. The energy bill for the thing is amazingly low considering its vintage.

I think you can only do this with really old fridges. I think newer fridges don't allow independent control.
 
I think you can only do this with really old fridges. I think newer fridges don't allow independent control.

Yes and no. Most side-by-sides work like this: all the cooling happens on the freezer side, and the fridge is cooled by a damper that allows some air from the freezer into the fridge. The only electronic thermostat is actually controlling the freezer. (although you can get entangled in light switches, defrost circuits, and mullion heaters (mullion heaters?! who knew?) and stuff).

So, what I did was hijack the freezer-side thermostat so I could control it precisely with one STC-1000, and then added another to either pull air from the freezer or run a heater to manage the fridge/fermenter side.

Where you're right is that newer fridges have printed circuit boards doing a lot of this and are much more difficult to hot-wire. There are some great side-by-side build threads here that have tackled some of these problems. I avoided them by acquiring a very old fridge. As a poster above has noted, however, nobody can say for sure how long this old girl will last.
 
This build is awesome, great thread, i love the build and 1/2 the finish... 7/8 that's all I'm saying

Question on your paint job. I'm looking at redoing my kegerator and possibly my new fermentation chamber that I need to get around to setting up (separate fridges since I need the freezer in the kegerator for kid stuff). Can you elaborate on how you did the final paint job? What grit sand paper did you use? what type/brand of paint? Primer? How long did it take you? Did you only paint the doors or the main cabinet as well? how has your finish held up so far?

Sorry about the late reply, Sparty - summer got away from me. I only did the doors with the full paint job, although I hit the white cabinet in the first round of Rustoleum in some damaged spots and it's held up fine.

The final paint job was: (and this took me about a week of fitful efforts)

Acetone to remove the Rustoleum and goo-gone - also got a fair bit of the original finish
Sanded 200-grit to clean up
Sanded 400-grit to smooth it out
Primed with Dupli-Color white spray bomb - 2 coats in quick succession per instructions, then left to cure 24h
Actually had to sit for a few days waiting for warm, still enough weather outdoors
Masked: Rather than try to explain, I'll just tell you I used this technique to get clean lines between the white, blue, and green.

The finish colors needed three coats each and more than once, I got too excited and let runs happen. I had to take the damaged area back down with acetone, let it dry, sand, and start over.

The fridge has been 'in production' for six months now and is a little scratched on the lower freezer door where we have to kick it a bit to make sure it really closes. I may eventually attach a little diamond-plate down there.

Other thing I've learned since this job, in the Right Tool For the Job Department is that stepped drill bits are the only sane, safe way to cut holes in metal. Now I own some :)
 
Sorry about the late reply, Sparty - summer got away from me. I only did the doors with the full paint job, although I hit the white cabinet in the first round of Rustoleum in some damaged spots and it's held up fine.


The final paint job was: (and this took me about a week of fitful efforts)


Acetone to remove the Rustoleum and goo-gone - also got a fair bit of the original finish

Sanded 200-grit to clean up

Sanded 400-grit to smooth it out

Primed with Dupli-Color white spray bomb - 2 coats in quick succession per instructions, then left to cure 24h

Actually had to sit for a few days waiting for warm, still enough weather outdoors

Masked: Rather than try to explain, I'll just tell you I used this technique to get clean lines between the white, blue, and green.


The finish colors needed three coats each and more than once, I got too excited and let runs happen. I had to take the damaged area back down with acetone, let it dry, sand, and start over.


The fridge has been 'in production' for six months now and is a little scratched on the lower freezer door where we have to kick it a bit to make sure it really closes. I may eventually attach a little diamond-plate down there.


Other thing I've learned since this job, in the Right Tool For the Job Department is that stepped drill bits are the only sane, safe way to cut holes in metal. Now I own some :)


Thanks for the info. Summer got away from me too so I haven't gotten around to painting mine yet. Will definitely file the info away. Go Green.
 
Back
Top