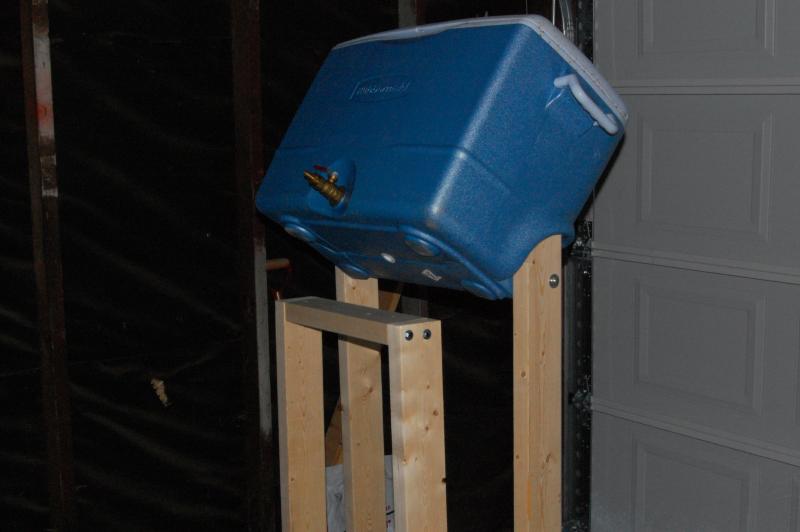
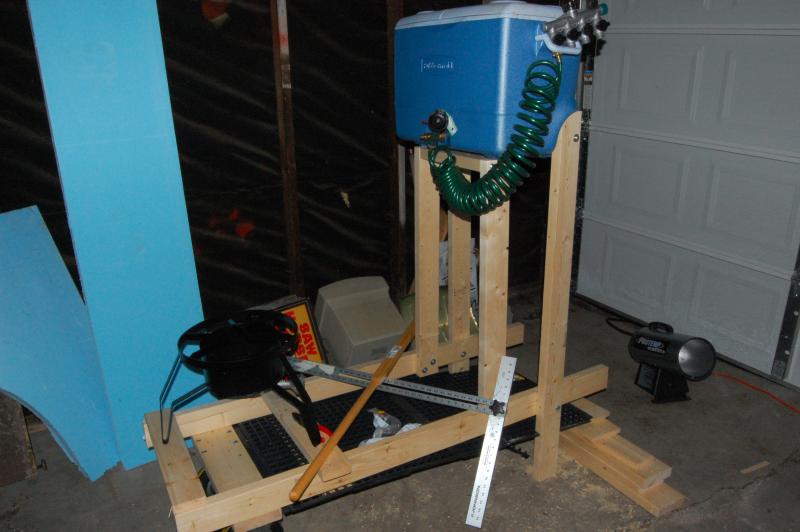
Here's a pic of my grain-dumping system for my MLT in my old set up. Man, I had that system figured out!
I had two wheel barrow handles coming off the end with two wheels on the opposite end, so I could drive the thing around like a wheel barrow. Super convenient.
Another touch I added was a plastic grate from Farm and Fleet on the bottom. I used that so I could store stuff on the bottom shelf during brew days, but also hose it off easily without pooling water.
It also had a 4 way splitter for the water. Screw in the garden hose to a single point, and then you have a pre-installed spray nozzle on an 8 foot hose for handling boil overs or cleaning out the MLT. Or just twist a knob and you are running water through your chiller. Or twist a different knob and you're filling your HLT, etc.
The height of the system was based upon the need to completely fill a carboy from the kettle using only gravity, so it was maybe a tiny bit on the tall side, given that it was a two tier, but didn't require a pump and I found the slightly elevated kettles to be very comfortable to work with. The farthest I had to lift water was from the HLT to the MLT.. and I did that 2 quarts at a time with a pitcher... hardly any work at all.
The propane fit on the cart, resting on the grate when not in use, but I simply pulled them out and put them on the ground when brewing. This meant I didn't need "safe separation" between the flames and the tanks when brewing because I was manually moving the tanks. And the total time to move the tanks was like 10 seconds... They aren't that heavy. The hoses are already attached. So I was able to have a relatively low set up with safe propane use. The pics above me seem like the kettles are excessively high for comfortable brewing. Just store the tanks under the MLT and drag them a couple feet farther away while brewing.... then return them for storage.
I had two burners with a 7.5 and a 20 gallon kettle. When I kept it running, I could produce 15 gallons every 90 minutes... allll day long.
Man, I miss that contraption.
In the second pic, picture a second burner between the burner shown and the MLT. Picture handles coming off at an angle, extending from the MLT side (which also added some stability to the design). They were attached to the bottom frame with bolts, then angled upwards, mounting to both the fore and aft vertical supports for the MLT. Then picture the 4-way water valve mounted on one of the verticals. Picture my 2 quart pitcher hanging off one of the wheel barrow handles, and picture a carboy sitting on the ground, with the neck just even with the very bottom of the brew kettle. That pretty much describes it. The green coiled hose you see was for my nozzle for fighting fires and boil-overs, and cleaning out the MLT after a brew session. It was nicer to work with than a normal hose.
If I were to do it over again, the only thing I would tweak is the dumping system. It tended to dump all over the handles and I never had a good way to keep everything in a garbage bag. You'd dump, make a huge mess, and just deal with it. I think that if you could maybe come up with something that would dump more cleanly, this would have been the perfect low-cost brewing rig. Ideally, the lid for the MLT would have been hinged the other way, but given the pre-drilled location of the valve, I was kind of stuck with what it was. Still, dumps were.. ummm... "eventful", but it sure beat cleaning the thing out by hand or moving around heavy water-logged malt. Maybe the thing to do would have been to unhinge the lid to make it fully removable and limit rotation to about 110 degrees to allow a more controlled removal of grain. I never got to refine my set up like that... but I think I had some pretty cool features.
Looking at it now, I agree it looks like it's a fire hazard, but from my experience, given that you are there watching it all the time, it would take some seriously crazy shiznit to set this thing on fire. I mean, the burners are mounted on stands that are designed to provide an acceptable amount of separation from the get-go. And anybody who's ever used a burner like this and seen the flame from a propane burner knows it's very controlled... it's not a flame thrower or a demented dragon. In a nutshell, after using this system, I felt it was perfectly safe and would require some pretty retarded shiznit to go down before it caused a fire.... especially given the ready access to a garden hose... but even that shouldn't even be the deciding factor. You simply have ample and safe separation between flames and combustibles.... and you're using this outside.
The pics above mine depict a GORGEOUS set up. But it seems higher than it needs to be, the solid bottom could pool wort or water and get messy.. the grate is more convenient. And I wouldn't use a propane tank directly under a burner (I'm assuming the poster just stores them that way, but still.. it's a waste of space. Keep them under the MLT, Drop the setup by about a foot, and you can still use gravity and won't need a step ladder.
But with that said, the above poster's set up does look really nice and better refined... but I do believe some of my alternative features are well thought-out.


![Craft A Brew - Safale S-04 Dry Yeast - Fermentis - English Ale Dry Yeast - For English and American Ales and Hard Apple Ciders - Ingredients for Home Brewing - Beer Making Supplies - [1 Pack]](https://m.media-amazon.com/images/I/41fVGNh6JfL._SL500_.jpg)


