• Please visit and share your knowledge at our sister communities:
  • If you have not, please join our official Homebrewing Facebook Group!

    Homebrewing Facebook Group

BruControl: Brewery control & automation software

Homebrew Talk

Help Support Homebrew Talk:

This site may earn a commission from merchant affiliate links, including eBay, Amazon, and others.
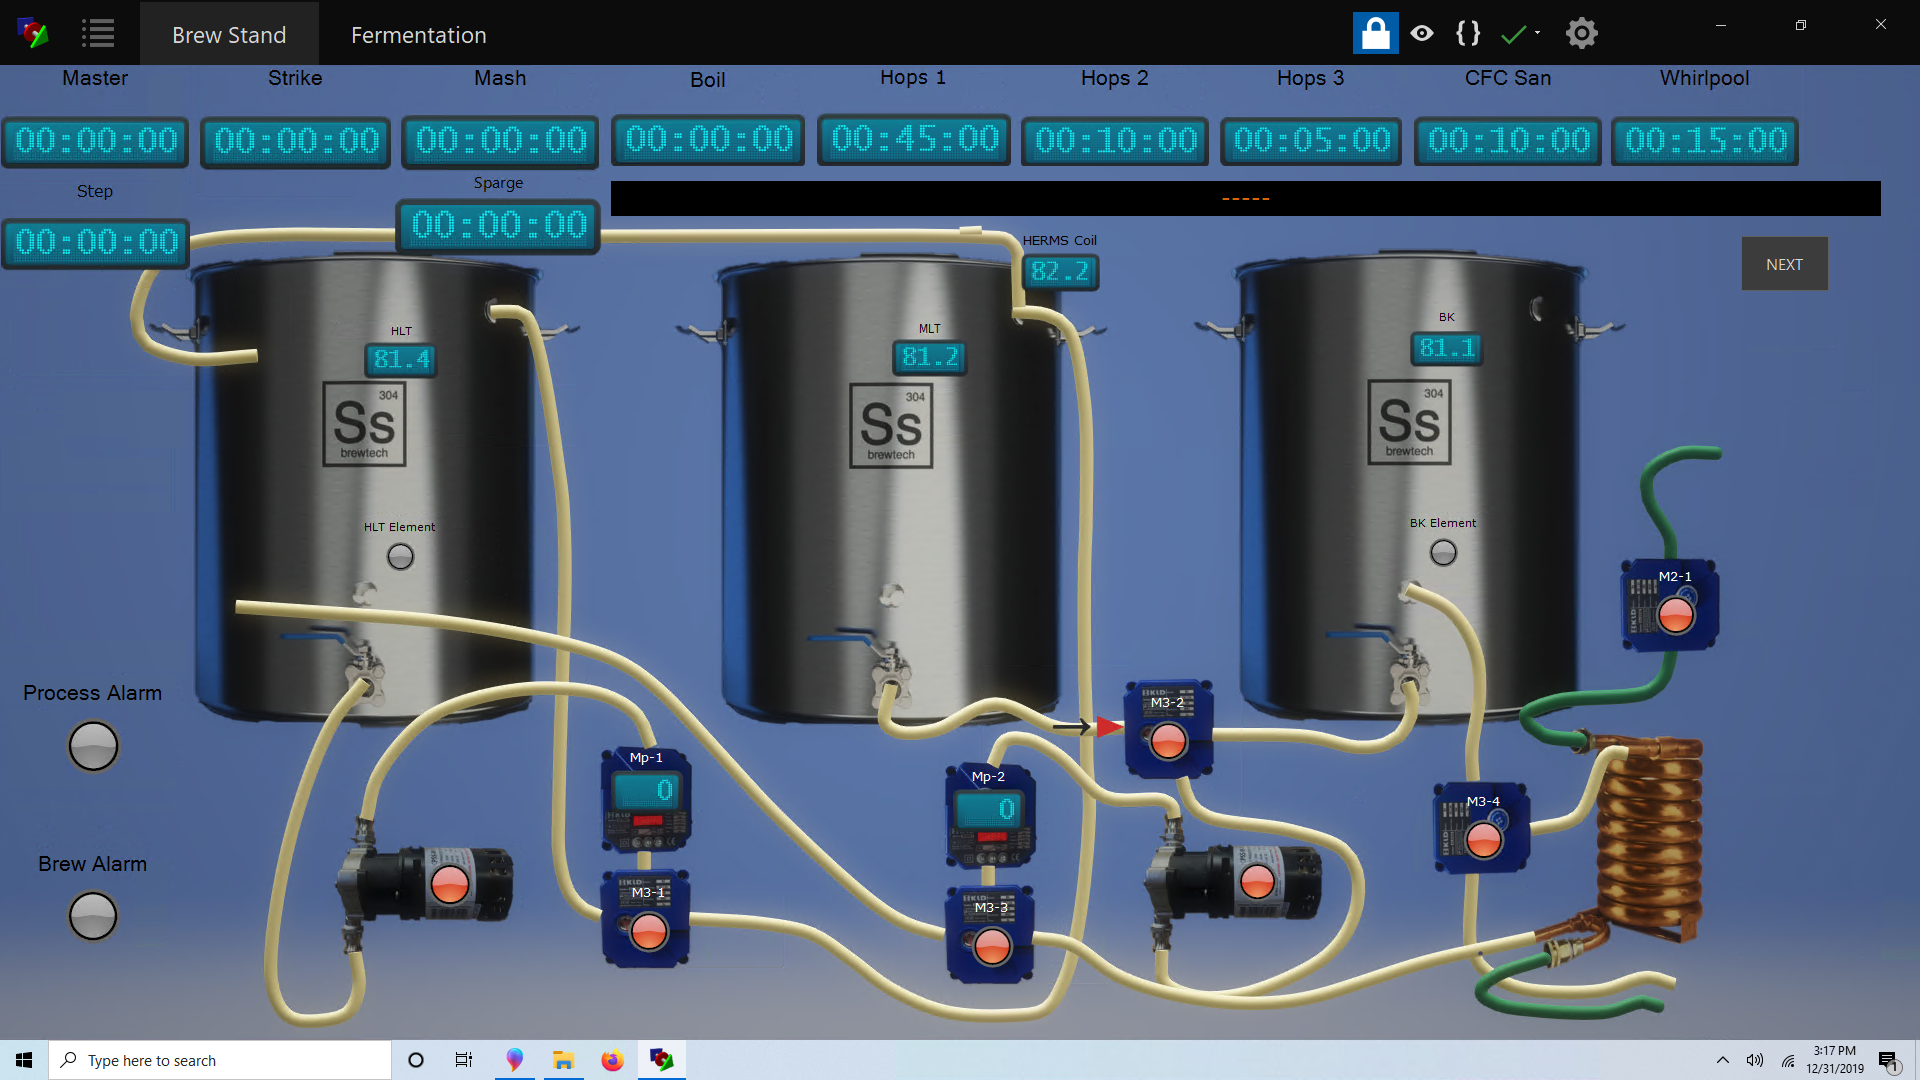
You can basically ignore "LOAD". It just starts the script and pauses it. We will likely remove that button.

I do use that feature for troubleshooting (especially in nested 'if' loops when I do nto have enough endif's). If you had a need to remove, it, a possible alternative would be a command you could place in the first line of script that would pause and give the same function... you would still need the step function...
 
Here is my chiller with three fermenters script, it seems to work fine, but appreciate comments or improvements.

Code:
new value F1SetPoint
new value F1TempHigh
new value F2SetPoint
new value F2TempHigh
new value F3SetPoint
new value F3TempHigh
F1SetPoint precision = 1
F2SetPoint precision = 1
F3SetPoint precision = 1
F1SetPoint = 90
F2SetPoint = 90
F3SetPoint = 90

"Run F1" State = false
"Run F2" State = false
"Run F3" State = false
"Run F1" Enabled = true
"Run F2" Enabled = true
"Run F3" Enabled = true
"F1 Cooling" State = off
"F2 Cooling" State = off
"F3 Cooling" State = off
"F1 Cooling" Enabled = true
"F2 Cooling" Enabled = true
"F3 Cooling" Enabled = true
"Chiller" State = off
"Chiller" Enabled = true
"FV1 Temp" Enabled = true
"FV2 Temp" Enabled = true
"FV3 Temp" Enabled = true
"Tilt Red" Enabled = true
"Tilt Blue" Enabled = true
"Tilt Pink" Enabled = true


[State1]
F1TempHigh = F1SetPoint + .5
F2TempHigh = F2SetPoint + .5
F3TempHigh = F3SetPoint + .5

if "Run F1" State == true
  if "FV1 Temp" value > F1TempHigh
    if "F1 Cooling"  State == off
     "F1 Cooling" State = on
     print "F1 Cooling request ON"
    endif
  else
    if "FV1 Temp" value < F1SetPoint
      if "F1 Cooling" State == on
        "F1 Cooling" State = off
        print "F1 Cooling OFF"
      endif
    endif
  endif
else
  if "F1 Cooling" State == on
    "F1 Cooling" State = off
    print "F1 Cooling OFF"
  endif
endif


if "Run F2" State == true
  if "FV2 Temp" value > F2TempHigh
    if "F2 Cooling" State == off
     "F2 Cooling" State = on
     print "F2 Cooling Request ON"
    endif
  else
    if "FV2 Temp" value < F2SetPoint
      if "F2 Cooling" State == on
        "F2 Cooling" State = off
        print "F2 Cooling OFF"
      endif
    endif
  endif
  if "F2 Cooling" State == on
    if "Chiller" State == off
      "Chiller" State = on
      print "chiller turned on for F2"
    endif
  endif
else
  if "F2 Cooling" State == on
    "F2 Cooling" State = off
    print "F2 Cooling OFF"
  endif
endif


if "Run F3" State == true
  if "FV3 Temp" value > F3TempHigh
    if "F3 Cooling" State == off
     "F3 Cooling" State = on
     print "F3 Cooling Request ON"
    endif
  else
    if "FV3 Temp" value < F3SetPoint
      if "F3 Cooling" State == on
        "F3 Cooling" State = off
        print "F3 Cooling OFF"
      endif
    endif
  endif
else
  if "F3 Cooling" State == on
    "F3 Cooling" State = off
    print "F3 Cooling OFF"
  endif
endif


[Chiller Loop]
if "Chiller" State == off
  if "F1 Cooling" State == on
    "Chiller" State = on
    print "chiller turned on for F1"
  else
    if "F2 Cooling" State == on
      "Chiller" State = on
      print "chiller turned on for F2"
    endif
  else
    if "F3 Cooling" State == on
      "Chiller" State = on
      print "chiller turned on for F3"
    endif
  endif
else
  if "F1 Cooling" State == off
    if "F2 Cooling" State == off
      if "F3 Cooling" State == off
        "Chiller" State = off
        print "chiller turned off"
      endif
    endif
  endif
endif

sleep 2000
goto State1
 
Do you need to have a "debounce" or a delay (compressor delay) on the "Chiller" State? For example, if on one cycle "F3 Cooling" is on but then shuts off, then 2 seconds later "F1 Cooling" goes high? Would it need a "if you haven't chilled/not chilled in 5(?) loops then shut off/on the chiller"?

Code wise (ignore completely) my only comment would be, since you are doing all the comparisons already why not have a boolean that you set to 0 at the beginning of the loop and then set to 1 when to you set the "Fx Cooling" State. Then at the end of the loop set "Chiller" State = that boolean? It would save a bunch of code lines and comparisons, not that it matters at all.
 
Good call.. Thanks!.. I will look at that... It won't happen very often, and won't hurt in this case, as the chiller is a commercial 1.5hp lab chiller with bunch of safeties including a delay for the compressor portion but I guess I still don't want the 20a-3-phase contactor it is on bouncing if that happened..... I want to also delay the chiller 'on' so that the electric ball valve has a bit of time to get open so glycol chiller pump is not it is not hitting the 15psi pressure bypass.. not a necessity, but probably a good idea...
 
My TILTs came in today. I had done some pre setup as I waited for their arrival. I flashed firmware on ESP32, setup network DHCP and after researching IP on router, I was connected via wireless. I used port 220 in BC.

I went to connect today and BC isn’t connecting to ESP32 interface nor do I see it at the router. Any idea where I went wrong?
 
Did you try re-running the network setup on the ESP32? I certainly have "fat fingered" something when putting in the network information and had to do it again.
 
Do you have a static DHCP assignment in your router or are you just letting the router pick an address on it's own? I can almost guarantee that the ESP32 has a new address now... See Page 98 of the BruControl Manual for Static vs DHCP, my recommendation is DHCP with static reservations on the router.
 
Weird question - The ESP8266/85 (specifically SonOff dual ESP8285) seem really slow to boot (15 seconds or more) and connect to BC, whereas the ESP32 is very rapid (2 seconds), is this merely a function of the hardware, or is the software/firmware radically different?
 
What do the EN and BOOT buttons do on the board?

Curious what happens if TILT app is open and BC is connected. Does one or the other take precedence?
 
Last edited:
Weird question - The ESP8266/85 (specifically SonOff dual ESP8285) seem really slow to boot (15 seconds or more) and connect to BC, whereas the ESP32 is very rapid (2 seconds), is this merely a function of the hardware, or is the software/firmware radically different?

The ESP32 is significantly more powerful than the 8266. The way the wifi stack is handled in each of the hardware platforms will be different, so its probably a hardware driven problem.

Typically very similar code can be used between these boards, as most are compatible in the Arduino environment. However, it's a couple layers up. The hardware will dictate how it's handled internally. For example, it's like if you tell a short person and a tall person to grab a cup from the top shelf, the short person might need to go get a ladder first, where the tall person can just grab it, but they still get the cup.
 
What do the EN and BOOT buttons do on the board?

Curious what happens if TILT app is open and BC is connected. Does one or the other take precedence?

The TILTs broadcast their data (advertisements) independent of any recipients. Therefore you can have multiple listeners all capturing the data, including apps, etc.
 
The TILTs broadcast their data (advertisements) independent of any recipients. Therefore you can have multiple listeners all capturing the data, including apps, etc.

Ahh I see. So like a radio signal?
 
Not sure, but it would probably be cheaper to just plug in an Esp32 at every fermenter that uses a tilt.
I see what your saying. Just use the wifi signal instead of repeating the bluetooth. I am asking for my friends sake. He doesnt plan on using BC to monitor but rather the app which I believe to be bluetooth only. In this case I dont think an ESP would help him.

I'm seeing connection issues with using certain USB wall warts, most of the ones that do not work are provided with cell phones etc. The one I have found to work is a 6 out USB, it also works when connected to Laptop USB (simply used for power not serial connection) Perhaps some of these arent providing enough amps?
 
I'm trying to use an if statement when a timer reaches a certain value. Cant seem to get it to work.

reset "FV-1 REST TIMER"
stop "FV-1 REST TIMER"

start "FV-1 REST TIMER"
if "FV-1 REST TIMER" == 00:00:00:30
pause "FV-1 ALARM HIGH LOW"
goto "Crash-Ramp"
endif

[Crash-Ramp]
sleep 500

goto "Crash-Ramp"

Do I need to define a value as time then compare against that value?

new time RestTimer
RestTimer = 00:00:30

reset "FV-1 REST TIMER"
stop "FV-1 REST TIMER"

start "FV-1 REST TIMER"
if "FV-1 REST TIMER" value == RestTimer
pause "FV-1 ALARM HIGH LOW"
goto "Crash-Ramp"
endif

[Crash-Ramp]
sleep 500

goto "Crash-Ramp"
 
I see what your saying. Just use the wifi signal instead of repeating the bluetooth. I am asking for my friends sake. He doesnt plan on using BC to monitor but rather the app which I believe to be bluetooth only. In this case I dont think an ESP would help him.

I'm seeing connection issues with using certain USB wall warts, most of the ones that do not work are provided with cell phones etc. The one I have found to work is a 6 out USB, it also works when connected to Laptop USB (simply used for power not serial connection) Perhaps some of these arent providing enough amps?

There is also this.... https://www.homebrewtalk.com/forum/...lt-to-wifi-device-for-tilt-hydrometer.664368/

That is really weird about the wall bricks. They should be providing at least 500mA which is plenty for am ESP32 board. I would check the to see their output.
 
I'm trying to use an if statement
...
if "FV-1 REST TIMER" == 00:00:00:30 <<<----
pause "FV-1 ALARM HIGH LOW"
goto "Crash-Ramp"
endif

...

if "FV-1 REST TIMER" value == RestTimer <<<---
pause "FV-1 ALARM HIGH LOW"
goto "Crash-Ramp"
endif

Don't use == because it means that the comparison has to happen at that exact moment. Use >= or <= to make it so it doesn't have to happen at that instant.
 
A few RTD users have reported variation in their temp readings comparing probes against a certified/known good probe or each other. This should not be the case. RTD’s should deliver both high accuracy and repeatability - that’s the point of using them.

Here is a recommendation to identify the potential source of the discrepancy (amplifiers or the probes), assuming you have the RTD amp set up correctly (wiring, jumpers, pad resistor).

1. Apply a jumper across the amplifier wire-probe terminals and a known 100 ohm resistor across the probe-probe terminals. That will simulate a probe with no resistance in the wires and 100 ohms at the probe. A Pt100 probe should output 100 ohms at 0 deg Celsius, so with this resistor, you should get a reading of 0 in BC just from the RTD calibration alone.

2. Put a probe into a medium along with a certified/know-good temperature probe. Give them time to settle and note the temperature on the certified probe. Using an quality ohmmeter, measure the wire-probe resistance and the probe-probe resistance. Subtract the former from the latter to get the actual probe resistance. Check that resistance against a Pt100 resistance chart to see how close it is. The properties of these probes assuming they are of proper construction with platinum should yield an exact resistance which matches the chart. As above, if the medium is at exactly 0 degrees (quality ice water), the resistance should be 100 ohms.

Here is a link to a RTD chart:
https://www.sterlingsensors.co.uk/pt100-resistance-table

Here is a link to an online calculator as well: https://www.peaksensors.co.uk/resources/rtd-calculator-temperature-resistance/
 
Last edited:
One thing to keep in mind for part [1] of the above is the tolerance of the resistor used. Due to the way that they bin out resistors during production, you will almost always get something that is near the % limits of what you bought. So if you use a 5% resistor, you will basically never get 98-102 Ohms (just picking some numbers) because that whole population was pulled out and sold as 2% resistors. So even using a 1% resistor, you should expect that you will see some error in the resistor that is >0.5% because all the 0.5% or tighter ones were sold as 0.5% tolerance resistors.

Just something to look out for if you just grab a resistor out of "the bin" and try it.

Here is a picture I found out on the internet of the phenomena I'm referring to as a distribution of values:
283802-7_solution_figure_1-W490.jpg
 
For those of you in colder climates, those are live temps from my garage, in case you had to spend the day shoveling snow or something.
 
tbh, he did a whole lot more than just the animations. Opened my eyes to some really cool stuff to make the workspace HMI a whole lot more intuitive. The pic is work in progress, but it's a quantum leap forward for me.

View attachment 659425

Are we talking element background changes via script or something more intuitive?
 
I have been trying to create some "flow" globals but I find that the global are too wide or too tall. I would like them to be much smaller.

Being an issue with the source graphic or the global itself?
 
I have been trying to create some "flow" globals but I find that the global are too wide or too tall. I would like them to be much smaller.

Being an issue with the source graphic or the global itself?
 
Made some good progress today. I took the lessons from @Die_Beerery and jumped in with both feet. My desktop is now a reasonable facsimile of the physical brewstand (pics attached). I just need to replicate and duplicate the flow animations across the remaining valves, and I will be done enough with that workspace for now. Last night, I told my inner procrastination demons to get bent, and finally tacked the remaining 80% of my brew day script (also attached). I have enough of it done that I think I'll be ready to run some water tests tomorrow to check out the new temp sensors and get some script debugging done.

Yesterday, I also received the ESP32 I ordered from the smile box people. After an exasperating 2-hour delay due to my own lack of home network organization, I got it configured and attached to BC. It's now waiting happily for the two Tilts I ordered that have not yet arrived.

I have tumbleweeds growing in my kegs at this point. I'd really like to get a brew in before I go back to work on Monday, so I can get going on refilling the magic happy juice fridge.

Screen Shot 2019-12-31 at 3.17.51 PM.png


Brewstand.jpg
 

Attachments

  • Screen Shot 2019-12-31 at 3.17.51 PM.png
    Screen Shot 2019-12-31 at 3.17.51 PM.png
    1.7 MB
  • Brewstand.jpg
    Brewstand.jpg
    557.1 KB
  • Brew.txt
    9.1 KB
Cool stuff!

On the dynamic pictures/animation are you doing it with global elements and changing the backgrounds images? I tried doing this with inspector elements but the image background in the element is a problem. I tried creating a transparent background picture to use for it, but it still blocked out the thing under it (other elements, not the background image). I like the look you've got going.

A couple comments on the script:
-There are "Sleep" statements in a couple places, where it needs to be "sleep"
-The "whirlpool" section header is missing a " ] "
-I think you need to " " around the section name if it is multi word for a goto (like goto Hops 3 loop -> goto "Hops 3 loop")
 
Last edited:
Back
Top