BruControl: Brewery control & automation software

Homebrew Talk - Beer, Wine, Mead, & Cider Brewing Discussion Forum

Help Support Homebrew Talk - Beer, Wine, Mead, & Cider Brewing Discussion Forum:

This site may earn a commission from merchant affiliate links, including eBay, Amazon, and others.
I understand what you're saying... don't use 6 timers for 6 steps instead use 6 global variables of type time and decrement their values based on the value of a central timer element. I'm just not sure that's the same thing as having 6 individual real time countdown timers.

The way I picture your layout operating is that at initialization, the 6 step temperatures are loaded and the countdown time for each step is loaded. At eh start of mashing, step one is executed until it's timer reaches zero, then the set point becomes the step 2 temperature and step 2's countdown timer begins. This repeats until all 6 steps are complete....is that the process?
 
Many user two timers: one for total brew time (counting up), one for step time (counting up). You could easily add a total step time (counting down).

But again, there are many ways to accomplish what you want. And I guarantee you will change it from time to time as you tinker and refine.

I kinda like my current script with the 6 countdown timers, seems to work a treat but like you say coding lends itself to changes if necessary.
 
The way I picture your layout operating is that at initialization, the 6 step temperatures are loaded and the countdown time for each step is loaded. At eh start of mashing, step one is executed until it's timer reaches zero, then the set point becomes the step 2 temperature and step 2's countdown timer begins. This repeats until all 6 steps are complete....is that the process?

Winner! Winner! Chicken Dinner! But one can also just enter the temps/times (no coding!) and then hit play
 
Winner! Winner! Chicken Dinner! But one can also just enter the temps/times (no coding!) and then hit play

Yes, the time/temp step combinations do not have to be loaded via script, they can basically be static elements. The "Hit Play" piece would have to trigger a script. The "Play" would be a button and the script would set in a WAIT state until that button was pressed. The script then handles the stepping through the countdown timers and changing the target temperatures as required. My "Hit Play" button is called "Start Mash" and looks like this:

This is one step but would be repeated for any number of additional steps.

JavaScript:
[start]
"Start Mash" state = false
wait "Start Mash" state == true
"Start Mash" background = 2  //Change boarder to green while timer is running
"Start Mash" state = false       // resets the button to wait for another press
//Make sure pump is running
sleep 5000
if "Recirc Pump" value < 50   
    "Recirc Pump" value = 50
endif
sleep 2000        //Give pump time to start moving fluid across element
//Enable RIMs heating element
if "Enable RIMs" state != true
    "Enable RIMs" state = true
endif
"Set Mash Temp" value = "tmpMash" value //Retrieve global variable tmpMash
//Start the mash timer
"Mash Timer" value = "timeMash" value        //Retrieve global variable timeMash
start "Mash Timer"
//Loop to trigger alarm at end of mash
[loop]           
if "Mash Timer" value <= "00:00:00"
    "Mash Alarm" active = true
    goto alarm             //call alarm code
    endif
sleep 1000
goto loop
//Reset Start Mash btn border to red, stop the timer and set to 00:00:00
[alarm]   
"Start Mash" background = 1
stop "Mash Timer"
"Mash Timer" value = "00:00:00"
//flash alarm while active, stop script when alarm is silenced
[flash]       
if "Mash Alarm" active == true
    "Mash Alarm" background = 2
    sleep 800
    "Mash Alarm" background = 1
    sleep 800
    goto flash
else
    stop "startMash"
 
Not sure... I'd have to ask my partner, who is on vacation right now. Why do you ask?

Just gives insight into implementation, resource usage, contention, etc... on multi-core systems the threaded model works well and if it's using thread pool threads or the newer "Tasks" - 6 timers is really meaningless. Plus if it's known what is used behind the scenes better decisions can be made on how to use those elements in the script (for those of us who think "natively" or lower level than the script).
 
Yes, the time/temp step combinations do not have to be loaded via script, they can basically be static elements. The "Hit Play" piece would have to trigger a script. The "Play" would be a button and the script would set in a WAIT state until that button was pressed. The script then handles the stepping through the countdown timers and changing the target temperatures as required. My "Hit Play" button is called "Start Mash" and looks like this:

This is one step but would be repeated for any number of additional steps.

JavaScript:
[start]
"Start Mash" state = false
wait "Start Mash" state == true
"Start Mash" background = 2  //Change boarder to green while timer is running
"Start Mash" state = false       // resets the button to wait for another press
//Make sure pump is running
sleep 5000
if "Recirc Pump" value < 50  
    "Recirc Pump" value = 50
endif
sleep 2000        //Give pump time to start moving fluid across element
//Enable RIMs heating element
if "Enable RIMs" state != true
    "Enable RIMs" state = true
endif
"Set Mash Temp" value = "tmpMash" value //Retrieve global variable tmpMash
//Start the mash timer
"Mash Timer" value = "timeMash" value        //Retrieve global variable timeMash
start "Mash Timer"
//Loop to trigger alarm at end of mash
[loop]          
if "Mash Timer" value <= "00:00:00"
    "Mash Alarm" active = true
    goto alarm             //call alarm code
    endif
sleep 1000
goto loop
//Reset Start Mash btn border to red, stop the timer and set to 00:00:00
[alarm]  
"Start Mash" background = 1
stop "Mash Timer"
"Mash Timer" value = "00:00:00"
//flash alarm while active, stop script when alarm is silenced
[flash]      
if "Mash Alarm" active == true
    "Mash Alarm" background = 2
    sleep 800
    "Mash Alarm" background = 1
    sleep 800
    goto flash
else
    stop "startMash"

Definitely a useful piece of code, thanks for posting that.
 
The way I picture your layout operating is that at initialization, the 6 step temperatures are loaded and the countdown time for each step is loaded. At eh start of mashing, step one is executed until it's timer reaches zero, then the set point becomes the step 2 temperature and step 2's countdown timer begins. This repeats until all 6 steps are complete....is that the process?

Lol, this is exactly what we have been suggesting/saying/giving examples for. If you use a while loop like in my example, you can also change the variables in the gui and have the script update the pid and timer in "real time".
 
Trying to recreate some other controllers interface seems silly to me. I understand that may be what your are comfortable, but why not take full advantage of BruControl?

I do effectively the same thing you are trying to accomplish, but I skin the cat very differently. I do pretty much everything that has been suggested above, plus more. I use 2 timers for all of my brew day scripts/actions. Both count up. One captures the entire brew day time. The other is reset at the beginning of every step. The latter timer is used to trigger advancement in all of the steps that use time for their end condition. I import my recipe from Beersmith, so I have over 100 different global variables to capture everything. Way too many to display on my main dashboard workspace, so they are captured on 2 "recipe" workspaces.

mash.PNG


On my main dashboard workspace I use a global to display the current step and the end condition for that step so I don't have to bounce back and forth between workspaces.

step-end.PNG


Here is how I coded it. For the mash rest, it calls a function to actively do something (adjust HLT target temp based off difference between actual mash temp and target temp) while I am in the mash rest. If you don't have a need for that you can change the call line to 'wait "Brew Step" Value >= Rest6Time' and remove the MonitorMashTemp and MonitorMashTime assignments.

mash_steps.PNG


If you do want to do something useful while waiting on a time end condition, you can do something like this. In this case I use script variables (MonitorMashTemp and MonitorMashTime) to effectively pass arguments to the MonitorMash function. Once a minute the script looks at the mash temp, and adjusts the HLT target. Once the brew step timer exceeds MonitorMashTime the function returns to where it was called from.

monitor.PNG


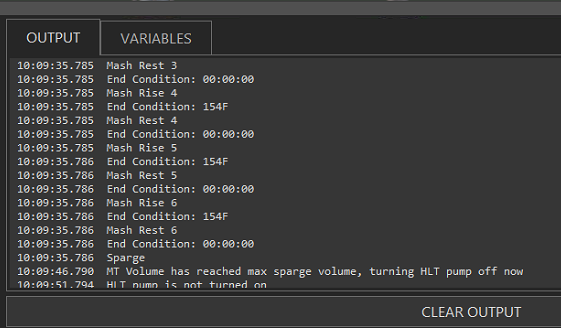
Here is the resulting messages in the output window. I generally don't look at any of this, but its there preemptively for debug if something seems off.

output.PNG
 
Last edited:
Useful information and, as previous stated, you are all correct that one thread (or timer element) updating multiple variables is the generally accepted methodology.

Every time a Timer element is placed on a workspace it instances a System.Threading.Timer object (maybe a System.Timers.Timer but doubtful). These timers use thread pool threads and have very little overhead.

Trying to recreate some other controllers interface seems silly to me. I understand that may be what your are comfortable, but why not take full advantage of BruControl?

Not trying to recreate the Braumeister interface just use that same concept of all steps displayed on the same screen with the times and then count down, like @helibrewer explained in his post. What do you mean by "take full advantage of BruControl" as opposed to not taking full advantage of BruControl?

GUI's and coding at this level are certainly subjective. There is no one right way.

If you really understand how BruControl is implemented behind the scenes you can take full advantage of such things. I have 6 threads currently and will probably increase that to 12 or more to get all processes implemented. You and others use one or two threads (aka... timer elements) to accomplish your goals. That doesn't mean you're correct or that your methods are absolutely "right" just different.
 
I would like to purchase a Uniflex but am certainly still confused by what options I need.

I would like to have a two vessel system with one temperature probe per vessel and one 5500W element per vessel (maybe a 5500W RIMs tube on the mash tun). A single pump.

I'm guessing I don't need the integrated i/o but would like the proportional control.

Does this look correct?

Single Vessel, 30A with dual feed power (NEMA 6-30P and 5-15P plugs): $849 US
Dual Vessel (includes 2nd Temperature Probe): $189 US
Proportional Control: $99 US
BruControl Advanced License: $99 US
 
GUI's and coding at this level are certainly subjective. There is no one right way.

I agree. It's all about flexibility and options as far as I am concerned. These guys have done an awesome job on their breweries, and have helped guide us with BruControl development along the way, so have an intimate working knowledge (often better than I). We are all passionate about brewing automation, so some healthy and academic dialog gets going from time to time!

Sorry about the UniFlex confusion. Yes, you have it correct. If you do not want/need the integrated I/O, no problem. We can add it later via an upgrade path if you decide to have it then. You might consider the second pump/accessory just in case you want to add a pump or other 120VAC device later. Alternatively, we can upgrade this later as well.

Thanks, I think I've got it sorted, had to watch your video several times and read and re-read the web page... would probably purchase the integrated I/O and second pump/accessory right away, just because, you know, more toys to play with... :)

What type of computer is everyone using to run BruControl? I just have an old desktop tower w/ Win7 not anywhere near where I'd be brewing but it does have WIFI.

I'd probably have to invest in a laptop or maybe something like an Intel Nuc attached to back of a monitor??
 
So when the BruControl software is setup for the Uniflex does it automatically setup the PID (SSR) device and temp probes so all the user has to do is add the elements to their GUI and code the script around them?

How is the PID device switched from outputting to the first or second output or are there two PIDs (i.e. SSRs) included in the Uniflex?
 
Last edited:
WRT computer... a basic computer is fine, especially if you are just using it for brew sessions. If you use a mini-pc aka PC on-a-stick (atom based CPU), the experience isn't great. I do use one of those on my brewery to screen share my main network PC, where BC runs full time. I, like some, have it running all the time to act like a "server", running dispensing, fermentation, etc.
 
So when the BruControl software is setup for the Uniflex does it automatically setup the PID (SSR) device and temp probes so all the user has to do is add the elements to their GUI and code the script around them?

How is the PID device switched from outputting to the first or second output or are there two PIDs (i.e. SSRs) included in the Uniflex?
The control port (ESP pin) would be hardwired to the SSR. BruControl allows multiple GUI elements to be assigned to a single port, however only one can be enabled at a time. So you might have a GUI set-up for PID to mash and another set-up as Deadband for boiling...just an example. You can only use one of those at a time, the other must be disabled (easy to do via GUI). This way, one SSR can serve multiple tasks, albeit, only one at a time.

Hope that helps.
 
So when the BruControl software is setup for the Uniflex does it automatically setup the PID (SSR) device and temp probes so all the user has to do is add the elements to their GUI and code the script around them?

How is the PID device switched from outputting to the first or second output or are there two PIDs (i.e. SSRs) included in the Uniflex?

In BC, the Device Elements connect to certain hardware ports/pins to control them. For example, you define a PID Device Element in the software to control a certain port on the micro-controller. In the case of the UniFlex, it is port 33 on the internal micro-controller, which is in turn connected to the SSR inside. The SSR is in turn connected to the interlock-relays, directing power to one or the other 240V outlets for your heating elements.

You can also define a Duty Cycle Device Element for "manual mode" on port 33. When you enable either one of these, the other is automatically disabled. Normally, people build their system from zero, using the documentation, but in the case of the UniFlex, we provide a starting template (configuration) that you can use right out of the box. It is shown in the video, and shows the PID, Duty Cycle, Vessel Heater Enables, Pumps, alarms, and timers. It does not show any of the Integrated I/O controls - these can be digital inputs or outputs, or other Device Elements, depending on what you want each physical pin to control. We should add these to the workspace, but you can also add them as you see fit.

So to be clear on your first question: yes, but the user doesn't need to add elements to your GUI, unless you are talking about the Integrated I/O... those need to be added. And yes, you can write your own scripts to automate any of the functionality as you have been discussing above.
 
Thanks again guys, it all makes sense.

Just thinking through my process, I can envision boiling and cooling the strike water in the HLT and pumping to underlet the mash in the BIABasket but at what point in time would the sparge water be boiled and cooled if only one element can be active at a time...?
So boil in HLT then underlet into BIAB for mashing.
While still mashing, you desire to heat your HLT for sparging the BIAB to achieve boil volume
Sounds like you want the ability to run 2 elements simultaneously.
 
Afraid so, but thought there might be a compromise w/ one element, , just trying to do the LODO thing...
 
If you want to run 2 elements simultaneously, that’s a 50 or 60 amp rig and supporting circuit. The UniFlex is 30A max (single element running).

I don’t think many who LODO are sparging. Independent of that, considering you don’t a ton of sparge water, nearing the end of the mash, you could time switch these In scripting by cycling the mash off for a short period and use that time to fully heat your sparge water. Then back to the mash foR another short period. The mash will be stable at this point and not lose much in temp so you can spend most of the time dedicated to the sparge heating.

This will cycle the relays more but if you script the PID (or Duty or whatever) off before the switch, there would be no wear on the relay contacts. A viable idea I think, but if you want them both running, this control system won’t be a fit.
 
Basically I have 2 - 40A circuits to pull from, but you make good points, maybe switch to a no sparge RIMS or HERMS, could probably do either in 2 vessels.
 
You could always use a relay AND SSR with one of the IO of the uniflex for the 40 amp circuits. Regardless, you can add as many io/temps as you want with additional interfaces.
 
The Uniflex in my mind is for someone to get into automated brewing in a hurry with some hardware and GUI decisions already made for you. While it is a starting point, it can easily be expanded and can easily grow to an extremely complex system.

I personally counted the timers I have and there are 9, but many are simply copies on different Workspaces (screens). For example, I have an Alarm Workspace where I have my alarms and some messages as what to do. I have a Timer that that is in sync with my main Brew Timer that controls Mash Times, Boil Times, Hop Drops, and other things. I simply reuse the same timer and set the others to synch. Some timers are positioned on the screen on the Vessel they are timing. I time how long it takes to preheat my Strike Water. I reuse the timer on how long it is till I obtain Strike (I add the strike above the Strike and let it cool to Strike. It is 1000 times easier to cool water 5 degrees than raise it one!)

You can create and use as many timers as you see fit. And the comment about one method being right or wrong is not the point. With BruControl you can do what is right for you. If you need 100 timers, go for it. It you want one timer, you can do that also. Generally, I use just one timer and the others are simply to make a record of what happened on a particular brew or to show the timer on a different screen.
 
Here's a screen grab of my NTC and 1-wire sitting side-by-side......NTC is blue:
View attachment 685777
Looks like one wire is smoother, but that brings up a question: Which one is correct? At the low point on the right of the graph, it looks like the NTC went down all the way to 69 while the one wire maybe 70.2. Did it actually fall to 69?
 
Looks like one wire is smoother, but that brings up a question: Which one is correct? At the low point on the right of the graph, it looks like the NTC went down all the way to 69 while the one wire maybe 70.2. Did it actually fall to 69?
Hard to say, what you’re seeing is the air conditioner cycling in that room.
 
Here's a screen grab of my NTC and 1-wire sitting side-by-side......NTC is blue:
View attachment 685777

If you did both of those tied to the same little bit of thermal mass, the blue thermistor would show twice the resolution. I think the smoothness is the thermal mass difference between the two
 
Started a build on a 50A control system, which will be called the UniCon. This control enclosure will be the "standard" type box and will include a bunch of automation capability including lots of digital I/O, analog inputs, analog outputs, etc. Its control foundation will be a UniShield, and will show how it can be leveraged using universal connectivity to accommodate a user's expansion into more automation over time.

This build will be documented in a video series along the way. Here is the first video in this series. Happy to take any comments and questions as this is built!


Just watched the Uni-con build. Nice to see what the componets are & where they can be mounted in the control panel. Looking forward to the next steps in the 50 amp assembly.
 
I am having trouble reaching a boil with my new build. 15 gallon spike kettles with a 5500 watt element mounted in the kettle and controlled via BruControl. I have the element configured as PID control with a target temperature of 212 degrees. I used the default Kp, Ki, Kd, etc specified in the BruControl manual on page 51 to start with. I was testing with 6 gallons of water in the kettle and the element comes on and seems to heat fine but would only heat up to around 209 degrees and wouldn't get any further. I thought I had read a post here about someone with a similar problem but couldn't find it. Do you think it is an element problem, SSR, etc. I have verify voltage on the 220v outlet on the panel and am getting 118 - 120v on each leg of the 220v circuit for the element. Anyone got any thoughts or ideas?
 
Don't use a PID Device Element to boil. You want a "manual mode", so that would be a Duty Cycle Device Element.

You can use the PID to get it up to temp, then transition (in person or via script). This will prevent boil-overs. I (and others) use a Duty Cycle and control it in script. For example: 100% to 210 degrees, then 65% to 212, then 35% onward.
Thanks BrunDog. I will give that a try. So that I understand. Are you saying that there is something in the PID algorithm / process that would prevent it from reaching a temp past 209 degrees that the Duty Cycle control would allow?
 
The PID tries to reach a setpoint, but will lower power as it reaches it, depending on the tuning, which is not what you want. Even if you get it boiling, with the ceiling of 212, it will not work right. You could increase the PID temp to 215 or 220, but after its boiling, the temp won't climb any higher than 212, and you'll have full power when you don't want it. Many have tried, likely all have failed to use PID for boil control, with BC or not.

Here is an example script to handle stepping down your Duty Cycle power to ensure it doesn't boil over (might need adjustment for your rig and change of the element names to match yours):

Code:
"BK Heat" DutyCycle = 100          // set duty cycle to 100%
"BK Heat" Enabled = true          // enable the boil kettle heater
wait "BK Temp" Value >= 208          // wait for the boil kettle to reach 208 degrees
"BK Heat" DutyCycle = 75          // set duty cycle to 75%
wait "BK Temp" Value >= 211          // wait for the boil kettle to reach 211 degrees
"BK Heat" DutyCycle = 50          // set duty cycle to 50%
Thanks for the explanation BrunDog. That makes sense. I just tried to achieve a boil with Duty Cycle set at 100% and just letting it roll and monitoring temperature. No script, no altering just wanted to see if it would get there. I could still only reach 209.

Could this have something to do with kettle size and volume, etc. 6 gal isn't a lot in a 15 gal kettle so lot of surface area I guess. It heats to the 209 relatively quickly but never seems to progress past that.
 
When it reaches 209, have you physically looked at it to see what it's doing? At my elevation, 210 is boiling. Another thought, you said your power was reading 220v, which in my area is 20v low, is it possible you are experiencing a heavy voltage drop under load?

Final thought, have you checked the resistance across the element?
 
When it reaches 209, have you physically looked at it to see what it's doing? At my elevation, 210 is boiling. Another thought, you said your power was reading 220v, which in my area is 20v low, is it possible you are experiencing a heavy voltage drop under load?
I looked in and I definitely see boil activity around the element itself but not around the sides of the kettle. It isn't what I would call a rolling or vigorous boil for the entire surface area in the kettle at all. I stand corrected on power. 118-120 for each leg. So 236-240 for both legs combined.
 
I’m not sure how you are qualifying the boiling. If it’s a few bubbles off the element, then you have a problem. It won’t boil at the sides since there is no heat there, but with that element in 6 gallons, it should be such a violent boil that you can even see where the bubbles are coming from.

I assume you have an SSR with an LED on it. With 100% duty, that LED should be lit full time.

It sounds like you have a meter so I’d measure the voltage (carefully) at the element.You should see a few volts less than your main supply of ~240VAC.
I may be ok then. This is my first foray into electric and I am used to gas burner and a much more aggressive boil. There is definite turbulence where the element is, not individual bubble coming off the element like when at mash or strike temp. Just not as aggressive as I was thinking it should be in my mind and not the temp I was expecting. But taking into account RiverCity's comment about altitude. I am at 751 feet which should be about 210.5 degrees so I am not as far off as I thought.
 
Back
Top