• Please visit and share your knowledge at our sister communities:
  • If you have not, please join our official Homebrewing Facebook Group!

    Homebrewing Facebook Group

Brew Bucket by SS Brewing Technologies

Homebrew Talk

Help Support Homebrew Talk:

This site may earn a commission from merchant affiliate links, including eBay, Amazon, and others.
Chris is napping,

Can you rotate it so the two legs are flush against the hump.
oh i totally forgot about this - when they legs are flushed - it is still a bit large. I am fermenting my second beer in it now - and it's holding up just fine with some tape to keep the door closed. not the perfect solution - but it allows me to use a 3 piece blow off. eventually i'll get a block of food to make the front portion level with the compressor hump.
 
I use it and it's one of the features I like the most. I keep it horizontal during fermentation so it doesn't collect yeast... Though if the yeast are trucking along, it can happen anyway. When kegging I rotate as needed to draw in clear beer above the yeast cake.

I've never had a clog. 5 gallons of beer above the outlet provides plenty of pressure to get things moving even if the tubing is full of yeast.

Can't imagine not using it, honestly.
The thing is, Normally if your using the conical as intended you would have already dumped the yeastcake after the primary fermentation stage and whatever yeast that settles during cold crashing should be below the level if the side port your kegging from. thats the idea behind a conical is you can get the beer off the yeastcake without doing transfers..
At least my experience with 3 years use on my three conicals.. when I open my side valve I get a tiny bit of yeast which settled in the port opening which amounts to about an inch in my hydrometer tube.

EDIT*** My apologies, I just realized this is not a conical thread its a brew bucket someone asked about these in the spike conical thread and I mixed up the threads.... I can see where this arm would be beneficial here.. some people bought these to use with conicals and thats where they have less merit.

I'm honestly suprised no one has put a bottom drain on one of these yet.
 
Last edited:
I'm sure this has been asked, but I can't find an answer anywhere. Is there a teflon washer that can be used to replace the internal O-ring on the racking arm/valve? The o-ring squeezes out from under the nut after a half rotation for me. I know I only need a partial rotation to rack the beer, but I just don't like an unconstrained o-ring for a moving piece.
 
I have been seriously thinking about the best way to install a bottom drain without increasing the height of the brewbucket itself.
 
I would love to see a bottom drain on these. I'm not hands-on enough to try and do it myself, though.
I belive the cone area is shallow enough were a person could literally just drill a hole in the botton and install a weldless fitting with a good silicone oring inside. you can get an additional small ball valve just like ss uses on the side port for under a dollar shipped on aliexpress.
 
Do any of you guys cold crash in the brew bucket? I was thinking about it but I am worried about introducing too much oxygen. Anyone have a good method to do this or would I be better off just crashing in the keg?


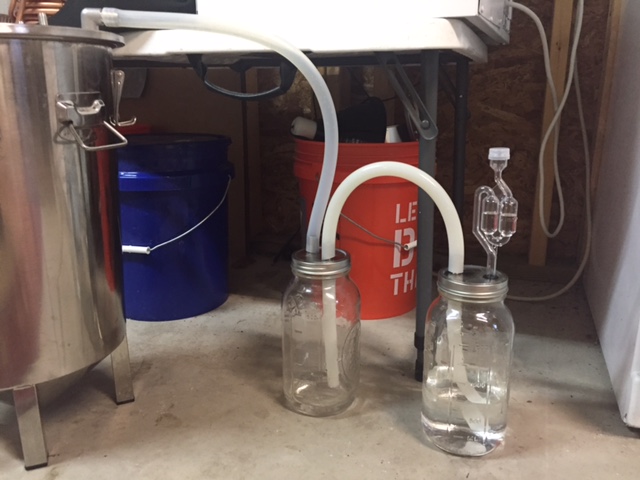
You may have already gotten this information, but my picture shows a CO2 reservoir system that will prevent suck back into your fermenter. These lids with nipples are available at NorCal Brewing Solutions, or are you can make DIY. During off gassing, CO2 fills the quart jars, so in my case as pictured, I have about 1.5 quarts of CO2 that can fill the jars as a reserve. During crashing, the star san is pulled back into the empty jar (along with CO2 reserves) but can never reach back into the BO tube. I use mine every brew day, and in fact crashing a lager now with the jars in place.
 
sorry...pic here:
airlock.JPG
 
I just bought the CO2 Harvester and picked up some 1/2 gal canning jars. Haven't used it yet, but looking forward to cold-crashing and lagering w/o suckback, and reducing O2 uptake.

Did you buy the lids from NorCal?

I had an air leak at first but solved it by putting a bit of keg lube on the silicone sealing ring on the jar lids, and by using 3/8" tubing on the 1/2" nipples. Put a good amount of torque on the jar lid sealing rings and all is well!
 
You may have already gotten this information, but my picture shows a CO2 reservoir system that will prevent suck back into your fermenter. These lids with nipples are available at NorCal Brewing Solutions, or are you can make DIY. During off gassing, CO2 fills the quart jars, so in my case as pictured, I have about 1.5 quarts of CO2 that can fill the jars as a reserve. During crashing, the star san is pulled back into the empty jar (along with CO2 reserves) but can never reach back into the BO tube. I use mine every brew day, and in fact crashing a lager now with the jars in place.
So you only use about a quart in your jar? How long do you crash and how much water/starsan is left in the jar with the airlock when your done?
 
Did you buy the lids from NorCal?

I had an air leak at first but solved it by putting a bit of keg lube on the silicone sealing ring on the jar lids, and by using 3/8" tubing on the 1/2" nipples. Put a good amount of torque on the jar lid sealing rings and all is well!

Yep, from NorCal. Good idea about the keg lube and torque. I might seal the end and do a leak test of them in a bucket of water.

I did the math and even with 2 gal of headspace (more than I will ever have), dropping from 70F to 32F would create only about 18 oz. suckback. Having the second jar half full of Starsan just before cold-crashing will provide more than enough liquid to prevent it all from being sucked back into the first jar (and air getting through).
 
So you only use about a quart in your jar? How long do you crash and how much water/starsan is left in the jar with the airlock when your done?

That's a quart jar so about 1/2 jar equals a pint of sanitizer starting off in jar 2. I crash 5F at a time until I hit 35F. All said and done, all of the sanitizer from jar 2 with the airlock will have been pulled back into jar 1 attached to the BO tube. As MaxStout says above, you only need 18 or so ounces of CO2 in reserve so no outside O2 is drawn in. BTW....I started using a 3 pc airlock on the second jar for an additional safety measure.
 
That's a quart jar so about 1/2 jar equals a pint of sanitizer starting off in jar 2. I crash 5F at a time until I hit 35F. All said and done, all of the sanitizer from jar 2 with the airlock will have been pulled back into jar 1 attached to the BO tube. As MaxStout says above, you only need 18 or so ounces of CO2 in reserve so no outside O2 is drawn in. BTW....I started using a 3 pc airlock on the second jar for an additional safety measure.


MaxStout will be using 1/2 gallon jars...not quart jars like I am using. I think I'll shift to 1/2G next brew.
 
FWIW, here's the formula for determining suckback:

Suckback volume = Headspace volume*(1-(Mintemp+459.67)/(Maxtemp+459.67))

Temps in Fahrenheit. Volume units don't matter, as long as you use the same.
 
Once you empty jar number 2 you would be pulling oxygen back into your fermentor. How many days to get down to 35F?

I can crash with my glycol chiller from 65F to 35F in an hour...but I go in 5F increments every 4 hours.

With a 3 pc airlock (using that now) on jar 2, the top hat of the airlock would suck down to seal off the stem if that happens, but jar 2 is half full of CO2 also.

But....I have never seen jar 2 fully emptied of sanitizer even with quart jars. 1/2G jars may be an overkill, but I plan to go that route next brew.
 
Are you somehow flushing those jars with co2 before starting fermentation? If not, wouldn't the o2 in the air (in the jars) diffuse with the incoming co2 and still be present when cold crashing?
 
FWIW, here's the formula for determining suckback:

Suckback volume = Headspace volume*(1-(Mintemp+459.67)/(Maxtemp+459.67))

Temps in Fahrenheit. Volume units don't matter, as long as you use the same.


MaxStout, do you mind double checking my math for me?

I have 5.5G in a 7G fermenter. My fermenting temp is 65F and my temp to crash to is 35F.

I am coming up with .241665. Is this basically 1/4 of a gallon or 32 ounces?
 
Last edited:
I can crash with my glycol chiller from 65F to 35F in an hour...but I go in 5F increments every 4 hours.

With a 3 pc airlock (using that now) on jar 2, the top hat of the airlock would suck down to seal off the stem if that happens, but jar 2 is half full of CO2 also.

But....I have never seen jar 2 fully emptied of sanitizer even with quart jars. 1/2G jars may be an overkill, but I plan to go that route next brew.
Thanks for clarifying. I had thought jar two was being drained dry.

One last question how long do you stay at 35F and do you see additional movement of starsan once the temperature stabilizes?

I am asking all these question as I have three fermenters and the cost of three harvesters is about the cost of buying a dedicated 5gal CO2 tank and regulator. I read the harvester thread and it seems like reabsorption of CO2 could need more than what can be captured in a 1/2gal jar so for an extended crash you might need to add more co2 somehow.
 
Should be about .086 gallons, or about 11 oz.

Thanks MaxStout. I'm on the same page now.

Thanks for clarifying. I had thought jar two was being drained dry.

One last question how long do you stay at 35F and do you see additional movement of starsan once the temperature stabilizes?

I am asking all these question as I have three fermenters and the cost of three harvesters is about the cost of buying a dedicated 5gal CO2 tank and regulator. I read the harvester thread and it seems like reabsorption of CO2 could need more than what can be captured in a 1/2gal jar so for an extended crash you might need to add more co2 somehow.

Once I hit equilibrium and the crash temp is stable, I don't see much movement in the jars. My process is to hit crash temps for a day or two, then move to keg with an O2 free pressure transfer. These brew buckets cant take more than 1-2 psi, so this is very delicate.

I guess I'm not giving the beer much time to reabsorb.
 
FWIW, here's the formula for determining suckback:

Suckback volume = Headspace volume*(1-(Mintemp+459.67)/(Maxtemp+459.67))

Temps in Fahrenheit. Volume units don't matter, as long as you use the same.
Thanks for the formula and the other comments.

I think you also need to take into account contraction of the beer itself, which is something like 1 or 2% but still would still be within the reserve of a 1/2gal jar.

When you finally get around to using your setup I would like to hear if your results match the calculated values.
Thanks MaxStout. I'm on the same page now.


Once I hit equilibrium and the crash temp is stable, I don't see much movement in the jars. My process is to hit crash temps for a day or two, then move to keg with an O2 free pressure transfer. These brew buckets cant take more than 1-2 psi, so this is very delicate.

I guess I'm not giving the beer much time to reabsorb.

In the harvester thread it seemed people agreed co2 reabsorption is an issue but it was unclear how much time is required. Thanks for sharing your experience which I would guess is pretty typical for a cold crash.
 
MaxStout, do you mind double checking my math for me?

I have 5.5G in a 7G fermenter. My fermenting temp is 65F and my temp to crash to is 35F.

I am coming up with .08577. Is this basically 1/4 of a gallon or 32 ounces?
Thanks for the formula and the other comments.

I think you also need to take into account contraction of the beer itself, which is something like 1 or 2% but still would still be within the reserve of a 1/2gal jar.

When you finally get around to using your setup I would like to hear if your results match the calculated values.


In the harvester thread it seemed people agreed co2 reabsorption is an issue but it was unclear how much time is required. Thanks for sharing your experience which I would guess is pretty typical for a cold crash.

My process for a beer like a Lager is to cold crash in fermenter only a day or two before kegging so I can drop out suspended solids and transfer beer that's as clean as possible. Long term cold storage in keg encourages more solids to drop out of suspension, but the crash in the fermenter is a very quick process and not long term storage...at least for me.
 
Okay so I got the ss brew tech hose barb to connect a blow off tube to. I also want to use it to do pressurized transfers.

Issue is I only have one gas post coming out of my regular and it has a ball lock connection to it. Is there any way I could rig up a gas post that I can connect to the ball lock and then have tubing coming out of that into the blow off barb on the brew bucket?

This is the setup I have:
http://www.laundrybrewing.com/2017/05/blow-off-set-up.html?m=1

Works good.
 
Okay so I got the ss brew tech hose barb to connect a blow off tube to. I also want to use it to do pressurized transfers.

Issue is I only have one gas post coming out of my regular and it has a ball lock connection to it. Is there any way I could rig up a gas that I can connect to the ball lock and then have tubing coming out of that into the blow off barb on the brew bucket?

You may be able to engineer some sort of gas post, but I bought a wye and two shut off valves so I'd have 2 outlets off my regulator. Outlet one/line one is a gas ball lock QD for keg purges (etc) and the other outlet is a simple gas line with no fittings.

Off the 90 degree barb on the Brew Bucket lid, I have a length of 3/8" silicone tube that goes into my Star San bucket. When ready to pressurize the fermenter, I use a pair of hemostats and clamp off the BO tube close to the jug before pulling it out of Star San. I match up the regulator line and the blow off tube line with a brass straight connector (barb to barb) I got at Home Depot.

I use this auxiliary CO2 tank and regulator all the time, and found it may be worth your trouble to consider the wye off the regulator to keep things easy to manage. Probably more engineering ways than mine to skin the cat, but I have multiple purposes I use mine for.
 
Last edited:

Latest posts

Back
Top