• Please visit and share your knowledge at our sister communities:
  • If you have not, please join our official Homebrewing Facebook Group!

    Homebrewing Facebook Group

Brew Bucket by SS Brewing Technologies

Homebrew Talk

Help Support Homebrew Talk:

This site may earn a commission from merchant affiliate links, including eBay, Amazon, and others.
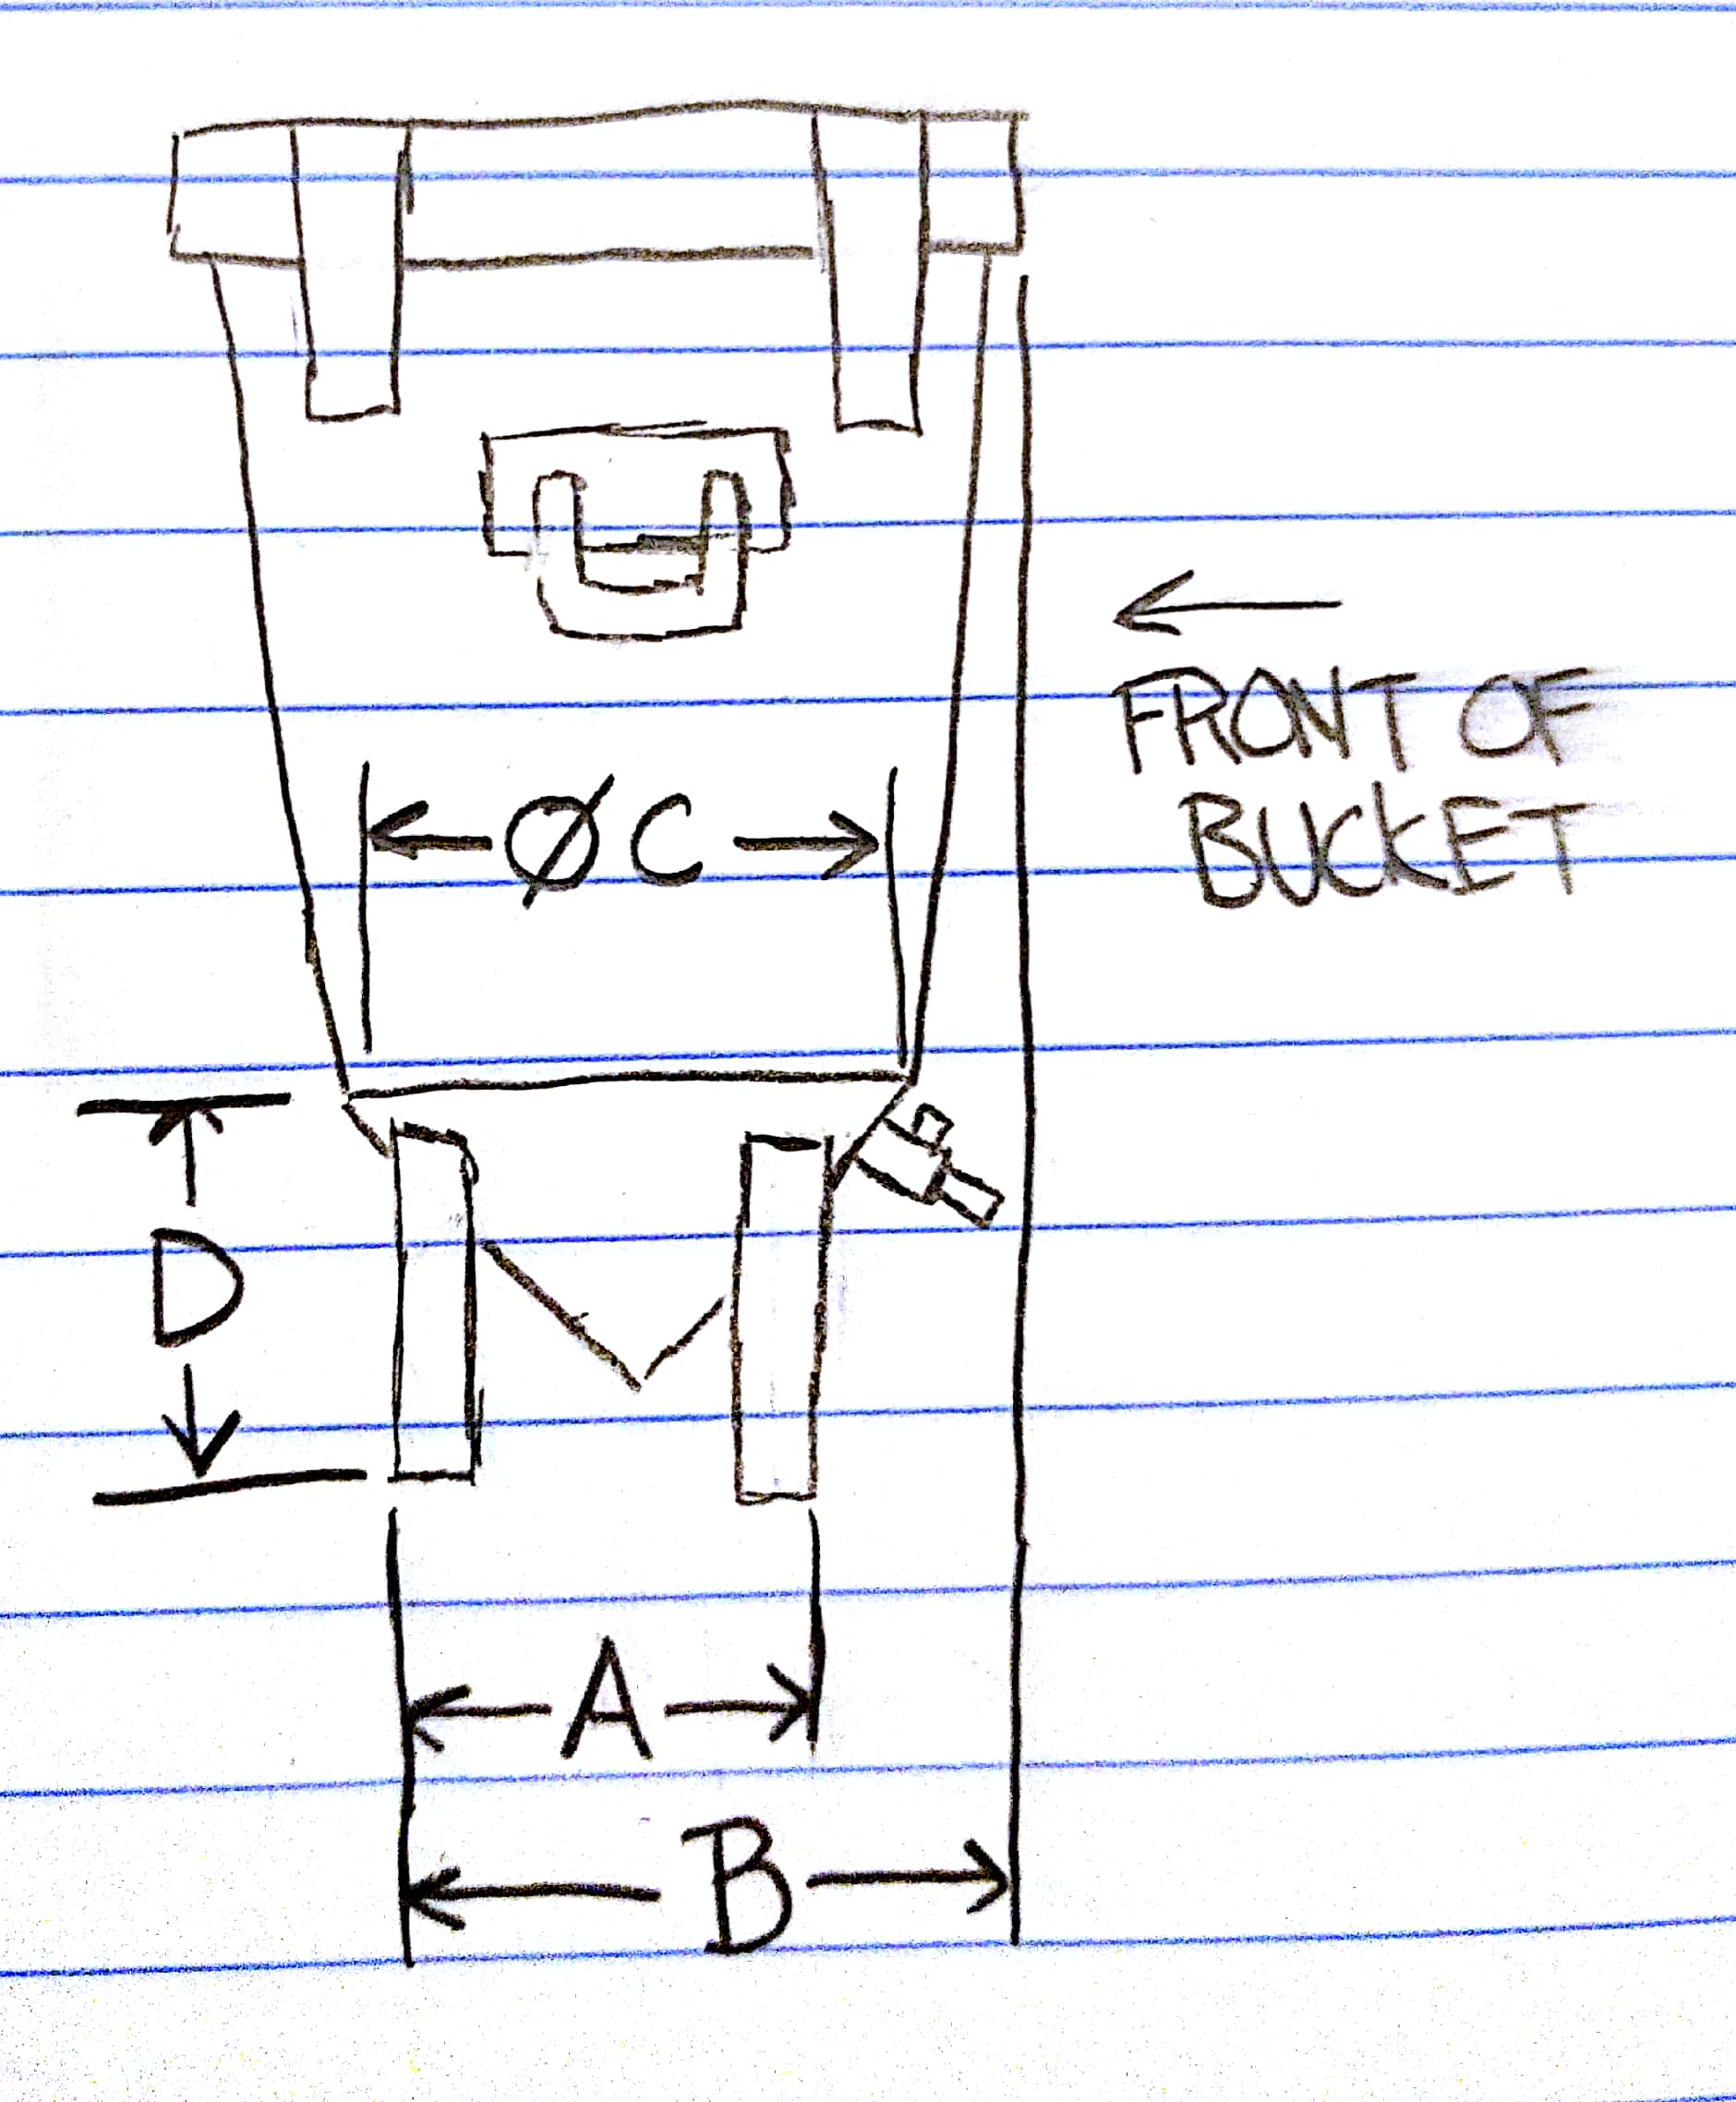
I use the spigot to pull a gravity sample and also shoot StarSan into it after I am done. I ferment in a closed mini chest freezer so I don't worry about things getting up in there.
If I did, I would have no issues using a StarSan soaked paper towel stuffed in after I pulled the sample.
 
I'm wanting to set up my buckets for pressurized transfers. I saw on the ss brewtech site they have some parts available that include a PRV for co2 transfers.

I was just planning on pulling my blow off tube out, and hooking it up to to co2 directly, and setting to 1 psi. It looked to me that people had been doing this before ss brewtech got behind the idea of ss buckets doing pressurized transfers. I believe the PRV is set at like 2.5 psi on their fitting.

I just thought the co2 transfer would be easier to do then gravity feeding the keg. I was planning on pushing into the out line on the keg, like all the cool kids are doing.

How are you guys doing you transfers? Do you feel the need for a PRV and mod on the bucket to accomplish this?
Thanks!

I do it this way all the time^^^^. I have a 90 elbow barb on my brew bucket(s) lid for BO tube, so I clamp off that tube to seal out O2 until I plug in the CO2 line, pull it out of star san jug and connect my CO2 line with a 3/8" straight barb. Unclamp tube and keep CO2 low at 1 or 2 psi as this lid is not designed for much pressure. Push beer from ball valve into purged and sanitized keg.

I think Ss BT is covering their butts in case someone pumps the bucket too high and it pops the lid off and hurts someone. Then they can say we sell PRV's to prevent this..of course this also gives them another item to sell. Just keep under 2# of psi and all is good.

Pressure transfers go more quickly than gravity for sure, but my main goal for this is to keep my beer as O2 free as possible during transfers.

Thanks man, That is what I was thinking/hoping. Yeah, I am excited to give it a whirl. I have not really had any O2 problems so far(that have been noticed), but I am curious to see if I can note any improvements in my hoppy beers. I have been having to move my fermenter around to accommodate the gravity feed. I have to move it, and them let it settle before transfering to the keg. All this when I have a bottle of co2 sitting right next to the thing.

Hopefully I also get some flavor improvements as well. That would be a major bonus. Thanks again!

Yeah, for sure CO2 pressure transfers are a win-win in all regards as you mentioned.

For years I just opened the fermenter lid, stuck in an auto siphon racking tube and pumped into an open keg. Honestly I never considered how much damage I was doing to my beers this way. If you burned thru a keg in a weekend, no biggie. But if that keg lingers for a month or three like mine, I noted a slow dulling or lack of vibrancy. Of course this loss of vibrancy comes from a variety of factors, but for sure oxidation adds to the list. Plus, as we are discussing, elimination of O2 during transfers is fairly simple and easy to accomplish.

Good stuff, thanks. I just added another tap in my keezer (from 2 to 3), so the what you are saying might make a significant difference here pretty soon. I usually blow through my hoppy beers pretty quick, so maybe that's why I have not had previous issues. Cheers!
 
Good stuff, thanks. I just added another tap in my keezer (from 2 to 3), so the what you are saying might make a significant difference here pretty soon. I usually blow through my hoppy beers pretty quick, so maybe that's why I have not had previous issues. Cheers!

For sure control of O2 exposure is in our best interest as brewers. I typically have 10 kegged beers (capacity) in my pipeline at various stages, so it may be several months until some of mine kick. NE IPA's don't last that long...lol.
 
I love the idea of a pressurized/closed transfer - thanks for the ideas.
I also like the idea of using the 90-degree barb for the blowoff tube as I currently use a rubber stopper and the big piece of a 3 piece arilock with a hose covering the vent and running to my blowoff jar. The issue is that the tubing using kinks a bit after coming straight up/off the airlock so I love this way to fix it.

Questions:
1) Does anybody know the size of that 90-degree part so I can either pick it up at my hardware store or find it much cheaper online? $17.95 seems ridiculous for that part.
2) What type of hose clamp do you use after you are done with the blowoff but before you push CO2 through?

I suppose I could remove the elbow joint and replace with an airlock but that would be counter to my goal of reducing oxygen exposure. This would be used during the cold crash to avoid suckback from the blowoff jar.
 
I just bought a brew bucket and can't wait to use it for closed system transfer. I'm going to put a 1.5" TC fitting on top and close the small hole the lid comes with. When fermenting I am going to use a TC to barb fitting. When transferring I'm going to swap the barb out for a TC fitting that has a gas post and PRV (http://www.norcalbrewingsolutions.c...re-Relief-Valve-1.5-Inch-Tri-Clover.html#2053).

I wish they made a TC lid with 1.5" and not 3".
 
I love the idea of a pressurized/closed transfer - thanks for the ideas.
I also like the idea of using the 90-degree barb for the blowoff tube as I currently use a rubber stopper and the big piece of a 3 piece arilock with a hose covering the vent and running to my blowoff jar. The issue is that the tubing using kinks a bit after coming straight up/off the airlock so I love this way to fix it.

Questions:
1) Does anybody know the size of that 90-degree part so I can either pick it up at my hardware store or find it much cheaper online? $17.95 seems ridiculous for that part.
2) What type of hose clamp do you use after you are done with the blowoff but before you push CO2 through?

I suppose I could remove the elbow joint and replace with an airlock but that would be counter to my goal of reducing oxygen exposure. This would be used during the cold crash to avoid suckback from the blowoff jar.


On my Ss brew bucket lids, I bought the 90 degree barbs from Ss BrewTech. The barb is 1/2" diameter and the hole for the threaded portion of the fitting is 17mm. You may find it cheaper, but remember it is engineered for this application to seal and fit correctly.

I use a length of 3/8" silicone tubing and it is flexible enough to fit on the 1/2" barb and hold tightly w/o a clamp. I dangle it into a jug of star san for BO. When I am ready to pressure transfer to keg, I clamp off the tube before taking all the way out of the star san with a pair of smooth jaw hemostats (no damage to hose) to prevent O2 intrusion. From my regulator I run a CO2 hose that I have forced on a 3/8" brass barb to barb connector (Home Depot) and simply fit the two lines together. Apply 1.5psi from your CO2 tank and transfer to keg. When done just pull the two lines apart and I leave the brass barb in the CO2 line for next use. I have a dedicated CO2 tank and regulator set up for transfers so I just leave the barb in the CO2 line as is.

Make sure your keg is purged of O2 to minimize oxidation.
 
Excellent information Morrey, thanks. When it comes down to all of the money I've spent on brewing another $17.95 is really no big deal and it saves me the time and trouble to try and make something else work.

I'll pull the trigger on this, thanks for the information. This will make me even happier with my BrewBucket.
 
my 7.5g SS Brewbucket BME arrived on Monday and I filled it up yesterday, and my Danby 36 bottle DWC93BLSDB also arrived yesterday. It's a tight fit - and I need to use tape to ensure that the door stays closed. Eventually I will build a platform so that brewbucket sits level with the compressor hump. A plastic 6 gallon carboy fits perfectly fine. I purchased the BME so I had the thermowell, and placed my STC probe in there. So far so good.
 

Attachments

  • IMG_20171121_164535.jpg
    IMG_20171121_164535.jpg
    2.6 MB
Chris is napping,

Can you rotate it so the two legs are flush against the hump.
sure, when i take a gravity sample in a few days i'll move it around. The upper portion is what is slightly too large. Once I have something set up so that all 4 legs are even with the compressor hump, it'll be fine.
 
Do any of you guys cold crash in the brew bucket? I was thinking about it but I am worried about introducing too much oxygen. Anyone have a good method to do this or would I be better off just crashing in the keg?
 
You could add a gas post to your lid and pressurize the brewbucket with 1 or 2 psi of C02 while cold crashing. I haven't done this but it's something I may consider.

Interesting, that sounds like a good idea. Do they sell anything or would I have to DIY?
 
I don't see anything on their site but it doesn't mean they don't have something available. I would email them. They may or may not recommend it. I vaguely remember there being a max pressure recommended for the brewbuckets but it's been awhile. I bet JayBird (http://www.norcalbrewingsolutions.com/store/index.html) on here could get you something. They do a lot of custom stuff.
 
Interesting, that sounds like a good idea. Do they sell anything or would I have to DIY?

IMG_1512.JPG

I made this and posted about it a while back....serves as a blow off tube, and a way to push the beer, and my friend (who came up with the idea) uses it to add CO2 while cold crashing (I don't cold crash). Article from my blog below:

http://www.laundrybrewing.com/2017/05/blow-off-set-up.html

You could also just rig up a hose going into the blow off hole and put a couple PSI on it or silver solder a gas post to the lid...I'm sure there are many ways to do it. I haven't seen anything sold for the brew buckets though.
http://www.laundrybrewing.com/2017/05/blow-off-set-up.html
 
Hi all,

I'm going to be picking up a brew bucket in either late December or early January and I'm on the hunt for a mini-fridge that'll fit the vessel prior to its arrival. I was wondering if one of you kind gentlemen might be able to help me out by measuring your fermenter and letting me know what the dimensions are in the attached image.

B & C might be pretty hard to measure. For C, a circumference should work if that's easier, and for B, if it's too difficult, I can probably just figure out that dimension from the leg distance A.

Thanks in advance!

xq5qefF.jpg
 
"D" is 4 5/8". The top of the leg is actually even with the base of the cone, so it is a little different than your drawing. Unfortunately I can't measure anything else since it's currently crammed into the mini fridge.

I can tell you one other thing that may help. Mine is in a Vissani 52 bottle wine cooler/mini fridge with a 12" deep flat floor before the compressor hump, which itself is 7" tall. The compressor hump is itself 6" deep for a total depth is 18". The fermenter seems to be only 13" wide at the top, so it leans over the compressor hump by less than an inch.

Hope you can make it work, I love mine.
 
Does anyone not use the racking arm? It gets you .25 liters out of the fermenter. I am not so sure that it is actually gaining me anything, as I usually don't rotate it completely down when racking.

My only concern is the angle of the hole, and getting clogs. The racking cane being down eliminates matter from settling in the hole. I'm not sure if this would really be an issue....

Thoughts?
 
I use it and it's one of the features I like the most. I keep it horizontal during fermentation so it doesn't collect yeast... Though if the yeast are trucking along, it can happen anyway. When kegging I rotate as needed to draw in clear beer above the yeast cake.

I've never had a clog. 5 gallons of beer above the outlet provides plenty of pressure to get things moving even if the tubing is full of yeast.

Can't imagine not using it, honestly.
 
I've forgotten to install mine a couple times and during transfer I haven't had any issues yet. I don't see any reason to not install it.

Does anyone not use the racking arm? It gets you .25 liters out of the fermenter. I am not so sure that it is actually gaining me anything, as I usually don't rotate it completely down when racking.

My only concern is the angle of the hole, and getting clogs. The racking cane being down eliminates matter from settling in the hole. I'm not sure if this would really be an issue....

Thoughts?
 
Interesting, that sounds like a good idea. Do they sell anything or would I have to DIY?
They do now have a Pressure Relief Valve that allows you to push CO2 back into the ferementer for a closed transfer. I looked at it a few weeks ago but based on the discussion here and some crafty ingenuity I put together something myself that works, too.
 
Might I bother you kind gentlemen for one two more dimensions?

Would someone mind measuring the overall height of the bucket without the lid as well as the diameter at the top of the bucket without the lid?

Thanks in advance, and I promise I'll never bother you again.
 
Back
Top