Brew Bubbles: Web-Enabled Airlock

Homebrew Talk - Beer, Wine, Mead, & Cider Brewing Discussion Forum

Help Support Homebrew Talk - Beer, Wine, Mead, & Cider Brewing Discussion Forum:

This site may earn a commission from merchant affiliate links, including eBay, Amazon, and others.
OK I did the update of my BPR with (sudo /home/brewpi/left/utils/doUpdate.sh)
The update asked me several times if I want to override the same version 0.5.40 and I answered yes.
Then I did sudo /home/brewpi/left/utils/doPerms.sh
And then I did a reboot.
But when I checked the brewbubbles it still wasn't able to send date to my BPR see logfile.

I also have the impression that none of the files under /var/www/html/left were updated!
Did I forgot something? The Mega Thread isn't a good reference to point to as it is getting to big to find anything in it.

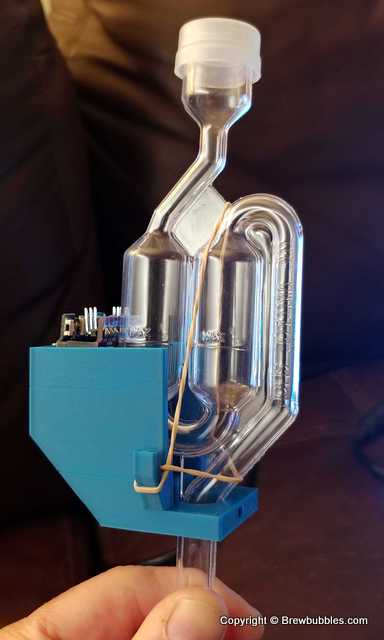
Further I did also the test with the coloring water but this wasn't a success either!
The only color I had was blue and none (or a few) bubbles were detected :-(
Maybe when I receive the photo interrupters from Sparkfun I can try it with those but they should be the same.
Or I can try it again with a green color but then I need to buy that first in the shop.
 

Attachments

  • brewbebbles6.txt
    1.9 KB · Views: 14
  • IMG_20200218_214939_resized_20200218_095122665_.jpg
    IMG_20200218_214939_resized_20200218_095122665_.jpg
    811.7 KB · Views: 52
Look on line 24 of brewpi-api.php. It should look like this:
Code:
$url = 'http://' . $_SERVER['SERVER_NAME'] . dirname($_SERVER['PHP_SELF']) . '/newsocketmessage.php'; // Destination
If it does not:
  1. Stop the script from the web page
  2. Issue the command
    Code:
    sudo git pull
    from the chamber's www directory
  3. Validate the above line is correct
  4. Issue the command
    Code:
    sudo ./doPerms.sh
    from your chamber's brewpi/utils directory
  5. Restart the script
  6. Test
I'm typing this without access to my home system, but it seems right.

As far as the food coloring goes, I would have thought blue would be close enough to block the light. When it's just sitting static, is the blue LED on or off? Any difference in the bracket? It helps shade a lot of the outside light.
 
Look on line 24 of brewpi-api.php. It should look like this:
Code:
$url = 'http://' . $_SERVER['SERVER_NAME'] . dirname($_SERVER['PHP_SELF']) . '/newsocketmessage.php'; // Destination
No it still is :
$url = 'http://localhost/newsocketmessage.php'; // Destination

If it does not:
  1. Stop the script from the web page
  2. Issue the command
    Code:
    sudo git pull
    from the chamber's www directory
  3. Validate the above line is correct
  4. Issue the command
    Code:
    sudo ./doPerms.sh
    from your chamber's brewpi/utils directory
  5. Restart the script
  6. Test
I'm typing this without access to my home system, but it seems right.
Done these steps:
pi@brewpi:/var/www/html/left $ sudo git pull
Updating b6b9621..aef7e0b
Fast-forward
brewpi-api.php | 2 +-
1 file changed, 1 insertion(+), 1 deletion(-)

pi@brewpi:/home/brewpi/left/utils $ sudo ./doPerms.sh
***Script doPerms.sh starting.***
Fixing file permissions for /var/www/html/left.
Fixing file permissions for /home/brewpi/left.
Allowing BrewPi python access to Bluetooth interfaces.
Checking user accounts.
***Script doPerms.sh complete.***

Then after restarting the script I power up the brewbubbles and simulated a few bubbles with my pen, but still nothing on my BPR!
this is the log from the brewbubbles:
18:32:59.416 -> ⸮Q⸮ao 2020-02-19T17:32:59ZV: ॰ₒ๐°৹
18:32:59.816 -> 2020-02-19T17:33:00ZV: ॰ₒ๐°৹
18:33:00.296 -> 2020-02-19T17:33:00ZV: ॰ₒ๐°৹
18:33:00.656 -> 2020-02-19T17:33:01ZV: ॰ₒ๐°৹
18:33:01.616 -> 2020-02-19T17:33:02ZV: ॰ₒ๐°৹
18:33:01.936 -> 2020-02-19T17:33:02ZV: ॰ₒ๐°৹
18:33:02.256 -> 2020-02-19T17:33:02ZV: ॰ₒ๐°৹
18:33:02.616 -> 2020-02-19T17:33:03ZV: ॰ₒ๐°৹
18:33:02.896 -> 2020-02-19T17:33:03ZV: ॰ₒ๐°৹
18:33:03.186 -> 2020-02-19T17:33:03ZV: ॰ₒ๐°৹
18:33:03.536 -> 2020-02-19T17:33:04ZV: ॰ₒ๐°৹
18:33:03.816 -> 2020-02-19T17:33:04ZV: ॰ₒ๐°৹
18:33:19.062 -> 2020-02-19T17:33:19ZV: Time is 2020-02-19T17:33:19Z, BPM is 11.99.
18:33:19.062 -> 2020-02-19T17:33:19ZV: Averages: BPM = 11.99 (1 in sample), Ambient = 22.19 (1 in sample), Vessel = -100.00 (1 in sample).
18:33:19.096 -> 2020-02-19T17:33:19ZV: Triggered httpPost().
18:33:19.096 -> 2020-02-19T17:33:19ZN: Posting to: http://192.168.123.55/left/brewpi-api.php
18:33:19.096 -> 2020-02-19T17:33:19ZV: Resolved host 192.168.123.55 to IP 192.168.123.55
18:33:19.135 -> 2020-02-19T17:33:19ZV: Connecting to: 192.168.123.55, 80
18:33:29.374 -> 2020-02-19T17:33:29ZW: Connection failed, Host: 192.168.123.55, Port: 80 (Err: 0)
18:33:29.408 -> 2020-02-19T17:33:29ZE: Target post failed.
18:33:29.408 -> 2020-02-19T17:33:29ZV: Handle File Read: /
18:33:29.649 -> 2020-02-19T17:33:30ZV: Handle File Read: /mstile-144x144.png
18:33:29.961 -> 2020-02-19T17:33:30ZV: Handle File Read: /favicon.ico
18:33:30.133 -> 2020-02-19T17:33:30ZV: Handle File Read: /favicon.ico

Still connection failed. But I can ping from the BPR to the brewbubble fine so I don't think that is is network related.

As far as the food coloring goes, I would have thought blue would be close enough to block the light. When it's just sitting static, is the blue LED on or off? Any difference in the bracket? It helps shade a lot of the outside light.

The blue led is on and doesn't flash when a bubble passes.
 
Please check /var/log/apache2/error.log. I cannot reproduce your problem so I need more information.

On the bubbles - until you get your physical configuration to where the blue light is out (sensor blocked) when at rest, it's not going to count bubbles. I didn't have any issues with that but everyone has a different setup.
 
Lee Good new! The brewbubbles finally can send his information to my BPR.

18:12:51.930 -> ⸮!⸮qj⸮j%⸮2020-02-21T17:12:53ZV: ॰ₒ๐°৹
18:12:55.690 -> 2020-02-21T17:12:56ZV: ॰ₒ๐°৹
18:12:58.270 -> 2020-02-21T17:12:59ZV: ॰ₒ๐°৹
18:13:00.480 -> 2020-02-21T17:13:01ZV: ॰ₒ๐°৹
18:13:23.220 -> 2020-02-21T17:13:24ZV: Time is 2020-02-21T17:13:24Z, BPM is 4.00.
18:13:23.220 -> 2020-02-21T17:13:24ZV: Averages: BPM = 4.00 (1 in sample), Ambient = 21.00 (1 in sample), Vessel = -100.00 (1 in sample).
18:14:01.660 -> 2020-02-21T17:14:02ZV: ॰ₒ๐°৹
18:14:03.110 -> 2020-02-21T17:14:04ZV: ॰ₒ๐°৹
18:14:05.279 -> 2020-02-21T17:14:06ZV: ॰ₒ๐°৹
18:14:23.227 -> 2020-02-21T17:14:24ZV: Time is 2020-02-21T17:14:24Z, BPM is 3.00.
18:14:23.227 -> 2020-02-21T17:14:24ZV: Averages: BPM = 3.50 (2 in sample), Ambient = 21.03 (2 in sample), Vessel = -100.00 (2 in sample).
18:14:23.227 -> 2020-02-21T17:14:24ZV: Triggered httpPost().
18:14:23.227 -> 2020-02-21T17:14:24ZN: Posting to: http://192.168.0.187/left/brewpi-api.php
18:14:23.269 -> 2020-02-21T17:14:24ZV: Resolved host 192.168.0.187 to IP 192.168.0.187
18:14:23.269 -> 2020-02-21T17:14:24ZV: Connecting to: 192.168.0.187, 80
18:14:23.349 -> 2020-02-21T17:14:24ZN: Connected to: 192.168.0.187, 80
18:14:23.349 -> 2020-02-21T17:14:24ZV: Connected to endpoint.
18:14:23.349 -> 2020-02-21T17:14:24ZV: POST /left/brewpi-api.php HTTP/1.1
18:14:23.349 -> 2020-02-21T17:14:24ZV: Host: 192.168.0.187
18:14:23.389 -> 2020-02-21T17:14:24ZV: Connection: close
18:14:23.389 -> 2020-02-21T17:14:24ZV: Content-Length: 140
18:14:23.389 -> 2020-02-21T17:14:24ZV: Content-Type: application/json
18:14:23.389 -> 2020-02-21T17:14:24ZV: X-AIO-Key:
18:14:23.389 -> 2020-02-21T17:14:24ZV: End headers.
18:14:23.389 -> 2020-02-21T17:14:24ZV: Posting JSON to target.
18:14:23.509 -> 2020-02-21T17:14:24ZV: Status: HTTP/1.1 200 OK
18:14:23.509 -> 2020-02-21T17:14:24ZV: JSON posted.
18:14:23.549 -> 2020-02-21T17:14:24ZN: Target post ok.

upload_2020-2-21_18-24-50.png


I didn't change anything since the last modifications except I completely shutdown everything for a few days.

Now I only need to find a solution for the bubbles that are not counting.
I found some identical problems in an very old forum (more then 10 years ago) were they encountered the same problem and someone suggested to cover up the sensor so that outside light does not interfere. At this moment I don't know how but I think that I will find a way to do this.

PS: is there a way that the airlock information is also visible in the chart? or at least the bpm?
 
Lee Good new! The brewbubbles finally can send his information to my BPR.

I didn't change anything since the last modifications except I completely shutdown everything for a few days.
It was looking like a local network thing - who knows though.
Now I only need to find a solution for the bubbles that are not counting.
I found some identical problems in an very old forum (more then 10 years ago) were they encountered the same problem and someone suggested to cover up the sensor so that outside light does not interfere. At this moment I don't know how but I think that I will find a way to do this
It seems like just dropping a paper bag over the top will help. The bracket model, printed in black, is what I used for testing.
PS: is there a way that the airlock information is also visible in the chart? or at least the bpm?
Not yet. To be honest, working with dychart seems to be something only a sacred few can do without messing it up. :) I am fairly certain a third legend (and then the bubbles) can be added in newer versions of dychart. I have started down the road of upgrading to a current version, but then something gets in the way (like an actual bug) so it gets shelved.

It's defintely on the list though!
 
I recently came across your project and had a couple questions. Does this also support the brewpiless version of brewpi? I noticed it supports Brewers Friend and was wondering if there is plans to support BrewFather? I have also testing the project iSpindel-TCP-Server and think it possibly maybe something worth integrating with because it would allow the data to be forwarded to multiple locations without you needing to support it.

https://github.com/DottoreTozzi/iSpindel-TCP-Server
 
Does this also support the brewpiless version of brewpi?
It's the other way around really. I will send JSON to an endpoint, that endpoint needs to do something with it. I've not had a chat with pocketmon about it, but I'm open to the possibility of collaborating. When I Have Time™ I'll drop him a note. Only half making fun of this really. I'm willing to make a couple of changes to support it.
I noticed it supports Brewers Friend and was wondering if there is plans to support BrewFather?
Yes. You would not BELIEVE the issues I've been having lately, but it all culminates in me making some really major changes to the internals to make extending that portion of it more modular. I have a dev account on Brewfather and have been in contact with Thomas about it. There's a (maybe) small bug on his side, and a large one on mine. The next release of BB should have support for Brewfather.
I have also testing the project iSpindel-TCP-Server and think it possibly maybe something worth integrating with because it would allow the data to be forwarded to multiple locations without you needing to support it.
The issue with that is you'd need to host a web server with PHP and/or Python support somewhere in order to do it. Neither the iSpindel nor Brew Bubbles (nor Brewpiless for that matter) otherwise requires that, so it's a heavy lift for someone wanting "just this." If they have a handy server (or BrewPi Remix for instance) then it's not a big deal. The better move might be to use an endpoint which already will forward, like Brewer's Friend. Not sure if Brewfather does that or not.
 
Thanks for the response and the work you put into this. I can imagine how challenging it is to integrate with all this different solutions that’s why I suggested you take a quick look at the ispindel-tcp-server. It is not the ispindel but a forwarding engine that runs on raspberry pi. It already works with the ispindel and emanometer. The whole point of it is to take the information from the sensor and allow users to decide on the fly where it gets sent. It currently supports mqtt, brewpiless, brewfather, craftbeerpi and a bunch more. Thought it maybe a way of simplifying things but if it doesn’t then don’t worry about it. I have been looking at it to allow me to setup my ispindels once and redirect depending on what I’m brewing. This look like a great project and just waiting on parts to start testing it.
 
Yes, I'm familiar with it. The point I am making is that it requires someone to run a web server where the products which you suggest can take advantage that do not need a web server. So, it's a heavy lift unless someone already has a web server handy. If a person has no automation but just has these passive tools, running a web server may be a step too far.
 
I've received all the bits and built my first BrewBubble! I can confirm it counts fingers, cutters and paper extremely well, going to start some wine off in the next few days and I'll report on findings.

One question I can't easily work out from the documentation is how to configure so that I can log to Fermentrack?

Chris
 
I've received all the bits and built my first BrewBubble! I can confirm it counts fingers, cutters and paper extremely well, going to start some wine off in the next few days and I'll report on findings.
Please keep in mind that this is intended to be a relative counter, and that it should show trends but is not a scientific measurement. I did discover a workflow where some bubbles might not be counted under VERY high frequency. That's going to be fixed in the next version.

One question I can't easily work out from the documentation is how to configure so that I can log to Fermentrack?
You have to continue to bother @Thorrak to add that support. (Maybe add a note or a thumbs up on the issue.) It does work on BrewPi Remix, so ditch that blocky interface and come back into the BrewPi fold. :p
 
You have to continue to bother @Thorrak to add that support. (Maybe add a note or a thumbs up on the issue.) It does work on BrewPi Remix, so ditch that blocky interface and come back into the BrewPi fold. :p

Blocky?! No comment. :)


I've received all the bits and built my first BrewBubble! I can confirm it counts fingers, cutters and paper extremely well, going to start some wine off in the next few days and I'll report on findings.

One question I can't easily work out from the documentation is how to configure so that I can log to Fermentrack?

Chris

I have the code half-done, but need to finish it. Soon!
 
I'm getting some bubbles counted but not all, OK I know this is a known "issue" with Infra Red and water, but what have other people tried to make the water more opaque to the Infra Red? I've tried a couple of store cupboard colours/dyes but nothing so far provides any consisency.

So for example, what colour and kind of dilution of food colouring do people find successful. Other than food colouring anybody tried anything else and got good results?

Chris
 
There's also a condition in the code that can cause bubbles at a higher frequency to be missed - that may help. That's in the release that is pending. I really hope to be releasing it this weekend.

In my testing, I used blue food coloring. That seemed to work the best. I was far from scientific, but it was dark. A couple of times I got so much in there that I stained the plastic. Use less than that. :)

I also use Star San and water in my airlocks. I have a decent amount of iron in my water and that tends to make it cloudy. Maybe that helps too?

ETA: I hope you guys are using a flat-black printed bracket and hopefully covering the airlock/fermenter? Outside light will definitely impact the accuracy.
 
Last edited:
I'm getting some bubbles counted but not all, OK I know this is a known "issue" with Infra Red and water, but what have other people tried to make the water more opaque to the Infra Red? I've tried a couple of store cupboard colours/dyes but nothing so far provides any consisency.

So for example, what colour and kind of dilution of food colouring do people find successful. Other than food colouring anybody tried anything else and got good results?

Chris

Although I don't want to put anything else then pure water in my airlock I'm also curious to know what does work because it never counted bubbles properly in my cases but I only tried it with blue food colouring.
 

Attachments

  • IMG_20200218_214939_resized_20200218_095122665_.jpg
    IMG_20200218_214939_resized_20200218_095122665_.jpg
    811.7 KB · Views: 19
Release Announcement: v1.0.1 - Timers and Bracket

The biggest visible change for this release is to the bracket. @matridium was instrumental in getting me going on this whole project which is something I should have put in the first post. His questions in another thread inspired me to do the project to begin with, as well as providing a good deal of information related to work he did with a similar project in an academic setting. He designed the first bracket which was offered at launch. His creation sort of "backed in" to the object file. He created the first bracket in a machine shop, and subsequently put that into a 3D model.

Thanks to @matridium for the inspiration and hard work!

This change adds a few tweaks which @gromitdj was nice enough to do. The changes were all around the hole where the airlock stem passes:
  • Enlarged the hole, the original would only allow a smaller stem
  • Three different ways now to secure the bracket to the airlock
    • Added a small hole for an optional M3 set screw
    • Added a collar to secure a zip-tie around the bracket and stem
    • Added "ears" which allow for a rubber-band to wrap the device
20200105_102113.jpg

Thanks Donnie!

All changes in this release:

Thanks @LBussy for the kind words. As with all these DIY projects I find the creative think of others is inspiring. Again this project could have not happen with out the motivation and expertise of @LBussy.

I have been very busy since mid January and now with Covid I’ve had some time hay home to get back to brewing. I hurt my arm bad back in November and I’m still trying to recover.. I’m doing much better but still not 100%. I’m actually going to get another test batch of beer up and going this weekend to test out brew bubbles.
My first bracket was made in my machine shop, and if anyone finds ways to make it better please do! Any way happy bubble counting!
 
Although I don't want to put anything else then pure water in my airlock I'm also curious to know what does work because it never counted bubbles properly in my cases but I only tried it with blue food colouring.
When we used counters in the lab we used red food coloring and the LED we used was 635nm (maybe 633nm). Yes we did have problems with multiple and also skip counting of bubbles or frequency of bubbles were extremely high. When I did initial testing with the design @LBussy and I started working on I used blue, green, and red food coloring they all worked about the same. Again I think this is more for tracking a trend and not so much a precise scientific way to count bubbles.
 
Major Version Change - 2.0.0

This is a significant update, therefore incremented as a major version change. This upgrade breaks configuration, and because of an inadvertent bug introduced in 1.0.x, the OTA upgrade via the application page does not work to apply this upgrade. I recommend you use BrewFlasher to flash your controller - I have updated it for version 2.0.0.

Remember you will need to set up the controller configuration after the upgrade.

New Functionality

  • Extended target support (easier additions of new targets later)
  • Enable posting to Brewfather
  • Improved web server performance
  • Use Async Web Server
  • Update docs for BrewFlasher
  • Update from Espressif 8266 2.3.3 to 2.4.0
  • Enhance bubble detection
  • New settings page
  • Align with new config structure
  • Add new generic target and class handler
  • New target lib
  • Create new defaults

Moved to Private Libraries

Because I've been bitten not once, not twice, not three times, but FIVE times by upstream "enhancements," I have frozen the libraries I need here:

  • Move to DS18B20 library
  • Use lbussy version of OneWire to elim compile warning
  • Move to async web server
  • Moved to my DS18B20 lib
  • Move more libs to personal projects
  • Move to controlled repos

Bugfixes and Minor Changes

In case you are interested in the minutia, here are most of the additional changes:

  • Convert target config to String
  • Move configuration to declarations in *.h
  • Bring in new config type
  • Get rid of deprecation warning during compile
  • Change to valid resolution
  • Add reset after saving credentials
  • Reorder include order
  • Testing new post classes
  • Debug the client connect
  • Begin moving posts back to semaphore/loop
  • Split out functions away from helper class
  • Add push semaphore and response checking
  • Cleanup and fix semaphores
  • Move macros to constants
  • URLTarget has unique needs
  • Check key and use it to turn on/off push
  • Check URL and trigger push from contents
  • Enable BF push, add stubs for BRF
  • Change to core NTP functions
  • Fix common push logic
  • Rename files
  • Centralize JSON config sizing
  • Rename to remove name conflict
  • Merge in configuration changes
  • Improve ntp sync
  • Improve time synch blocking loop
  • Reboot on enforced portal timeout
  • Change timing of time hack
  • Add async thatVersion lookup
  • Move to serveStatic() for SPIFFS files
  • Fix heap display (view /heap/)
  • Add a little delay in loop to help response
  • Fix image URL
  • Skip processing on 0-length key
  • Raise upload baud rate
  • Reduce icon size
  • Remove reboot and mDNS reset
  • Move bubbles to struct
  • Add NTP failure mode reboot
  • Move interrupts externally
  • Fix reset for NTP hack
  • Cleanup wifi startup
  • Add license to web pages
  • Change NTP loops to 10
  • Add version information
  • Standardize page load
  • Fix null sensors
  • Return bool from update
  • Allow clearing keys/urls
  • Correctly determine posting status
  • Remove '?' in querystring when posting
  • Add reset handling
  • Add delay before restart()
  • Reset page now reloads gracefully
  • Rename 'restart' to 'reset'
  • Cleanup reset logic
  • Address crashing on resets (#19)
I hope some of you get some use from this.
 
@LBussy the changes you made in this new version are a big improvement! I especially like the option to send the information to Brewfather because I'm a big fan of Brewfather. Unfortunately this version still doesn't count the bubbles in my airlock :no::(
This time I even tried it with different food coloring: Red, Yellow, Blue and in combination with Star San but none of them counted an air bubble. With the point of a pencil it works fine so it is not the censors.
 
Unfortunately this version still doesn't count the bubbles in my airlock :no::(
This time I even tried it with different food coloring: Red, Yellow, Blue and in combination with Star San but none of them counted an air bubble. With the point of a pencil it works fine so it is not the censors.
Do you have the sensor in the bracket and covered? If there's ambient light, the sensor will be much less effective.
 
Man, I don't know - I hate to say it but "it works here". Which sensor did you end up getting?

What are you using for an airlock? Maybe it's a different material?

Does the LED stay on or off?
 
Did this sensor ever work?
Pull it off the carboy and try flashing a strip of paper through the gap, as a test, maybe?

Cheers!
@day_trippr it works fine with the point of a pencil or any other object but not with the bubbles in my airlock.
This is a small movie of my test. And a second one with the air bubbles.

@LBussy The led stays on when the bubbles are passing and it goes off when I pass it with the point of a pencil.
I bought the sensor at sparkfun but with the one I found on ebay I have the same result. I will buy some new airlocks when I make my next beer supply order. Which type of airlock should I buy?
They have 2 different kind of models:
upload_2020-4-20_7-43-41.png

or this one:
waterslot-bolletjesmodel_1_3.jpg

Currently I'm using the first model.
 
Last edited:
Major Version Change - 2.0.0

This is a significant update, therefore incremented as a major version change. This upgrade breaks configuration, and because of an inadvertent bug introduced in 1.0.x, the OTA upgrade via the application page does not work to apply this upgrade. I recommend you use BrewFlasher to flash your controller - I have updated it for version 2.0.0.

@LBussy I've just upgraded and all went well. One observation, I have one temperature probe connected and that's working OK, the unused channel is reporting a temperature of 0.06C, previous version reported 0C.

I'm getting a few more colour dyes/additives to try today as I'm now not counting any bubbles now, even though I have an opaque bag over the top of the fermentation lock.


This is the only type of lock that I have. As @wd16261 my sensor counts pens, paper, even counts being placed on and of the fermentation lock.

Chris
 
I suspect there are different kinds of these, however, the Sharp GP1A57HRJ00F I have says it emits 950 nm light, and the receptor is sensitive to 400 to 1200 nm. That ranges from blue/violet through infrared. The sensor is most sensitive to IR light (700 nm – 1 mm) at 900 nm.

Water absorbs infrared far better than the lower visible wavelengths:

Water_absorption_coefficient_large.gif


Therefore, it seems like this would work best with an IR filter on it.

IR filters are common in photography but possibly expensive to purchase. Unless you have one you can cannibalize this way might be pricey. What's not pricey is gels used for lighting in photography, stage, and film making. There are infrared gels, but these too are expensive and more difficult to find. What we used to do in the Army to make a flashlight for night-vision devices was to take our angle-head flashlights and put on the red and green filters. Red blocks all but red and green blocks all but green. The combination blocks pretty much all visible light but allows IR to pass. For less than $10 you can get an assortment of gels to make your own IR filter.

You would want the filter on the sensor side. That would be the side with the long slit, and that side of the sensor has three leads.

In theory, a combination of green and red food coloring would have the same effect, but that setup would still be quite sensitive to ambient light.

So, that would be an idea for you. I suspect this would help quite a bit.
 
I suspect there are different kinds of these, however, the Sharp GP1A57HRJ00F I have says it emits 950 nm light, and the receptor is sensitive to 400 to 1200 nm.

I sourced my devices from a "real" shop and are all labeled 1A57HR SHARP 8Z. OK, I know that's no guarantee that they are genuine parts but I did my best? I've built two and both are behaving the same, I'm sharing the D1 Mini between the two BrewBubbles PCBs. With the type of lock I have I'm not sure if it covers the same amount of "the tube", but the transmitter/receiver whilst not pointing exactly in the middle of the tube it's not far off. Should I try more off centre? Thicker meniscus?

I've got a layer of carboard around the top of my FV covering the lock and then I've put a semi opaque plastic bag over that and it doesn't make any difference.

Staying in today now, will do the shopping for coloured dyes tomorrow. I was wondering if dissolved salts (not just table salt) would help, but I can't find any information on their absorption when disolved in water. I'll try some combinations see what works.


Chris
 
Well, Star San, food coloring and water - all are "beer-safe" just in case. I'd be uneasy with salts. I think the gels stand the best chance - but trying red + green coloring may get you there.
 
I think I may have a/the solution? A sliver of double sided tape, a sliver of carboard (could be something more robust for a long term solution) and a pin (likewise might need a drill bit)!

Make a small (very small) hole in the cardboard just above the IR Receiver. Stick the carboard so the hole ligns up and detects usual suspects, fingers, pins and pens. Fit the PCB back onto the lock and it seems to work, even under relatively strong artificial light.

Bubbles being counted just as the fermentation is slowing down. I'll have to confirm with the life left in the remaining yeast or wait for a few days and I'll get the next batch under way...

OK, so a bit more detail on materials: I used a corner of a cereal box for the cardbord. Double sided mounting tape. I used a Map Pin, one of the ones you can write on the head.

On the hole size. When I pushed the pin the whole way through it made no difference. Pushed just the point of the pin through and then turned it round and did the same from the other side. This worked, but was a little sensitive regarding placement.

I've also used a wide piece of elastic webbing to hold everything in place.

I'll do a few pictures in the daylight tomorrow!


Chris
 
Last edited:
I think I may have a/the solution? A sliver of double sided tape, a sliver of carboard (could be something more robust for a long term solution) and a pin (likewise might need a drill bit)!

Make a small (very small) hole in the cardboard just above the IR Receiver. Stick the carboard so the hole ligns up and detects usual suspects, fingers, pins and pens. Fit the PCB back onto the lock and it seems to work, even under relatively strong artificial light.

Bubbles being counted just as the fermentation is slowing down. I'll have to confirm with the life left in the remaining yeast or wait for a few days and I'll get the next batch under way...

OK, so a bit more detail on materials: I used a corner of a cereal box for the cardbord. Double sided mounting tape. I used a Map Pin, one of the ones you can write on the head.

On the hole size. When I pushed the pin the whole way through it made no difference. Pushed just the point of the pin through and then turned it round and did the same from the other side. This worked, but was a little sensitive regarding placement.

I've also used a wide piece of elastic webbing to hold everything in place.

I'll do a few pictures in the daylight tomorrow!


Chris

Yes pictures would be nice or maybe a small movie because I would love to see a working version in action :rock:
 
Last edited:
@LBussy I've just upgraded and all went well. One observation, I have one temperature probe connected and that's working OK, the unused channel is reporting a temperature of 0.06C, previous version reported 0C.

I'm getting a few more colour dyes/additives to try today as I'm now not counting any bubbles now, even though I have an opaque bag over the top of the fermentation lock.


This is the only type of lock that I have. As @wd16261 my sensor counts pens, paper, even counts being placed on and of the fermentation lock.

Chris
I've also noticed that when you switch from Fahrenheit to Celsius it doesn't show you directly the correct temperature in °C but it counts down slowly to the correct temperature (or it take the average).
 
Well, Star San, food coloring and water - all are "beer-safe" just in case. I'd be uneasy with salts. I think the gels stand the best chance - but trying red + green coloring may get you there.

Sorry I could find any green coloring in my shop so I can't test this.
 
@ChrisThomas You are great! But I think that I might have a must easier solution. I used a piece of black shrinking tube and made a very small hole in it and then slide it over one side and now finally it is counting bubbles! I made some small movies and this is a picture of my solution.
20200420_232209_resized.jpg

Without shrinking tube:
Working version with shrinking tube:
 
Or maybe just using some black tape with a very small hole can work as well. I will try this tomorrow.
And I used pure water in my test!
 
What you are doing there is creating a collimator - focusing the beam of light ("pinhole camera" style.) Glad it's working for you!
 
What you are doing there is creating a collimator - focusing the beam of light ("pinhole camera" style.) Glad it's working for you!
Yes a bit like the Nintendo Zapper gun did. Thanks to @ChrisThomas I got it working for me as well.
I was already thinking about giving up this project.
My next brew will be in a few days so I can't wait to see it in real action.
 
Back
Top