Bottling Tips for the Homebrewer

Homebrew Talk - Beer, Wine, Mead, & Cider Brewing Discussion Forum

Help Support Homebrew Talk - Beer, Wine, Mead, & Cider Brewing Discussion Forum:

This site may earn a commission from merchant affiliate links, including eBay, Amazon, and others.
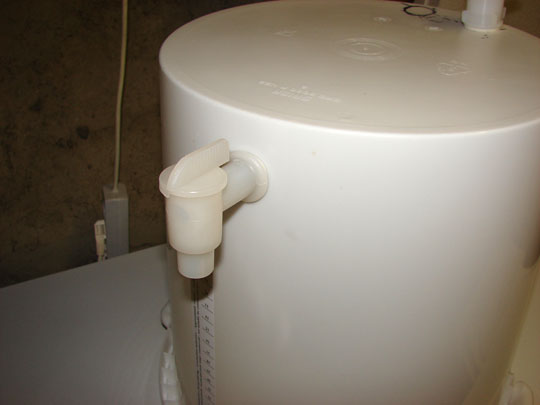
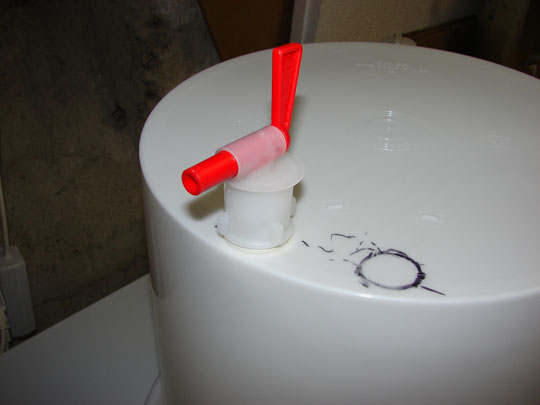
I will be using a bucket with a "spigot" and the dishwasher for the bottling of my first batch (such as the setup shown in the OP). But I had a question regarding racking from the fermenter to my bottling bucket...

I have read many a passage in books and on the internet warning not to shake/slosh/stir the beer around so as to not oxidize it. My concern is that I will be bottling in the kitchen, but will have to move my carboy to get it there (it will be fermenting in another room, obviously). Is this not a problem or do I just need to make sure I take care to not disturb it too much?
 
Be as careful as you can and wait about a half hour for things to re-settle. That is usually the first thing I do (move the fermenter to where I will be bottling) on bottling night or day
 
Sounds good. I have a feeling there will be a lot of "taking my time" and "being (too) careful" involved with this first batch.

Thanks for your help!
 
DIY dirty diptube/racking arm...

I was bottling a batch Monday night and my cpvc setup was out of commission... so I needed a solution.

Using a number 2 drilled rubber stopper, I cut a 6" piece of siphon tubing (3/8") ran it under hot water to make it malleable, and then pressed it into the drilled stopper... ran it under more hot water to "bend" the tubing so it would curve down. Immediately ran it under cold water once I had my desired shape. Inserted stopper/tubing diptube into the spigot opening, and presto, diptube!

At the end of bottling there was less than 3 ounces of fluid remaining.

I will try and get a pic later to add to this post.


...
 
Just thought I would add a few suggestions and an outline of my procedure... bottom line I can bottle a 5g batch including cleaning in 20-30 minutes.

Buy this:

bottlerinser.jpg


Search Results

Literally it will pay for itself... if you have not used one, I can understand where bottling might suck. I truly believe this is one of the best homebrew pieces of equipment I own.


Also buy this:

star-san.jpg

NORTHERN BREWER: Sanitation & Cleaning

You can mix up a batch of Starsan and keep it for extended periods of time. No rinse, no fuss, and (relatively) cheap if you don't just mix up 5 gallons all the time and dump. Additionally keep some in a cheap $1 Spray bottle to make it go further too.

Buy the above two pieces to go along with this:

SpringFiller.jpg

Bottle Filler: Search Results

Everyone has a bottle filler, but I truly believe the vinator and a no rinse sanitizer are just as necessary/mandatory to streamline the process

Combine those three things together along with the other tips in this thread Revvy started (most importantly the bottling bucket diptube/racking arm) and bottling is much easier. I am telling you, the vinator makes sanitizing a snap.

Here is my process:

First, all my bottles are already rinsed/cleaned right after pouring. Time saver #1. On bottling day my bottling bucket is on the counter above the dishwasher with the dishwasher door down, my chair is at the front of the dishwasher door, my bottle tree with vinator on top directly next to the dishwasher on the right hand side, and I line up a case of 20 .5l german flip-top bottles (one case of 20= 2.5 gallons) at a time right next to my chair.

(missing from the pick is bottle tree with vinator on top)
SANY0376.JPG


The actual process goes like this: pop the tops on all the bottles. Grab one bottle, sanitize it, and place it under bottle filler; open spigot, start to fill while holding bottle in left hand. With right hand grab new bottle and sanitize. Place sanitized empty bottle on dishwasher door. Start holding bottle being filled with right hand. Once the bottle is filled I remove the filled bottle and immediately using my left hand place the empty sanitized bottle in place and begin filling. I do not lose one drop. While the one is being filled I secure the flip-top onto the filled bottle with my right hand, and place it right back into the case. The process starts over with grabbing an empty bottle, sanitizing, etc... I can bottle a case of 20 bottles in under 6 minutes with ease all by myself. With cleaning figure a total of 20-30 minutes.

I tried kegging, and still might do it for larger batches, but the time for me to transfer from into a keg, and then clean-up was not not significantly faster (2-3 minutes tops).

Just my suggestions, my process, and my way of doing things.... maybe it will help someone out.

PS. I also can do this without flip-tops and that does add about another 5-10 minutes to the process.


...
 
This is all just awesome info. I've been bottling for years and just had a few "why the heck didn't I think of that" moments. I think the most informative part of homebrewing is watching other people brew, man I learn a lot.

I still need a Vinator, but so far a rubber tub of Star San has worked so well. Do you just fill it will Star San solution and just pump it into one bottle at a time? Don't the bottles need some contact time with the Star San or is that quick blast enough?
 
Yes, I just fill the Vinator with starsan and you sanitize one bottle at a time; it pumps the bottle with a quick blast which coats all of the interior surface. I also dip the "head" of the bottle into the solution to sanitize the flip-top. I believe recommended contact time is 30 seconds, and I normally am one or two bottles sanitized "ahead" of filling, so contact time is easily met... I have never had any issues.
 
Originally Posted by cyberbackpacker:
.....I was bottling a batch Monday night and my cpvc setup was out of commission.....
Out of commission? How so? I was thinking of putting that cpvc tidbit together after seeing your setup.

Nothing functional, I just mistakenly used the threaded cpvc part to attach a spigot in one of my fermenters because I could not find the regular nut, so it was not able to be used in the bottling bucket.
 
Nothing functional, I just mistakenly used the threaded cpvc part to attach a spigot in one of my fermenters because I could not find the regular nut, so it was not able to be used in the bottling bucket.

Ah ok cool I shall be picking those pieces up to test it out soon.
 
Many thanks to Revvy for the tips and the label template. I poached the template today to make up a few labels to give some bottles away. Actually, I rebuilt it in PowerPoint, because I find that much easier than Word when working with graphics. Unfortunately, I cannot upload it here, but if anyone is interested then let me know.
 
I don't label unless I'm giving bottles away as gifts, then I don't use traditional labels, I bottle hanging tags. I designed the template and it is freely available online. Thanks to Morotorium

After looking all day for hanging tags templates for bottles, I made up one of my own as a MS word Document.

Bottle%20tags.jpg


Each tag is approx 2 inches wide, and the text area after the fold is about 5 inches.


I don't like to glue labels on, especially since I spend so much time removing them (Although some folks swear by milk as label glue). So I like the idea of a hanging tag that slips over the neck of the bottle and hangs there. I printed it out on thick photopaper. All you need to do is cut them out, cut out the hole for the neck (or just make 2 slits at the cross) and fold it downword.

You just basically need to stick a graphic in each space, and add your own text to the text blocks...Or move stuff around and add your own text boxes wherever you want it.

Here's the links from MoRoToRiUm
Sample

Template

When I bottle I just write on the bottlecap with a sharpie a letter code for the name of the beer I brewed. For Example, Old Bog Road (my brown ale) is simply OBR...If I have multiple batches of the same beer going at the same time, I will add a letter code as well.

Again, there are plenty of ways to do just about every aspect of brewing, and the trick is to make it work for you. This is a hobby, not something to do battle with. Even something that some people consider a pain, such as bottling can become as effortless as you choose to make it. All it takes it experimentation; trying something new until it works for you.

:mug:

I like these. I's probably not do it for every batch, but for certain ones, it lends an air of elegance. Like you say, it's a hobby and things like doing up your own labels can be fun and rewarding and can make your beer appear more professional (or less, as the case may be...) to those who don't understand "homebrew" like we all do.
 
Great idea BrianP seems like an easy way to go on the diptube.

I put the bottling bucket on top of my fridge and hang the filler off the side. I prefer standing and I can rest my hand against the fridge as I fill my bottles.
 
I have one tip for bottlers... buy some kegs.:D

while kegging i'm sure is easier.. my two best beer drinking buddies have the bakyard pools.. so many of the summers activities are not at my house.. I wouldn't want to hassle with transporting kegs.. bottles are great for that.
 
I read a bottling tip on the forum somewhere but I can't seem to find it...
It described racking to the bottling bucket the day before bottling to allow for the sediment to settle.
It makes sense but what I need to know is : I assume the carbonating sugar must be added immediately before bottling, if it was added the day before alot of the carbonation would be lost. If its added just before bottling it needs to be stirred which disturbs the sediment making the days wait pointless.
What am I missing ?
Im going to bottling my first AG on Saterday.

That's NOT a good tip, and if it was on this forum it probably was shot down immediately. You open your beer up to both infection and oxydation.

If you are racking off a beer that has spent any length of time in either a long primary or a secondary, then the majority of the sediment HAS ALREADY settled. Anything else, such as the sediment kicked up from lifting your carboy/or bucket onto the table prior to racking will fall back down quickly. And again you are racking off any sediment.

With bottling it is best to begin and finish in one session.

And using tips like the ones in here you should be able to get it done in under an hour.
 
Revvy, thanks for all the great stuff you contribute on here. This thread inspired me for my own process. While it's not the same, the initial inspiration of a nice, simple bottling process came from this thread.

I liked the idea of the elbow you use to get all the liquid. But I was just far too lazy to deal with it. Sure I guess it's not a lot of effort, but for me, what I did was easier because I already had everything I needed in my apartment.

When I bought this:

DSC05117_540.jpg


it had a leftover spigot. This is actually a fermenter that is intended for making sauer kraut, which tons of people do here. So, it had a spigot but no hole cut. Anyway, I used that spigot to plug up the hole on the side of the plastic fermenter I bought to use as a bottling bucket, like so:

DSC05418_540.jpg


I then had my wife, who has much steadier hands than I do, cut a hole in the bottom of the bucket and put the spigot for this bucket in that hole. Like so:

DSC05419_540.jpg


But the spigot had a larger section for the threaded part than I needed, which would have led to more wasted beer, so I sawed off a decent little section to get it lower.

DSC05426_540.jpg


I will then attach a short section of hose to the spigot and then the bottling tube. That bottling tube couldn't be put straight in there like Revvy's system, as it's horizontal. But a short section of tubing does the trick.

Setting the bucket on the edge of a table with the spigot hanging off does the trick:

DSC05422_540.jpg


Angling the bucket a little bit, this is what the bottom of the bucket looks like after my initial test with water, after pouring as much liquid out through the spigot as I can.

DSC05424_540.jpg


Pouring the remnants out of the bucket, this is the "waste" liquid. So, I should lose something less than 2 ounces during this process.

DSC05425_540.jpg


Anyway, I'll be bottling my 91st batch on Saturday, but it's my first batch here in Croatia, my first batch in 7 years, and probably the first batch I've bottled in 10 or more years as I was kegging before in Portland.

Revvy, thanks again for the inspiration.
 
I'm 1 week into fermentation on my first homebrew attempt (dunkelweizen). I am very limited on storage space so I have been trying to figure out the best way to brew without a secondary and without a bottling bucket.

My plan is to add the priming solution (8 oz table sugar boiled into 2 cups water) into the primary (6 gal better bottle) with the trub still in place. Then very carefully give it a slow stir to mix in the priming solution without disturbing the trub too much.

I will push a racking tube through the sanitary siphon lid and adjust the height to just above the level of the trub. Then connect a length of flexible tube and the gravity filler wand. Then start the siphon by blowing into sanitary filter to rack into 17 oz bottles. I'd like to try Revvy's tip of letting the caps sit loosely for a few minutes to push the O2 out that makes great sense.

This all seems similar to Rein's method in post #155 page 16. Is there any obvious reason this might not work? TIA
 
I put all my sanitized bottle upside down in the dishwasher. Here's a timelapse of our process.

 
Last edited by a moderator:
I added Revvy's dip tube and it works great, with one added trick:

With the dip tube, I get a little pocket of air at top-dead-center of my spigot body. I have to rotate the spigot and bottling wand up and depress the filler valve to get the little air pocket out, then rotate it back down for bottling. Not a huge deal, but the first time I bottled with the dip tube, I kept getting bubbles. The dip tube works great, though.

Since we're on the topic of bottling, for carbing, I highly recommend a water bath with an aquarium heater and small water pump for circulation. I live in a cold house in New England and ever since I've gone this route, I get fully carbed beer in just over a week (but I let it go for three, just for good measure).

A lot of excellent ideas in this thread, by the way. Thanks to everyone!
 
Since we're on the topic of bottling, for carbing, I highly recommend a water bath with an aquarium heater and small water pump for circulation. I live in a cold house in New England and ever since I've gone this route, I get fully carbed beer in just over a week (but I let it go for three, just for good measure).

A small word of warning on that: RUST.

I conditioned my first two batches in a water bath, and both came out with rust from the caps that took a good long soak in oxiclean to remove. ;/

Now that I put a window A/C unit in the bedroom, I just condition in there.
 
A small word of warning on that: RUST.

Yes! I had the same experience with my first water bath. (It didn't affect the beer, though.) Now I keep my water level around the shoulder of a 12oz bottle. I also add a splash of bleach to keep things April-fresh.

One slight difficulty is getting the darn bottles to stand up straight. They tend to want to float just a bit (or at least be more bouyant than when in air). Couple that with my rubbermaid tub, which does not have a flat bottom, and I have to simultaneously try to align/balance fifty beers. This is very amusing to anyone watching.
 
Then the boxes go into a dark warm closet and I forget them for the next 3 weeks, trusting that they will be approaching drinkability and an adequate carbonation level by then.[/b]

Revvy, you store your bottles in a "warm" closet? I always thought they were supposed to be kept somewhat cool.
:confused:
 
I added Revvy's dip tube and it works great, with one added trick:

With the dip tube, I get a little pocket of air at top-dead-center of my spigot body. I have to rotate the spigot and bottling wand up and depress the filler valve to get the little air pocket out, then rotate it back down for bottling. Not a huge deal, but the first time I bottled with the dip tube, I kept getting bubbles. The dip tube works great, though.

THANK YOU FOR THIS TIP!!! I have been using the dip tube (90° pvc elbow) for many batches now and I always got an air pocket like you mentioned that created some bubbles. I saw your post and tried it last weekend and it worked wonderfully - no more bubbles!
 
Revvy speaks the truth. Listen to the preacher-man.

I always pop a couple bottles early. Truth be told I allow them plenty of conditioning time before bottling so they're never terribly green at this point and thus drinkable, but even at two weeks they're always, always, always flat. Tiny hiss when you open them, a little bit of foam on top, couple of promising champagney bubbles inside the beer, but overall disappointingly carbonated. The earliest I've seen even minimal "real beer" carbonation is 19 days.
 
In preparation for my first time bottling, I have read alot of info.
This thread has invaluable.
Looking at the spigot, without purging, it is inevitable to have an air pocket.
The liquid flows through a small oval opening in the bottom most part of the spigot.
Without purging this somehow, there will be an air pocket.

Thanks Revvy for these tips, as I am sure I am more prepared to bottle now.
 
Any recommendation for a target bottling temperature? Mostly I ask as I have an Oktoberfest sitting at about 34 degrees in my fermentation cabinet atm. As this is my first lager I thought I would ask. All previous batches have been bottled at around 70 F.
 
Any recommendation for a target bottling temperature? Mostly I ask as I have an Oktoberfest sitting at about 34 degrees in my fermentation cabinet atm. As this is my first lager I thought I would ask. All previous batches have been bottled at around 70 F.

You mean temp to carbonate you bottles at?

Whether it's an ale or a lager the same rules for carbonation apply. You can't get much carbonation until the beer spends a minimum 3 weeks @ 70 degrees.

However you choose to lager or is irrelevant to getting carbonation. You can make ales, you can lager, you can cold crash your ale, you can secondary, not secondary, long primary, but come bottling day all that really doesn't matter too much to the rules regarding carbonation. The beer sitting their waiting for priming sugar is all the same.

They may affect bottle conditioning but you still need warm temps to get carbonation happening.
 
You mean temp to carbonate you bottles at?

No, I mean the temp of the beer at the time of bottling when the priming solution is introduced. Would you, for example, let a lager warm up to roughly room temperature prior to introducing the priming solution and bottling? Or does it really matter? I realize yeast activity will not begin until the yeasties are happy with the temp of the medium.
 
Back
Top