• Please visit and share your knowledge at our sister communities:
  • If you have not, please join our official Homebrewing Facebook Group!

    Homebrewing Facebook Group

Boil kettle condenser - no overhead ventilation needed

Homebrew Talk

Help Support Homebrew Talk:

This site may earn a commission from merchant affiliate links, including eBay, Amazon, and others.
That's a big difference and explains the 13 gallons of waste water you had (although the steam should add to the volume too... so maybe 12.3 is spray and 0.7 is boil-off). 60 psi is nice. Higher pressure is better as you create finer particles to more efficiently convert the steam. I think you can try the 6, but I would wait on trying one smaller than that.

I just ordered both nozzles but will use the 6 on my next batch.
 
I read MOST of this thread so forgive me if i missed the answer to my question. Has it been determined that DMS not an issue?
 
We can’t say for sure yet! Only a couple of beers made so far. Per above, my test beer was a multi-variable experiment so nothing came from it. Got one in the fermenter but screwed that up to per above! More tests from more users soon hopefully.
 
Thanks for the compliment.......I do not see a problem. I also do 10 gallon batches. I have a 1.5" tri blank cap in case I have to mash some massive beer. Once the basket is out I can connect the condenser for boil.

That's what I was thinking. I'm going to order the parts to build the same one you did and give it a try. I'm interested to hear how you make out with the hop basket. Keep us posted.
 
I read MOST of this thread so forgive me if i missed the answer to my question. Has it been determined that DMS not an issue?

I do not think the DMS will be a problem. If you leave the lid on with all grain brewing you will get DMS. DMS exits at 99 degrees. Yes the lid is on but we ARE venting the steam with a vigorous boil. Look at the kettles in any brewery. They are all covered and have some sort of vent system, some active and some passive. I was in a brew pub in Dayton Ohio the other day and the venting was a passive vent out of the top, that was it. Ultimately the proof will be in the finished beer and I cannot wait to taste the one in the fermenter. Standby.........
 
Last edited:
I just put the pressure meter on my house....60 PSI. I am going to order the 6.32 and 3.16 to experiment with. I wish they had a spec for other water pressures.

It’s not exact but you can approximate by using a flow coefficient (Cv). Cv=GPM/sqrt(dP). For the 6 gph version at 40 psi: 6 gph=0.1 gpm, 40 psi is the pressure drop at that flow since it discharges at atmospheric pressure. So Cv=0.1/sqrt(40)—>Cv=.0158. Then if you apply your house pressure to that nozzle: GPM=Cv*sqrt(dP)=0.0158*sqrt(60)=0.1225gpm=7.35 gph.

Looking forward to the results of the experiments. This is really cool!

Thanks for the formula. Here is what I calculated for the 3 nozzles at 60 psi

3.16 gph nozzle will actually be at 3.87 at my pressure
6.32 gph nozzle will actually be at 7.74 at my pressure
9.49 gph nozzle will actually be at 11.62 at my pressure

It looks like the 6.32 will be my best bet. I could always add a pressure gauge to tweak.
 
Hopefully I didn't miss this being discussed already, but is the proximity of the spray nozzle to the steam source(kettle) important? Or, to ask in another way, other than the extra $$ for more stainless plumbing, what do you guys think of having this setup mounted a few feet away from the BK, like down on the lower level of a brew stand to get it out of the way/have a permanent mount location, and using a longer pipe to connect to the kettle?
 
Last edited:
I don’t know if that will work. Probably would if you seal the kettle lid. Steam is hot and wants to rise. The sprayer does not create much of a Venturi effect and that is not the goal. The vacuum is theoretically created by the steam getting cooled and volumetrically shrinking. So, conceptually speaking, it could work as long as there is motivation for the steam to get to the sprayer location.
 
I don’t know if that will work. Probably would if you seal the kettle lid. Steam is hot and wants to rise. The sprayer does not create much of a Venturi effect and that is not the goal. The vacuum is theoretically created by the steam getting cooled and volumetrically shrinking. So, conceptually speaking, it could work as long as there is motivation for the steam to get to the sprayer location.

I have a somewhat hairbrained idea of using a keg with the top uncut, connecting a tc to the top with an instrument t. Cap on the top for hop additions, steam out the side of the T... But there's a lot of other issues to consider so the easiest thing is likely to copy your setup with a normal, top cut out keggle. Since it's a keggle and I usually do 5 gal with the occasional 10 gal batch, there's plenty of room for a side port at the top, and I wouldn't really *need* to vent out the top, was just wondering.
 
Did you order a 1.5 blank cap just in case for a large grain bill mash in?

Yeah. I also ordered 3,6 and 9 gph nozzles because I can't resist experimenting and trying to use as little water as possible. Also got a 1.5" nipple, I think you said to use that length if going with 1.5" tri clamp version.
 
That is 100% correct. Get a good drill bit to drill your pilot hole. That SS puts up a fight. Use cutting oil on the hole saw. Lots of pressure and low RPM.
 
That is 100% correct. Get a good drill bit to drill your pilot hole. That SS puts up a fight. Use cutting oil on the hole saw. Lots of pressure and low RPM.

I'm a little concerned about drilling the hole in the kettle. I bought the 42 mm drill bit from SS Brewtech so hopefully everything goes smoothly. Did you have any issues with the 1.5" weldless bulkhead sealing against the kettle wall? SS Brewtech mentioned a lot about using the fitting on a flat surface like a kettle lid but not much else.
 
The pilot hole is the key. Measure twice drill once! The fitting seats really well. It has a nice O ring. When you install it, the 42 mm hole has a little wiggle room. Make sure the fitting is centered up and hand tighten the nut. Then put a tri clamp fitting in the outside to help hold it while you tighten the nut. I used a pair of channel locks.
 
Thanks for the formula. Here is what I calculated for the 3 nozzles at 60 psi

3.16 gph nozzle will actually be at 3.87 at my pressure
6.32 gph nozzle will actually be at 7.74 at my pressure
9.49 gph nozzle will actually be at 11.62 at my pressure

It looks like the 6.32 will be my best bet. I could always add a pressure gauge to tweak.

No problem. Those all look right. Especially since you used the right flow rates. :D
 
Maybe I missed this, but are you using 1.5 or 2" tc for the port out of the kettle? Looking at the comments, it appears 1.5, just wondering. I may look into doing this on mine. I know the results aren't in conclusively, but I can't imagine any difference with this vs. a standard boil for dms elimination.
 
Thanks for the link. More validation. That study was with no venting at all. I was about to design a hood setup when I stumbled upon Bundogs thread. This will make inside brewing a reality and save a lot of money in the process. Plus no loud vent hood!!
 
Thanks for the link. More validation. That study was with no venting at all. I was about to design a hood setup when I stumbled upon Bundogs thread. This will make inside brewing a reality and save a lot of money in the process. Plus no loud vent hood!!

I agree! I was really struggling to come up with a ventilation solution for the area in my basement where I'll be brewing. I'm actually brewing my last batch out in the garage today. I may still install a small fan in the basement just to help with odors, but I'm not really worried about it. Now all I have to do is drill the hole in the kettle without screwing up.
 
This system is also great for people like myself that don't have a dedicated brew space. I can brew in the kitchen, laundry room, or bathroom without really worrying about all the wood trim etc getting mildew or mold or any other potential water/steam damage. The linked dms experiments are also pretty interesting, but to be honest, moisture/steam control is my biggest concern
 
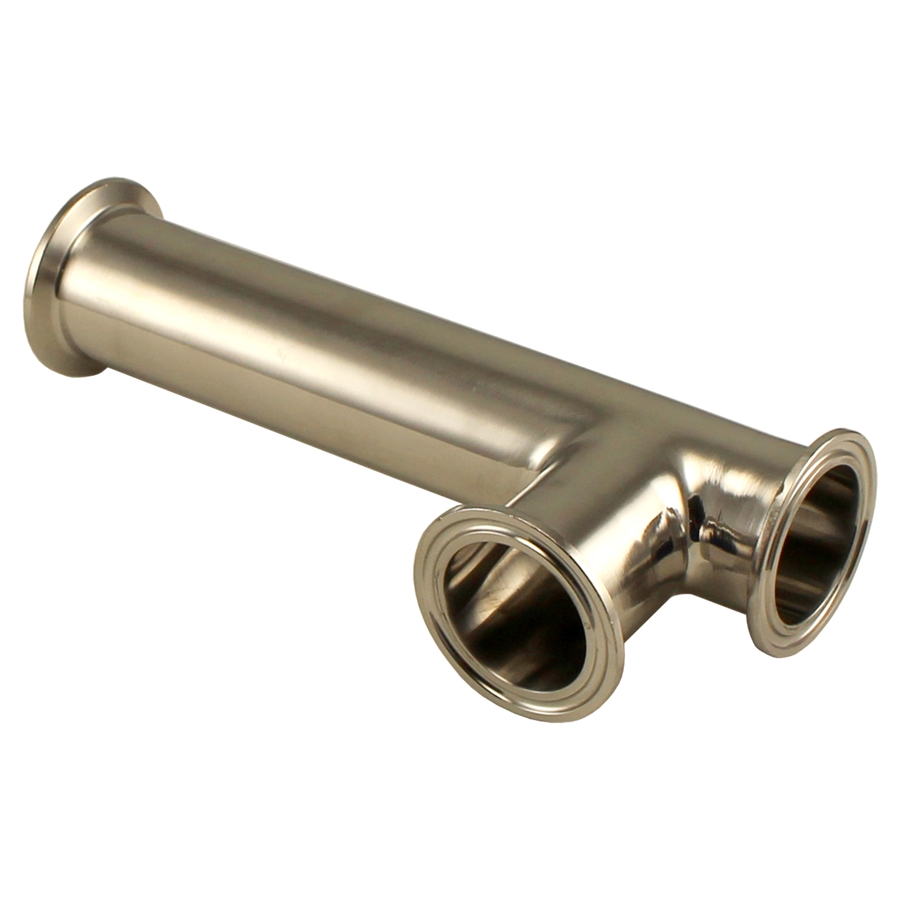
Does anyone know if the actual port dimensional specification of the TC tee makes any difference to the efficiency of the condenser? I'm not referring to sizing of the TC tee (1-1/2" vs 2") but rather the distance between input from the kettle (steam) and the spray inlet and waste water output ports. Here are a couple of pics of what I'm referring too. As you can see the RIMS tube has a longer drop on it vs the instrument tee.
tc-rims-tube-.jpg
ss-1.5TC-instrument-tee.jpg
 
Steam naturally goes up, if I have a spare RIMS tube, and would like to use it for this configuration, I would put nozzle on the long side.
 
Does anyone know if the actual port dimensional specification of the TC tee makes any difference to the efficiency of the condenser? I'm not referring to sizing of the TC tee (1-1/2" vs 2") but rather the distance between input from the kettle (steam) and the spray inlet and waste water output ports. Here are a couple of pics of what I'm referring too. As you can see the RIMS tube has a longer drop on it vs the instrument tee.
View attachment 550356 View attachment 550357
I would be fairly confident that a longer down tube will help, but I also believe the results will be negligible. Can probably get away with a lower volume sprayer, but to me, that's a moot point. Within the thread, they're between a 6 and a 9gph, I'm not overly concerned about 3-5 gallons.

That said...

Where is that rims tube from? I was piecing this setup together last night and noticed with a couple more parts, you'd also have a nice E-RIMS setup for mash. Haven't figured out a way to use the tc flange on the kettle for return yet, but have the rest worked out.

Don't think I'll be able to use the kettle port, as I BIAB, but someone who doesn't could probably use a TC cap on the kettle with a full coupling in it (I believe brewhardware has these) and run a pipe/manifold from the inside to the mash. Then something threaded into the other side to go to the "out" from the RIMS.

For the rims, you'd add a TC element from brewhardware and likely a 12-18" tc sanitary 1.5 spool to allow for the element (don't think the Tre is long wnough, but the one you posted may be).

Take the barb that was on the bottom as the drain and place in the side as the new inlet for the RIMS, replace the top with a 1/2 male npt tc cap and put a 1/2 NPT tee on that run the perpendicular port on that tee as a temp probe and the final open port with whatever connection you prefer as the out to mash port(cam lock in my case)

A few extra parts, but other than the element, probably only about 50 bucks to be able to switch easily between RIMS and condense.


*Edit to add that the steam/condensing portion of the process would probably clean up the RIMS pretty well too.
 
Last edited:
Two comments:
1. There may be a big difference between 6 and 9 gosh sprayers. When I did the math, the calculations yielded a need for approx 7 gph. But that assumed that the boil-off rate would remain the same. It is not because the contained heat requires the power to be brought down and reduces the boil-off rate. So 6 is probably the right number for a typical 15-20 gal boil kettle powered by a 5500W element.

2. The RIMs tube shown is from a typical kit that some vendors like Brewers Hardware sell.
 

Latest posts

Back
Top