Boil kettle condenser - no overhead ventilation needed

Homebrew Talk - Beer, Wine, Mead, & Cider Brewing Discussion Forum

Help Support Homebrew Talk - Beer, Wine, Mead, & Cider Brewing Discussion Forum:

This site may earn a commission from merchant affiliate links, including eBay, Amazon, and others.
I do not believe you will find a technical downside to the 2", rather, after reading @BrunDog 's posts, there appears to be a technical upside to it. The physical size of the 2" system is not an issue either. If you would like a picture of my BK with the 2" system, let me know and I will take a picture of it and upload it when I get home.
That would be terrific, and much appreciated!
 
What is the material of the waste water bucket? Maybe it is an odd-sourced bucket made from a material which is off-gassing something foul when filled with near-boiling water? Just trying to find something that might explain this unique situation...

It was an HDPE bucket fermenter. Waste water wasn’t that hot. 110-120 tops.
 
@Gozie Boy , here are some pictures that will give you some perspective and hopefully are helpful. As you will see, I have a brass quick disconnect to the unit that I attach my hose to.
 

Attachments

  • image.jpeg
    image.jpeg
    912.8 KB · Views: 558
  • image.jpeg
    image.jpeg
    698.4 KB · Views: 525
  • image.jpeg
    image.jpeg
    658.2 KB · Views: 519
  • image.jpeg
    image.jpeg
    605.1 KB · Views: 522
  • image.jpeg
    image.jpeg
    742.3 KB · Views: 519
  • image.jpeg
    image.jpeg
    646.4 KB · Views: 516
I have Spike's 20 gal BK as well and had them put in a 2" TC port. The cost is the same regardless the size. When I bought the parts from using @BrunDog 's parts list that was posted earlier in this thread, I didn't see much cost difference between the 1.5" and 2" systems.

Below you can see pricing between a 2" TC tee vs a 1.5" TC tee to only be $6. By reading this thread, others appear to have success with the 1.5" system. With that said, I chose the 2" system as I know there will be enough spray pattern, volume and wall space in the tee. For me, I didn't care about saving a few dollars on the 1.5" system nor did I want any regrets. Good luck with your decision!

https://www.brewershardware.com/2-Tri-Clover-Clamp-Tee-TC20TEE.html

https://www.brewershardware.com/1_5-Tri-Clover-Clamp-Tee.html
As I have posted several times, including a quote a few posts back, I have been extremely happy with the 1.5" TC on my 20 gallon Spike kettle. I recall the reason I went with 1.5" was that I couldn't find a 2" instrument tee in stock at the time I was building my DIY system (and also maybe the weldless TC port). Obviously, the cost of the 2" is slightly higher for all the parts, so it's considerably more than the $6 referenced (maybe 20-25%, but don't hold me to that). Also, note that the links are for standard tees, NOT instrument tees, so they would protrude further from the kettle wall.
I can't visualize a technical downside of going with 2", unless I am not seeing something (which does happen, which is part of the reason why I asked!).
There's no technical downside to larger other than size and weight. If you're going to have Spike put in the condenser port like @CodeSection, and there's no cost impact for 2 vs 1.5, then I'd probably also go with 2 unless you prefer to buy the kit from Bobby, which I think is only available in 1.5.
 
...Also, note that the links are for standard tees, NOT instrument tees, so they would protrude further from the kettle wall.
There's no technical downside to larger other than size and weight. If you're going to have Spike put in the condenser port like @CodeSection, and there's no cost impact for 2 vs 1.5, then I'd probably also go with 2 ...

@cbier60 , thanks for pointing out the wrong link. Here is the correct link and the instrument tee I bought. It is the same price..$25.

https://www.brewershardware.com/2-Tri-Clover-Clamp-Instrument-Tee.html

I believe and have experienced the cost of a 2" system with the parts @BrunDog has given does not increase the cost 20-25% over a 1.5" system. The increase cost of a 2" tri clamp is only $1. Multiply that by 3, you have $3. The 2" barb costs $2 more then on the 1.5". Gasket cost is the same with either size. Spray nozzles with either size are the same cost.

I'm sure you are correct that the 2" weighs more. I'm not sure when dealing with a kettle weighing around 35 lbs not including wort, that an extra few ounces makes a difference.

I spoke with Bobby way back when I was buying parts. I wanted to buy from him since he has been helpful on HBT. At that time he had not made anything for himself and had not thought of commercializing it. I wish him well.

Since you brought it up, there are differences between @BrunDog 's parts list and Bobby's model. As you mentioned, the size difference. I believe there are posts suggesting why 2" has an advantage. Then there are differences in the material used in the parts. Mine has no plastic parts and as @BrunDog has pointed out several times why it shouldn't, mine does not have a valve to reduce water flow.

Again @cbier60 , thank you for pointing out the wrong link.
 
I'm building a new electric brewery and just saw this thread. I'm hoping it will save me some money and get me up and running faster.

I happen to have a bathroom fan mounted in my brew room right over where the kettles will go because the builder wouldn't install the vent hood for me but was willing to do a standard fan with a 7" vent. I'm guessing with the condenser plus the bathroom vent I should be 100% good and this would really negate any need for a hood?

Yeah, you really don't need any extra ventilation with the condenser. You only get a little puff of steam when you take the lid off for hop additions and stuff.
 
For hop additions you can put a tube section in the lid with a butterfly valve and a cap. Preload your addition, cap it, open the valve when ready. Close and then reload. Ripe for automation too.
 
For hop additions you can put a tube section in the lid with a butterfly valve and a cap. Preload your addition, cap it, open the valve when ready. Close and then reload. Ripe for automation too.
lol, that was my suggestion earlier. Didnt think anyone would actually consider it!
 
Thanks all! I've followed this thread for a few months, and very much appreciate the timely feedback to my query! Most importantly, the thermodynamics works and works well -- in theory and in practice with these small scale "process plants"! I was well into my planning for my electric brewery build when I ran into the ventilation dilemma. In my situation, a proper vent hood, fan, duct work and roof vent could easily run $1500 - $2000, and I would end up with a new roof vent where I really didn't want one. There are certainly a few "economical" solutions around this, but that would have compromised my objective. So Brundog's concept was seen as a potentially BRILLIANT and game changing solution to my (and others') situation!

In this context, the cost delta between 1.5" and 2" is almost trivial, and I was much more interested in confirming (now that there have been some learning curves) whether there was a meaningful performance difference in the 1.5" and 2" systems. I am also blessed with a very high quality, high pressure, cool, plentiful, and low cost water supply (hurray!). So there is no tangible cost or environmental difference in using 6 gph or 15, although I appreciate that this may not be the case for everyone. I was happy to go with a 2" system, if there were no downsides other than cost, if for nothing more than peace of mind and added flexibility if ever needed. From the anecdotal evidence, it appears that 1.5" probably handles most needs quite well, although some have expressed added comfort with the larger system.

So now it's time to forge ahead, stop thinking/planning and start acting. I'll be building around the 2" design for my 20 gal BK rig, and will be delighted to report back with my experiences and results.

The community's ingenuity, and generosity to help others (who they may not even know), is very impressive and most appreciated, especially by those of us lacking some of that ingenuity! Thanks again.
 
@Gozie Boy , here are some pictures that will give you some perspective and hopefully are helpful. As you will see, I have a brass quick disconnect to the unit that I attach my hose to.
Special thanks to you, CodeSection, for your time and effort to take and post these pics, which was helpful to get some more sizing perspectives of the 2" condenser. Very nice looking set up! I'm curious as to what you use the lower left and lower right ports for on this kettle. One is certainly for whirlpooling, but the other? Still learning all I can...
 
@Gozie Boy , you are correct in one of them being for whirlpooling. The ports are in the shape of a "V". The valve in the upper right is for whirlpooling. The upper left is where I have a thermometer. Even though I am using a temperature probe with my Auber controller, I wanted a backup in case the probe ever failed. Lastly, I had those two upper ports at that level in case in the future I ever wanted to brew a five gallon batch.

Here are some pictures along with a copy of my SB's custom template. Hopefully, this helps.
 

Attachments

  • BK with added  2 inch TC.png
    BK with added 2 inch TC.png
    144 KB · Views: 358
  • IMG_1338.jpg
    IMG_1338.jpg
    73 KB · Views: 365
  • IMG_1339.jpg
    IMG_1339.jpg
    59.3 KB · Views: 367
  • IMG_1340.jpg
    IMG_1340.jpg
    59.8 KB · Views: 364
@Gozie Boy , you are correct in one of them being for whirlpooling. The ports are in the shape of a "V". The valve in the upper right is for whirlpooling. The upper left is where I have a thermometer. Even though I am using a temperature probe with my Auber controller, I wanted a backup in case the probe ever failed. Lastly, I had those two upper ports at that level in case in the future I ever wanted to brew a five gallon batch.

Here are some pictures along with a copy of my SB's custom template. Hopefully, this helps.
Thanks again! Couldn't see the thermo in your earlier pics.
 
Got my new 15 Gallon SS Brewtech Kettle earlier this week and decked it out with a bunch of goodies from Bobby, namely the steam slayer on the lid (using the weldless triclamp bulkhead). Planning on doing a wet run either tomorrow night or Saturday night to make sure everything is tightened properly and test out the steam slayer then brew my first 10 gallon batch the following day.

I got into electric brewing last year with my Avantco 3500 induction plate. I liked the experience of brewing indoors: 1. Don’t have to wait for a nice day; 2. Can multitask around the house while I’m waiting for strike water to heat; 3. Don’t have to worry about a dog running around a propane burner. The one thing that killed me was the humidity. I only have one 240v outlet in my house (for the dryer) and don’t have space in the breaker box to add more. Even running the bathroom exhaust fan next to the laundry room and blowing as much air as possible into the garage with the garage doors open the walls just had significant moisture build up on them. This should fix that problem. Planning to run the waste water right to a utility sink. Also based on the power reduction; the 3500w induction plate should be able to handle 10 gallon batches without me having to insulate or add a supplemental heat source.

Thanks to BrunDog for the great idea and Bobby for the great products. I’m looking forward to testing this out.

4543551C-2C7C-4766-A88F-BF4B48B519F2.jpeg
 
I just brewed another 10 gallon batch except this time with the 6 gph nozzle. The exit water was a lot hotter(205 degrees vs 160 degrees) and produces more steam in the sink. Boil off was close to the same so I may switch back to the 9 gph nozzle
Definitely use the 9.
Edit. Duh, I didnt see the age of this post.
 
Last edited:
Definitely use the 9.
Edit. Duh, I didnt see the age of this post.
Hi Bobby. Thanks again for putting these condensers together. Mine should be here next week. I ordered the 6 after reading some experiences. Is there a way I can order a 9 sprayer to switch it out? Is that possible? Thanks for any answers.
 
Hi Bobby. Thanks again for putting these condensers together. Mine should be here next week. I ordered the 6 after reading some experiences. Is there a way I can order a 9 sprayer to switch it out? Is that possible? Thanks for any answers.

I just ordered the 3178K77 part from McMaster-Carr
 
Welp, looks like I’ll be busy for a few days!

View attachment 593510
Nice, looks like they have pretty good turnaround!

I placed an order yesterday for 2 custom 30gal kettles as well as 2 15gal unitanks. The sales rep said if it didn't ship within a week she'd give me an update!

Pretty excited!

Oh and my steam slayer and 2 riptides pumps, amongst other things, is scheduled to arrive Monday. I'm looking forward to building my new brewery.
 
I was finally able to brew yesterday using BobbyM's steam slayer, a complete brew, not a test.

Those above who noted issues with "too hot" wastewater would be addressed by reducing the vigor of the boil were right--I had the element powered at 28 percent of max, and the wastewater is actually pretty mild in temp. Very, very little steam from it.

In fact, the water is so cool that I think I can figure a way to drain it directly into the trap pipes under my sink--though capturing some of it for cleaning is something I probably will also do.

I also ended up using just about 10 gallons for a 1-hour boil--certainly in line with the 9 gph rating of the spray fitting. I was running both an RO filter and the spray fitting off the same water line, so I am sure the pressure was less than it otherwise would have been.

All in all--very pleased how this worked. I'm set up to be able to brew in the garage in the dead of winter, and I don't need ventilation to do it.
 
My brew day is going terrific so far. I’ve also been able to boil with the garage door closed! I’ve got the 6 gph model for my 15 gallon system. I purchased a 9 gph spray head in case I needed it. With my unknown water pressure the 6 is enough! I filled a brew bucket and a half of run off. Watered the trees with it.

Thanks everyone for all the advice and such. Especially to @Bobby_M for awesome hardware and @BrunDog for your expertise.

Cheers y’all!

Here’s the brew day with my own NEIPA recipe.
7CC48AFA-37BB-42AE-8067-117692B210AB.jpeg
 
Last edited:
I see that Brundog and others have all used misting nozzles (ca 6 or 9 gph nominal rates). I am wondering whether anyone has tried the fogging nozzle design? The key parameters for heat exchange are of course water temperature, volume of water and surface area of water contacting the steam. Changing water temp would be a little involved, but the water rate and contactable surface area are functions of the nozzle used (and I suppose the spray chamber size, if too small). The fogging nozzles provide smaller, more atomized droplets (more surface area) than the misting sprayers. If they can also provide as much mass throughput (as it appears they can), then I would think they would be more efficient. The result would be a hotter effluent (for a given rate), or a smaller volume of water required to achieve the same level of heat exchange compared with the misters. Anyone tried one of these?
 
Just installed my steam Slayer as part of an expirimental system . Being that one of the frequent complaints of the low wattage all in one systems is the weak boil. Having a closed lid system seems like it would remedy that. Grabbed a non pump robobrew for a steal a few weeks ago and have been watching this thread, figure I'll guinea pig for those out there with these types of systems. Given the robobrew has a clamping lid, it should help provide a positive seal and ensure the vacuum for steam to exit. Still have a few items to setup for the system, but should get a brew done in week or two.
Any update on this configuration? Would appreciate any findings you could share.
 
I see that Brundog and others have all used misting nozzles (ca 6 or 9 gph nominal rates). I am wondering whether anyone has tried the fogging nozzle design? The key parameters for heat exchange are of course water temperature, volume of water and surface area of water contacting the steam. Changing water temp would be a little involved, but the water rate and contactable surface area are functions of the nozzle used (and I suppose the spray chamber size, if too small). The fogging nozzles provide smaller, more atomized droplets (more surface area) than the misting sprayers. If they can also provide as much mass throughput (as it appears they can), then I would think they would be more efficient. The result would be a hotter effluent (for a given rate), or a smaller volume of water required to achieve the same level of heat exchange compared with the misters. Anyone tried one of these?

Fogging nozzle would be great, so long as the volume requirements are met as you noted. I didn’t try this one because it doesn’t have a pre-screen. I now have an in-line filter and some different nozzles, so I will be testing those soon.
 
Hi everybody. I am new into this forum as writing, but I have been a reader for long while. I read this post since the beginning and I got very interested in implementing the ideas here. I decided to have this solution to my own homebrewing and as I live in Sweden I can't find the nozzle as a private person. Is there anyone who knows if/where I can find some equivalent Nozzle in Europe? Thank you.
 
Try agricultural suppliers in your area. These nozzles are used for spraying chemicals and fertilizers on crops, as well as misters for keeping livestock cool.
 
Hi everybody. I am new into this forum as writing, but I have been a reader for long while. I read this post since the beginning and I got very interested in implementing the ideas here. I decided to have this solution to my own homebrewing and as I live in Sweden I can't find the nozzle as a private person. Is there anyone who knows if/where I can find some equivalent Nozzle in Europe? Thank you.

I use this nozzle. Works ok, I have 3.5 bar water pressure and I am boiling 50 liter with a 4500W element at 60% duty.
 
Try agricultural suppliers in your area. These nozzles are used for spraying chemicals and fertilizers on crops, as well as misters for keeping livestock cool.

I will try to find in those stores, thanks.

I use this nozzle. Works ok, I have 3.5 bar water pressure and I am boiling 50 liter with a 4500W element at 60% duty.

Thanks for the tip, I will look this option, it seems quite simple but if works I am good with that.
 
Any update on this configuration? Would appreciate any findings you could share.
Did a maiden voyage brew on it the earlier part of last week . Worked out well, drained it right into the drain for my washing machine
, so no babysitting a bucket for overflow. Once the boil started to roll I turned it down to just the 1000w element and locked down the lid. Still gotta dial in the boil off rate , but not by much . Extending my boil could of helped me hit my numbers but I was only off my target gravity by <.05 . Still have some tinkering and playing around to do with the system overall to get the kinks out. I did use a wilser bag inside the mash pipe so I could go extra fine on my crush and to aid in clean up. All in all I'm satisfied. Should make New England winter brewing more comfortable.
 

Attachments

  • IMG_20181016_092110.jpg
    IMG_20181016_092110.jpg
    2.5 MB · Views: 315
Last edited:
Hello, I just finished reading thru this thread and I'm looking to purchase a new boil kettle soon and I would like to incorporate this design with my order (Spike Brewing). I make 5 gallon batches and typically need 7 - 7 1/2 gal at the start of my boil. Currently I'm leaning towards using the 2" design, would a 10 gallon tank be sufficient size? I'm concerned the port may be too close to the boil as I'm not sure where the 10 gal mark in the kettle is, and where the hole would align with that mark.

Not sure if this matters, as most people throughout the thread sound like they are electric brewers, but I'll be brewing in my basement on the stove top that I have down there.

Thanks for the help, and the research into this, looking forward to implementing it in the near future.
Are you still intending to make 5 gallon batches? If so, you should be fine, since most everyone is reporting about half as much boil-off with the condenser systems. In other words, you'll be reducing your pre-boil volume compared to open boiling.

As to your other concern, I agonized over port placement also. I finally went through the lid, using an elbow fitting. I'm certain that, had I gone through the side, I would've regretted my choice. This way I can just rotate the lid to clock the condenser wherever I like. I put the port as close to center as possible. To my immense suprise, there was no problem with the condenser assembly overbalancing the lid. Of course I am using Bobby M's 1-1/2" unit on a 15 gallon kettle, 2" on a 5 gallon lid might be different. If I had found the expected balance issue, I intended to make a cloth bag filled with sand or shot to keep the lid in place.

BTW: I have yet to find a kettle that actually holds the rated volume. Maybe the high-end kettles are better in that respect?
 
BTW: I have yet to find a kettle that actually holds the rated volume. Maybe the high-end kettles are better in that respect?

Define "hold". My 20g G1 kettles hold 20 gallons with an ~1-1/2" free board remaining.
I wouldn't even consider doing a pre-boil volume that large, but it sure comes in handy for big ass beers (like a 110 point stout) in the mash tun...

Cheers!
 
Define "hold". My 20g G1 kettles hold 20 gallons with an ~1-1/2" free board remaining.
I wouldn't even consider doing a pre-boil volume that large, but it sure comes in handy for big ass beers (like a 110 point stout) in the mash tun...

Cheers!
By hold, I meant that a 15 gallon (stated on box) kettle should contain at least 15 gallons without overflowing, measured by some reliable graduated liquid container. Or by weight, I suppose, I haven't tried that. My economy grade kettles always come up a quart or more short. It's not a real problem, I wouldn't try to boil more than, say, 12 gallons in a 15 gallon pot, and then very cautiously. By training and experience I'm a nuc operator and tool & die maker, by nature I'm a bit of a perfectionist (at least where other people's claims are concerned (joke)). It just annoys me to see '60 quart' on the label, and measure out 57.5 max. before it overflows. End of rant, sorry.
 
I was finally able to brew yesterday using BobbyM's steam slayer, a complete brew, not a test.

Those above who noted issues with "too hot" wastewater would be addressed by reducing the vigor of the boil were right--I had the element powered at 28 percent of max, and the wastewater is actually pretty mild in temp. Very, very little steam from it.

In fact, the water is so cool that I think I can figure a way to drain it directly into the trap pipes under my sink--though capturing some of it for cleaning is something I probably will also do.

I also ended up using just about 10 gallons for a 1-hour boil--certainly in line with the 9 gph rating of the spray fitting. I was running both an RO filter and the spray fitting off the same water line, so I am sure the pressure was less than it otherwise would have been.

All in all--very pleased how this worked. I'm set up to be able to brew in the garage in the dead of winter, and I don't need ventilation to do it.

Ran another brew day yesterday, and I took a short video of the steamslayer working--linked below.

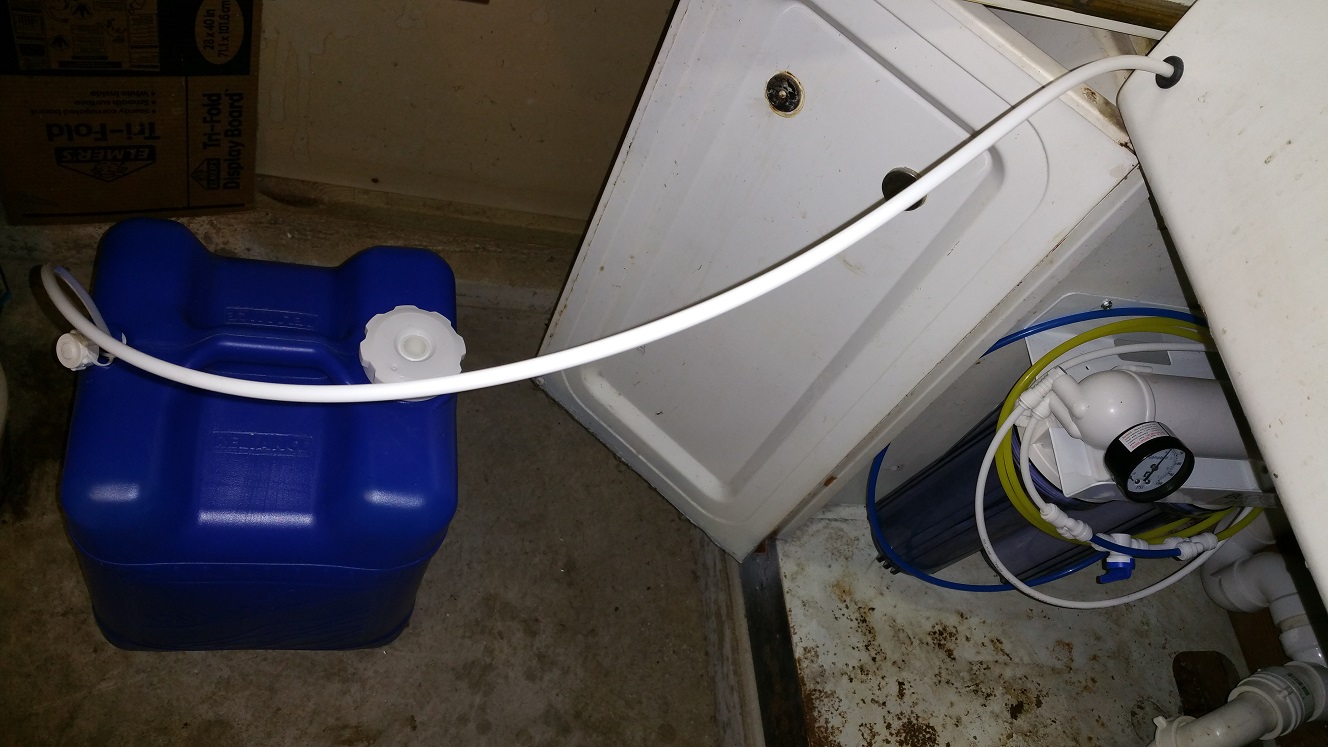
The only remaining thing to do with it is figure out how to set it to drain in the trap under the sink to the right. Below is a pic showing the current setup. I have two 1/4" water lines coming out from under the sink. One is from the RO filter replenishing my water supply (goes into the blue aquatainer). The other is from the house water line, feeding the steam slayer.

There is enough room that I could run a longer silicone hose from the steam slayer to a hole cut in the sink facade just above the grommets where the water lines come out. I want something that I can connect to the drain, then disconnect to collect water for cleaning as I wish. There's a standing pipe drain that feeds into the trap, so just putting the end of the hose in there would work.

But I want a fitting or something on the outside that lets me connect/disconnect the silicone hose from that fitting, so I can drain to a bucket or not, as the case may be. Any ideas for that?

steamslayerwater.jpg


Back
Top