• Please visit and share your knowledge at our sister communities:
  • If you have not, please join our official Homebrewing Facebook Group!

    Homebrewing Facebook Group

Arduino - Networked Temperature Monitor

Homebrew Talk

Help Support Homebrew Talk:

This site may earn a commission from merchant affiliate links, including eBay, Amazon, and others.
This is the inline temp sensor I referred to in a previous post. I've debated making a slightly friendlier version with two single jacks on either end to make it easier to run inline. Finding a cheap jack was annoying, these were $1.58 each.

When time permits, my plan is to put a few of these in my fermentation chamber (ambient outside, bucket side, ice side and thermowell) to monitor multiple temps. I'm using a linear topology with actively driven sensors so it's easy to just connect them up with stock RJ45 cables. I also vaguely recall following some standard when I chose the pin connections.

RJ45
  • #1 is GND
  • #2 is +5V
  • #4 is DQ
  • #5 is GND

The resistor R1 is a 100 ohm per the guidelines here http://www.maxim-ic.com/app-notes/index.mvp/id/148

20120809-DSC_2052.jpg


schematic.png


20120809-DSC_2053.jpg
 
Because of this thread, I just ordered a full Inventor's Kit from Sparkfun!

Cheers to Jimmay!
 
I started off using the RJ45 cables as well. I took an 8-PORT Cat 5E UTP Patch Panel and wired it in parallel, essentially creating a linear topology, since none of the cables were >3m. I hooked up 8 sensors with no problems, except that the cat5e cable that I was using was too large to fit in the Brewer's Hardware Probe Ends. That's when I hit upon using the standard 4-conductor phone wire and RJ11 connectors. They were smaller, cheaper and easier to wire. With judicious placement of the probe wires, it still looks like a linear/stub setup, and I have not needed any additional resistors to read up to 8 probes.

If anything, I might do the improved CPU Bus Interface shown in appendix A of the document you supplied, and use a beefier independent 5V supply.

Of course, YMMV.
 
Last edited by a moderator:
I started off using the RJ45 cables as well. I took an 8-PORT Cat 5E UTP Patch Panel and wired it in parallel, essentially creating a linear topology, since none of the cables were >3m. I hooked up 8 sensors with no problems, except that the cat5e cable that I was using was too large to fit in the Brewer's Hardware Probe Ends. That's when I hit upon using the standard 4-conductor phone wire and RJ11 connectors. They were smaller, cheaper and easier to wire. With judicious placement of the probe wires, it still looks like a linear/stub setup, and I have not needed any additional resistors to read up to 8 probes.

If anything, I might do the improved CPU Bus Interface shown in appendix A of the document you supplied, and use a beefier independent 5V supply.

Of course, YMMV.

I like the patch panel idea, and you're correct about the cable lengths -- shouldn't be an issue. I'm also planning on using these things I made for my house which will end up with long runs.

I'm using the same probe ends and was able to fit the cable inside with a little slit in the cable (eventually it'll get adhesive heatshrink on it). I like the RJ11 idea though -- much less bulk for the connectors.

Let me know if you build the improved CPU interface, I'm curious if it makes an improvement in reliability. I have the required parts on my next order...
 
Last edited by a moderator:
I'm also planning on using these things I made for my house which will end up with long runs.

Yeah, if my wife didn't still have a business land-line coming into her home office, I would consider trying to use the house phone wiring as a test of a long-line 1-wire lan :drunk:
 
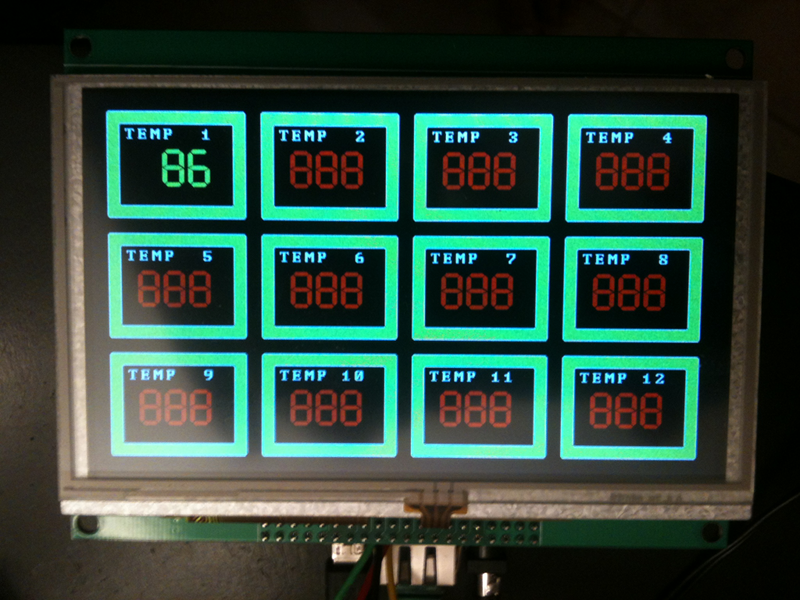
This is a 5" 800x480 Graphic LCD with resistive touchscreen.
GLCD-50.png

Got the monitor section working the way I want it, now on to SSR control. :ban:

The LCD and adapter shield are from Itead Studios, the EtherMega and protoshield from Freetronics via 
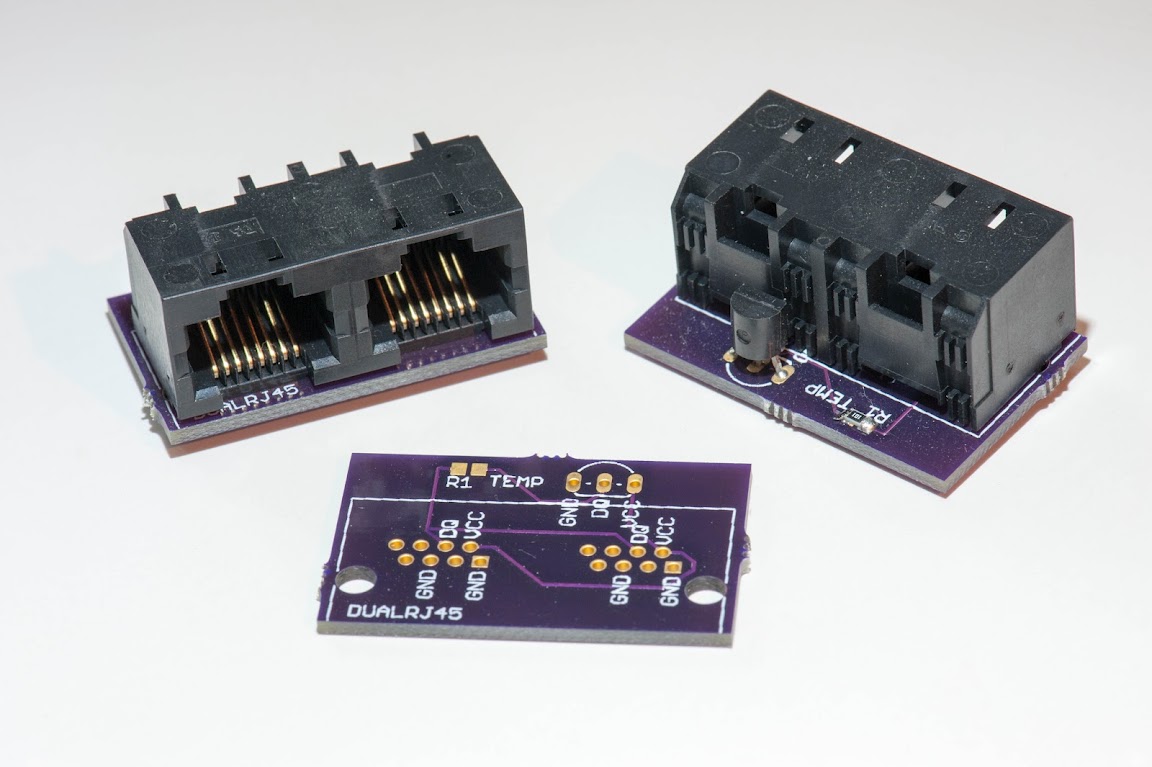
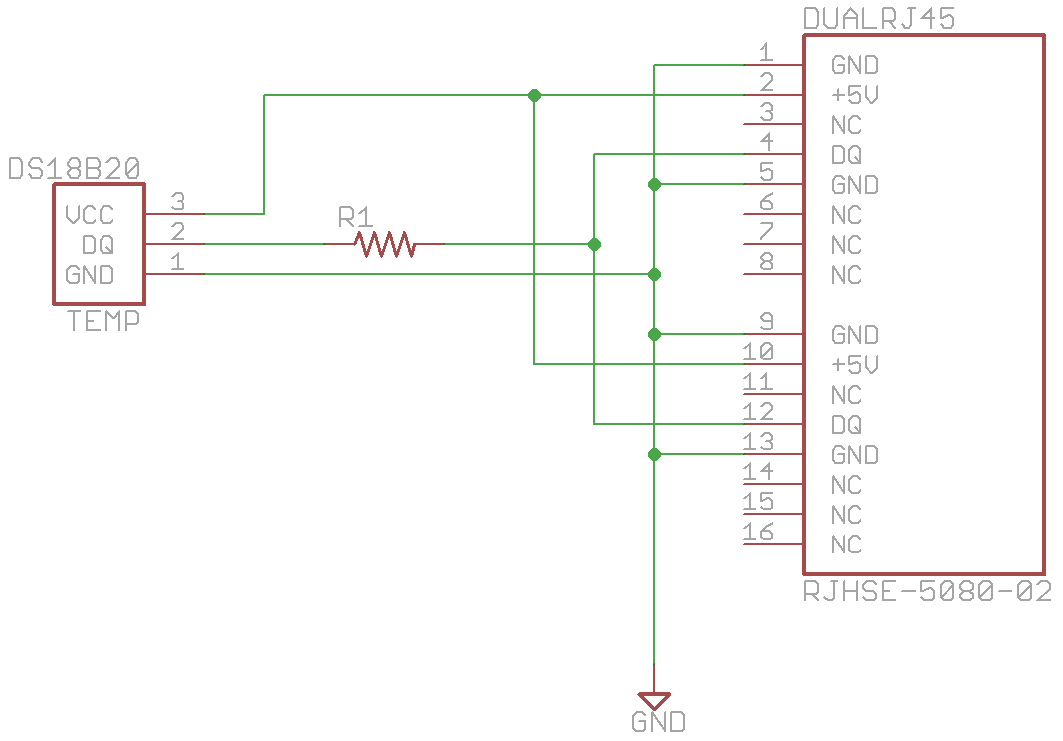
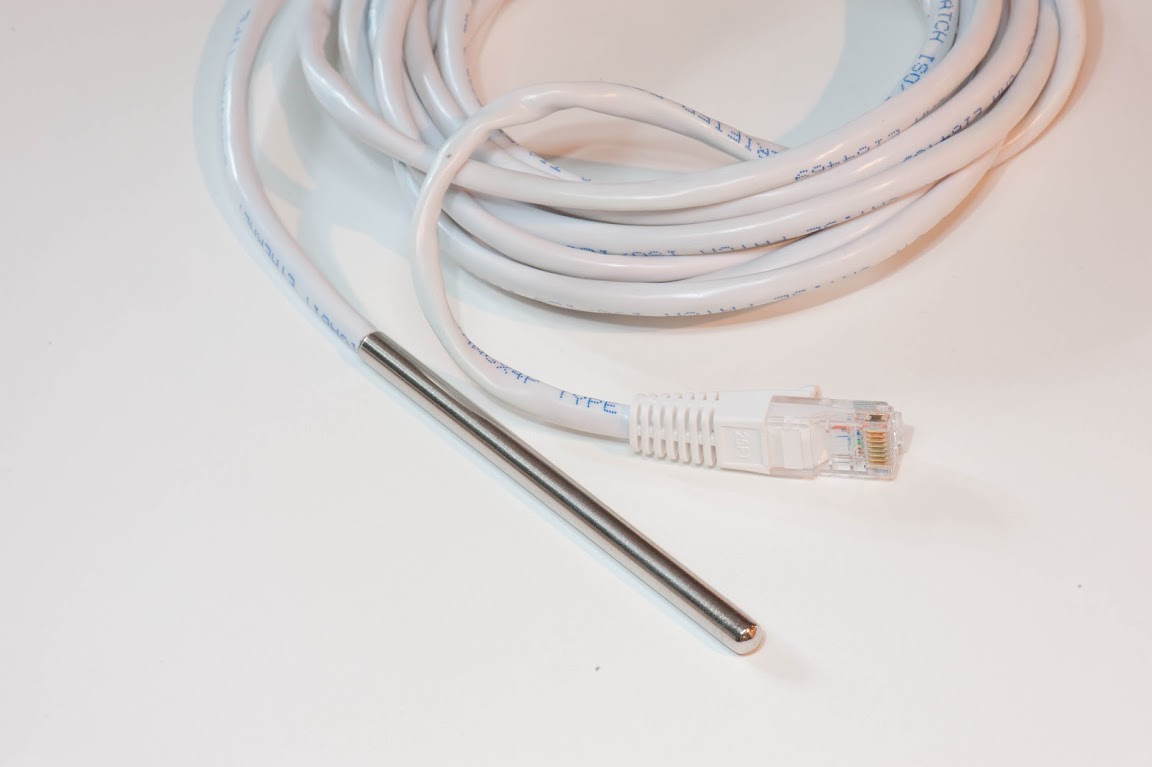
EpicTinker. The protoshield is used to re-position pins and house the DS18B20 interface and connector.

Some caveats:
Make sure you have a power supply capable of supplying at least 1 amp, power from the USB alone may not be sufficient, which caused the ethernet hookup to fail sporadically.

The software checks the on-board EEPROM for an initialized sensor array, and creates one if non-existent. Subsequent restarts use the EEPROM to initialize the sensor array. The EEPROM is also updated whenever you add a DS18B20 to the array, or modify the sensor name or temperature range.

This uses the same networked setup as previous versions, and has been setup for 12 sensors. You can modify the "high" and "wide" constants in the code (multiples of 8 work best) and the code will try to work out a "best fit" number of windows. Make sure you modify the "maxSensors" constant, and the sensor structures array to match the new count, and erase the EEPROM prior to the first run of the code.

This setup definitely requires a Mega2560 board or equivalent. I use the EtherMega, which has the W5100 baked right into the board, and uses the arduino ethernet library out of the box. This solves stacking problems caused by trying to add in a standard ethernet shield.

I mechanically moved the pins for the touchscreen from D2-D6 to D42-D46, and disconnected the pins for the on-board SD card on the LCD shield when I thought it was causing a conflict with the ethernet setup (turns out it was a power supply problem). My software reflects those changes, but may not be required.

The LCD shield requires plugging into all of the mega pins, and the 2x20 connector for the LCD board offers very little support, so some sort of support for the LCD board is suggested.

The 1.0.1 version of the Arduino IDE has a nifty String object library that has a major problem: the destructor doesn't properly remove unneeded Strings, and has massive memory leaks, This quickly consumes all available SRAM and causes really weird problems. This is avoided by doing everything the old fashioned way with character arrays and direct supervision. Use String objects at you own risk if modifying this code.

The UTFT library is available here. I've added code to the DefaultFonts.c file that adds a minus sign to the SevenSegment font for temperatures below zero. Because of the way that the font structure is set up, this added 3000 bytes of code that is unused yet unavailable. My copy is available here

The EEPROMWriteAnything library is here

You may see some commented-out code and references to the touchscreen. This code will not work properly if compiled, as it requires a modified library that I'm still working on.

Finally here's the code, last code release was 09/02/2012:
ITDB50_TempMonitor code.
 
Nice Im using the XLR headphone jacks for mine but I only have two so wiring directly into the arduino (no shield). Looking good
 
I ordered the high temp water proof DS18B20's from Adafruit Here since they were pre-made and I felt lazy. I extended the cable using Cat 3 phone line and terminated with 3-pin mini DINs. My initial use will be on my brew stand. I have found variation, up to 2-3 degrees, between sensors that are co-located so I need to iron out critical locations and use the mose accurate sensors there.

When building the probes using the Brewer's Hardware probe ends, what type of thernal expoxy are you using to fill the probes?
 
Got the DS2406+ samples from Maxim yesterday, gonna breadboard up one and see how it operates :)

On another note, I got a Raspberry Pi (RPi) a few days ago, and am working on integrating the RPi and an Arduino with an I2C interface, using the Arduino to handle the I/O intensive items, while using the RPi for the web/network/wireless control interface. I'd leave the 5" touchscreen for local control, and have a network interface.

I breadboarded a level-shifter for the Arduino-to-RPi I2C communications channel (the Arduino is 5v I/O, the RPi is 3v3), and got some rudimentary communication going just to verify the hardware.

This should be fun... :ban:
 
The RPi is a fully enabled (I'm using Adafruit's I2C-enabled Debian distro) Linux computer that is very easy to configure as a full LAMP (Linux/Apache/Mysql/PHP or Python) webserver, and at $35-$40, it's the same price or less than an ethernet shield. With the addition of an inexpensive USB wireless ethernet dongle it's a very effective wireless server, something that, while doable with the right arduino shield, is still pretty pricey.

With the RPi doing the web-intensive stuff, and the Arduino doing the I/O intensive operations, it should be pretty easy to set up a complete brewing/fermentation/storage system that can be accessed locally or remotely.

Plus, I'm a beer/wine/computer geek, a truly dangerous combination :D
 
Followed you over from the RPi thread, and subscribed to this one as well. Have you taken a look at the Gertboard they're coming out with? Looks like it handles the level shifting, the ADC (DAC as well, but less necessary), and provide a slot for another controller to handle the I/O intensive stuff. Debating that vs. a separate Arduino for the I/O intensives - any thoughts, as someone who has had hands on at least one of those options?
 
Yeah, I took a look at it, and for me at least, it has more than I need and less than I want. :drunk:

One addition I'm planning on is the 5" touchscreen that I showed earlier as a local display/control, and that needs a companion shield.

I'm also planning on using DS2406+ OneWire switches to turn 25-40 amp SSRs on/off for my pumps, and if I can get the Arduino PID library working, for my RIMS (yeah, I know, I over-engineer everything). The 120/240VAC lines are all located on the back side of Barney, and isolated from the low-voltage stuff.

As an aside, I got the wireless dongle working on the RPi side, my only complaint right now is that I have to broadcast my wireless SSID in order for the dongle to work :mad:
 
I wound up picking up one of the Netgear wireless dongles (nice and small, don't really stick out much at all), and got it working pretty easily with the RPi distro - had issues getting it to work easily under the Adafruit, so I switched over the RPi native and got it working pretty easily after that. Was easy enough to install the I2C libraries and such that the Adafruit distro has native after that. Suprised that you have to broadcast SSID to get it to work - I usually broadcast mine anyway for visitors, but I should give it a try with SSID hiding and see if it still works . . .
 
I wound up picking up one of the Netgear wireless dongles (nice and small, don't really stick out much at all), and got it working pretty easily with the RPi distro - had issues getting it to work easily under the Adafruit, so I switched over the RPi native and got it working pretty easily after that. Was easy enough to install the I2C libraries and such that the Adafruit distro has native after that. Suprised that you have to broadcast SSID to get it to work - I usually broadcast mine anyway for visitors, but I should give it a try with SSID hiding and see if it still works . . .

I picked mine up from Adafruit. I got the larger one, since it's got a bigger antenna, better reception. It was driving me NUTS until I figured out that it was searching for the SSID, even after I told it what it was in /etc/network/interfaces :mad:

I turned off my SSID broadcast after reading some reports of roaming sniffers that attempt to find unsecured wifi spots to exploit. I also don't have any of my important systems on wireless. :D Same reason that my firewalls and computers don't respond to pings unless I know the address.
 
jimmayhugh said:
I picked mine up from Adafruit. I got the larger one, since it's got a bigger antenna, better reception. It was driving me NUTS until I figured out that it was searching for the SSID, even after I told it what it was in /etc/network/interfaces :mad:

I turned off my SSID broadcast after reading some reports of roaming sniffers that attempt to find unsecured wifi spots to exploit. I also don't have any of my important systems on wireless. :D Same reason that my firewalls and computers don't respond to pings unless I know the address.

The key point there being "unsecured" - if you have no encryption on it, you're asking for trouble. But any wardriver that i ever heard of will be able to tell that there's a wifi signal there if you're broadcasting the SSID or not, and if they are capable of pulling the encryption keys from the signal, then figuring out the SSID would be a trivial exercise for them (just like spoofing a MAC address is trivial). Key point is to make sure you use the strongest encryption your WAP will allow. Of course, the only way to make a system totally secure is to not put it on a network . . .

Since mine will be living not far from my WAP, i didn't need the Extra range the larger antenna would have bought me. Also, Adafruit was sold out of their adapter (along with most of the rest of their RPi inventory) when i was ordering.

Not broadcasting SSID doesn't really increase the protection of a wireless network. It can actually decrease it due to how a client aloways attempts connection no matter where it is. However, combining that with encryption and MAC filtering will handle about 99% of threats (which are basically script kiddies). An expert can break through a hidden SSID (easily) and MAC filtering (also easily). Encryption, however, can be hard, particularly if you use WPA/WPA2 and make sure your key is long. All lowercase is fine so long as it is >=15 characters. It would take an average cluster that can handle 5 million key attempts per second over a million decades (yes, that's over a million decades) to crack a 15 character encryption key. Of course, make sure that the key isn't easy enough to be crackable with a dictionary or typical heuristics.
 
Moving on...

I've dropped my attempts at using I2C communications between the Arduino and RPi. I'm now looking at the Arduino SoftSerial library as an alternative.

Be aware that a level shifter is a very good idea when hooking up the 5v Arduino with the 3v3 RPi. While I made my own circuit with mosfets and resistors, the 4-bit I2C-Safe and 8-bit Bi- Directional level converters are the way to go.

More to come...
 
Got the communication between the Arduino and RPi working, so now I can monitor and control the One-Wire devices (4 ds18B20 and 2 ds2406+ devices so far) on the Arduino from the RPi.

Next step is to wire up the DS2406+ switches to the SSRs, and try some real-world tests.

Once I've got that working, it's on to the remote wireless interface. I'm anticipating using Apache, MySQL, and PHP to create a local website that can be used by a laptop, iPad, etc.

We'll see how it goes... :p
 
Got the communication between the Arduino and RPi working, so now I can monitor and control the One-Wire devices (4 ds18B20 and 2 ds2406+ devices so far) on the Arduino from the RPi.

Next step is to wire up the DS2406+ switches to the SSRs, and try some real-world tests.
Nice! Run into any gotchas while doing it?

Once I've got that working, it's on to the remote wireless interface. I'm anticipating using Apache, MySQL, and PHP to create a local website that can be used by a laptop, iPad, etc.

We'll see how it goes... :p
When I did the LAMP setup on my RPi, I used the info towards the bottom of this
link to install the Apache/MySQL/PHP stuff, and it worked like a charm. Let us know how it goes!
 
Nice! Run into any gotchas while doing it?

Never did get the I2C to work correctly, but I've found some new info, so I may revisit that. I really like the idea of one RPi controlling multiple slave Arduinos. Might also consider an RS-485 multi-drop setup for distant slaves, the possibilities are endless. :ban:

Right now I'm using the RPi's /dev/ttyAMA0 port and the Mega's Serial1 port to communicate at 115200baud. Getting the settings on the RPi to properly buffer the Arduino's responses to prevent data loss was the biggest problem, but I'm pretty sure I've got that nailed down for now.


When I did the LAMP setup on my RPi, I used the info towards the bottom of this
link to install the Apache/MySQL/PHP stuff, and it worked like a charm. Let us know how it goes!

I've been playing with Linux and x86 derivatives of Unix for a LONG time (since before Red Hat 1.0), so setting up the LAMP server was a no-brainer, especially with the Debian derivative that the RPi uses. That is an excellent write-up for anyone getting into it for the first time.
 
OK, got the serial interface nailed down. I had to implement a hardware flow control to prevent data loss during temp and switch updates. Ended up waiting for some parts, which slowed things down, Have tested with PHP and C programs, and am now digging into AJAX to develop the web interface.

I'm currently monitoring 4 temp probes and three switches, but there's plenty of room to expand.
 
Update on the networkable Raspberry Pi/Arduino fermentation/RIMS/pump/whatever controller.

I'm currently using the Mega2560 board, as it has multiple serial ports available, making Arduino debug easier, but the system should work fine with the Uno using the SoftSerial library.

115200 baud serial interface is working between Arduino and RPi.

The Arduino is constantly checking and updating the status of all of the OneWire chips, currently 4 DS18B20 Temperature Sensors, and 3 DS2406+ Switches.

Requests from the web pages are queued-up and serviced via a daemon that uses the serial interface.

I wrote some php web scripts to get the DS18B20 temps, and to turn the DS2406+ switches on and off, and interrogate their status, and all seems to work as planned. :D

AJAX and jQuery are a little slower going, as this is all new to me, and I apparently ain't as smart as I used to be. :drunk: If there are any web gurus that want to offer some help, I'd be obliged.

More as things develop...
 
I got the jQuery working, so now I have a rudimentary web page up that monitors the temp sensors and allows me to turn the switches on and off from my intranet. It should also automagically detect new chips when added (currently up to 20).

Now I'll start working on the SSR interface.

Quick Video here.
 
Got the communication between the Arduino and RPi working, so now I can monitor and control the One-Wire devices (4 ds18B20 and 2 ds2406+ devices so far) on the Arduino from the RPi.

Next step is to wire up the DS2406+ switches to the SSRs, and try some real-world tests.

Once I've got that working, it's on to the remote wireless interface. I'm anticipating using Apache, MySQL, and PHP to create a local website that can be used by a laptop, iPad, etc.

We'll see how it goes... :p

Have you thought about using something like COSM to display and storage of your data rather than going through all of the hassle of creating your own backend server?
Sorry if this was already asked in a previous page..

Something like
https://cosm.com/feeds/71920

Is incredibly easy to push data to COSM with Arduino, you'd have to rewrite their connection code to connect and send data with your ethernet shields API(They use the Wiznet library code)

And, its free.
 
Yeah, I have an account with them, and I wasn't all that thrilled with it. I prefer to have all of my data at hand, not "out there" somewhere. Plus, this is what I'm used to working with.
 
Back
Top