To be honest, just get it clean, give it a sniff test afterwards to be sure it doesn't smell like oil, metal or cleaner, and then go for it. I wouldn't get too wrapped up about BKF vs PBW vs. etc. Clean it, and go.
You are using an out of date browser. It may not display this or other websites correctly.
You should upgrade or use an alternative browser.
You should upgrade or use an alternative browser.
ANVIL FOUNDRY ALL-GRAIN BREWING SYSTEM
- Thread starter czmkid
- Start date

Help Support Homebrew Talk:
This site may earn a commission from merchant affiliate
links, including eBay, Amazon, and others.
Summa_Brewologica
Well-Known Member
- Joined
- Nov 11, 2020
- Messages
- 228
- Reaction score
- 98
tsp will for sure kill the grease just make sure you wash it out real good with some dish soap afterwards.thanks, I also have some TSP cleaner left over from cleaning my SS Brewbucket, would that suffice in place of barkeepers?
Trying to limit my time in stores bc of covid, so would like to use what I have on hand.
Noob_Brewer
Well-Known Member
Sorry, never used TSP, so not sure. Hopefully someone else can chime in.thanks, I also have some TSP cleaner left over from cleaning my SS Brewbucket, would that suffice in place of barkeepers?
Trying to limit my time in stores bc of covid, so would like to use what I have on hand.
Edit never mind lol. The previous two responses didn't show up until I posted this.
Noob_Brewer
Well-Known Member
Definitely provide some photos when you get it all together and going. Always interested in the mods people are choosing to use on these all-in-ones. Id say that as long as the false bottom clears the top of the dip tube nut, you are good to go. This may actually be a tiny bit higher than the malt-pipe since the malt-pipe has a smaller diameter, it only needs to clear the dip tube itself. With my bent legs, it barely clears the nut closest to the kettle that the dip tube is connected to.I think folks are probably right about the false bottom being unnecessary with a quality brew bag. I got one, anyway, just in case. I ended up drilling holes in the legs (brewzilla false bottom) and got some u bolts (304 stainless). I’ll take some photos, and go through my process, if anyone is interested. My goal was to lift it as high as the bottom of the malt pipe.
- Joined
- Apr 13, 2013
- Messages
- 1,987
- Reaction score
- 965
Are you saying your grain bed floats? Is this common? I have never had this happen even over many years using a cooler mlt.
The grain bed 'floats' -- or really forms a very loose bed -- until either gravity or pressure difference from recirculation pushes the grains down.
If you are asking why the bed distance to the bottom increases, it is because the grains push the sides of the bag out to the sides. Since the bag is a constrained volume, this filling the bag will raise the bottom of the bag a bit higher than when the bag is empty and you have the spoon pushing down on the bottom.
I brewed a Session IPA yesterday with a recipe that called for 9.5 pounds of grains. So far, I've been going by the Foundry's user manual's chart for the "5 gallon Sparge method at 240 volts." The chart for 9.5 lbs of grain, calls for 6.2 gallons of strike water and 1 gallon sparge. This just looked like way too much water once I mashed-in the grains. Nothing like the consistency I've seen in the past when following the chart for 11 lbs of grains. However, the recipe says OG should have been 1047 and I hit 1052, so I guess it went OK? I'm kind of confused about the Foundry manual's chart because everything I've read says to use ~1.25 qts of water per lb of grain. Why so much more with the Foundry?
So the 1.25 qts historical method is for mash tun/boil kettle systems. The Foundry is basically a "brew in a bag" type system which uses full volume, no sparge method, so that the qts per lb will be much higher. Basically the manual has you hold a gallon of water back as sparge water, just to help rinse the sugars out of the grain to improve efficiency slightly. However, many of us do no-sparge. For example, I did a Helles yesterday, no sparge...7.5 gallons of water, 9 lbs of grain, so a 3.33 qt/lb rate.


$53.24
1pc Hose Barb/MFL 1.5" Tri Clamp to Ball Lock Post Liquid Gas Homebrew Kegging Fermentation Parts Brewer Hardware SUS304(Gas MFL)
Guangshui Weilu You Trading Co., Ltd


$58.16
HUIZHUGS Brewing Equipment Keg Ball Lock Faucet 30cm Reinforced Silicone Hose Secondary Fermentation Homebrew Kegging Brewing Equipment
xiangshuizhenzhanglingfengshop


![Craft A Brew - Safale S-04 Dry Yeast - Fermentis - English Ale Dry Yeast - For English and American Ales and Hard Apple Ciders - Ingredients for Home Brewing - Beer Making Supplies - [1 Pack]](https://m.media-amazon.com/images/I/41fVGNh6JfL._SL500_.jpg)
$6.95 ($17.38 / Ounce)
$7.47 ($18.68 / Ounce)
Craft A Brew - Safale S-04 Dry Yeast - Fermentis - English Ale Dry Yeast - For English and American Ales and Hard Apple Ciders - Ingredients for Home Brewing - Beer Making Supplies - [1 Pack]
Hobby Homebrew


$22.00 ($623.23 / Ounce)
AMZLMPKNTW Ball Lock Sample Faucet 30cm Reinforced Silicone Hose Secondary Fermentation Homebrew Kegging joyful
无为中南商贸有限公司


$44.99
$49.95
Craft A Brew - Mead Making Kit – Reusable Make Your Own Mead Kit – Yields 1 Gallon of Mead
Craft a Brew

$7.79 ($7.79 / Count)
Craft A Brew - LalBrew Voss™ - Kveik Ale Yeast - For Craft Lagers - Ingredients for Home Brewing - Beer Making Supplies - (1 Pack)
Craft a Brew


$176.97
1pc Commercial Keg Manifold 2" Tri Clamp,Ball Lock Tapping Head,Pressure Gauge/Adjustable PRV for Kegging,Fermentation Control
hanhanbaihuoxiaoshoudian


$76.92 ($2,179.04 / Ounce)
Brewing accessories 1.5" Tri Clamp to Ball Lock Post Liquid Gas Homebrew Kegging Fermentation Parts Brewer Hardware SUS304 Brewing accessories(Gas Hose Barb)
chuhanhandianzishangwu


$719.00
$799.00
EdgeStar KC2000TWIN Full Size Dual Tap Kegerator & Draft Beer Dispenser - Black
Amazon.com

$479.00
$559.00
EdgeStar KC1000SS Craft Brew Kegerator for 1/6 Barrel and Cornelius Kegs
Amazon.com


$49.95 ($0.08 / Fl Oz)
$52.99 ($0.08 / Fl Oz)
Brewer's Best - 1073 - Home Brew Beer Ingredient Kit (5 gallon), (Blueberry Honey Ale) Golden
Amazon.com

$53.24
1pc Hose Barb/MFL 1.5" Tri Clamp to Ball Lock Post Liquid Gas Homebrew Kegging Fermentation Parts Brewer Hardware SUS304(Liquid Hose Barb)
yunchengshiyanhuqucuichendianzishangwuyouxiangongsi


$20.94
$29.99
The Brew Your Own Big Book of Clone Recipes: Featuring 300 Homebrew Recipes from Your Favorite Breweries
Amazon.com


$33.99 ($17.00 / Count)
$41.99 ($21.00 / Count)
2 Pack 1 Gallon Large Fermentation Jars with 3 Airlocks and 2 SCREW Lids(100% Airtight Heavy Duty Lid w Silicone) - Wide Mouth Glass Jars w Scale Mark - Pickle Jars for Sauerkraut, Sourdough Starter
Qianfenie Direct
LagerLover78
Well-Known Member
- Joined
- Apr 22, 2017
- Messages
- 79
- Reaction score
- 16
To be honest, just get it clean, give it a sniff test afterwards to be sure it doesn't smell like oil, metal or cleaner, and then go for it. I wouldn't get too wrapped up about BKF vs PBW vs. etc. Clean it, and go.
Wish I saw this before I went through the PBW/BKF regimen...still has a feint aroma of oil, so I'm going to get after it with a bit more PBW tonight and give it another really good rinse with hot water.
The maiden voyage is Saturday on a Velvet Merlin clone...new equipment/new process

RufusBrewer
Well-Known Member
Try Dawn dish washing soap to get rid of oil film and oil scent.
shoreman
Well-Known Member
- Joined
- Feb 1, 2012
- Messages
- 1,352
- Reaction score
- 413
I hit it with a TSP - PBW - Starsan treatment. Seems fine now and will run a hot water test before brewday.
The tubing that came with the chiller smells terrible, won't be touching the beer, but will replace that at some point.
Thanks!
The tubing that came with the chiller smells terrible, won't be touching the beer, but will replace that at some point.
Thanks!
Summa_Brewologica
Well-Known Member
- Joined
- Nov 11, 2020
- Messages
- 228
- Reaction score
- 98
I scrubbed it real good with barkeepers friend and a sponge with a no scratch scrubber. You have to really use some muscle but it it is very effective at removing that factory grease. After a couple passes with that I took a paper towel and would rub it against the metal in areas I cleaned. Also using a bit of muscle. If the paper towel stays white, you are good to go.
Summa_Brewologica
Well-Known Member
- Joined
- Nov 11, 2020
- Messages
- 228
- Reaction score
- 98
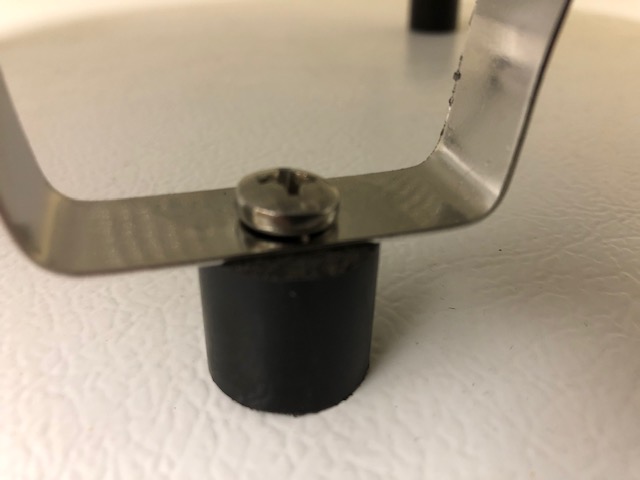
So here is my take on the brewzilla false bottom mod. I drilled out 1/4 in holes for the u bolts. If this interests anyone, let me know. I can give parts lists, steps, and what I would do different if I were to do it again. What I like about it is you can adjust the height to where you want it.

myndflyte
Well-Known Member
What would you have done different? It looks like a pretty good idea. I assume those are U-bolts used for an antenna?So here is my take on the brewzilla false bottom mod. I drilled out 1/4 in holes for the u bolts. If this interests anyone, let me know. I can give parts lists, steps, and what I would do different if I were to do it again. What I like about it is you can adjust the height to where you want it.
View attachment 714303
Summa_Brewologica
Well-Known Member
- Joined
- Nov 11, 2020
- Messages
- 228
- Reaction score
- 98
I would have gone with smaller u bolts, I think. If you can see, the bolts are too close to the edge of the feet keeping them from fully coming together. It’s actually not that big a deal because the fit is so tight it stays into place unless you put a bit of force on it. I went with 1/4 inch because I wanted it to be able to handle as much weight as possible but even the smaller sized can hold way more than whatever grain we could throw at it.What would you have done different? It looks like a pretty good idea. I assume those are U-bolts used for an antenna?
The u bolts are the 304 stainless from the hardware store. Keep in mind, that unless it says “304 stainless” it is not 304 stainless. So I had to order some extra hex nuts from Amazon that specifically states they are 304 stainless.
myndflyte
Well-Known Member
What diameter U-bolt did you get? Or what is the length of the bottom of the leg on the false bottom?I would have gone with smaller u bolts, I think. If you can see, the bolts are too close to the edge of the feet keeping them from fully coming together. It’s actually not that big a deal because the fit is so tight it stays into place unless you put a bit of force on it. I went with 1/4 inch because I wanted it to be able to handle as much weight as possible but even the smaller sized can hold way more than whatever grain we could throw at it.
The u bolts are the 304 stainless from the hardware store. Keep in mind, that unless it says “304 stainless” it is not 304 stainless. So I had to order some extra hex nuts from Amazon that specifically states they are 304 stainless.
Summa_Brewologica
Well-Known Member
- Joined
- Nov 11, 2020
- Messages
- 228
- Reaction score
- 98
The u bolt was just 1/4 inch and I think it was 2 inches. The foundry false bottom had 2 -1/4 inch feet. I think to have this brewzilla one set close to 3 inches but you could obviously make it shorter which I probably will before I brew with it.
I don’t remember what the leg length is on the brewzilla false bottom without the modification but I can get that for you later on.
I don’t remember what the leg length is on the brewzilla false bottom without the modification but I can get that for you later on.
I'm thinking about buying the anvil with 10% off going on right now. My question is, should I get the pump with it or use another pump? How do you flow control with the pump? I see you can use flow reducers on the line. Do those come with it if you don't get the pump? Thanks.
McKnuckle
Well-Known Member
If you already have a suitable brewing pump, there's no need to get the Anvil pump. Otherwise it seems a no-brainer to get the pump and its accessories, which include the reducer. A better means of flow control is to install a proper valve downstream of the pump's output, not a plastic squeezy thing. But the latter would work in a pinch (pun intended).
myndflyte
Well-Known Member
The pump is a good pump. You get it and hoses for $100 so you can't beat that. At some point I'd like to upgrade to a Riptide but for now, I'm happy with the Anvil pump.I'm thinking about buying the anvil with 10% off going on right now. My question is, should I get the pump with it or use another pump? How do you flow control with the pump? I see you can use flow reducers on the line. Do those come with it if you don't get the pump? Thanks.
- Joined
- Jan 17, 2017
- Messages
- 300
- Reaction score
- 131
I realize this post has many pages but earlier I posted my solution (see below) but many have just used a SS bolt and two nuts to accomplish this:What would you have done different? It looks like a pretty good idea. I assume those are U-bolts used for an antenna?
Attachments

Summa_Brewologica
Well-Known Member
- Joined
- Nov 11, 2020
- Messages
- 228
- Reaction score
- 98
My decision ultimately came down to adjustability and materials.I realize this post has many pages but earlier I posted my solution (see below) but many have just used a SS bolt and two nuts to accomplish this:
Where do you see the 10% off? I looked at morebeer and also the anvil site and did not see itI'm thinking about buying the anvil with 10% off going on right now. My question is, should I get the pump with it or use another pump? How do you flow control with the pump? I see you can use flow reducers on the line. Do those come with it if you don't get the pump? Thanks.
Thanks!
harrower
Active Member
Anvil Site has the 10% discount. Also, buying the pump also gets you the screen to spread the water during RIMS mash. I also use the screen during sparge. I didn't like the little clamp for the hose. I added a valve to easier control flow in RIMS-and trans to fermentor. Only few areas to improve the AF but easy to do if you want to. Keep it simple.
Attachments
![VALVE[1].jpg](https://cdn.homebrewtalk.com/data/attach/655/655141-VALVE-1-.jpg)
LagerLover78
Well-Known Member
- Joined
- Apr 22, 2017
- Messages
- 79
- Reaction score
- 16
Try Dawn dish washing soap to get rid of oil film and oil scent.
Will give that a shot 1st thing in the morning!
Thanks for the information. I went with the anvil and the riptide pump.The pump is a good pump. You get it and hoses for $100 so you can't beat that. At some point I'd like to upgrade to a Riptide but for now, I'm happy with the Anvil pump.
NSMikeD
Well-Known Member

Chimay double Trappist ale clone. Brewed 12/20 kegged 1/10. Cold crashed Friday. Brought back to 45 Sunday where it will stay until my pale ale is spent. Took a sample today and it hit the mark. It will be interesting to see it condition when it’s moved to the kegerator but I love already. Smooth malty and it came in at a whopping 8.5% ABV with the safe ale 33.
Anvil Foundry is producing some very very good beer (fermentation fridge takes a bow as well. This was my first brew using BrewFather (concurrently with BeerSmith). I like the app.
NSMikeD
Well-Known Member
^^^^^
Fwiw I make 2.5 gal in the 6.5 with full volume water no sparge, self milled grain with rice hulls. Ran it at 110v this time. For small batch brewing, 110v is all you need and with the pump no need to sparge (other than lifting the malt pipe). I do use salts and I strike at mash temp and let the anvil quickly bring back to target mash temp as I’d rather undershoot than overshoot mash temps.
Fwiw I make 2.5 gal in the 6.5 with full volume water no sparge, self milled grain with rice hulls. Ran it at 110v this time. For small batch brewing, 110v is all you need and with the pump no need to sparge (other than lifting the malt pipe). I do use salts and I strike at mash temp and let the anvil quickly bring back to target mash temp as I’d rather undershoot than overshoot mash temps.
Summa_Brewologica
Well-Known Member
- Joined
- Nov 11, 2020
- Messages
- 228
- Reaction score
- 98
Might I ask what’s recipe you used? Chimay grand reserve is probably my favorite beer. I did one I am still drinking on but used the monastery yeast. I am curious to try the safe ale 33 because I am a little tired of starters. Every time I use dry yeast I high five myself.View attachment 714985
Chimay double Trappist ale clone. Brewed 12/20 kegged 1/10. Cold crashed Friday. Brought back to 45 Sunday where it will stay until my pale ale is spent. Took a sample today and it hit the mark. It will be interesting to see it condition when it’s moved to the kegerator but I love already. Smooth malty and it came in at a whopping 8.5% ABV with the safe ale 33.
Anvil Foundry is producing some very very good beer (fermentation fridge takes a bow as well. This was my first brew using BrewFather (concurrently with BeerSmith). I like the app.
NSMikeD
Well-Known Member
Might I ask what’s recipe you used? Chimay grand reserve is probably my favorite beer. I did one I am still drinking on but used the monastery yeast. I am curious to try the safe ale 33 because I am a little tired of starters. Every time I use dry yeast I high five myself.
https://www.homebrewtalk.com/threads/anvil-foundry-all-grain-brewing-system.666090/post-9030723
This was my recipe (tweaked from Clone Brews). I have the last minute changes to the grain I’llcome back to edit
At 2.5gal batches, starters and liquid yeast arent practicable. My LHBS has been very helpful picking out dry yeast for me. Fwiw I rehydrate using the whole packets even though they are meant for 5gal.
no question in my mind this brew fits the silky fruit astringent harmony Chimay uses to describe their beer. At some point I’ll pick up a bottle at do a side by side.
self high fiver.
Summa_Brewologica
Well-Known Member
- Joined
- Nov 11, 2020
- Messages
- 228
- Reaction score
- 98
Oh hahahaha I already asked you the recipe. My apologies. I’m slow. And keeping track of too many threads, as well.
I always rehydrate as well. Still beats cooking up dme for a starter.
No need to self high five. I got you.
I always rehydrate as well. Still beats cooking up dme for a starter.
No need to self high five. I got you.
Silver_Is_Money
Larry Sayre, Developer of 'Mash Made Easy'
What is the reason for raising the height of the Brewzilla false bottom when used in the Anvil Foundry?
Summa_Brewologica
Well-Known Member
- Joined
- Nov 11, 2020
- Messages
- 228
- Reaction score
- 98
To clear the dip tube and temp probe at the bottom. You could just throw it in there, unlevel, but that would be bad if you are recirculating.What is the reason for raising the height of the Brewzilla false bottom when used in the Anvil Foundry?
I posted this a while ago didn't hear from anyone. Can this be done with the items I've listed from amazon? and do you have to do wiring differently on the plug with the ground and neutral bonded together? Thanks for any help.[/QUOTE]I'm trying to figure out how to make an adapter for my 3 prong dryer to the anvil. I'm checking to see if these items I've linked will work. Thanks.
View attachment 711650
3 prong plug
Leviton 515CV
In-Line User Attachable GFCI
Silver_Is_Money
Larry Sayre, Developer of 'Mash Made Easy'
[/QUOTE]I posted this a while ago didn't hear from anyone. Can this be done with the items I've listed from amazon? and do you have to do wiring differently on the plug with the ground and neutral bonded together? Thanks for any help.
Here is a video showing a method to accomplish the wiring of everything sans the inline GFCI. Warning: This would not meet code requirements.
Here is a video showing a method to accomplish the wiring of everything sans the inline GFCI. Warning: This would not meet code requirements.
[/QUOTE]
Thanks, I saw that video, and it's a help. I'm trying to figure out if this works with the old style 3 prong outlets? Since the ground and neutral and bonded. Do I have to wire it differently? I really don't have much electrical experience.
I just took my dryer outlet apart and noticed it has 4 wires. Using 10/3 with a ground. I've attached a picture. Can I upgrade this outlet to a 4 prong ? or should I keep it as is?

Last edited:
shaggybeerprof
Active Member
I am not an electrician and take no responsibility for your actions. OK, so, a quick Googley on "4-prong 240 wiring diagram" might help. Though, you could probably leave the receptacle as is and use a dryer plug on end of wire.

Hey does anyone know what size of quick disconnect I would need for the valve? Wanting to upgrade but I’m not sure what to measure. Is it a 1/2” female for the foundry side? Also want to add a valve for flow control instead of this clamp thing that sucks. Anyone find a decent one on Amazon or anything? I was thinking of putting one right where the hose disconnects from the valve as well, every time I disconnect it before the boil I get a bunch of hot wort spilling everywhere. Thx
Noob_Brewer
Well-Known Member
I think the valve is a little undersized, perhaps 3/8". Ive seen a few posts on this thread I think where peeps have done this at the valve with 1/2" QD but need a lot of tape to make it work.Hey does anyone know what size of quick disconnect I would need for the valve? Wanting to upgrade but I’m not sure what to measure. Is it a 1/2” female for the foundry side? Also want to add a valve for flow control instead of this clamp thing that sucks. Anyone find a decent one on Amazon or anything? I was thinking of putting one right where the hose disconnects from the valve as well, every time I disconnect it before the boil I get a bunch of hot wort spilling everywhere. Thx
- Joined
- Jan 17, 2017
- Messages
- 300
- Reaction score
- 131
For the spigot- forget what it’s called but it’s some kind of straight thread pipe. Many (including me) wrap it with several layers of Teflon tape and turn a female 1/2” NPT QD onto it.Hey does anyone know what size of quick disconnect I would need for the valve? Wanting to upgrade but I’m not sure what to measure. Is it a 1/2” female for the foundry side? Also want to add a valve for flow control instead of this clamp thing that sucks. Anyone find a decent one on Amazon or anything? I was thinking of putting one right where the hose disconnects from the valve as well, every time I disconnect it before the boil I get a bunch of hot wort spilling everywhere. Thx
Noob_Brewer
Well-Known Member
Im totally with you on the clamp to control flow. I recently added a ball valve myself to finally, after over 30 brews with the clamp, have an easier way to control flow. In the beginning, the clamp was "ok" but as the more I brewed, I found myself fidgeting with it constantly to get the flow I wanted. After a while it just seemed that the tubing would bulge outside of the clamp. So this is how I configured it. (ball valve was brewers hardware). At about 30 degrees of the valve turning open, I calculated a flow of about 30 seconds per quart equating to 0.5 gal per minute. Very easy to achieve the flow I want without fidgeting with the clamp.Hey does anyone know what size of quick disconnect I would need for the valve? Wanting to upgrade but I’m not sure what to measure. Is it a 1/2” female for the foundry side? Also want to add a valve for flow control instead of this clamp thing that sucks. Anyone find a decent one on Amazon or anything? I was thinking of putting one right where the hose disconnects from the valve as well, every time I disconnect it before the boil I get a bunch of hot wort spilling everywhere. Thx

Similar threads
- Replies
- 12
- Views
- 764
- Replies
- 14
- Views
- 1K
- Replies
- 27
- Views
- 3K
- Replies
- 4
- Views
- 1K
