• Please visit and share your knowledge at our sister communities:
  • If you have not, please join our official Homebrewing Facebook Group!

    Homebrewing Facebook Group

3-in-1 "Boil Kettle, Jacketed Chiller, Conical Fermenter" by Brewha

Homebrew Talk

Help Support Homebrew Talk:

This site may earn a commission from merchant affiliate links, including eBay, Amazon, and others.
I now have two large BIACS and regularly do 200 liter boils.


I still need to finish reading this but it is a bear mobile. Has anyone that is an active poster ordered a large? Seems like a pretty decent price for a 1-1.5bbl system, if it can actually produce a 45gallon yield!

And (this is probably in the thread)- what the highest volume yield that anyone with a medium has had?
 
I ended up building a whirlpool arm out of an old 1/2" stainless racking cane and a few triclamp parts from brewhardware.com

I really appreciate this contribution! I've been learning a lot on my BIAC, enough to know what to improve upon and this will go a long way in my interest in whirlpooling my hops and separating the break from my bounty.

Thanks so much again!
 
Anyone else have issues at dough-in with the mash being too thick when doing a 6 gallon batch in the medium BIAC? It's not until I turn on the pump to get some circulation going that I seem to get enough water in the colander to completely wet all of the grains. It was especially bad with the last batch I did that started with 9.25 gallons of water and 15 pounds of grain in the colander.
 
Anyone else have issues at dough-in with the mash being too thick when doing a 6 gallon batch in the medium BIAC? It's not until I turn on the pump to get some circulation going that I seem to get enough water in the colander to completely wet all of the grains. It was especially bad with the last batch I did that started with 9.25 gallons of water and 15 pounds of grain in the colander.

Mdime
Add some water. Not all grains absorb the same amount of water per pound. So if you do not have a good looking mash add to it. If you get too much liquid then you can boil it down a little bit more.
OR maybe you just have to stir your mash more and wait a little longer to let the water settle down
Good luck
 
Anyone else have issues at dough-in with the mash being too thick when doing a 6 gallon batch in the medium BIAC? It's not until I turn on the pump to get some circulation going that I seem to get enough water in the colander to completely wet all of the grains. It was especially bad with the last batch I did that started with 9.25 gallons of water and 15 pounds of grain in the colander.

Had a few stuck mashes with the system and have learned a couple approaches to avoiding them. I minimize my stirring. I put grains in a pound or two at a time and stir them in at the water's surface but not much below. Dough balls would only be an issue in my experience if I dump more grain in at once.

When doughing in I close the bottom valve and open it slowly to minimize clogging before circulation. Also, Regardless the batch size between 1 and 2 pounds of rice hulls are mixed into the grist. I don't know if you use adjuncts, but 5-60 percent of all my brews contain flaked somethings and you will do yourself a favor by a nice beta glucan rest if you do.

Now to the small batch issue with lack of water, the dead space in the bottom of the conical poses a challenge to the system. I prefer it to the three vessel model but it comes with its own idiosyncrasies. Mash thinly, I don't run my pump unless my grain is submerged or damn close to it. The dip stick is a great tool for the mash. I attach it at an angle. Whatever the reading is before you kick the pump on is a gauge to go by. Say my number is 65, I won't like the mash liquid rise above 70 and control the flow accordingly.

Instead, I just brew less often and split batch beers to use different yeasts, or dry hop varieties/schedule.
 
Well the first brew is done! It was also my first brew ever. After a year of reading, listening, and watching I dived into the deep end.

I have attached some pictures of the system I and my brother in law are building.

Some newbie goof ups were, dumping trub using the full port ball valve into a SS bowl - bad idea, the bowl did an outstanding job of directing the stuff everywhere!
Did not adjust the lid band clamp correctly, so I never had a single bubble out the blow off hose, but by golly the hydrometer kept saying fermentation was cranking.
Rushed and did not let the wyeast smack pack do its job.
We tried to lift the colender out by hand, even though we went to all the effort to install that hoist in the attic.
Really need to figure out a way to deal with fluid in hoses, more wort on the floor.
Supposed to have 11 gallons of beer, but wound up with 6.5, still scratching my head on that one, oh wait, my brother in law used 12oz samples for hydrometer readings. From the notes maybe hourly.

The important thing is that we got 6.5 gallons of a nice golden ale, somehow hitting the OG and FG. We are taking 5 gals up to my nephews graduation from West Point next week.

Need to figure out the Beer Smith settings tweaks. Pretty sure I should have had more water to start with.

Scotch Ale is next.

image.jpeg
 
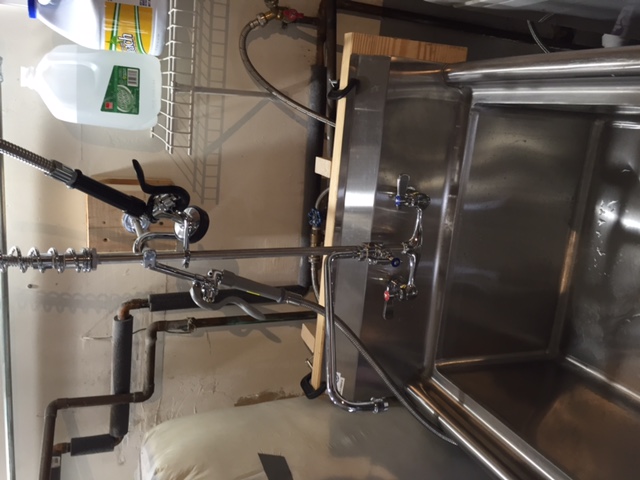
The 24 by 24 sink was a huge help in making clean up easier.

I have a commercial rise sprayer and regular faucet.

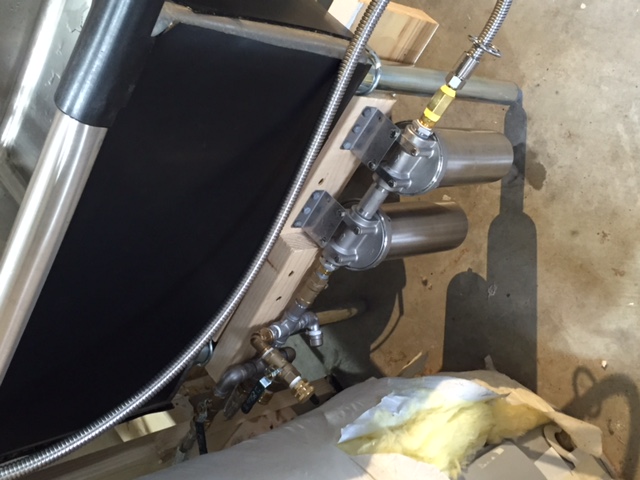
The pot filler nozzle is hooked to the sediment and carbon block filter and four way manifold.

image.jpeg
 
The manifold feeds cold water to my clothes washer, the sink, the RO/DI filter and the SS 10 inch sediment and Daulton ceramic carbon block filter

image.jpeg
 
Cmason FYI I usually have about 15 gallons of water in the mash and end up with about 10 gallons net beer. I did the same exact thing with the trub and stainless bowl on my first brew. Glad to see I'm not the only one [emoji2] Can you tell me about the motor on your grain mill? My drill works fine but that looks like a nice upgrade. Cheers [emoji481]
 
I went with the motor offered by all American ale works.

It drives a Monster MM3 SS mill. The work to set up the direct drive using their directions was straight forward. The electrical was the hardest part because I am parinoid about electrical safety.

The cabinet was given by a friend. I use a piece of pipe insulation to seal between the bucket and the drop down slot. The bucket is pushed up by just sliding a 2 by 6 under it. Works quite well. Pictures are included.

Hope that helps.

image.jpeg
 
Well,

I have seen some comments on the amount of material at the bottom after mash. I saw that on my first brew, but that was my only brew, so I have no idea if what I saw was normal, or if I had a channeled grain bed, or to fine a crush.

I doubt the crush as I was at .045 on the MM3.

Just thought the bag might clean up the mash more, but it might cause a slow down or stuck mash easier.

My most recent batch was done with a Wilser BIAB bag and this false bottom (without any feet) in the colander. I actually think that it improved the speed of drainage though it did add about 1/2" to the grain bed height.

My ultimate goal in getting the bag and false bottom was to try and brew smaller experimental batches. By swapping out the element with a shorter 2000W one and by not using the colander I think I can get the batch size down to 3 gallons.
 
Well the first brew is done! It was also my first brew ever. After a year of reading, listening, and watching I dived into the deep end.

I have attached some pictures of the system I and my brother in law are building.

Some newbie goof ups were, dumping trub using the full port ball valve into a SS bowl - bad idea, the bowl did an outstanding job of directing the stuff everywhere!
Did not adjust the lid band clamp correctly, so I never had a single bubble out the blow off hose, but by golly the hydrometer kept saying fermentation was cranking.
Rushed and did not let the wyeast smack pack do its job.
We tried to lift the colender out by hand, even though we went to all the effort to install that hoist in the attic.
Really need to figure out a way to deal with fluid in hoses, more wort on the floor.
Supposed to have 11 gallons of beer, but wound up with 6.5, still scratching my head on that one, oh wait, my brother in law used 12oz samples for hydrometer readings. From the notes maybe hourly.

The important thing is that we got 6.5 gallons of a nice golden ale, somehow hitting the OG and FG. We are taking 5 gals up to my nephews graduation from West Point next week.

Need to figure out the Beer Smith settings tweaks. Pretty sure I should have had more water to start with.

Scotch Ale is next.

Can you list the details of your ventilation setup? Currently looking to buy a fan, hard ducting, and some sort of stainless mixing bowl upside down and looks like you have all of that. :mug:
 
Can you list the details of your ventilation setup? Currently looking to buy a fan, hard ducting, and some sort of stainless mixing bowl upside down and looks like you have all of that. :mug:

cuda6pak,

Just another view on ventilation - I've been really happy with my ventilation setup and used 6" insulated flexible duct typically used in HVAC systems. Bends and connections use hard metal duct with the insulation pulled over the metal and secured in place with HVAC flexible duct tape; not the cheap gray stuff. I purchased the 50 qt. bowl here: http://www.ebay.com/itm/CONCORD-Stai...r=430448091560

The fan I purchased can be found at this link (http://www.amazon.com/dp/B000RKOOGE/?tag=skimlinks_replacement-20). I shopped around and prices varied somewhat.

My system in use:


...and stored:
 
Last edited by a moderator:
The fan is from this link, designed for hypnoics applications

https://www.plantlightinghydroponic...earch&utm_campaign=Google Shopping&kpid=13017

The duct is similar to Norfab - http://www.ductingsystems.com, but sourced from gorilla duct http://www.oneida-air.com/category.asp?Id={3345C4DA-0E18-4EF2-B7F7-374003290CAF}

I used the Norfab flange to tie to the bowl with round bolts used for furniture assembly from Home Depot and also automotive gasget caulk.

Current issue is that I still get a bit of condensate, need to rig up something to catch it.

Where did you get the mixing bowl from? Haven't had luck finding any bigger than 45qt or right at the diameter of the BIAC that were a pure rounded shape. That thing looks huge. Figured the full radius would help with condensate unlike JB Brewings bowl, but looks like you are having some issues too.
 
Where did you get the mixing bowl from? Haven't had luck finding any bigger than 45qt or right at the diameter of the BIAC that were a pure rounded shape. That thing looks huge. Figured the full radius would help with condensate unlike JB Brewings bowl, but looks like you are having some issues too.

FWIW, I get no condensation on the flat of the bowl I'm using. I chose that bowl because it has a slightly larger radius than the medium BIAC. It's the CFM of the fan that really matters.
 
I got the bowl from a used restaurant supply place, aluminum and larger in diameter than the BIAC.
 
I think condensation issues are tied to local weather at the time and how vigours the boil is, along with fan speed, duct length, and my astronomical chart for the brew day.

My condensate point is near the fan at the wall. I silicone caulked all the duct seams where the duct exits the house. I also double walled the duct at that point and insulated in between.

I will wind up with some sort of dish tray below the fan to catch the condensate.
 
Well the first brew is done! It was also my first brew ever. After a year of reading, listening, and watching I dived into the deep end.

I have attached some pictures of the system I and my brother in law are building.

Some newbie goof ups were, dumping trub using the full port ball valve into a SS bowl - bad idea, the bowl did an outstanding job of directing the stuff everywhere!
Did not adjust the lid band clamp correctly, so I never had a single bubble out the blow off hose, but by golly the hydrometer kept saying fermentation was cranking.
Rushed and did not let the wyeast smack pack do its job.
We tried to lift the colender out by hand, even though we went to all the effort to install that hoist in the attic.
Really need to figure out a way to deal with fluid in hoses, more wort on the floor.
Supposed to have 11 gallons of beer, but wound up with 6.5, still scratching my head on that one, oh wait, my brother in law used 12oz samples for hydrometer readings. From the notes maybe hourly.

The important thing is that we got 6.5 gallons of a nice golden ale, somehow hitting the OG and FG. We are taking 5 gals up to my nephews graduation from West Point next week.

Need to figure out the Beer Smith settings tweaks. Pretty sure I should have had more water to start with.

Scotch Ale is next.

If you are using beersmith, I highly recommend downloading the BIAC equipment profile. Others have already put in the effort to create the profile for it, so no need to try and reinvent the wheel. RO water will need some salt additions. How fast does it come out the system. I would still even recommend getting a water test (ward labs or someone local). For 40 bucks you can confirm what your water is coming out of your filtration system to adjust salts according to the beer style you are making.

Brewing salts for RO will likely be needed for anything beyond pilsners. CaSO4, CaCl2, NaCL, MgSO4, CaCO3 will likely all have to be put in for many styles. Look up sulphate to chloride ratios to get a better sense of flavor adjustments with water.

Also, a refractometer is a worthwhile investment, I don't use the hydrometer until I am finished with pumping my wort to fermenters and drain my hosing for the reading (less loss). Two drops of wort on your refractometer (dont buy the cheapest one) will tell you where your gravity is throughout the process. I take both hydrometer and refractometer in the end to confirm both readings are correct, or at least off in the same way.

I had a low yield first few times too, I realized I was mashing too thickly and sparging too heavily. Now, when I make a 15-17 gallon batch I still only use <5 gallons to sparge and about 18 gallons to mash 34 lbs of grain. These are not solid numbers to be repeated to a T but they might be ballpark ones you can use as a baseline to work from.

Here comes another recommendation, invest in a pH meter with buffering solutions (7.01 and 4.01). This will ensure you can acidify your water to 5.2 to 5.6 depending on the style. It will improve mash efficiency (for me by almost 30%!) and give you more data to work with when fine-tuning your craft with your equipment.

Brew expecting for some loss, I lose between .25 and .75 gallons depending on the trub content. More than that and there is something you will learn to do differently that will improve your efficiency. Also, cranking your power box on 100 will boil more wort off than I was used to when I got the system. I like a good vigorous boil so I mash thinner to account for evaporation.

Oh, and dumping trub, we use the rubbermaid bins (4 gallon) which help. They slide under the lowest valve and the perpendicular walls reduce spillovers. Hope this helps, keep brewing on it, you will learn something new every time! My last two batches I got a brewhouse efficiency of 77% and 79% using these methods. Some people can push that to the mid 80s but I haven't gotten there yet.
 
Thanks for the input!
I used Beersmith and the profiles from Brewha, but I may need to figure out some adjustments. Such as the comment "up the water to grist ratio". By how much? The next brew will be after the National Homebrew Convention in a few weeks. I am going and will hit up Nathan on several questions dealing with Beersmith and the volume consideration for the BIAC.
 
First off, I have to say that the BIAC is a great system. It does, however, take some time to get the system dialed in to what and how you brew. My preference is to brew hoppy IPA’s so keep that in mind as you read (i.e. a lot of hops).

I have brewed and tasted 3 beers with the BIAC now and I think it is going to take a few more to get my system to where it is approaching the quality of brews I used to make with my 5 gallon gravity system that I was good at. It is different brewing a beer without sparging than what I was used to. From reading various articles in brewing magazines, I see that it is required to add somewhere between 10 and 30% more grain to get the same gravity I expect (with an additional bump in hops) when doing a no sparge batch. On my 3rd brew, I added 15% more grain, used 63% efficiency in Beersmith, and my pre-boil gravity was accurate. In the BIAC 10G equipment profile, I changed the values to: fermenter loss 1.0 (because there is 1 gallon loss from the racking port to the dump valve), and the loss to trub and chiller 0.5 gallon. And I have been dumping about 1.25 gallons trub per brew. With my last brew, I thought that 1.5 gallons would have been better, because after dumping the 1.25 gallons, I still had a little sediment coming out while racking my beer. Had I dumped a little more, the level of trub would have been an inch or two below the racking port. I did get a full 10 gallons into carboys (Recipe was 25.5 lbs. grain, with 17 gallons water into kettle to start) and there was about a half of gallon or beer left in the kettle. Perfect I thought.

So…
1. Are you adding grain to make up for not sparging (compared to a traditional 10g batch)?
2. How much trub do you dump before pitching your yeast?
3. How much trub are you dumping before racking to kegs?
4. Does anybody chill the beer to 40F (the lowest setting on Nathan’s chiller) for a few days to clear beer before racking?

Cheers!
 
Back
Top