• Please visit and share your knowledge at our sister communities:
  • If you have not, please join our official Homebrewing Facebook Group!

    Homebrewing Facebook Group

Nitrogen Levels / Seaweed

Homebrew Talk

Help Support Homebrew Talk:

This site may earn a commission from merchant affiliate links, including eBay, Amazon, and others.

CodeSection

Well-Known Member
Joined
Feb 4, 2018
Messages
1,655
Reaction score
819
I have been reading from various sources about suggested nitrogen levels. Sources from posts here in this forum range from using Miracle Grow 10-10-10 to 12-4-8 to 17-17-17.

Others suggest using granules with a slow release. Sources from universities like MSU give nitrogen recommendations based up pounds per acre which doesn't help me since I will be using 10 gallon grow bags.

For those of you that have hops planted in a small area, pot or grow bag, what are you using?

Currently, I have Miracle Grow in two concentrations (16-8-8 and 30-10-10).

Lastly, in the past I have used a Seaweed fertilizer on plants and vegetables....
https://www.amazon.com/Sea-Soluble-Seaweed-Extract-Fertilizer/dp/B00NIZ6KEO

Has anyone tried something like that?
 
Organic labs has one called haymaker. Dilute it down to around a 28%. Hit them early May and late June. Your plants will love it. Also consideration is mine grow in the ground. You might go with the 17-17-17. Better if you got away from the potassium and phosphate as they are not needed in abundance.
 
Literature out there will scare the cra p out of you with you don't want to give nitrogen in abundance cause it will burn your plants. Booo! Not accurate info! They eat it like candy!!! You do want to cut way back in July though.
 
I agree with you on that, not a lot of us can get the quantity of real solid fertilizer cheaply. Especially in a close neighborhoods. Most people don't bother with active composting either.
 
Varies from place to place, but usually anyone can go to an ag coop to buy "the real deal", though that's often in quantities superior to what most gardeners want to buy. Manure can bring a lot of carbon that mineral fertilizers can't, and for the nutrients one can rarely get cheaper than the mineral fertilizers. Sure you pay upfront for the volume, but you save over time.
 
I agree with you on that, not a lot of us can get the quantity of real solid fertilizer cheaply. Especially in a close neighborhoods. Most people don't bother with active composting either.

I do have compost but I was going to use it for my 22" 4'x8' and a couple of 22" 4'x4' raised beds. Even with the compost, I still need more soil so I bought 30 bags of 3 cubic feet/bag of soil. I've been filling the bottom of the beds with cardboard, shredded paper, clippings, palm tree palms, desert dirt etc. to build it up so as I did not have to fill it 22" high with better soil.

Are you suggesting I mix some of the compost with the bedding soil for the hops?
 
Varies from place to place, but usually anyone can go to an ag coop to buy "the real deal", though that's often in quantities superior to what most gardeners want to buy. Manure can bring a lot of carbon that mineral fertilizers can't, and for the nutrients one can rarely get cheaper than the mineral fertilizers. Sure you pay upfront for the volume, but you save over time.

I looked into buying bulk soil and considered it. My driveway's thickness is 6" with reinforced rebar and can easily withstand the weight of the load and a 18 ton truck. The problem I was told was their trucks leak oil and they were concerned with my driveway's small aggregate finish being stained with oil. My driveway is long, is wide and curves so dumping a bulk soil load at the entrance of my driveway off the dirt road I live on was not an option.

For a little more money, Home Depot delivered and used a three wheel fork lift to deliver the bags on a pallet exactly where I needed it. The advantage with the bags it it is easier to get the dirt to my backyard and dump it into the raised beds as opposed to trying to move loose soil.
 
Yes, incorporate it right in there. Easy way I found was to drop it in the rows however/whichever way, then till it, re - rake into raised row. That way decomposition happens through out and consistency of soil is the same.

Manure is what you are looking for mixing with the soil. Cow or horse. Don't get urea for it though!
 
I looked into buying bulk soil and considered it. My driveway's thickness is 6" with reinforced rebar and can easily withstand the weight of the load and a 18 ton truck. The problem I was told was their trucks leak oil and they were concerned with my driveway's small aggregate finish being stained with oil. My driveway is long, is wide and curves so dumping a bulk soil load at the entrance of my driveway off the dirt road I live on was not an option.

For a little more money, Home Depot delivered and used a three wheel fork lift to deliver the bags on a pallet exactly where I needed it. The advantage with the bags it it is easier to get the dirt to my backyard and dump it into the raised beds as opposed to trying to move loose soil.

Why the 18 tonne truck? Just go to the coop and buy a 50lb bag of whatever you need.

I'm talking about fertilizer, here, not compost. A little goes a long way. If it's a garden and not a field, those bags will last you years, the drive doesn't seem a huge deal. Or otherwise have them ship it to your entrance, and just go pick it up with your car (or wheelbarrow). We're probably talking about 1-4 50lb bags, it's not a huge quantity. Plus micro-nutrients, if needed, which come in jars of a few pounds. Maybe a few bags of chicken manure while you're at it to get a source of carbon. A few years' worth of all that easily fits in any car.

Yes, you are correct....I thought you were suggesting compost/manure for my entire raised beds and grow bags. I can use my SUV for such a small amount of what you were suggesting as my driveway is just way too long to use a wheelbarrow.
 
I was talking the full width and length of the "raised" portion of your raised row. A shovel's worth to be tilled in. It takes time for it to be broken down and utilized, has the trace elements you will need, and makes "maintenance" of your raised row a bit easier.
 
I was talking the full width and length of the "raised" portion of your raised row. A shovel's worth to be tilled in. It takes time for it to be broken down and utilized, has the trace elements you will need, and makes "maintenance" of your raised row a bit easier.

Gotcha. Just received notice from Great Lakes Hops that my Amalia, Willow Creek and Multihead are shipping out.
 
These are raised rows. Shovel's worth of manure that was mixed with compost in every single row, that was then tilled in. The rows are 16 to maybe 18 inches wide, plants are 3 feet apart. Each shovel load was the length of a standard spade type shovel, and touched each other. Not saying you have to do the same, but I'll tell you, the plants were starving!
 

Attachments

  • 0830151146.jpg
    0830151146.jpg
    686.9 KB
  • 0430171835a.jpg
    0430171835a.jpg
    463 KB
  • 0804161748a_HDR.jpg
    0804161748a_HDR.jpg
    546.1 KB
Last edited:
These are raised rows. Shovel's worth of manure that was mixed with compost in every single row, that was then tilled in. The rows are 16 to maybe 18 inches wide, plants are 3 feet apart. Each shovel load was the length of a standard spade type shovel, and touched each other. Not saying you have to do the same, but I'll tell you, the plants were starving!

Wow! Very, very nice setup! How many acres do you have?

I will mix some manure, compost and planting soil together in the grow bags. Speaking of grow bags, the 10 gallon bags I ordered will not be delivered until about two weeks. I guess I could cancel the order and buy different 10 gallon grow bags, but these were 17.5" in diameter and 12" in height where as, the others were 16" in diameter and 12"-13" in height. I thought the slightly larger diameter would be better.

Seeing I have no idea how quickly the roots and plants will grow in our warmer weather, I was thinking of initially planting the hop plants in either one or two gallon plastic nursery containers until the 10 gallon grow bags arrive. I actually have several five gallon nursery containers as well. How quickly do the roots grow?
 
They are astonishing Code. They will more than equal what you see. Get some red dixie cups, you can use them as a makeshift planter until you get your bags. You'll want to separate them if they are together in tray like planters, they are challenging to untangle if they start intertwining. You won't have much regret when slicing the sides of the cups. Make sure you punch some drainage holes. The young plants are more susceptible to everything. Heat, light, too much water, and too little water.
2 1\4 acres is the size of that field. I designed it, installed most of it, and put the irrigation system in. Lots and lots of blood, even more sweat out into that.
Careful with the bags color. Dark is going to absorb the heat and you will cook those roots....

You have been very helpful! Thank you very much! I would have never thought of the red dixie cups....great idea!

I can easily cancel my current 10 gallon grow bag order and instead order tan colored grow bags. There are even lighter tan ones but they are not rated well.

Does the size of grow bags matter? The 10 gallon tan size is 16" in diameter and 12" in height. A 15 gallon tan grow bag is 20" in diameter and 12" in height. I would think there a benefit with a larger diameter, correct? Or is it a waste of money to buy the 15 gallon grow bag?
 
That is a tough question for me to answer...lol....I only ever tried growing strawberries in a grow bag.....I ended up not having any strawberries, so ended my expenditures with grow bags! I have learned from that though, as those bags were black, and basically cooked the root system. I know one thing is certain....the roots going down in earth will be kept cooler than what is on a bag above it. I would try to get the biggest, lightest colored bag I could, that still meets the strength test. That is just me though.....ymmv.
 
Well @Ruint, the hops from Great Lakes Hops were delivered today and they threw in a free Willamette? That was very kind of them and good marketing.

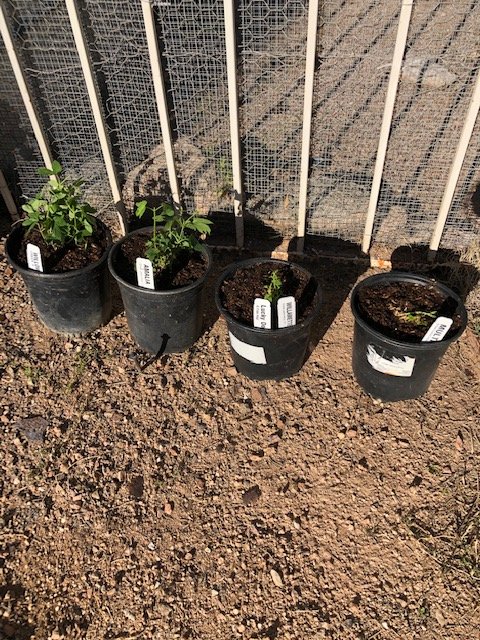
I brought a bag full of planting soil along with three red dixie cups to the office as I wanted to plant them ASAP. When I was walking through my garage this morning, I decided to bring four 2.25 quarts nursery containers just in case. I'm glad I grabbed the extra containers as the red dixie cups that I had were too small (8 oz size?) and were not the larger red dixie cups ones that you normally see used for beer. I know you had meant to use the larger red ones, but I did not want to go to the store and buy any ....I'm staying away from people. I thought the smaller ones would possibly work, but I did not expect the plants to be so large.

Here they are...

IMG_2843.jpg
 
Very nice!! Did you get them in the planters ok? Watered afterwards? Now they will be shocked from all the activity, so it would be good to give them some settle time, with only partial sunlight for a day or 2, before "fully" putting them out in the elements.
I did mean the larger red dixies...I always forget that they make smaller ones! LoL

I transplanted and watered them before heading back to the office. I tried to give them a little sunlight. This weekend I will add some compost to the top after the soil settles.

I will keep them in these containers I'm guessing for a week or so since I am waiting on my 15 gallon grow bags to arrive and now with the extra Willamette hop plant, I will need to rethink/redesign where I was intending to have them climb. I have a tall second story balcony that I was going to have the three plants climb to. The one side of the balcony is only 168" wide which would be too close with four different hop plants that had 3 jute twine ropes each going to the top railing.

Here are the plants getting a little sun....

IMG_2849.jpg
 
Your first year growth, I hope is vigorous! You might get to 12 feet maybe 14. Maybe get 2 foot laterals. Should be no reason you couldn't get them all there. With 40" spacing between all plants, that is 160 inches. Your lateral will droop with weight of cones.

You need some 20 foot lengths of coconut coir? I have extra and can send you some...
 
I was under the impression with different hop varieties, I should space them centered 5'-7' apart. I can space them closer, but I do not want the bines to mix at the top. Below is the initial area I was thinking for just three plants. You can't see the full width but you will get idea. I would put the plants in 15 gallon hop bags that would be placed behind the 22" raised bed. I choose this location as I can easily step out onto the balcony and untie the rope and not have to worry about using a ladder or some other type of trellis.

I was planning on having one plant go up three ropes spaced at a foot apart at the middle of the railing on top. I was going to tie the ropes to that top bar. Then, I was going to place the other two plants so as their bines would go up to where I would rig a three foot bar to attach the three ropes to that sat on each one of the pillars.

I googled coconut coir and still don't understand about "20 foot lengths". From what I see it is mixed in the soil?


IMG_2842.jpg
 
All those strings going to the ground, are tied off to the top line, same thing your railing will be, are coconut coir. A twine that is composed of coconut husks. It is renown for it's coarseness, and hop bines readily cling to them. In the picture attached, that top line is 18 feet from the ground. It would surprise the s**t out of me if your 1st year plants will make it to the top. For your particular set up, I would choose 1 string per plant, with 3 or 4 bines from that plant, trained to climb that 1 string. You could choose to do 3 strings per 1 plant, but, know that you will be getting into a tangled nightmare. The distance the laterals (the offshoots from the main bine that the hops will eventually form on) will not be to the fullest potential either, so having a 3 foot separation from 1 plant to another will also be adequate. The second picture is of 3 year old cascades, and all off the "limb" coming off from the main are the laterals, you can see the flower (spurs) on them, before they become cones. They normally will drop from the weight of themselves, especially when the cones are advanced in their growth stage.
 

Attachments

  • 0517172014_HDR.jpg
    0517172014_HDR.jpg
    550.6 KB
  • 0716171001a.jpg
    0716171001a.jpg
    572.7 KB
Thank you for the advise, explanation and pictures! I bought 6ply jute twine and was planning on doubling it up. I guess I could triple it up or more as well. Even if I do that, it is considerably thinner from your rope. I appreciate your kind offer to send me some, but if you can direct me to the size, I can try and buy some online. Where do you buy yours? Here is a link of what I have....https://www.amazon.com/Tenn-Well-Industrial-Decoration-Gardening/dp/B01M0TT9YS

Since I have no idea as to the bines weight on the vertical rope, last night I was looking at https://www.amazon.com/Stainless-Aluminum-Crimping-IETFULL-Breaking/dp/B07WYR9KKB. I could use carabiners to make it easy to attach to the top rail. I think the upside with the cable is that it is strong and can be used multiple seasons. I believe the major downside is separating the bines from the cable might be time consuming and difficult. Plus, it would be so much easier to throw the bines with the twine in the compost bin. What are your thoughts?

If I understand correctly, the normal practice is to use 1-2 strings per plant with 3 bines around the string. I'm guessing you are suggesting since these are young plants, one string is enough with three bines since the plant's root system is not developed. So, would one use two strings in the second or third year? Do people ever use three strings with three bines to each string?

I remeasured the area this morning. The space between the pillars and where the railing is 126". Then add the width of each pillar at 25", that gives a total width of 176".

I write way too much and I again appreciate all the help you are providing me.
 
No problem! When I first started, it was a big guess, and I did a boat load of searching, researching, and touring!! Still had a lot to learn, as quite a bit of info wasn't exactly on the up and up! If I can make it easier for just 1 person, I'll be happy!! In my travels, I have not seen anyone use 3 strings to 1 plant. The norm is either 1 string to 1 plant (straight verticle), or 2 strings to 1 plant, in what is called a "V" trellis design. That, I would not worry about in the first year. Concentrate on getting the plant situated and "happy" so to say. Get it going vertical as soon as possible! Do not train all the bines that shoot up. Pick the strongest of the growers, not necessarily the fastest. Lightly squeeze the bine, not at the apex bud, usually halfway between the apex bud and the first nodes (the spot that has the first off shoots of leaves, where your first lateral will start to grow). It should still be firm. Be gentle. If it collapses easily and reminds you of a piece of straw, I would say that is probably not one you want to choose to let continue up the coir (more likely it is what is known to be the bull sprout). It is debatable as to how many bines you let grow. 3 is usually it. If they get all the nutrition and water they need greatly weighs on how many to have. I did 4 bines per string times 2 strings per plant. That is a big burden for 1 plant to sustain. Easier on you, and the plant, especially new plants, if you just start with less. 1 plant with 1 string though, shouldn't have much problem with 4 bines.
 
Typical weight of 1 plant is going to be approximately 30 pounds. That is weight of plant, not including wet weight or wind shear. That can put your weight into the 70 or 80 pounds range.
No need for caribiners, they may not make it much easier.
 
So should I buy a thicker twine or rope? Or, should I consider the cable? I guess I could use the cable and wrap the twine around it to give extra area for the bines to grab hold of?

If you suggest a thicker rope, is there a particular online business you buy from?
 
Back
Top