You are using an out of date browser. It may not display this or other websites correctly.
You should upgrade or use an alternative browser.
You should upgrade or use an alternative browser.
Boil kettle condenser - no overhead ventilation needed
- Thread starter BrunDog
- Start date

Help Support Homebrew Talk:
This site may earn a commission from merchant affiliate
links, including eBay, Amazon, and others.
jdr01
Well-Known Member
1/2" tubing inside 3/4" tubing. The ends are easily opened for cleaning if I want to run a brush down them.


ingchr1
Well-Known Member
I'm just going to add mine at flame out and turn the water on after it's been in there for 10 minutes, I'll also have the kettle whirlpooling during this time.So, what kind of chiller is everyone using now that they’ve implemented the condenser? Just planning out a new purchase, and thought that an IC may be an issue here when it’s added to the boil for the last 15 or so, since we need the lid on. Anyone have a work around?
Last edited:
I'm just going to add mine at flame out and turn the water on after it's been in there for 10 minutes, I'll also have the kettle whirlpooling during this time.
This makes good sense. Once you add the IC, the temp of the wort will drop slightly, and steam production will drop dramatically.
augiedoggy
Well-Known Member
This solution would work best I think with an external chiller... I may be totally off base here but I am curious is there a lot of folks using these using an immersion chiller? I would have guessed no.
Also I know this came up in the beginning but has anyone noticed any ill effects of the dreaded "DMS" or is this really more of another brewing myth as suspected?
Also I know this came up in the beginning but has anyone noticed any ill effects of the dreaded "DMS" or is this really more of another brewing myth as suspected?
Last edited:

$53.24
1pc Hose Barb/MFL 1.5" Tri Clamp to Ball Lock Post Liquid Gas Homebrew Kegging Fermentation Parts Brewer Hardware SUS304(Liquid Hose Barb)
yunchengshiyanhuqucuichendianzishangwuyouxiangongsi

$44.99
$49.95
Craft A Brew - Mead Making Kit – Reusable Make Your Own Mead Kit – Yields 1 Gallon of Mead
Craft a Brew

$53.24
1pc Hose Barb/MFL 1.5" Tri Clamp to Ball Lock Post Liquid Gas Homebrew Kegging Fermentation Parts Brewer Hardware SUS304(Gas MFL)
Guangshui Weilu You Trading Co., Ltd

$176.97
1pc Commercial Keg Manifold 2" Tri Clamp,Ball Lock Tapping Head,Pressure Gauge/Adjustable PRV for Kegging,Fermentation Control
hanhanbaihuoxiaoshoudian

$33.99 ($17.00 / Count)
$41.99 ($21.00 / Count)
2 Pack 1 Gallon Large Fermentation Jars with 3 Airlocks and 2 SCREW Lids(100% Airtight Heavy Duty Lid w Silicone) - Wide Mouth Glass Jars w Scale Mark - Pickle Jars for Sauerkraut, Sourdough Starter
Qianfenie Direct

$58.16
HUIZHUGS Brewing Equipment Keg Ball Lock Faucet 30cm Reinforced Silicone Hose Secondary Fermentation Homebrew Kegging Brewing Equipment
xiangshuizhenzhanglingfengshop

$22.00 ($623.23 / Ounce)
AMZLMPKNTW Ball Lock Sample Faucet 30cm Reinforced Silicone Hose Secondary Fermentation Homebrew Kegging joyful
无为中南商贸有限公司

$159.99 ($26.66 / Count)
3M High Flow Series System BREW120-MS, 5616001, For Brewed Coffee and Hot Tea, Valve-in-Head Design
SpaceCityProviders

$10.99 ($31.16 / Ounce)
Hornindal Kveik Yeast for Homebrewing - Mead, Cider, Wine, Beer - 10g Packet - Saccharomyces Cerevisiae - Sold by Shadowhive.com
Shadowhive

$20.94
$29.99
The Brew Your Own Big Book of Clone Recipes: Featuring 300 Homebrew Recipes from Your Favorite Breweries
Amazon.com

$76.92 ($2,179.04 / Ounce)
Brewing accessories 1.5" Tri Clamp to Ball Lock Post Liquid Gas Homebrew Kegging Fermentation Parts Brewer Hardware SUS304 Brewing accessories(Gas Hose Barb)
chuhanhandianzishangwu

$7.79 ($7.79 / Count)
Craft A Brew - LalBrew Voss™ - Kveik Ale Yeast - For Craft Lagers - Ingredients for Home Brewing - Beer Making Supplies - (1 Pack)
Craft a Brew

$479.00
$559.00
EdgeStar KC1000SS Craft Brew Kegerator for 1/6 Barrel and Cornelius Kegs
Amazon.com

$28.98
Five Star - 6022b_ - Star San - 32 Ounce - High Foaming Sanitizer
Great Fermentations of Indiana

$719.00
$799.00
EdgeStar KC2000TWIN Full Size Dual Tap Kegerator & Draft Beer Dispenser - Black
Amazon.com
Also I know this came up in the beginning but has anyone noticed any ill effects of the dreaded "DMS" or is this really more of another brewing myth as suspected?
I wouldn't imagine DMS would rear it's ugly head unless boil off % dropped below 5-6. I doubt many folks here are south of 15%.
I've been wondering about this as wellThis solution would work best I think with an external chiller... I may be totally off base here but I am curious is there a lot of folks using these using an immersion chiller? I would have guessed no.
Also I know this came up in the beginning but has anyone noticed any ill effects of the dreaded "DMS" or is this really more of another brewing myth as suspected?
I was thinking of running an IC through the lid and just having it in the boil the entire time. I'm not doing BIAB so it would just be in the boil kettle. I plan on using a Boil Coil so it won't interfere with the element.
BudgetBrewer
Well-Known Member
- Joined
- Sep 20, 2015
- Messages
- 156
- Reaction score
- 42
Just got done running the water supply line and connector for the condenser assembly.
Got the mister nozzle, TC connector and waterline QD ready. Just need the TC tee which didnt arrive in time for tomorrows brewday. Next time...

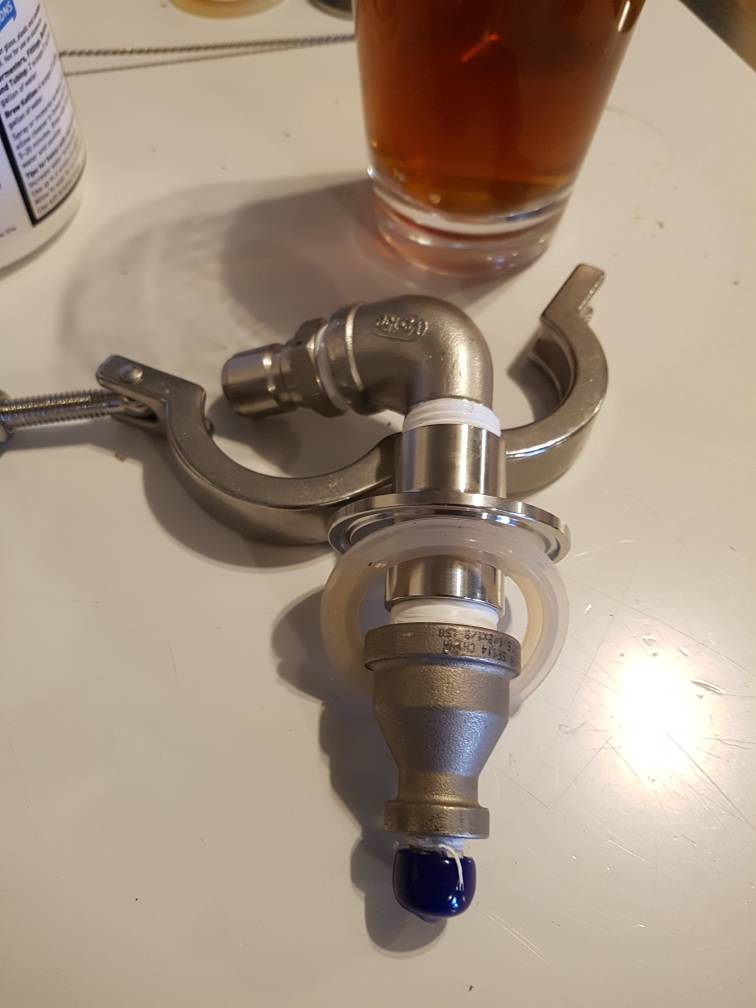
Got the mister nozzle, TC connector and waterline QD ready. Just need the TC tee which didnt arrive in time for tomorrows brewday. Next time...


Just got the Brew-boss condenser for my 1bbl pilot system and tested it out yesterday. It worked fine, condensed the steam, lowered the electrical usage requirements, etc. but it did have a low evaporation rate as has been noted before. I tested it at 20 gallons and the rate was fine, I think 8%, but at 40 gallons I'm guessing there is just too much restriction with the smaller camlock. Generally 4% is the minimum target, which is about what I hit when I tested it at 40 gallons, but I would prefer to be in the 6-8% range. The other option is to just boil for longer, but 30 extra minutes every batch adds up.
This is a commercial version of a condenser https://conical-fermenter.com/SP500CONDENSER-1325-Condenser.html , which is what made me figure that the diameter of the kettle outlet can make a big difference. Imagine if you were to just create a steam stack on your lid to go out the roof or wall, you wouldn't expect a 1/2" camlock to be able to vent enough steam but for the smaller pots a tri-clamp seems to be about proportionally right compared to larger systems. Going from a 1/2" camlock to even a 1" ID tri-clamp is 4x the area.
I have a dual 1bbl pilot system as well as a smaller 1/2bbl tank that I'll use for wort for yeast propagation, so at the least I'll be able to use the brew-boss for that. For the 1bbl tanks, I'm making a tri-clamp version like the ones that other people have mentioned on here and will let you guys know how the testing goes.
enormous13
Well-Known Member
I'm just going to add mine at flame out and turn the water on after it's been in there for 10 minutes, I'll also have the kettle whirlpooling during this time.
This makes good sense. Once you add the IC, the temp of the wort will drop slightly, and steam production will drop dramatically.
Ok, that handles the sanitation and steam. Will sitting at somewhere just-under-boiling down to wherever it cools by itself for 10 minutes cause any side effects we don't want? I know typically we want to cool as fast as possible and stay sanitary.
Like Auggie said, an external chiller may be better in this specific case/setup, but plate chillers and CFCs have their downsides compared to the Jaded chiller I was considering. I'm pretty dead set against a plate chiller, too many negative opinions on them, but I've left the door open for a CFC, if it were logically a better fit in this condenser setup. I don't want to start a general IC/CFC/PC discussion here, but picking the appropriate chiller for this specific setup is crossing my mind.
I don't think there's any danger, assuming you're still above ~160°F, and probably higher. This is similar to a commercial brewer's whirlpool temperatures. Just take into account the isomerization you'll get at these temperatures if you're adding flameout hops.Will sitting at somewhere just-under-boiling down to wherever it cools by itself for 10 minutes cause any side effects we don't want? I know typically we want to cool as fast as possible and stay sanitary.
I currently whirlpool with temps dropping as low as 140° for 30-45 minutes for many IPAs. It's the lower temperatures that are ideal for bacteria and bugs that you should be most concerned with getting through as fast as possible.
Ok, that handles the sanitation and steam. Will sitting at somewhere just-under-boiling down to wherever it cools by itself for 10 minutes cause any side effects we don't want? I know typically we want to cool as fast as possible and stay sanitary.
Like Auggie said, an external chiller may be better in this specific case/setup, but plate chillers and CFCs have their downsides compared to the Jaded chiller I was considering. I'm pretty dead set against a plate chiller, too many negative opinions on them, but I've left the door open for a CFC, if it were logically a better fit in this condenser setup. I don't want to start a general IC/CFC/PC discussion here, but picking the appropriate chiller for this specific setup is crossing my mind.
I bought the Jaded Cyclone CFC and have been very happy with it this far. I get 6 gallons down to 66f in around 11-13 min
BudgetBrewer
Well-Known Member
- Joined
- Sep 20, 2015
- Messages
- 156
- Reaction score
- 42
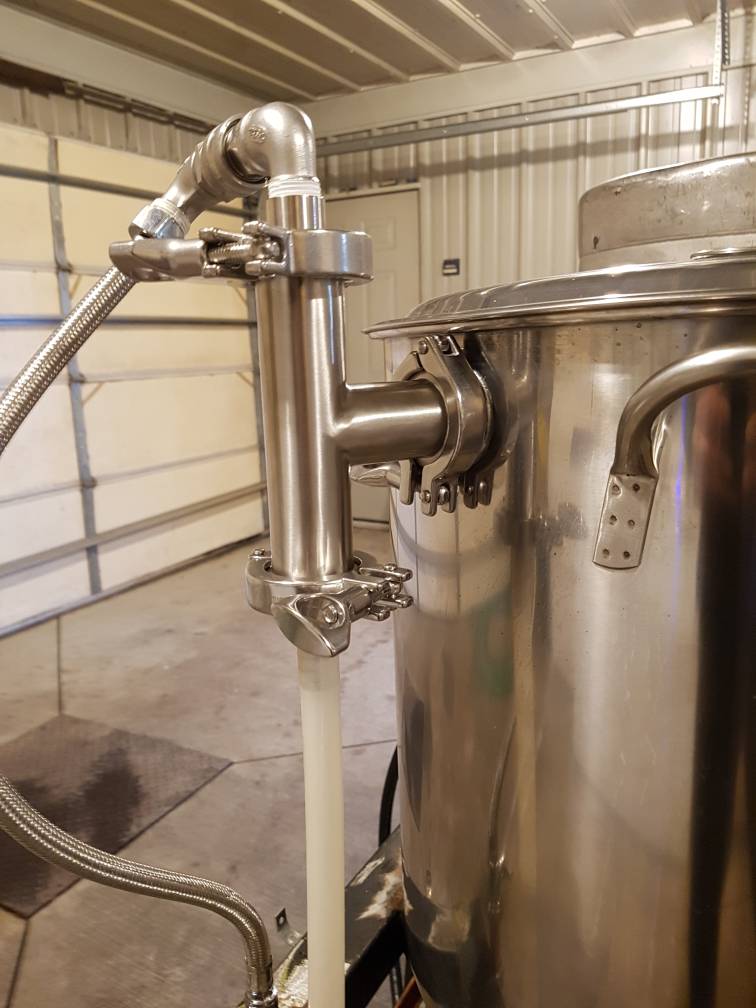
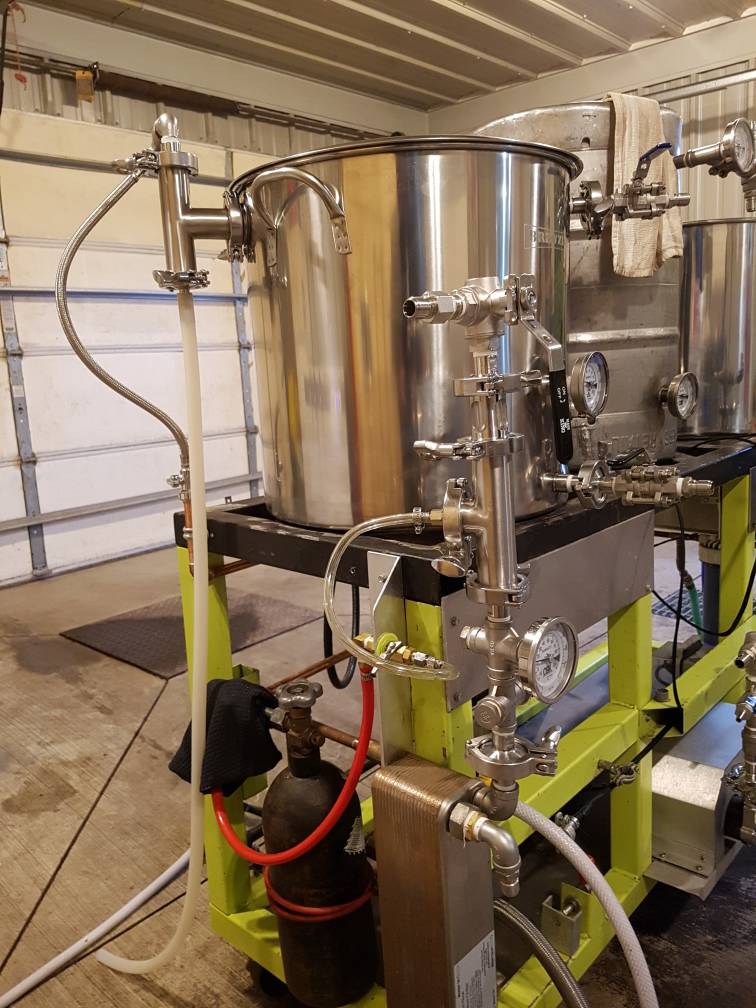
Hope to actually test it tomorrow on a brew.
Used to run around 78% power with ezboil controller. Anyone have a suggestion for power level with the lid on using this and / or boil off rate? Its the 9+GPH mister...
My guess is you will be roughly half of that.
One piece of advice I have for anyone using this who will inevitably find they need to dial the power way back... usually you have a power setting that is >60%. If your duty cycle length is 3 seconds, you may find the boil starts to appear pulsing more when you dial back the power. I think this is because less heat gets built into the element carrying it over between Off->On periods plus the element is off for long-ish period of times. So I suggest you drop the duty cycle time to 1 second. The element will turn on/off more frequently and stress the SSR a bit more, but it shouldn’t be a problem assuming that SSR is of reasonable quality and mounted to a decent heat sink.
One piece of advice I have for anyone using this who will inevitably find they need to dial the power way back... usually you have a power setting that is >60%. If your duty cycle length is 3 seconds, you may find the boil starts to appear pulsing more when you dial back the power. I think this is because less heat gets built into the element carrying it over between Off->On periods plus the element is off for long-ish period of times. So I suggest you drop the duty cycle time to 1 second. The element will turn on/off more frequently and stress the SSR a bit more, but it shouldn’t be a problem assuming that SSR is of reasonable quality and mounted to a decent heat sink.
BudgetBrewer
Well-Known Member
- Joined
- Sep 20, 2015
- Messages
- 156
- Reaction score
- 42
Thanks BrunDog. Gives me a starting point. I'll get out the EZ Boil controller manual and see how to change the duty cycle.
May hold off the brew session till next week. Instead, I'll try and change duty cycle, and boil some water for an hour. See what kind of boil off i end up with and it should be a good test for the condenser. I did get the 6GPH mister as well, if i feel the 9 is overkill. No clue what the water pressure is here.
May hold off the brew session till next week. Instead, I'll try and change duty cycle, and boil some water for an hour. See what kind of boil off i end up with and it should be a good test for the condenser. I did get the 6GPH mister as well, if i feel the 9 is overkill. No clue what the water pressure is here.
You don't need to change the duty cycle for an EZBoil. It modulates the current slightly differently than most PID's. EZBoils by default try to even out the current switching.Thanks BrunDog. Gives me a starting point. I'll get out the EZ Boil controller manual and see how to change the duty cycle.
May hold off the brew session till next week. Instead, I'll try and change duty cycle, and boil some water for an hour. See what kind of boil off i end up with and it should be a good test for the condenser. I did get the 6GPH mister as well, if i feel the 9 is overkill. No clue what the water pressure is here.
Brew on

BudgetBrewer
Well-Known Member
- Joined
- Sep 20, 2015
- Messages
- 156
- Reaction score
- 42
You were right!
Forgive a rather lengthy summation of my findings from this test on this particular Boil Condenser Unit, but hope it helps corroborate findings.
Test Environment:
Garage, 60 deg ambient, 48 deg groundwater temp, 18 gal. BK, 5500w element, Auberins EZ Boil controller, chugger pump. 8 gal. pure water only used. Lid left on kettle throughout test, with several times removing lid to ensure a full boil and vaccuum from condensing effect etc.
11:19 am. 8 gal. in BK, turn on element. Lid on BK.
11:56 am. 200 degree alarm sounded on controller. Power was reduced to the 66% power it was previously set to.
11:58 am. Opened water valve to mister, temp 208 deg.
12:02. Bk water at 210 deg. Noticed steam escaping BK around lid.
Investigated and found water exit hose was submerged in waste water. lifted hose above waste water level and noticed escaping steam had stopped within maybe 30 seconds. 154 deg coolant water exit temp
12:08 Controller power to 60% output water temp @ 129 deg.
12:12 Turned power on controller back to 55%
Definate suction when removing lid to check for rolling boil.
12:15 Temp still 210 deg, drop power to 45%
12:23 Coolant water pail was at 5-1/2 gal. exit waste water roughly 113 deg.
1:02 Turned off BK Element.
7.5 gal water remaining = 1/2 gal boil off
12.5 gal spent cooling water in pails minus 1/2 gal boiloff = 12 gal cooling water used over 64 minutes. Possibly higher water pressure here than rated 45psi?
Conclusion:
No condensate in brew environment.
MUST leave condensate exit tubing above collection vessel waterline to avoid losing vaccuum effect.
Power used significantly reduced although higher than expected usage of water. If you can use this to clean the system afterwards, that loss is regained.
Final test would be an actual brew day with full volumes. Im sure I'll have to increase power on the controller for 13 gal boil volume.
Biggest challenge will be how to account for .5 - .7 gal less boil off. I guess less sparge water...
Overall, very happy and excited at the possibilities. Less electricity consumption, less steam to extract later with a dehumidifier. The drop in current used may even make back to back brews possible with this 40A rig.
[emoji122] Thank you for the inspiration and guidance BrunDog!
Not sure if this has been mentioned somewhere yet, but I was recently at a very large brewery.
They have a similar condenser method and route the steam back into their HLT.
Could be a sweet setup on a Homebrew scale for B2B batches...
They have a similar condenser method and route the steam back into their HLT.
Could be a sweet setup on a Homebrew scale for B2B batches...
Except the condensate/spray has the boiled off volatiles in it. I don’t think you want to put that back into your next beer.
Except the condensate/spray has the boiled off volatiles in it. I don’t think you want to put that back into your next beer.
Hmmmmmmm... good point! [emoji13]
kcinpdx
Well-Known Member
Has anyone tried the lid mount version yet?
RiverCityBrewer
Well-Known Member
Yes, works just fine. Lifting the lid for hops, salts, etc. was kind of a pain with the added weight, fortunately I had another port in the lid that I was able to position over a basket for hops.
kcinpdx
Well-Known Member
Excellent. I'll just add a 90 elbow and assume the rest is the same. I'm also likely to go with a 1.5" vs 2"
Finally got to try out my new condenser last weekend. It's a 2" lid mounted version that I'm using on my EBIAB kettle. I went lid mount because I would have lost too much sidewall for the boil. If I were planing a new system, I would probably get a little bigger pot and go side mount. I added a second 2" port for adding hops. The condenser worked very well. I have an exhaust hood and fan that I normally use that does a satisfactory job, but it's pretty loud when running full on. It was wonderful to have it quiet for a change and especially nice not to have to suck what heat I have out of my garage in these colder months. I can definitely see the advantage to having a pot mounted condenser, it makes the lid a little heavy and cumbersome to remove. In the past, I have used mostly whole hops for the boil placed in a stainless hop spider. With this set up I'm going to try using mainly hop pellets loose in the boil as my spider will not fit with the lid on. I use conical fermenters, so I can dump the boil and WP hops out the bottom before pitching yeast. I may eventually build a different spider, but for now I will use hop bags if I add whole hops. I had a boil off rate of about .75 GPH and a very strong boil at about 35% with a 5500w element. In the past it was about 1.1 GPH at close to 55%. I only had some minor issues, the weight of the condenser makes the other side of the lid want to raise slightly but I cured that with a paper clip over the edge of the lid. I also had some steam trying to escape where I had a piece of stainless wire that was attached to my false bottom coming out of the pot. Fixed that with a couple more paper clips. I don't really need it, so it will be gone in the future. The other issue I had was when I pulled the lid up near the end of the boil, I found that there was a lot of hop matter stuck to the sidewalls above the boil. Fortunately, they were mostly late additions, so I don't think I lost much utilization before I scraped them back in.
I used the 6.32 GPH mister and I believe it used about 6.5 GPH. I had to change buckets about every half hour or so. I found that the bucket put off quite a bit of steam so I used a lid with a hole drilled in it to run the hose into. I have a TIG welder, so I drilled the tri clover cap and used a 4 1/2" long 1/8" pipe nipple welded directly. The nipple could have been 3 1/2", but I wasn't sure what I needed when I ordered the parts. My TIG skills are still somewhat limited, and my lid very thin, so there is a fair amount of distortion around the tri clover ports. They're still fully functional, if not beautiful.
I also have a 10 gal 3 vessel system that I will be adapting it to eventually, just have to decide if I will do lid or side mount for it.
Thanks again BrunDog for this great idea!
Here's a few pics of the system. I included one of my counter flow chiller that I recirculate through as I recall someone asking about chilling methods when using the condenser...

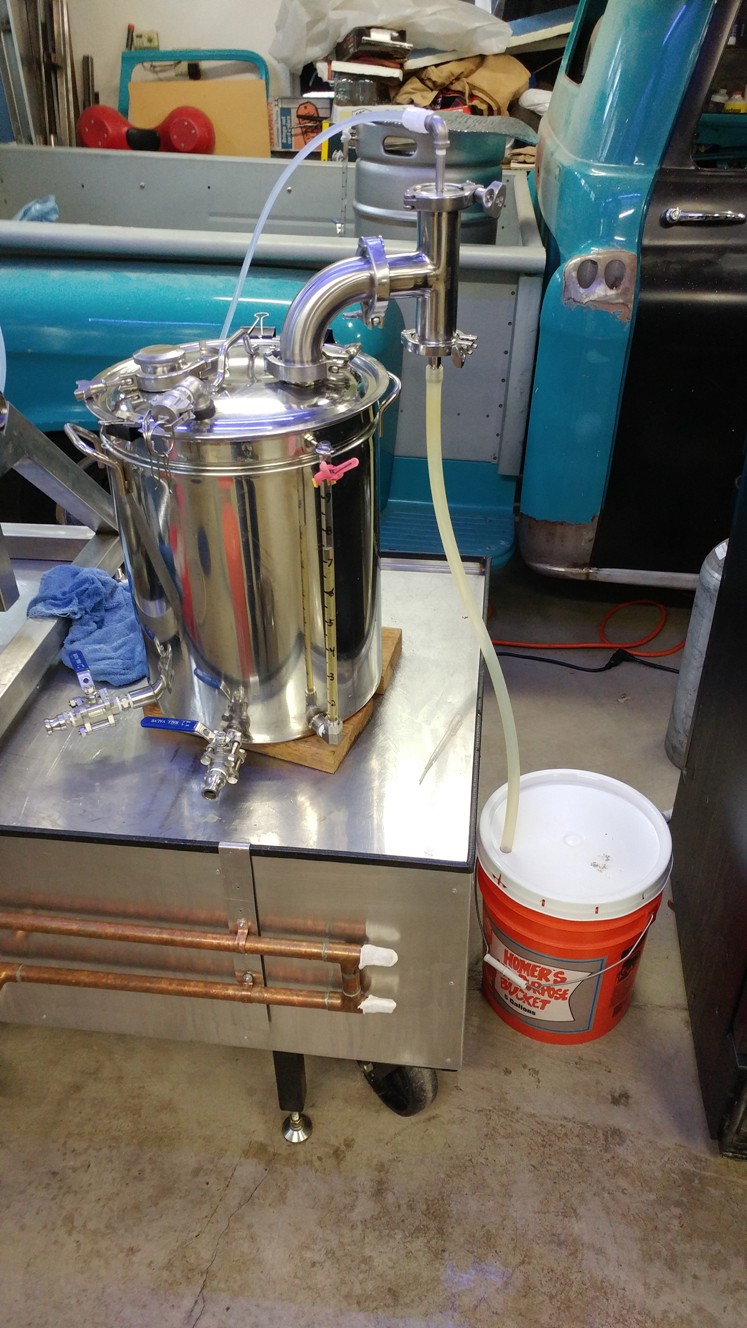
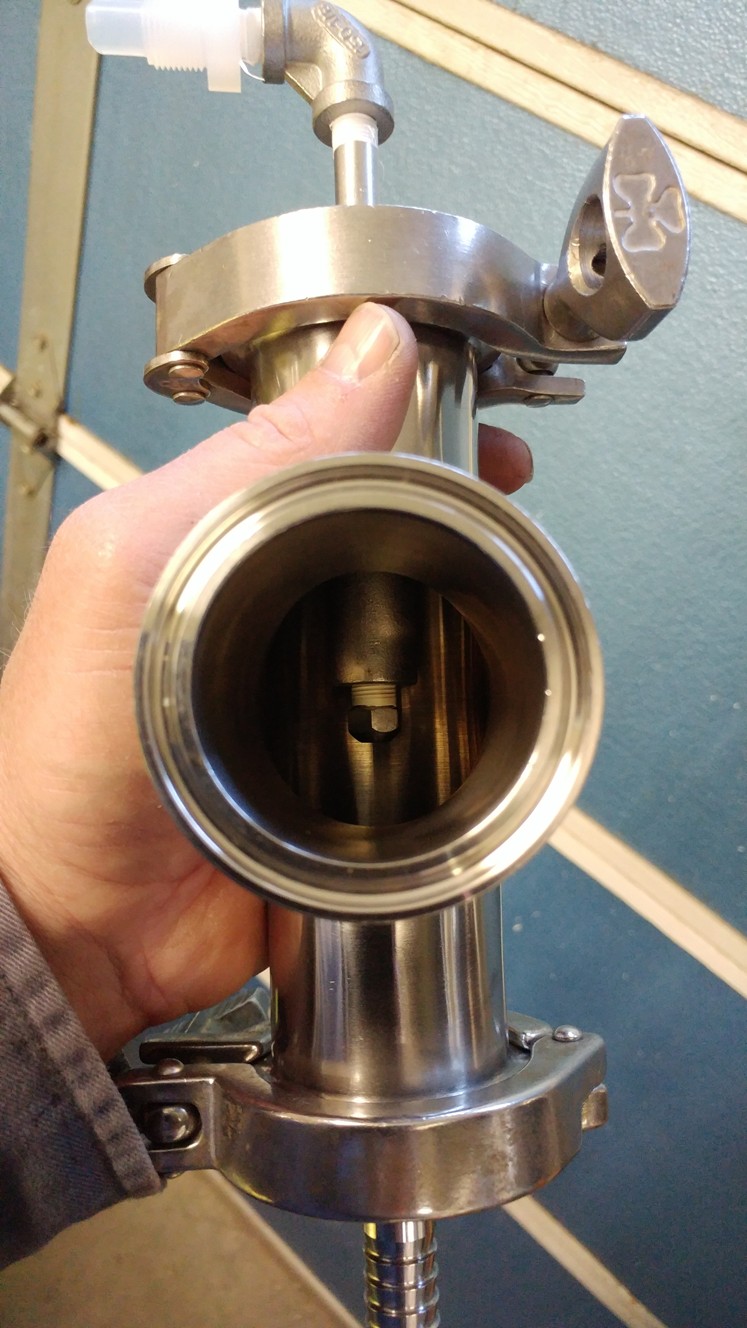
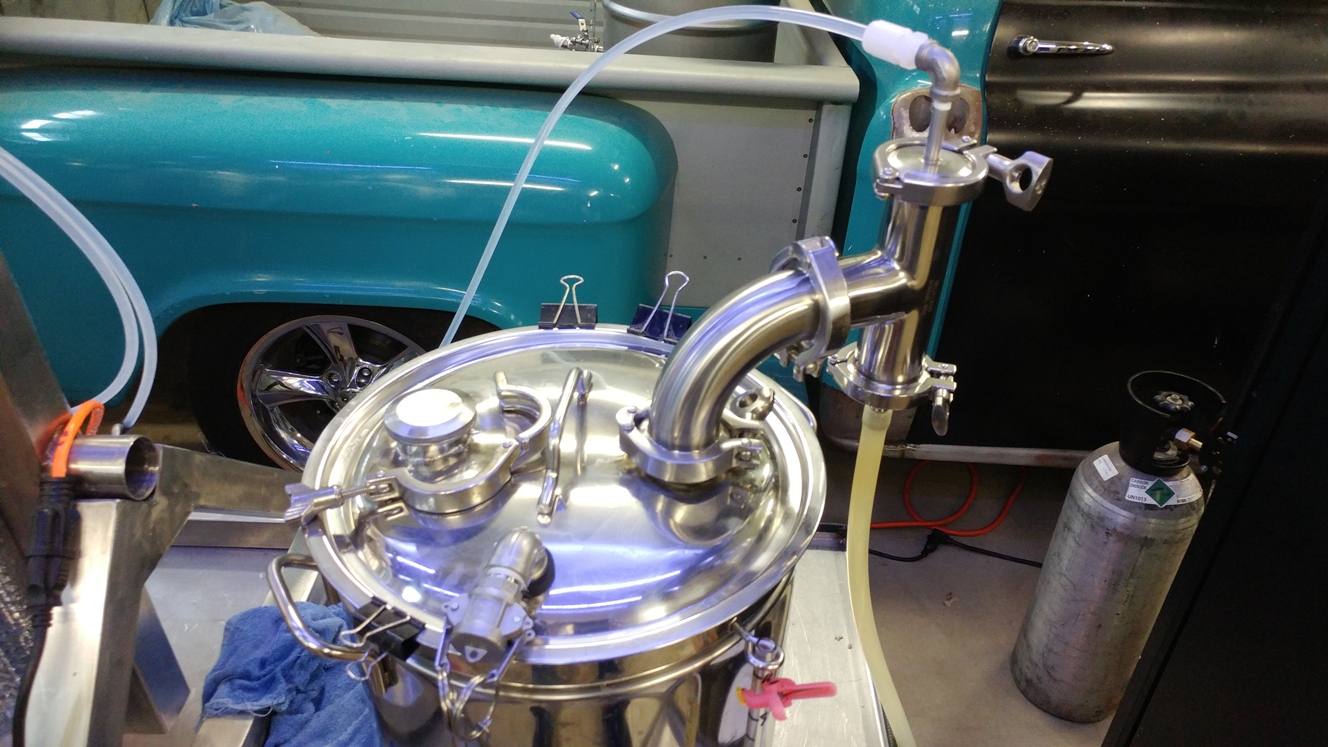
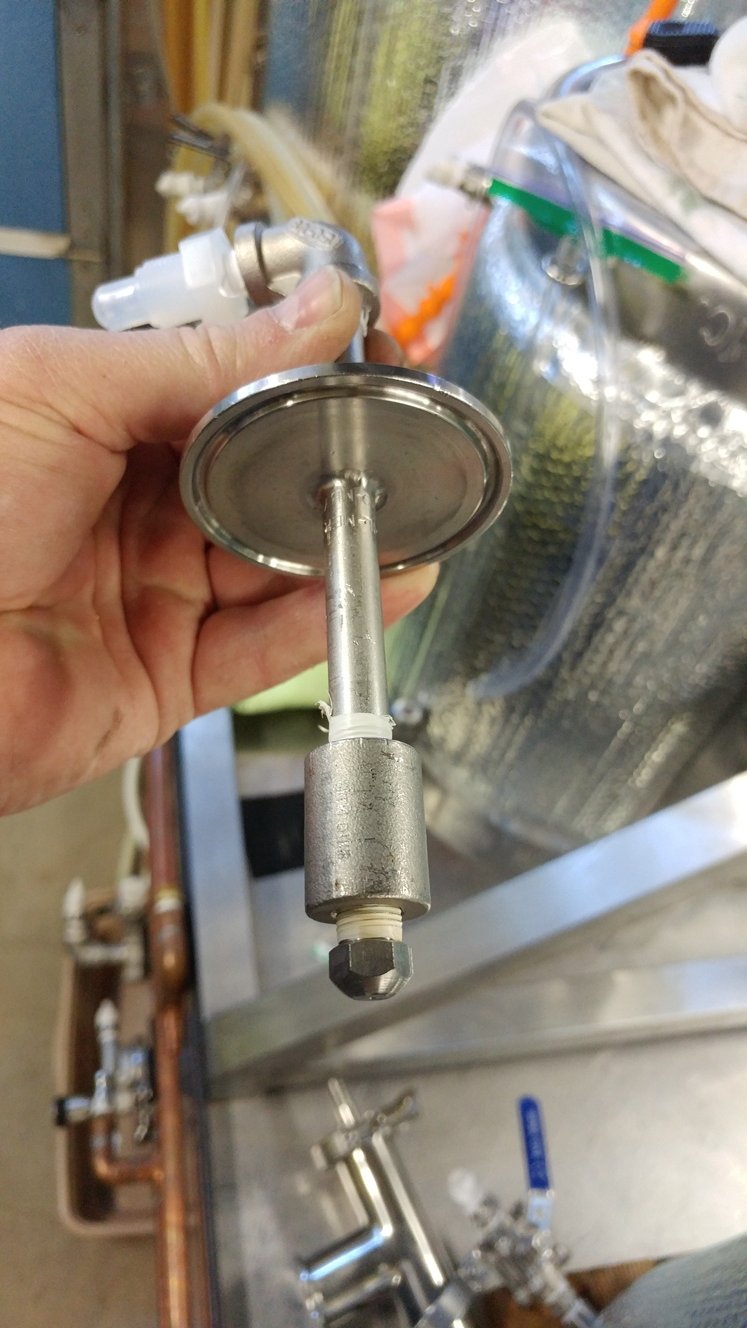
I used the 6.32 GPH mister and I believe it used about 6.5 GPH. I had to change buckets about every half hour or so. I found that the bucket put off quite a bit of steam so I used a lid with a hole drilled in it to run the hose into. I have a TIG welder, so I drilled the tri clover cap and used a 4 1/2" long 1/8" pipe nipple welded directly. The nipple could have been 3 1/2", but I wasn't sure what I needed when I ordered the parts. My TIG skills are still somewhat limited, and my lid very thin, so there is a fair amount of distortion around the tri clover ports. They're still fully functional, if not beautiful.
I also have a 10 gal 3 vessel system that I will be adapting it to eventually, just have to decide if I will do lid or side mount for it.
Thanks again BrunDog for this great idea!

Here's a few pics of the system. I included one of my counter flow chiller that I recirculate through as I recall someone asking about chilling methods when using the condenser...


Brett Goldstein
New Member
- Joined
- Jan 5, 2018
- Messages
- 4
- Reaction score
- 1
Just did my first brewday with BrunDog’s condenser design on the side of the pot in my non-ventilated basement. Much as everyone said - it captured all the steam produced, and probably cut smells down by at least 75%. I captured about 12 gals of water over an hour boil (I have the 9 gph nozzle but apparently crazy high water pressure, I had the valve only 1/3 open)
Bunch of lessons learned (that I think other people have posted some/most of these):
* significant drop in boil power (from 3500W on my induction burner down to 1500W)
* boil was more aggressive then usual - hops/trub was all over sides of pot and bottom of lid. Next time I’m putting all the hops in bags or a basket.
* had some issues keeping the lid fully on and not getting steam escaping around the lid, had to put weights around the lid. (Finally a use of those barbells I bought years ago!) next time making a gasket by slitting a silicon tube.
* I was worried since my nozzle seemed a little low, some of the spray lands on the portion of the T leading toward the pot. But with the steam from the boil, none of this water seemed to enter the pot.
Thanks for the awesome design - this makes electric indoor brewing possible in a space that’s super difficult to install an outside vent.
This is really exciting to hear. I have a 20G kettle that I typically have had 10-15G at the start of boil. I have a 3500W induction burner, but have always supplemented with a 1500W hotrod heatstick, which will no longer be usable with the lid on. Obviously, my boil-off will be reduced so the water volume will decrease, but it sounds like with the increase in efficiency that I should have no problem with the induction power alone. Can't wait to try this out.Bunch of lessons learned (that I think other people have posted some/most of these):
* significant drop in boil power (from 3500W on my induction burner down to 1500W)
* boil was more aggressive then usual - hops/trub was all over sides of pot and bottom of lid. Next time I’m putting all the hops in bags or a basket.
Glad to hear it guys. I think we have yet to learn how to boil with the lid on. I think the power requirements are even lower than we may think. If we’re getting hops up the sides of the pot, the boil may still be too aggressive. It’s hard to adjust when you can’t see it of course, but I am finding that even a few percent on the duty cycle makes a big difference.
Similar threads
- Replies
- 2
- Views
- 902
- Replies
- 1
- Views
- 379
- Replies
- 11
- Views
- 818


![Craft A Brew - Safale BE-256 Yeast - Fermentis - Belgian Ale Dry Yeast - For Belgian & Strong Ales - Ingredients for Home Brewing - Beer Making Supplies - [3 Pack]](https://m.media-amazon.com/images/I/51bcKEwQmWL._SL500_.jpg)


