Yet Another Electric Brewery Build

Homebrew Talk - Beer, Wine, Mead, & Cider Brewing Discussion Forum

Help Support Homebrew Talk - Beer, Wine, Mead, & Cider Brewing Discussion Forum:

This site may earn a commission from merchant affiliate links, including eBay, Amazon, and others.
After cleaning up from brew day this last weekend, I snapped a couple of photos to show how things ended up evolving after the first few brews.

IMG_20180121_130136 (1).jpg


BrewKaiser nailed it that the TC fittings on the HLT and MLT are a bit of a PITA. I'm in the process of replacing them with cam-locks. I'm also saving my pennies to get some braided silicone hose to prevent kinking on the hot side when I recirculate. (Not that this has really been a problem, but I worry about it when recirculating at the end of the boil.)

I replaced the SS Brewtech sparge/recirc manifold with Loc-Line. I found the weight of the SS manifold caused it to sink down into the grain bed, while the Loc-Line allows me to set the recirc and sparge right above the grain bed.

I'm also looking at a dedicated fill input on the HLT with a float valve. I'm sure you can guess why.
IMG_20180121_130106 (1).jpg


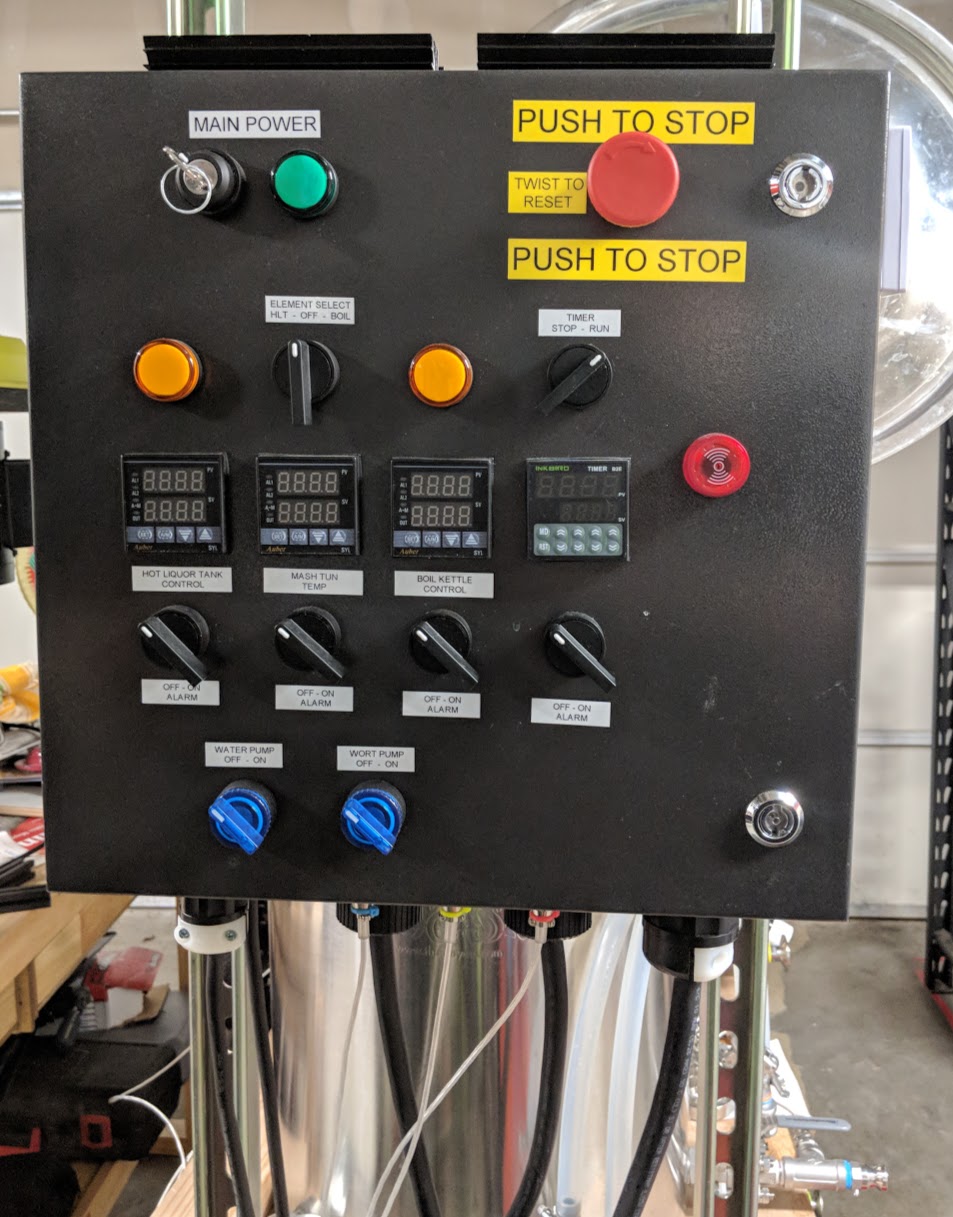
The panel has worked great. However, now that I've seen the EZboils, I am planning on replacing the PIDs for the two elements with those!

Still need to get that Homer decal...
 
Have a couple questions:

1. On the counterflow chiller how did you mount that under the table hanging?
2. on the CF which parts did you use to swap out the hose fittings to 1/2 in male NPT? 2a. Why did you do this are you using a prechilled water source to re-circulate during knock out>

3. What mash thickness are you getting when the manifold is sinking in? Mine has never sunk into the mash it just floated on the top?

Also have you seen major electricity bills by going electric? In CA mine went up enough I might just stick with propane because of the cost differential.
 
Nice setup btw I am still waiting to finalize mine. Need to get the electrical plugs run to the garage (going to have 2 30 amp 4 prongs so I can run the RIMS rocket and boilcoil at the same time. Along with two pumps.
 
BrewKaiser nailed it that the TC fittings on the HLT and MLT are a bit of a PITA. I'm in the process of replacing them with cam-locks.

The panel has worked great. However, now that I've seen the EZboils, I am planning on replacing the PIDs for the two elements with those!

Still need to get that Homer decal...
I'm glad My thoughts on this were not unfounded, after having and using both I really cant imagine why TC fittings are still so popular on the hot side over camlocks these days...
 
I'm glad My thoughts on this were not unfounded, after having and using both I really cant imagine why TC fittings are still so popular on the hot side over camlocks these days...

Here's my reason for going with TC fittings on my next upgrade: I have a lot of leak issues with the threaded fittings (T's, a 4 way cross, and valves) when the fittings have to be oriented a certain direction - can't tighten them anymore or they won't line up properly. Over several brew sessions, I think the heating and cooling expands and contracts the metal, allowing leaks to show up.

I agree with you that they are not a great quick disconnect fitting, so I'm only going to use them where the orientation is important and not as quick disconnects - they will stay in place for the entire brew session and won't come apart unless I feel the need to do a deep cleaning.
 
I have to take your word for it Frobozz although I could see what your saying especially if theres weight on those fittings to move them....
While I agree the tc fittings are ideal in a threadless sanitary installation I use threaded pipe fittings (a lot of them as youve seen) and although I had some trouble getting some to seal on installation due to being a mish mash of different fittings from different suppliers and some even being bsp threads, once I got the installation leaks worked out Ive been lucky to have no issues at all over the years. I even use a 1" camlock in my rims tube to be able to pull the element and clean it quickly if wanted.
I'm building a 3bbl nano now and thats all TC fitting from the manufacturer so I am going to try to eliminate as much hose switching as possible like I have on my home setup.
 
It's probably due to a combination of my lack of plumbing skills and cheap fittings, but after many attempts to stop the leaks with Teflon tape and more than a few different thread sealants, I'm done with messing around. TC may be more expensive, but it will be easier to work with when I inevitably change things around again in the future...

In my setup, I only have to switch hoses once: right at the end when switching from kettle recirc to filling the fermenter. That was a primary design requirement for my setup: I hate switching hoses!
 
In my setup, I only have to switch hoses once: right at the end when switching from kettle recirc to filling the fermenter. That was a primary design requirement for my setup: I hate switching hoses!
same here.. just a couple 3 way valves... no wort left in the rims or lines and the only hose I have that even moves is the one going from the chiller to fermenters... I dont have to switch it but I do have to drap it into the bk to sterilized for a couple mins at "flameout"

anyway... sorry homerbruer didnt mean to hijack your thread..
 
Last edited:
Have a couple questions:

1. On the counterflow chiller how did you mount that under the table hanging?
2. on the CF which parts did you use to swap out the hose fittings to 1/2 in male NPT? 2a. Why did you do this are you using a prechilled water source to re-circulate during knock out>

3. What mash thickness are you getting when the manifold is sinking in? Mine has never sunk into the mash it just floated on the top?

Also have you seen major electricity bills by going electric? In CA mine went up enough I might just stick with propane because of the cost differential.

1. The chiller has a cross-piece on the top with holes. I bolted it to one of the unistrut members that runs front-to-back on the underside of the wood top.

2. I think mine had odd connections for the water in/out. Morebeer says that it uses "¾ inch MPT and ¾ inch FPT garden hose fittings". Mine currently had a garden hose fitting on the bottom (I think it is soldered together) and 1/2" MPT on the top, which I wanted to tee-out for a thermometer. I'll inspect closer tonight and get some close-up photos.

3. Mashes have been 1.25-1.5 qt/lb. I will play around with the manifold again--perhaps I had too much weight from slack hoseon the top or something.

4. I think I can see a slight increase in electricity bills from the system. This month will be a good test, as we've brewed three times (I'll plot it up tonight). Back of the envelope, the elements should eat up 8.25 kWh for a brew day, assuming an 5.5kW elements, an hour boil at 100% duty cycle, and hour mash at 50% duty cycle. Electricity is around $0.11/kWh, so around a buck for an average brew day.

GLHF
Homer
 
same here.. just a couple 3 way valves... no wort left in the rims or lines and the only hose I have that even moves is the one going from the chiller to fermenters... I dont have to switch it but I do have to drap it into the bk to sterilized for a couple mins at "flameout"

anyway... sorry homerbruer didnt mean to hijack your thread..

No worry on the hijack.
One could also have tri-clamps on the vessel ports, use tri-clamp valves and tees for temperature sensurs, but then have TC-camlock fittings facing the user. This would give you the benefits of (1) being able to orient all the valve-ish bits without worrying about tightening threads resulting in bad valve orientation, (2) easy disassembly for cleaning, and (3) the cam-locks for easy hose changes during brew day.

One other comment about the tightening of threads and orientation: I used Bobby_M's weldless fittings, so I was able to put together the tees and valves, and then orient them as desired onto the kettle before tightening the backing nut that holds the bulkhead onto the vessel wall.

GLHF. Homer

EDIT: I think I just said what Frobozz was saying in #46. :)
 
I basically just went through the same re-work on my setup regarding qd vs. TC. I basically went with TC in spots I didn't want things to move and want the rigidity (e.g. coming out of the CF and on the front of the MT, BK, et al. I went with QD in the spots where I wanted to be able to change the hoses. I need to re-work things so I don't have to change hoses (I am 99% there I just got tired and wanted to brew and not screw around with hoses). I just had one hose change last time but I am using a small army of 3 way valves.

As for electricity cost mine is a wee bit more expensive @ kwh Tier 1 $0.2002 Tier 2 $0.28 Tier 3 $0.41.
 
I need to hook up a usage meter I think something else is at play on my pge bill it is just seems murderously high.
 
Ok, spent some time working on the hot liquor tank.

Getting things organized out of the pile of boxes in the corner of the garage:

20170330_210458.jpg


Using a Bayou Classic Model 1060, 62qt Kettle. I don't plan on needing to know the volume of water in the tank, so no sight glass. (Incidentally, I had originally gotten another 1060 for my boil kettle, but ended up switching it out for one with volume markings.)

On the left is the 5500 W ripple element with integrated tri-clamp (brewhardware item ELEMENT5500_RIPPLE_TC). These things are sexy as hell. I think the premium will be worth it for the ability to remove the element when desired. You can also see the weldless 1.5" TC bulkhead flange (brewhardware TC15WLF). I used the drill bit and socket that brewhardware sells for this weldless bulkhead during the install--made it very easy.

HLT outlet is a straightfoward true weldless bulkhead (brewhardware TrueBulkheadFem) to a tee for the RTD temperature sensor (Auber PT100-L401/2NPT) then to a NPT-TC adapter. I'm going with 1.5" tri clamp on the cold and hot sides for no other reason than that I wanted a standard style of connector across the brewery, and that I think they're pretty cool. A little more money up front, but low maintenance and should last forever.

HERMS in and out are compression true weldless bulkheads (brewhardware TrueBulkhead12Comp). HERMS coil is also from brewhardware (HERMSCOIL).

Just a quick note: these weldless bulkheads from brewhardware are top-notch construction. Kudos to Bobby_M!

You can also see my March 809 PL-HS-C polysulfone center inlet pump, leftover from my old brew setup (used at the time for kettle whirlpool while using an immersion chiller). I added 1.5" TC fittings from brewershardware and a basic stainless ball valve.

Finally, two filter housings containing carbon filters that I'll run in series. (Trying these out: https://www.amazon.com/gp/product/B000UQPONM/?tag=skimlinks_replacement-20.) Seattle does not use chloramine, so this ought to do the trick.

Here's the drilled hole for the TC bulkhead. A light filing and the fit was perfect. Wife complemented me on my "nice hole".

20170330_213027.jpg


We then punched the holes for the outlet and HERMS in/outs. For some reason drilling the holes for the punch bolt for these three was a real b... bear. Had another beer and kept at it; that worked. The 13/16" punched holes are absolutely perfect for the 1/2" NPT fittings.

20170330_222946.jpg


Test fitting everything:

20170330_223917.jpg


20170330_224109.jpg


20170330_224014.jpg

What did you use to make the hole for the element? I recently purchase two of the weldless 5500 watt elements kits.
 
Last edited by a moderator:
Back
Top