Turning your Fermonster into a complete closed transfer system for cheap!

Homebrew Talk - Beer, Wine, Mead, & Cider Brewing Discussion Forum

Help Support Homebrew Talk - Beer, Wine, Mead, & Cider Brewing Discussion Forum:

This site may earn a commission from merchant affiliate links, including eBay, Amazon, and others.
That's a fair point, though given that the liquid post which @Brewer Mike might be purchased by someone looking to do the regular style in this thread, I'm hoping we can find a workable solution other than having to buy a new post with a proper diptube.

^With that, you could easily attach it as a bulkhead directly on the lid, but not be able to use in the cross-configuration....
Sorry, but I'm coming up blank on anything other than getting another liquid post that does include the usual diptube;
https://www.brewhardware.com/product_p/npt12tokegpostliquid.htmhttps://www.brewhardware.com/product_p/floatingdiptube.htmI'll keep thinking on...maybe someone else had an immediate solve?
You can buy a replacement dip tube for a balllock keg and then cut it to the size that works for your set up.
 
You can buy a replacement dip tube for a balllock keg and then cut it to the size that works for your set up.
I'd hope he could do that, but looking at the pics and his description, it seems to be a totally non-standard bulkhead that simply doesn't have the diameter to drop a diptube into. Such a bulkhead wouldn't work for any configuration on this thread. :(
 
No dip tube at all. And that piece is machined as one piece. No way to at one.
PSA - don't buy this for this type of setup
TAPCRAFT Homebrew 19/32-18 Ball Lock Post with 1/2 Inch NPT Thread Bulkhead Assembly New Ball Lock Post (Liquid+Gas) Amazon.com
What set up are you trying to build? The one I posted in the OP of the thread? Of the one @Broken Crow has?

I think this is where I’m confused. Because if it’s the original, you should easily be able to make that work with a threaded barb.
 
if it’s the original, you should easily be able to make that work with a threaded barb.
Yeah that was my thought in #519. I mistakenly bought a set of posts similar to those once (for a different build) and the threaded barb solved the problem. You'll be wanting an o-ring too of course.
 
What set up are you trying to build? The one I posted in the OP of the thread? Of the one @Broken Crow has?

I think this is where I’m confused. Because if it’s the original, you should easily be able to make that work with a threaded barb.
Yeah that was my thought in #519. I mistakenly bought a set of posts similar to those once (for a different build) and the threaded barb solved the problem. You'll be wanting an o-ring too of course.
He's trying to build my 'Fermhead' version, but I totally agree; A female 1/2"NPT>1/4" barb would allow it to be used in the standard 2-holes in the lid. Apologies but I can't find such a fitting listed on any site.
 
I fill a keg to the brim with starsan solution and have 7 gallon bucket. I connect the co2 post of the fv to the co2 post of the keg and then connect the kegs liquid post to a 3ft hose at the bottom of the bucket.

the co2 from fermentation will push all the Solution from the keg to the bucket which completely purges the keg of oxygen and then the bucket becomes an airlock.
Could I just connect the CO2 post to a 3 ft. hose to the bucket?
 
Ugh indeed. TBH I didn't even look at the price. You can probably put something together a lot cheaper at your big box home improvement store even if you have to use multiple couplings/adapters.
They have nylon ones that you could use I believe. Also brass. But if you can fine stainless, def go stainless
 
Hi Guys,

Sorry if it's been asked before but I have put together a setup like the original post with a fermonster the two stainless steel posts.
I'm fermenting with a blow off tube but if I put it in my fridge it bearly fits (posts scrap the top of the fridge) so I can't put anything on there.
Will it be ok just to keep it totally closed when cold/soft crashing?
The contraction from cooling down from approx 70F to 55F won't damage the fermonster right?
It's only filled up to the 6 gallon mark so there's space for the loss of volume from the contraction.
The amount of vacuum created will be determined by how much headspace there is. The more headspace, the bigger the vacuum.

You can put the fermenter under 5 psi before putting in the fridge to cool. The pressure will drop but it should be enough positive pressure to start avoid a vacuum
 
The amount of vacuum created will be determined by how much headspace there is. The more headspace, the bigger the vacuum.

You can put the fermenter under 5 psi before putting in the fridge to cool. The pressure will drop but it should be enough positive pressure to start avoid a vacuum
Great, thanks for the tip.
 
Hi Guys,

Sorry if it's been asked before but I have put together a setup like the original post with a fermonster the two stainless steel posts.
I'm fermenting with a blow off tube but if I put it in my fridge it bearly fits (posts scrap the top of the fridge) so I can't put anything on there.
Will it be ok just to keep it totally closed when cold/soft crashing?
The contraction from cooling down from approx 70F to 55F won't damage the fermonster right?
It's only filled up to the 6 gallon mark so there's space for the loss of volume from the contraction.
I think earlier in this thread someone else had the same overhead issue so they used 90° elbows on the lid to make space.
Dunno if that's an option.
 
Thanks, I'll search and see what that looked like.
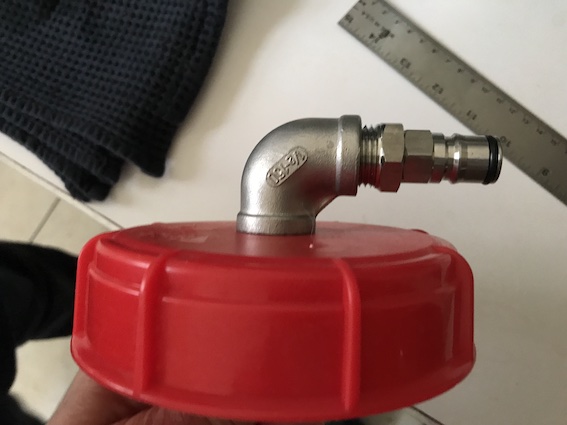
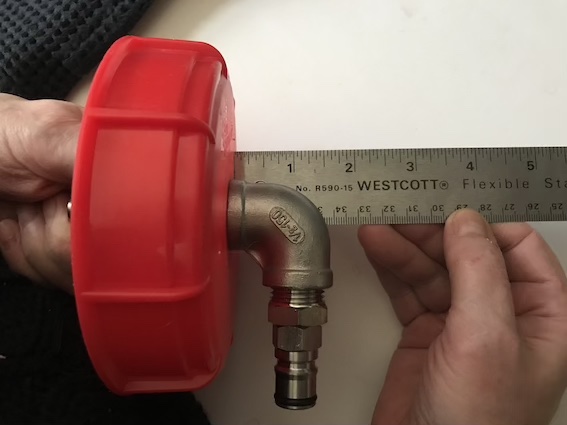
I just went to my 'beer-bits' bench and threw this together to give you a rough idea;
IMG_1560.jpg

IMG_1561.jpg

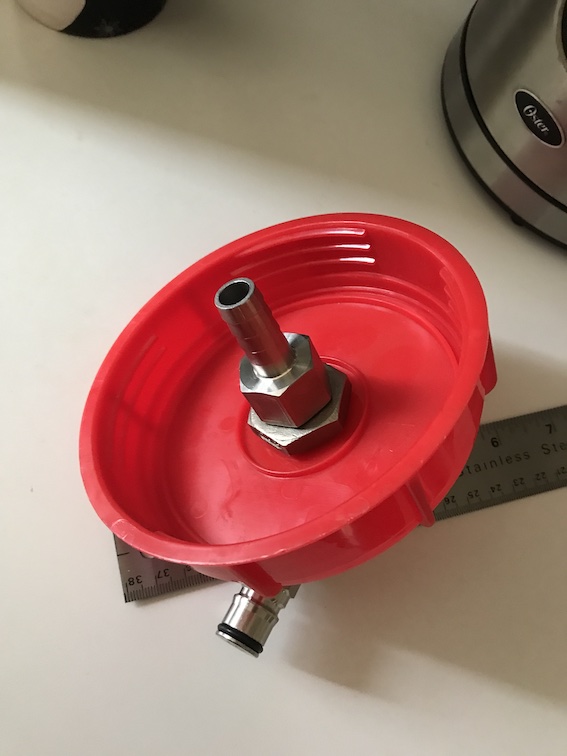
Of course though, you'll run into a similar problem that @Brewer Mike is having and won't have access to a diptube (at least not easy-access, and you'll probably have to put a female NPT>barb fitting on the inside;
IMG_1562.jpg

I used a 1/2" barb because that's what I had laying around... finding one in stainless seems to be problematic. @Dgallo 's nylon barb suggestion is probably your best bet.
Just spitballin' and hoping to be helpful... let us know what you end up doing.
:mug:
 
I'll keep thinking on...maybe someone else had an immediate solve?
Thanks, Broken Crow. Since I already have the one from Aliexpress, I'll keep trying to find a way to get a seal on that.
Going forward, tough, I'm thinking Fermzilla. With all the parts, and depending on the model, Its getting comparable in costs. My LHB shop has the older flat bottom for $49, but it's not pressure rated. I wonder if anyone's tried it under pressure?
 
What set up are you trying to build? The one I posted in the OP of the thread? Of the one @Broken Crow has?

I think this is where I’m confused. Because if it’s the original, you should easily be able to make that work with a threaded barb.
As Broken Crow mentioned, This was an attempt at his version.
I had built your version, but found it finicky to get a seal. If I tighten to much, my silicone washers mush out between the post/nut and the lid. You wouldn't have links to the washers/seals would you?
 
As Broken Crow mentioned, This was an attempt at his version.
I had built your version, but found it finicky to get a seal. If I tighten to much, my silicone washers mush out between the post/nut and the lid. You wouldn't have links to the washers/seals would you?
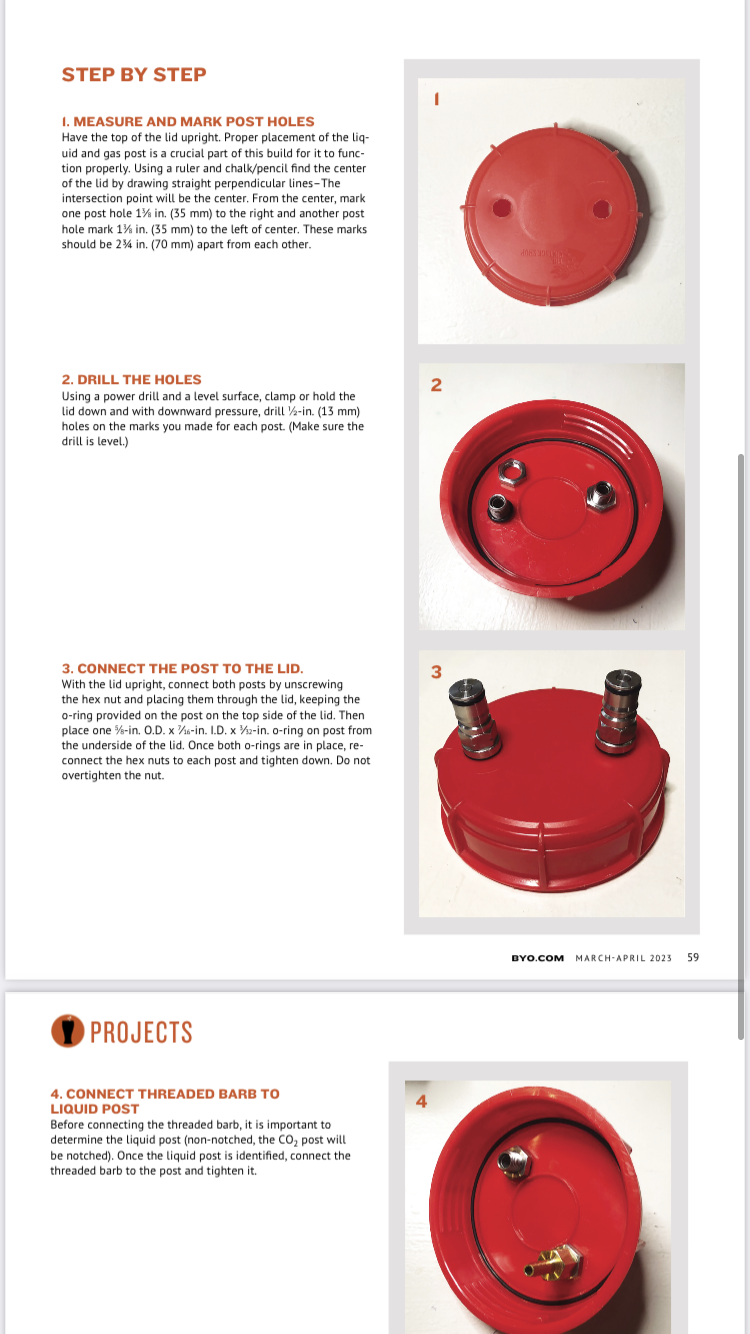
Here is the article I wrote for Brew Your Own for this build. The part list portion has the orings I used. But over tightening with cause the issue discussed. I used orings on both sides of the lid.
IMG_9281.png
IMG_9282.png
IMG_9283.png
 
Here is the article I wrote for Brew Your Own for this build. The part list portion has the orings I used. But over tightening with cause the issue discussed. I used orings on both sides of the lid.
Thanks! Nicely done article. I remember you soliciting photos, but never saw the finished article.
 
As Broken Crow mentioned, This was an attempt at his version.
I had built your version, but found it finicky to get a seal. If I tighten to much, my silicone washers mush out between the post/nut and the lid. You wouldn't have links to the washers/seals would you?
I was just typing this response when @Dgallo posted his excellent article above (Thanks!) ...In step 3; As long as you're using a grooved locknut with an o-ring on the inside, you only need "hand tighten" it...most bulkhead failures involving o-rings happen because of either overtightening, or the lack of a grooved locknut. Is your locknut grooved?

@Dgallo; I only noticed the "OP" next to your name this morning..I often miss what should be obvious and I've gotten accustomed to long threads having been started by long absent OP's... I just want to take a moment and express my deepest gratitude for you for this thread...it was the deciding factor that made me overcome my worries about plastic and switch from glass carboys to Fermonsters. Thanks Eternally!!
:bigmug:
 
I just went to my 'beer-bits' bench and threw this together to give you a rough idea;
View attachment 839456
View attachment 839457
Of course though, you'll run into a similar problem that @Brewer Mike is having and won't have access to a diptube (at least not easy-access, and you'll probably have to put a female NPT>barb fitting on the inside;
View attachment 839458
I used a 1/2" barb because that's what I had laying around... finding one in stainless seems to be problematic. @Dgallo 's nylon barb suggestion is probably your best bet.
Just spitballin' and hoping to be helpful... let us know what you end up doing.
:mug:
Thanks I get the idea now. :)

I might have another solution, I see there is a 6 and 7 gallon version of the fermonster.
I have the 7 gallon version and the 6 gallon one is apparently 2 to 2.5 inches shorter.
Hopefully it's big enough to get a full 5 gallons of beer for the keg.

I found a shop that is selling them online for 16.99 € in Germany- stock clearance.
Thats about half price compared to other shops, the only thing is they have no lids without a hole left.
I could use the lid I have already prepared but maybe I want to make a second one.

BTW looking at the BYO article I did it slightly different, I added a 3 inch dip tube to the gas post - cheaper than a barb and less screwing around but maybe i might want to add a clamp around the tube just in case.

Edit: just saw your point about the grooved locknut - mine is smooth but appears to be airtight.
If I have problems maybe I could add a grooved washer inbetween instead of replacing the nut. 🤔
 
Last edited:
Thanks I get the idea now. :)

I might have another solution, I see there is a 6 and 7 gallon version of the fermonster.
I have the 7 gallon version and the 6 gallon one is apparently 2 to 2.5 inches shorter.
Hopefully it's big enough to get a full 5 gallons of beer for the keg.

I found a shop that is selling them online for 16.99 € in Germany- stock clearance.
Thats about half price compared to other shops, the only thing is they have no lids without a hole left.
I could use the lid I have already prepared but maybe I want to make a second one.

BTW looking at the BYO article I did it slightly different, I added a 3 inch dip tube to the gas post - cheaper than a barb and less screwing around but maybe i might want to add a clamp around the tube just in case.

Edit: just saw your point about the grooved locknut - mine is smooth but appears to be airtight.
If I have problems maybe I could add a grooved washer inbetween instead of replacing the nut. 🤔
Sounds promising. :) Let us know how it works out, but especially: If you ever find a grooved stainless steel washer for 1/2" NPT fittings; PLEASE post a link! ..That's been something of a Holy Grail for me for some time now.
https://www.blacksheepbrewery.com/our-beers/monty-python/holy-grail/:thumbsup:
 
I was just typing this response when @Dgallo posted his excellent article above (Thanks!) ...In step 3; As long as you're using a grooved locknut with an o-ring on the inside, you only need "hand tighten" it...most bulkhead failures involving o-rings happen because of either overtightening, or the lack of a grooved locknut. Is your locknut grooved?

@Dgallo; I only noticed the "OP" next to your name this morning..I often miss what should be obvious and I've gotten accustomed to long threads having been started by long absent OP's... I just want to take a moment and express my deepest gratitude for you for this thread...it was the deciding factor that made me overcome my worries about plastic and switch from glass carboys to Fermonsters. Thanks Eternally!!
:bigmug:
Thanks for the appreciation!
 
Sounds promising. :) Let us know how it works out, but especially: If you ever find a grooved stainless steel washer for 1/2" NPT fittings; PLEASE post a link! ..That's been something of a Holy Grail for me for some time now.
https://www.blacksheepbrewery.com/our-beers/monty-python/holy-grail/:thumbsup:
I think I might have misunderstood exactly what a grooved lock nut was but would an equivalent washer look like this, or are they too rough?
https://www.amazon.de/Toothed-Stain...349&sprefix=selflocking+washers,aps,88&sr=8-2
 
I think I might have misunderstood exactly what a grooved lock nut was but would an equivalent washer look like this, or are they too rough?
https://www.amazon.de/Toothed-Stain...349&sprefix=selflocking+washers,aps,88&sr=8-2
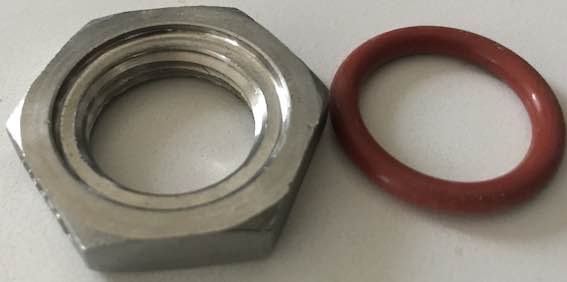
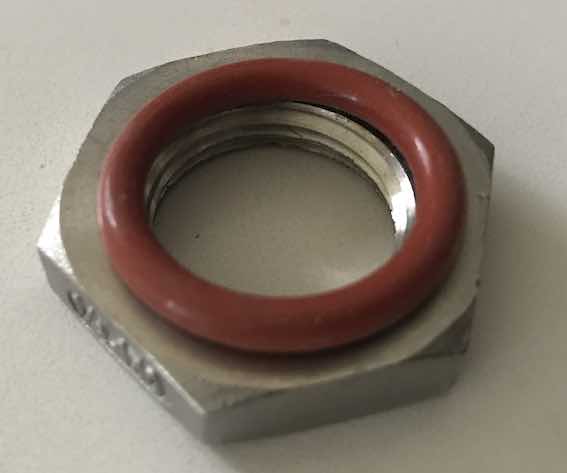
Sorry...amazon links on here rarely work for me as amazon always redirects to the Canadian site searches the item and rarely shows me the actual page. So; Here's a grooved locknut and o-ring;
lckntorng.jpg

grvorng.jpg

Whenever you're cobbling together your own bulkhead from a coupler and fittings; Always use a grooved locknut and o-ring on one side and never more than as tight as you can crank it by hand ..(well, ok; for practical purposes, most people can't actually grip a hex-fitting tight enough so use a wrench if you need to, but lightly and never over tighten.)
:mug:
 
Yes - some sanitizer. Will that work?
You can from a logistics standpoint but it’s certainly not “best practice”

Ideally you want the keg to be filled to the brim with liquid so you can confirm without a shadow of doubt that the entire volume of the keg was replaced with co2 and there is no o2 at all in the keg. If the keg is empty and you hook up during fermentation, mixing of gasses will occur in the keg and some o2 could remain. Supposedly fermentation produces enough co2 to do so, but I’d rather know for sure.
 
If the keg is empty and you hook up during fermentation, mixing of gasses will occur in the keg and some o2 could remain. Supposedly fermentation produces enough co2 to do so, but I’d rather know for sure.
We do know for sure that <5 ppb remains. Not only in theory based on @doug293cz doing the math, but in practice based on someone with the appropriate (expensive) testing equipment confirming that residual O2 was even lower than he had predicted. Pushing out a liquid won't get you to zero either, unless there is zero O2 dissolved in that liquid to start with.
 
We do know for sure that <5 ppb remains. Not only in theory based on @doug293cz doing the math, but in practice based on someone with the appropriate (expensive) testing equipment confirming that residual O2 was even lower than he had predicted. Pushing out a liquid won't get you to zero either, unless there is zero O2 dissolved in that liquid to start with.
Does the math work out for piggy backing kegs? Specifically, if hooked up at the start of fermentation, how many kegs could be purged to < 5ppb from a single fermentation?
 
Does the math work out for piggy backing kegs? Specifically, if hooked up at the start of fermentation, how many kegs could be purged to < 5ppb from a single fermentation?
The math is not as good for multiple kegs, but of course it depends on how big a beer you brew. IIRC, it was originally worked out for 5 gallons of wort purging a single 5 gallon keg, assuming 1.050 OG and 1.010 FG and making worst case assumptions about mixing. A ten gallon batch will purge two kegs just fine.
 
I haven't personally done the math on fermentation-CO2-keg-purging, but it wouldn't be just the batch size and number of kegs that matter. The ABV would also matter...the bigger the beer, the more sugar was turned (partially) into CO2.

I'd also add that 5 ppb (or whatever) of O2 in a keg doesn't mean 5 ppb in relation to the beer that subsequently gets pushed into that keg. The gas mix (mostly CO2, little O2) in the fermentation purged keg weighs a lot less than 5 gallons of beer.
 
You can from a logistics standpoint but it’s certainly not “best practice”

Ideally you want the keg to be filled to the brim with liquid so you can confirm without a shadow of doubt that the entire volume of the keg was replaced with co2 and there is no o2 at all in the keg. If the keg is empty and you hook up during fermentation, mixing of gasses will occur in the keg and some o2 could remain. Supposedly fermentation produces enough co2 to do so, but I’d rather know for sure.
Thanks - I think I did not explain well. When fermenting in the fermonster how do I exhaust the CO2? That is what I do not understand. Thanks, I'm new.
 
Thanks - I think I did not explain well. When fermenting in the fermonster how do I exhaust the CO2? That is what I do not understand. Thanks, I'm new.
Gotcha all good. If you are using the standard fermonster lid with the bung, you could just use a standard airlock to vent. If your not to the point of kegging your beer, than you most likely do not have a co2 tank and building this lid will have little to no benefit for you

If you are kegging and can perform close transfers then you’ll want the hook up to look like the picture on the front page of the article. Fermenters co2 post to a keg (filled with starSan or nothing) co2 post. And then kegs liquid post to an open ended hose into a brew bucket.
 
Last edited:
@Broken Crow what size nut are you using? I am getting a leak at the base of my fittings on the lid and trying to figure out a game plan. May try teflon tape.

I’m using a gasket under the lid where the fitting secures with a nut, I think the co2 is running up the threads of the fitting and making its way to the outside.

Edit: Looks like that was the issue. I ran some teflon tape through the threads and then a few normal wraps and no more leaks. I just read that @Dgallo used o-rings on both sides of the lid, which I will do as a long term fix. At least I am good to go for a big stout that I am prepping to brew.
I use 1/2" fittings, but yeah; I also use teflon tape on the threads to prevent exactly your thread-seepage issue.

EDIT: I always wonder when I see the word 'gasket' if that's referring to a flat washer or an o-ring...flat washers don't work anywhere near as well; with an o-ring in a grooved nut it will slightly spall while tightening and be confined to press itself against the coupler. Flat washers...not so much.
:mug:
 
@Broken Crow
Update - I doubled the amount of thread tape I was using, and it seems to have taken care of my NPT leaks. I used Blue Monster thread tape which feels thicker that the normal stuff.
 
I use 1/2" fittings, but yeah; I also use teflon tape on the threads to prevent exactly your thread-seepage issue.

EDIT: I always wonder when I see the word 'gasket' if that's referring to a flat washer or an o-ring...flat washers don't work anywhere near as well; with an o-ring in a grooved nut it will slightly spall while tightening and be confined to press itself against the coupler. Flat washers...not so much.
:mug:
Yeah, I am using a flat rubber gasket on the inside and nothing on the outside.

Where did you find that nut with the groove for the o-ring? and what is the size/thread size? Maybe I will use that for the inside and move the rubber ring gasket to the outside.

I have my fermonster with around 2 psi in it now, going to see if the teflon tape allows it to hold the pressure. I thought about using some kind of sealant around the fittings on the top of the lid if all else fails.
https://www.brewhardware.com/SearchResults.asp?Search=locknut&Submit=It doesn't mention the groove in the title, but it does in the desription. I've experimentally tried flat washers with hit and miss results...the only way I've had a flat washer hold pressure was using the flanged nut and a good amount of teflon tape then tightening it a bit beyond my comfort level. Now I'll often include a spare grooved one or 3 plus o-rings to add on to orders when I need to spend just a bit more to hit the $150 free-shipping limit... better to have and not need than need and not have.
:mug:
 
Back
Top