You are using an out of date browser. It may not display this or other websites correctly.
You should upgrade or use an alternative browser.
You should upgrade or use an alternative browser.
The adventures of a complete noob and a brew rig
- Thread starter Tomtanner
- Start date

Help Support Homebrew Talk - Beer, Wine, Mead, & Cider Brewing Discussion Forum:
This site may earn a commission from merchant affiliate
links, including eBay, Amazon, and others.
OneHoppyGuy
Well-Known Member
from what temp? must be the sucky gas lines 

Tomtanner
Well-Known Member
OneHoppyGuy said:from what temp? must be the sucky gas lines
Lol! I'm sure my lines are just fine but wondering about my burner shields and distance from my burner to my hlt. At first I noticed the flames going up the side of the keggle but the air inlet was only at about 25% open. Once I opened it up 100% the flames stayed under the keggle. I believe the water temp coming out of the spigot was around 75 degrees.
If this is about normal then no worries I'm thrilled, I was just curious what the consensus is to get 20 gallons up to boil.
OneHoppyGuy
Well-Known Member
10 gallons in 35 minutes is a little slow, not bad. Are the flames nice and blue? I ask because often there isn't enough air above the burner for proper combustion.
I have an electric system, 5500W element. I bring 10 gallons to a boil (from 70F) in 45 minutes. This is comparing apples to oranges I know.
Nice thread! I am putting together the parts for my first stand as well and guys like you sharing their trials and errors really helps! Thanks!!
One thing to note on your setup that I noticed was that your plate chiller is oriented wrong. According to the folks at kegcowboy where I got mine the ports should face straight up for optimal heat transfer.
Subscribed and watching your build with great interest...
Tony
One thing to note on your setup that I noticed was that your plate chiller is oriented wrong. According to the folks at kegcowboy where I got mine the ports should face straight up for optimal heat transfer.
Subscribed and watching your build with great interest...
Tony
Tomtanner
Well-Known Member
stonebrewer said:Nice thread! I am putting together the parts for my first stand as well and guys like you sharing their trials and errors really helps! Thanks!!
One thing to note on your setup that I noticed was that your plate chiller is oriented wrong. According to the folks at kegcowboy where I got mine the ports should face straight up for optimal heat transfer.
Subscribed and watching your build with great interest...
Tony
Thanks for the tip tony, I'll adjust that before I get to brewing on it.
I hope you have as much fun building your stand as I am having. I am pretty sure I can just about brew on this thing right now but I have several more projects that I still want to complete. The only problem is that now I can only dedicate about $100 a month to the project since I spent all the allotted money I originally had budgeted for the build.
I guess now I will have to take DIY to a new level.....
Tomtanner
Well-Known Member
So we bought a second puppy and I've been too drained to post s thing lately. Also this has slowed down my work, but I haven't been completely idle
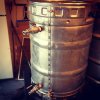
I've added another valve to my hlt. The point of adding the second valve Is to recirculate cold water into my plate chiller when I am using it to cool my Wort.
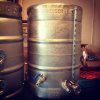
I've also added another valve to my bk for whirlpooling.

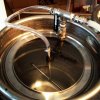
Here Is an interior shot of my bk.
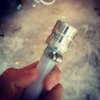
I've attached all of my quick disconnects to my high temp hosing

I now have about eight of these

Here is basically what the flow will look like when chilling wort. At the end of my boil I will add ice water to my hlt and just recirculate through my plate chiller while simultaneously recirculating in my bk until I reach my desired temperature

I've added another valve to my hlt. The point of adding the second valve Is to recirculate cold water into my plate chiller when I am using it to cool my Wort.

I've also added another valve to my bk for whirlpooling.

Here Is an interior shot of my bk.

I've attached all of my quick disconnects to my high temp hosing

I now have about eight of these

Here is basically what the flow will look like when chilling wort. At the end of my boil I will add ice water to my hlt and just recirculate through my plate chiller while simultaneously recirculating in my bk until I reach my desired temperature
Tomtanner
Well-Known Member
Today I made a decision. After much delay I sold my American made fender jazz bass so that I could finish my brew stand.
After selling it and thinking long and hard about my recirculating method I decided on the following. It is a design I saw on this forum and decided to mimmick for no other reason but how cool and clean it looked. Without further delay here it is.
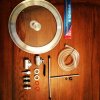
Parts list
Ikea lid $8
Dirt cheap rotating sparge arm $27
SS nipple x2. $4
O ring. $0.69
Clamp. $7
Ball valve. $10
SS T $5
SS lock nuts x2. $3
SS m/m disconnect. $8
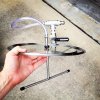
Assembled
After selling it and thinking long and hard about my recirculating method I decided on the following. It is a design I saw on this forum and decided to mimmick for no other reason but how cool and clean it looked. Without further delay here it is.

Parts list
Ikea lid $8
Dirt cheap rotating sparge arm $27
SS nipple x2. $4
O ring. $0.69
Clamp. $7
Ball valve. $10
SS T $5
SS lock nuts x2. $3
SS m/m disconnect. $8

Assembled
barryfine
Well-Known Member
I must be missing something. What is the purpose of the ball valve that is resting on the lid?
Tomtanner
Well-Known Member
barryfine said:I must be missing something. What is the purpose of the ball valve that is resting on the lid?
I drilled a hole in that lid so that if I wanted to add water without the rotating arm I could. I have read a lot of reviews about these things and they sometimes can get stuck. This was just a backup method in case the rotating sparge arm got stuck. Might be overkill but I just wanted the extra fail safe just in case.
Also this sparge arm was super cheap and they didn't de bur the inside so I used the file to clean that up.
wizardofza
Well-Known Member
I drilled a hole in that lid so that if I wanted to add water without the rotating arm I could. I have read a lot of reviews about these things and they sometimes can get stuck. This was just a backup method in case the rotating sparge arm got stuck. Might be overkill but I just wanted the extra fail safe just in case.
Also this sparge arm was super cheap and they didn't de bur the inside so I used the file to clean that up.
I went this route initially with my rig as well. I had a ****load of problems with the sparge arm staying at a low rate when needed w/o it getting stuck. It would only move when I had high pressure going to it - all or nothing type of thing.
I ditched it and just went with another port at the top of my MLT and used modular hosing instead. Works great now. Might have been me though.
wizardofza
Well-Known Member
Oh yeah - the build looks great too BTW!
Tomtanner
Well-Known Member
wizardofza said:Oh yeah - the build looks great too BTW!
Thanks man! I honestly considered just drilling a hole at thr top of the mlt and adding a standard dip tube with one if those northern brewing sprayer but I thought it would get in the way. If this doesn't work well then I will do just that.
barryfine
Well-Known Member
I drilled a hole in that lid so that if I wanted to add water without the rotating arm I could. I have read a lot of reviews about these things and they sometimes can get stuck. This was just a backup method in case the rotating sparge arm got stuck. Might be overkill but I just wanted the extra fail safe just in case.
Also this sparge arm was super cheap and they didn't de bur the inside so I used the file to clean that up.
Ah, that makes sense. Thanks! When is your first brew day going to be? You look all ready to go to me. It looks great, btw!
Tomtanner
Well-Known Member
barryfine said:Ah, that makes sense. Thanks! When is your first brew day going to be? You look all ready to go to me. It looks great, btw!
Thank you! I have a few leaks to clean up and I am essentially operational. There is still a lot that I would like to do, but I might need to put done of those things on the back burner due to my beer supply being dangerously low..... Thinking two weeks from now I fire this bad boy up for real.
StainlessBrewing
Well-Known Member
Very nice build Tom! Can't wait to see your first batch of brew from this beauty.
Looking very good! can't wait to hear how the brew day goes.
Tomtanner
Well-Known Member
Tomtanner
Well-Known Member
mjap52 said:At least it matches!
Ha! That it does. Works well enough too, it's pretty simple and easy to move clean etc
Tomtanner
Well-Known Member
Ok guys this Saturday is the day. I will be brewing on this thing for thr first time. There is more work to be done for sure but I think I can make beer with it at this point. A few questions need answering and after all I am a self professed noob
Question 1. Do I actually need to see the flame under the kegs? I did a test fire tonight and could not see the flame at all unless I look under the burner. One side note on this. I saw sine blue flame coming out from underneath the burner, is this a concern?
Question 2. My brew kettle leaves about a glad gallon at the bottom. I'll be whirlpooling Is this too wasteful?
Question 3. My plumbing is relatively leak free other than a few here and there. Is everyone else completely water tight in a phases?
Who can help a buddy out with done advice?
Tomtanner
Well-Known Member
Ok well I brewed on this thing last night!
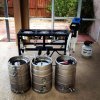
Cleaned everything up and moved the system back by the pool. Holy cow. This thing is easy to move but taking it through my house meant I had to take it apart which was a lot of work.

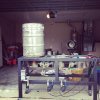
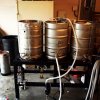
All together and ready to go
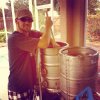
Stirring it up

Might have added a tad too much water to the mash.
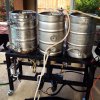
Recirculating

A few buddies came along to witness
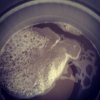
Waiting for the boil
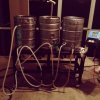
The cool down.

Success?

Cleaned everything up and moved the system back by the pool. Holy cow. This thing is easy to move but taking it through my house meant I had to take it apart which was a lot of work.

All together and ready to go

Stirring it up

Might have added a tad too much water to the mash.

Recirculating

A few buddies came along to witness

Waiting for the boil

The cool down.

Success?
Tomtanner
Well-Known Member
So here are my lessons learned and issues
Firstly something malfunctioned with my tank and I couldn't get any pressure. It was strange because the tank was full after changing the tank however I had no problems with my burners and temps.
Secondly I wanted to use my rotating arm however as I feared its cheap and didn't work properly. It basically got stuck and didn't spin. Then the end cap came off. Next time I will use the valve to recirculate for the first few minutes before letting my sparge water get too the rotating arm.
Third now that I know how long this takes I will not start drinking until I start mashing. By the end of my brew day I was a little too tipsy to notice that I left a valve open while I was draining my Wort into my primary. I lost about 1.5 gallons of the good stuff
The build looks great. Very impressive...just make sure you put as much effort into the fermentation aspect of the beer. Would hate to crank out some top notch wort to then leave fermentation to the elements.
And once you learn your system, you'll be good to go, tipsy or not. :-D
And once you learn your system, you'll be good to go, tipsy or not. :-D
Tomtanner
Well-Known Member
GlenF said:The build looks great. Very impressive...just make sure you put as much effort into the fermentation aspect of the beer. Would hate to crank out some top notch wort to then leave fermentation to the elements.
And once you learn your system, you'll be good to go, tipsy or not. :-D
You know what that's next project I am going to work on!
I have three full size sanke kegs and I intend to convert one into a primary fermenter and the other into a secondary.
I also plan to buy a mini fridge and a temp control unit, I am just not sure what size fridge to buy that will hold a full size keg and doesn't require too much modification.
wizardofza
Well-Known Member
Did you have the burners going for an extended period of time before the pressure dropped? When I brew the tank will get cold and lose pressure and I'll have to shake it from time to time - even more so when the tank gets low. If you keep the tank warm you won't have this issue.
Yeah, drinking and brewing don't mix for me either. I've messed up too many sessions that I just don't drink anymore until I'm done.
Yeah, drinking and brewing don't mix for me either. I've messed up too many sessions that I just don't drink anymore until I'm done.
duckredbeard
Well-Known Member
One of your photo captions was about waiting for the boil. You can turn your kettle burner on low once you start filling the kettle. Keep an eye on it and you can maintain about 200F. Once you have kettle full, it will only take a few minutes to hit a rolling boil.
Tomtanner
Well-Known Member
StainlessBrewing
Well-Known Member
Actually the straight legs usually go under the rim and rest on the top portion of the keg you cut out. This will keep the legs from sliding out in case any of your buddies or you happen to bump into it. You'll have to insert the last leg through the handle. If you want to use it on top like the picture above I recommend going with the hook legs.
35se
Well-Known Member
How much did this end up costing you? *might have missed it in all the reading*
But man this thing looks beastly. Can say nothing but job well done and I wish I had one!
But man this thing looks beastly. Can say nothing but job well done and I wish I had one!
stalewater
Well-Known Member
Truely amazing
alchemedes
Well-Known Member
- Joined
- Jun 26, 2012
- Messages
- 92
- Reaction score
- 8
Very nice, but there is still something just awesome about doing it the 'old-fashioned way' on the deck with a single banjo burner and an 8 gallon kettle without electric controls. This is like, digital brew. Rock on. 
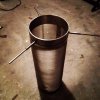
P.S. I am jealous of your stainless steel mesh hop strainer

P.S. I am jealous of your stainless steel mesh hop strainer
knuckleheadbrewing
Well-Known Member
Wow most awesome!! A great thread!! Good job on the first brew! I dont start drinking until i'm done with my MLT and it's clean....once the boil gets rocking....so do I 
I'll be interested in the first use of the hop spider, and if it's a PITA to clean!
I'll be interested in the first use of the hop spider, and if it's a PITA to clean!
Tomtanner
Well-Known Member
35se said:How much did this end up costing you? *might have missed it in all the reading*
But man this thing looks beastly. Can say nothing but job well done and I wish I had one!
Hey thank you! I'll do an updated price list for you in a bit. My cost was elevated due to not having any tools on hand though. I also wasted a good deal of money on things I didn't actually need, but hey that's part of being a rookie I guess.
Tomtanner
Well-Known Member
tugbucket said:Man, If I'm ever in Tampa again, I'm going to have a project for you
I'll try to have some brews on hand!
Tomtanner
Well-Known Member
alchemedes said:Very nice, but there is still something just awesome about doing it the 'old-fashioned way' on the deck with a single banjo burner and an 8 gallon kettle without electric controls. This is like, digital brew. Rock on.
P.S. I am jealous of your stainless steel mesh hop strainer
Ha! Don't think mine Is too technical my friend. The only real electronics here are the pumps and I didn't even wire them up the fancy way.
Similar threads
- Replies
- 0
- Views
- 540

