You are using an out of date browser. It may not display this or other websites correctly.
You should upgrade or use an alternative browser.
You should upgrade or use an alternative browser.
Temperature Control during ferment
- Thread starter scogan
- Start date

Help Support Homebrew Talk - Beer, Wine, Mead, & Cider Brewing Discussion Forum:
This site may earn a commission from merchant affiliate
links, including eBay, Amazon, and others.
OP
OP
scogan
Well-Known Member
- Joined
- Aug 7, 2022
- Messages
- 60
- Reaction score
- 33
Neat ,I will have an ispindel in when I start it off next week and post up my readings !FWIW, I use an Igloo cooler filled with water. I find it very easy to keep the water a stable temperature, whether it's low-to-mid 60's (F) for an ale or low 50's for a lager. I monitor it often and, using 20 oz. frozen water bottles (no lid!), I drop in a half-filled frozen bottle if I want a 1 degree F drop, a full bottle for a 2 degree F drop, and 2 full bottles if I want a 4 degree drop. I then cover it with a blanket to keep the temp from rising back up quickly, as well as to keep it dark. Really easy. I don't have a need for the wet shirt/towel wicking method because I use a small 3 gallon Fermonster as shown below, so filling the water to the top of the beer level is doable. Oh, and only a tiny splash of bleach in the water is enough to keep it from getting cloudy and funky. Cheers.
View attachment 810559

- Joined
- Jul 29, 2021
- Messages
- 119
- Reaction score
- 142
I know this is a long reply but short replys always get comments that assume I don't know the obvious.
My method for fermentation has progressed over the 30 plus years of brewing. Space and budget have controlled almost every step along the way.
When I started, I was just happy to have drinkable beer. As time went on and I was making beer I enjoyed. Reproducing the same beer was hard to do. Removing the environmental effects on fermentation made a big difference.
Putting the carboy in a roomwith stable temperature. Next, I tried setting the carboy in a large bucket of water. That helped in the warm months. Then a large towel to wick water made a major difference.
My current configuration is this:
Inkbird 308 WIFI ( Year round )
27.5 Watt flat heating pad, (Cool weather)
Hard foam board (Cool weather)
Beach towel to drape over carboy and pad to hold heat (Cool weather)
Small 120 volt fan to blow on wet towel. (Warm weather)
Yard tub (Warm weather)
Large towel in water (warm weather)
I use the Inkbird to control both heat and cooling and can track it from my phone when ever I want. It also gives me an alarm if attention is needed.
With this low cost of equipment, (less than $80. US), I can hold beer, wine and kombucha at 68-80 degrees +/- 2 degrees of set point in the cool months. I the summer the swamp cooler in room that is 78-83 degrees I can hold 72 degrees +/- 3 degrees. (Add water 2-3 days).
Fermentation control is only part of the brewing process but I feel it is as important as yeast selection or hop addition timing.
Last edited:
OP
OP
scogan
Well-Known Member
- Joined
- Aug 7, 2022
- Messages
- 60
- Reaction score
- 33
Thats helpful,thanks.I am lucky to have a fairly stable room temp year round.I know this is a long reply but short replys always get comments that assume I don't know the obvious.
My method for fermentation has progressed over the 30 plus years of brewing. Space and budget have controlled almost every step along the way.
When I started, I was just happy to have drinkable beer. As time went on and I was making beer I enjoyed. Reproducing the same beer was hard to do. Removing the environmental effects on fermentation made a big difference.
Putting the carboy in a roomwith stable temperature. Next, I tried setting the carboy in a large bucket of water. That helped in the warm months. Then a large towel to wick water made a major difference.
My current configuration is this:
Inkbird 308 WIFI ( Year round )
27.5 Watt flat heating pad, (Cool weather)
Hard foam board (Cool weather)
Beach towel to drape over carboy and pad to hold heat (Cool weather)
Small 120 volt fan to blow on wet towel. (Warm weather)
Yard tub (Warm weather)
Large towel in water (warm weather)
I use the Inkbird to control both heat and cooling and can track it from my phone when ever I want. It also gives me an alarm if attention is needed.
With this low cost of equipment, (less than $80. US), I can hold beer, wine and kombucha at 68-80 degrees +/- 2 degrees of set point in the cool months. I the summer the swamp cooler in room that is 78-83 degrees I can hold 72 degrees +/- 3 degrees. (Add water 2-3 days).
Fermentation control is only part of the brewing process but I feel it is as important as yeast selection or hop addition timing.
BrewnWKopperKat
ʘ‿ʘ
I currently use a variation of this with a couple of different coolers for different batch sizes. And for bottle conditioning.FWIW, I use an Igloo cooler filled with water. I find it very easy to keep the water a stable temperature, whether it's low-to-mid 60's (F) for an ale or low 50's for a lager. I monitor it often and, using 20 oz. frozen water bottles (no lid!), I drop in a half-filled frozen bottle if I want a 1 degree F drop, a full bottle for a 2 degree F drop, and 2 full bottles if I want a 4 degree drop. I then cover it with a blanket to keep the temp from rising back up quickly, as well as to keep it dark. Really easy. I don't have a need for the wet shirt/towel wicking method because I use a small 3 gallon Fermonster as shown below, so filling the water to the top of the beer level is doable. Oh, and only a tiny splash of bleach in the water is enough to keep it from getting cloudy and funky. Cheers.
View attachment 810559

| 
|
By checking the water twice a day, I can control the wort temperature to within 1F or 2F. If necessary, I add warm / chilled water to adjust the water temperature.
So, if I want to ferment at about 65F, I chill the wort to about 70F, put it in the cooler, then add 63F-ish water to the cooler. Next day, check the fermentation and adjust the water to 64F (if necessary). As fermentation starts to wind down, adjust the water to 68F.
Starting out with "stove top" brewing (3 gal batches in the kitchen), fermentating in a cooler could be an interesting, zero cost technique for getting good fermentation temperature control with the first batch.
Last edited:
redrocker652002
Well-Known Member
I have noticed my closet has been getting a bit cooler with the weather cool down, so I am thinking of going to my local home supply store and getting some of that sheet insulation then cut it and line the closet with it. Eventually I would like to make something, but for now, I just use the closet and it seems to be working ok
- Joined
- Jul 29, 2021
- Messages
- 119
- Reaction score
- 142
I improved temperature control by placing about half an inch insulation under the carboy and covering with a couple of beach towels. The concrete floor in contact with the carboy seemed to wick the heat out. Great for summer but not so good in the winter. Slipping the heat pad between and the carboy and insulation was the last step.I have noticed my closet has been getting a bit cooler with the weather cool down, so I am thinking of going to my local home supply store and getting some of that sheet insulation then cut it and line the closet with it. Eventually I would like to make something, but for now, I just use the closet and it seems to be working ok
I also use a closet for fermentation. Because it is a small closet that is deeper than wide, I purchased dolly from Harbor Freight and filled in the center to make a flat surface. The insulation sets on that with everything else on top. The dolly lets me pull everything out and saves my back from stress.
redrocker652002
Well-Known Member
I have been toying with making a small box out of 2x4's and inexpensive plywood, then insulating it and cutting small holes for a small heater and fan hooked up to my inkbird. My wife is dead set against me getting another small fridge, even for cheap as she thinks it will take up too much room. If I can make something compact enough to fit where I put my buckets now, that might work. I might fool with it next weekend as she will be away and I can do it on the fly. LOL.I improved temperature control by placing about half an inch insulation under the carboy and covering with a couple of beach towels. The concrete floor in contact with the carboy seemed to wick the heat out. Great for summer but not so good in the winter. Slipping the heat pad between and the carboy and insulation was the last step.
I also use a closet for fermentation. Because it is a small closet that is deeper than wide, I purchased dolly from Harbor Freight and filled in the center to make a flat surface. The insulation sets on that with everything else on top. The dolly lets me pull everything out and saves my back from stress.
BrewnWKopperKat
ʘ‿ʘ
A free weekend with power tools & electronics ! If all goes well, can you share the results?I have been toying with making a small box out of 2x4's and inexpensive plywood, then insulating it and cutting small holes for a small heater and fan hooked up to my inkbird. My wife is dead set against me getting another small fridge, even for cheap as she thinks it will take up too much room. If I can make something compact enough to fit where I put my buckets now, that might work. I might fool with it next weekend as she will be away and I can do it on the fly. LOL.
Related to building fermentation control (rather than buying it pre-built): back in the mid-1990s, there is Son of a Fermentation Chiller (overview link, blue prints link).
redrocker652002
Well-Known Member
My issue has been keeping the space warm, but I think I can take what they have there and mount a small heater type fan to it. Since it is insulated then it won't run all day and night and burn out the heater (I have done thru two cheap amazon ones so far). But that is pretty close to what I am looking for. Thanks.
Do you typically have just one bucket fermenting at a time? Here's what I sometimes use, depending on what I'm fermenting and how cool the house is. I slip a square of cardboard (a little larger than the heater) under it to insulate it from the cool tile floor, and the fermenter on top. I see Amazon does not currently have this but there are other, similar products that will do the same. I have a Rapt Pill that sits in the fermenter for real-time temperature and SG readings, and I have the heater plugged into a remote-controlled outlet for easy on/off. Just a thought.My issue has been keeping the space warm, but I think I can take what they have there and mount a small heater type fan to it. Since it is insulated then it won't run all day and night and burn out the heater (I have done thru two cheap amazon ones so far). But that is pretty close to what I am looking for. Thanks.
redrocker652002
Well-Known Member
I like it. Might try a heating pad. My concern is that it will heat the bottom of the bucket but not the top of it. But, I like it. That might be my next try. Tape the probe from my Inkbird about halfway up the bucket to get a decent reading.Do you typically have just one bucket fermenting at a time? Here's what I sometimes use, depending on what I'm fermenting and how cool the house is. I slip a square of cardboard (a little larger than the heater) under it to insulate it from the cool tile floor, and the fermenter on top. I see Amazon does not currently have this but there are other, similar products that will do the same. I have a Rapt Pill that sits in the fermenter for real-time temperature and SG readings, and I have the heater plugged into a remote-controlled outlet for easy on/off. Just a thought.
As I mentioned, I use a Rapt Pill, which is a floating wifi hydrometer/thermometer. I keep the reported temperature at the low-mid temperature range of whatever yeast I use. That way even if it's a couple degrees warmer near the bottom it should still be in its happy range. I use a remote to power on the outlet, then set a 30 minute timer on my phone and turn it back off when the timer alarm goes off. With a little trial and error and practice I can keep the Pill's reporting temperature at near constant plus/minus one degree or so.I like it. Might try a heating pad. My concern is that it will heat the bottom of the bucket but not the top of it. But, I like it. That might be my next try. Tape the probe from my Inkbird about halfway up the bucket to get a decent reading.
- Joined
- Feb 16, 2012
- Messages
- 3,355
- Reaction score
- 4,220
- Location
- Either in the brewery or on the road
I’m surprised nobody has mentioned Brew Jacket and peltier cooling. That was my ‘gateway’ system into temperature controlled brewing. It works “OK” for temp control as long as you don’t require more than 10-15F +/- away from ambient.
I eventually went all-in with glycol so I could do year-round lager brewing and the ability to cold crash into the low 30s F. Just couldn’t do that with the Brew Jacket. I will say that if you have a brew area with ambient temps between 50F~80F, and don’t want/need to cold crash or do extended lagering outside of a keezer or beer fridge, the device does an adequate job.
I used it in Speidel brew kegs, Better Bottles, and the Brew Jacket carboy with its insulated jacket successfully, but at the end of the day it just wasn’t powerful enough for me. It’s still rattling around somewhere in the brew area, though I haven’t used it in a few years.
Last edited:
- Joined
- Jul 29, 2021
- Messages
- 119
- Reaction score
- 142
I like the heat pads because there are no moving parts. The 27 watt heater has pushed two 6 gallon carboys to 80 degrees in a high 60 degree room.My issue has been keeping the space warm, but I think I can take what they have there and mount a small heater type fan to it. Since it is insulated then it won't run all day and night and burn out the heater (I have done thru two cheap amazon ones so far). But that is pretty close to what I am looking for. Thanks.
Gfei
Well-Known Member
If you are already fermenting in be a corny, have you considered forgetting the temperature control and fermenting under pressure instead?I don’t currently do this but seems a lot of folk do and rate it .I don’t really want to get into fridges and inkbirds .Can I just put corny fermenter in a plastic bucket of water with an aquarium heater .Some have suggested that isn’t enough to suppress the heat generation in the active phase .Might add my house is pretty much 17-20 the time.
- Joined
- Jul 29, 2021
- Messages
- 119
- Reaction score
- 142
I have a pressure regulator that fits on the gas side of the keg and have tried fermenting under pressure. The issues I had and not sure how to address were dry hopping and sediment in the bottom of the tank.If you are already fermenting in be a corny, have you considered forgetting the temperature control and fermenting under pressure instead?
How did you address those issues?
OP
OP
scogan
Well-Known Member
- Joined
- Aug 7, 2022
- Messages
- 60
- Reaction score
- 33
Does pressure fermentation banish the need for temperature control ??If you are already fermenting in be a corny, have you considered forgetting the temperature control and fermenting under pressure instead?
Gfei
Well-Known Member
It does, I don't do it myself but I've had examples of light lagers fermented at room temp that are fantastic.Does pressure fermentation banish the need for temperature control ??
It's worth looking into.
Gfei
Well-Known Member
I have a pressure regulator that fits on the gas side of the keg and have tried fermenting under pressure. The issues I had and not sure how to address were dry hopping and sediment in the bottom of the tank.
How did you address those issues?
I haven't done it myself, but there are members of the club I'm in who do with fantastic results. Not really sure how they deal with those issues. Actually I think our next meeting topic will be on pressure fermentation.I have a pressure regulator that fits on the gas side of the keg and have tried fermenting under pressure. The issues I had and not sure how to address were dry hopping and sediment in the bottom of the tank.
How did you address those issues?
OP
OP
scogan
Well-Known Member
- Joined
- Aug 7, 2022
- Messages
- 60
- Reaction score
- 33
I have only just started fermenting in cornys and serving from the same one .Floating dip tube bypasses the sediment .Dry hop either using magnets ,opening it up and purging ,or transfer to another vessel .I have a pressure regulator that fits on the gas side of the keg and have tried fermenting under pressure. The issues I had and not sure how to address were dry hopping and sediment in the bottom of the tank.
How did you address those issues?
OP
OP
scogan
Well-Known Member
- Joined
- Aug 7, 2022
- Messages
- 60
- Reaction score
- 33
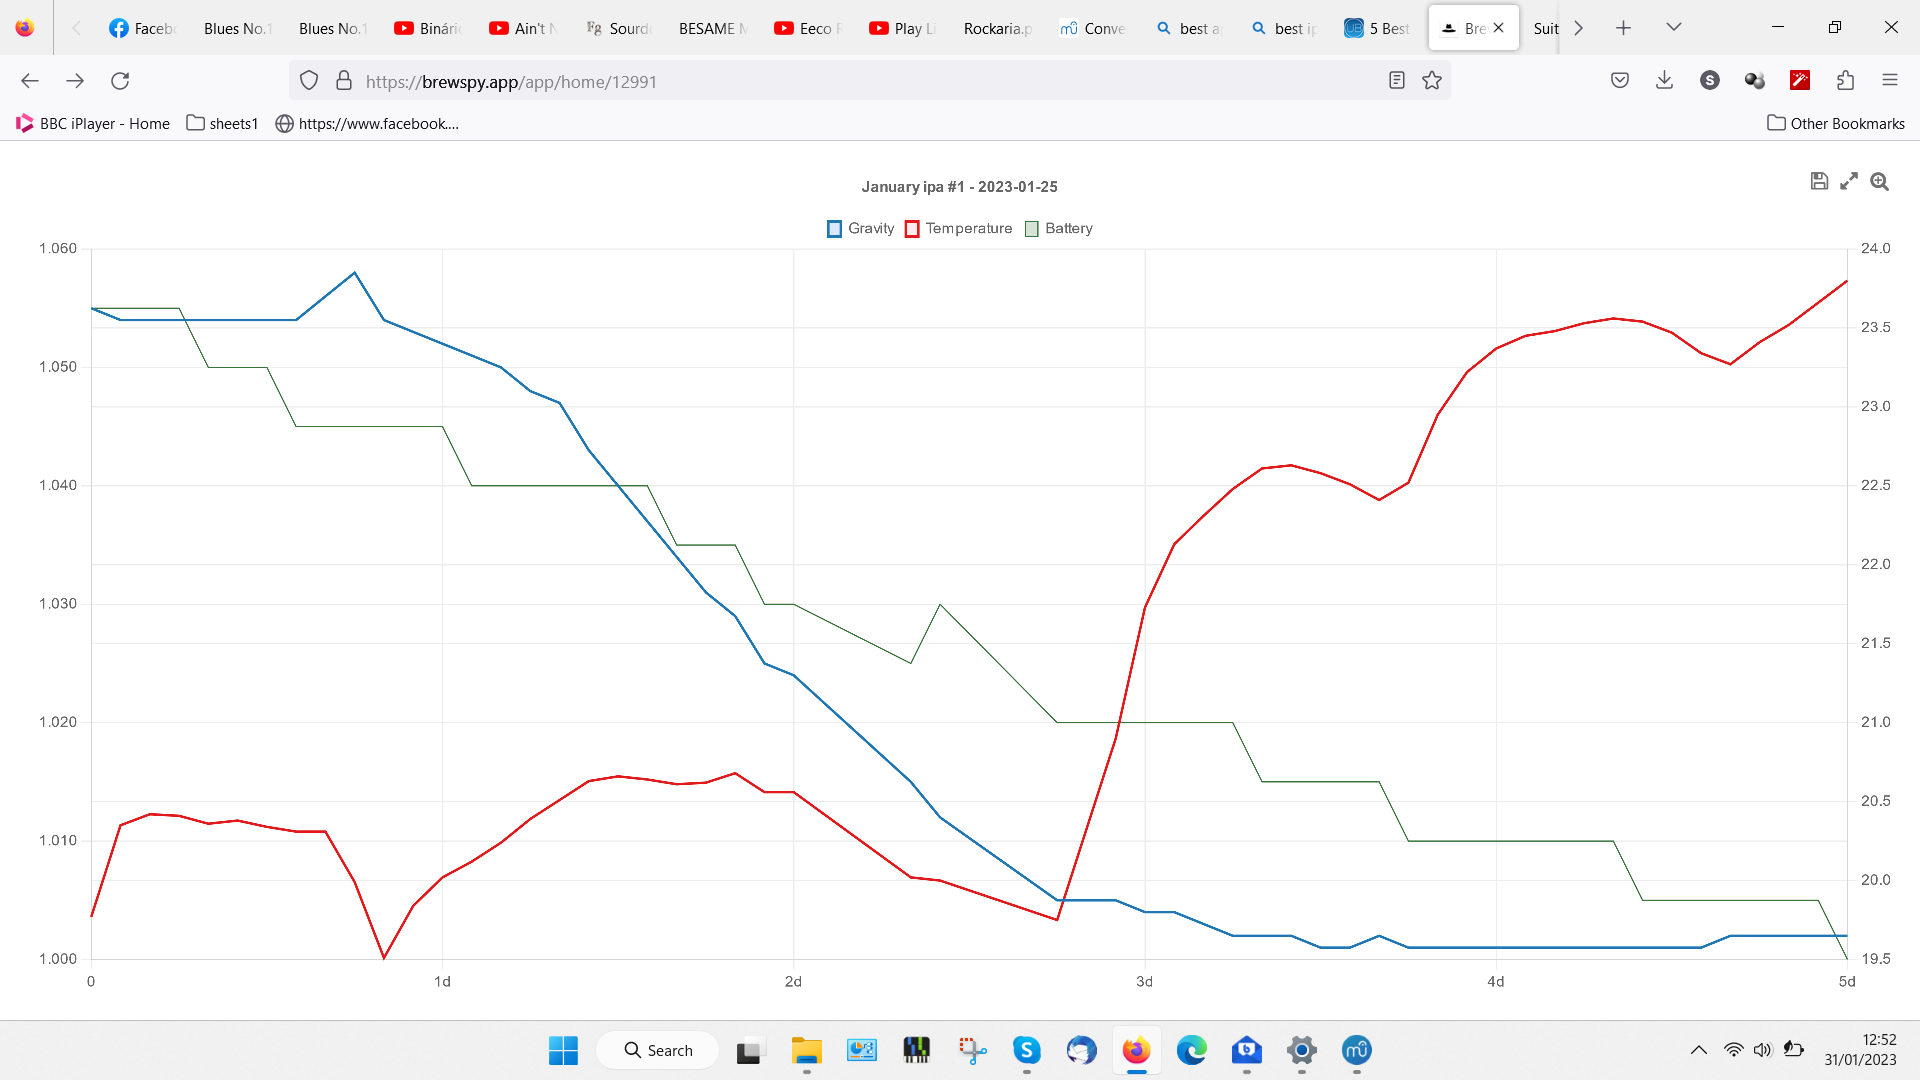
So here is my ispindel graph from corny keg in 5 gallon bucket with 2 gal of water and fishtank heater.As you can see even during the vigorous start (OG fropped 40 in 36 hrs ) there was no problem with temperature rise and until I cranked it up around day3 it stayed on +/- 0.5c from 20C. A good result and first time I used an ispindel.
Attachments
Similar threads
- Replies
- 5
- Views
- 1K
- Replies
- 8
- Views
- 2K
