Take a look at my set up

Homebrew Talk - Beer, Wine, Mead, & Cider Brewing Discussion Forum

Help Support Homebrew Talk - Beer, Wine, Mead, & Cider Brewing Discussion Forum:

This site may earn a commission from merchant affiliate links, including eBay, Amazon, and others.

jblank44

Active Member
Joined
Sep 12, 2016
Messages
43
Reaction score
1
Hey all,

Been planning my single tier brewing system and I will have 2 march pumps (Both 110 volts). So I will be building a switch controller with an emergency stop (just in case). I am not super experienced with wiring, I understand the components and such but just haven't had the chance to actually do it.

So, please look at my diagram and see if I have made some mistakes and help me correct them if so. OR any advice to improve its functionality.

A list of the elements I will use:
A junction box similar to this
2 way NO switches
Emergency Stop
LED Light 'ON' indicators
Female Receptacle
Male Receptacle
AWG #14
All needed connectors/equipment

pQWXBFS.jpg


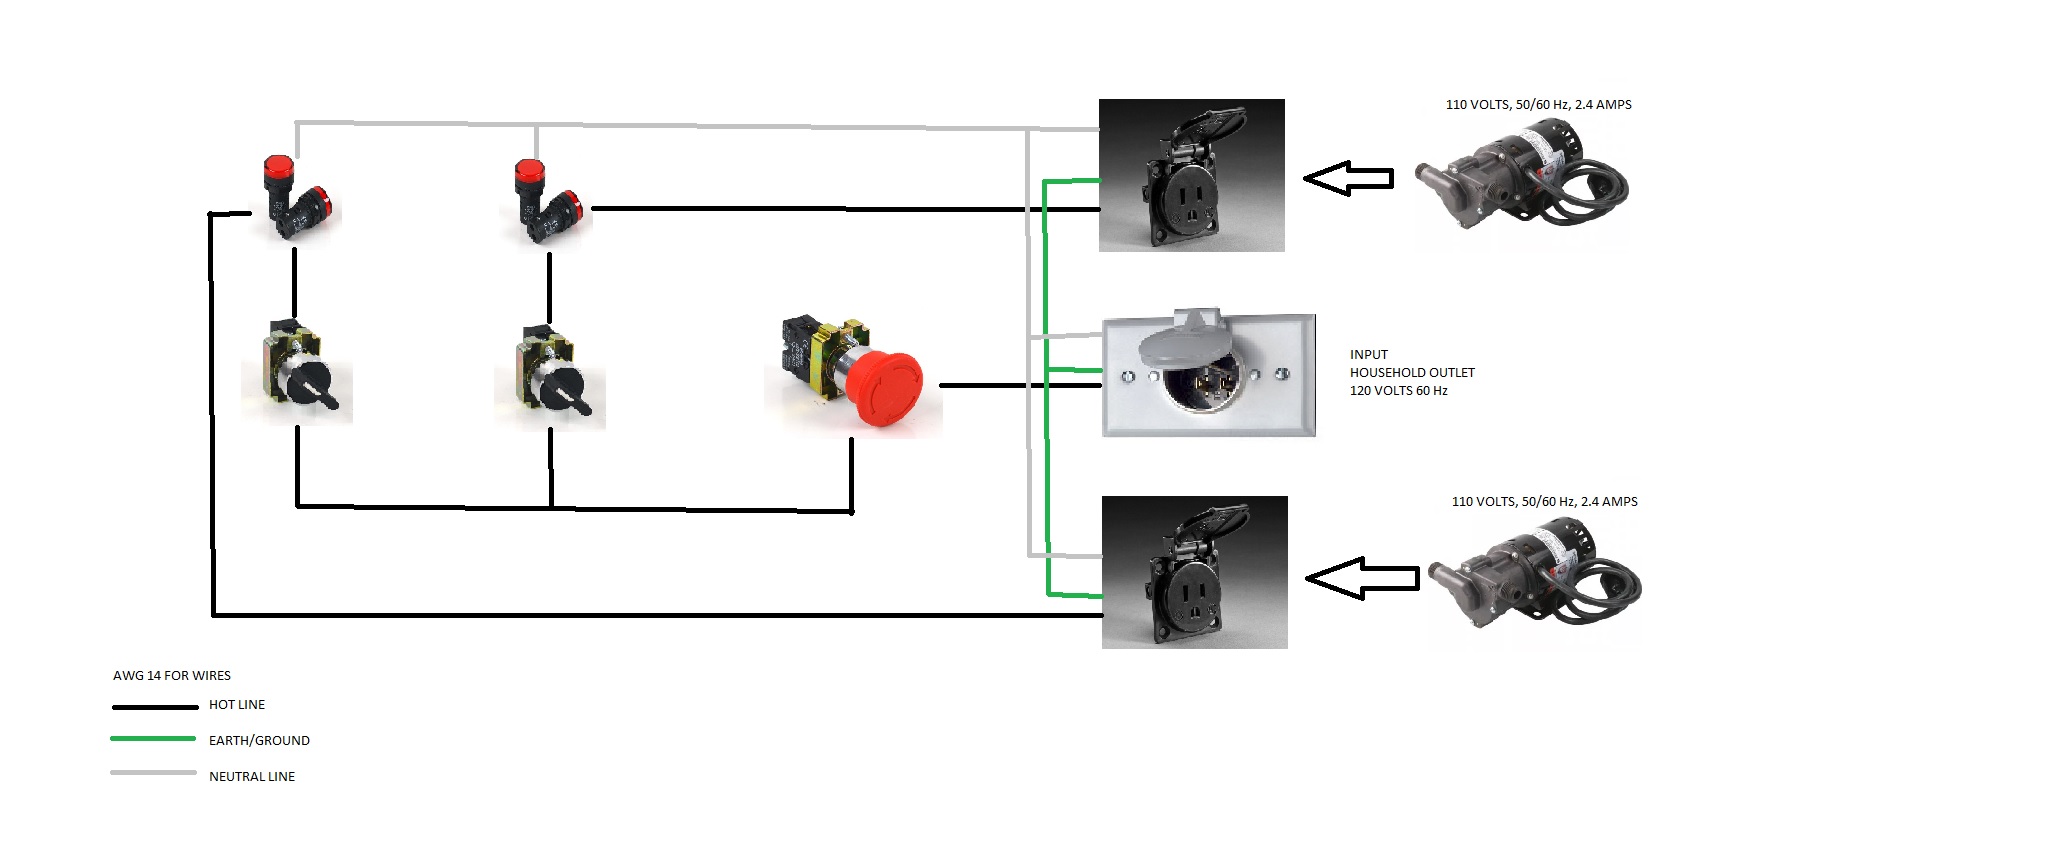
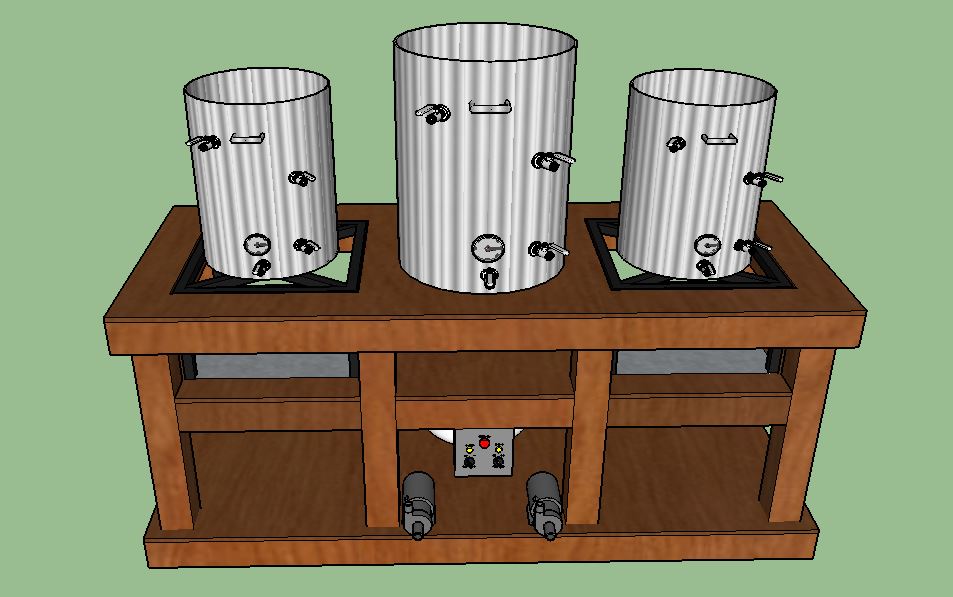
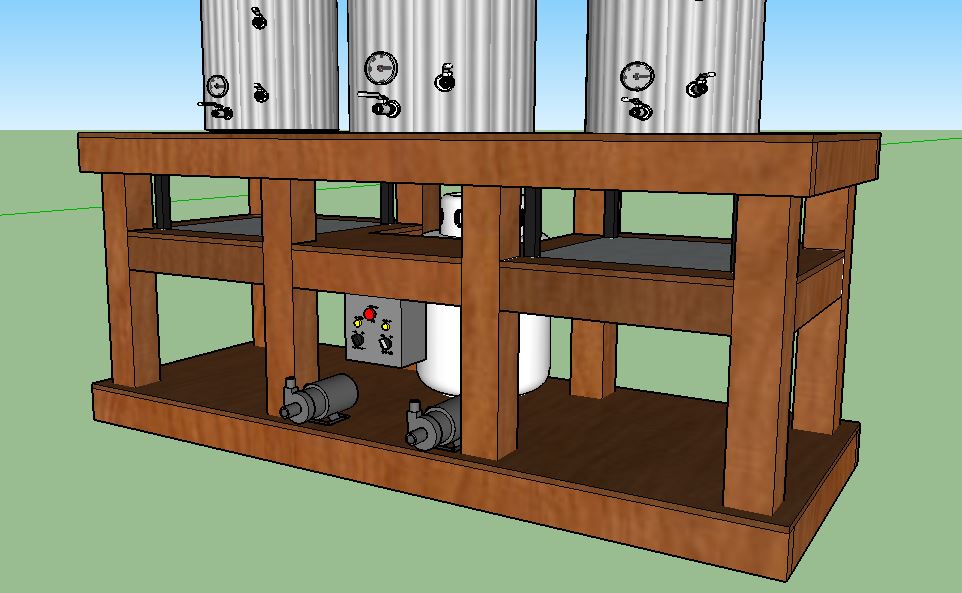
To give an idea of what I am doing with my brewing system. This will utilize 2 - 18" propane burners with two march pumps controlled by the switching module. I will also have all SS Brewing Technology (HLT/MT/BK). And a plate chiller which is not in these designs.

oeXiCnv.jpg


SxLzWFk.jpg


Any suggestions welcome.

Thank you!
 
I would recommend not running your load through your lights. Put the load off the switch and just run a second line to your light. Going through the light you could (not likely) over load the connections if the pump over amps (gets stuck or something). Good luck with your build!
 
I would recommend not running your load through your lights. Put the load off the switch and just run a second line to your light. Going through the light you could (not likely) over load the connections if the pump over amps (gets stuck or something). Good luck with your build!

Thanks for the suggestion. I had another thread running and we have come to a good solution. I'll post an update later on!

Cheers!
 
I would recommend moving your electrical box. I have my pumps plugged into Outdoor boxes with the covers where the are closed even when plugged in. The power cord to the outlets is with an extension cord with the female plug cut off. My Pump Panel uses locking lighted switches (http://www.auberins.com/index.php?main_page=product_info&cPath=7_32&products_id=223). That way I know if my pump is on and I also have a "red pump", "green Pump" and so on. You want to be able to be away from liquid and electricity.
 
I would recommend moving your electrical box. I have my pumps plugged into Outdoor boxes with the covers where the are closed even when plugged in. The power cord to the outlets is with an extension cord with the female plug cut off. My Pump Panel uses locking lighted switches (http://www.auberins.com/index.php?main_page=product_info&cPath=7_32&products_id=223). That way I know if my pump is on and I also have a "red pump", "green Pump" and so on. You want to be able to be away from liquid and electricity.

I don't quite know what you mean....

I think you are saying move the switch box from underneath in case water or whatever spills.
 
Yes. You need to protect the switches from spills and it needs to be away from anything wet. I have mine mounted on a wall and run the power from the switch to an outlet. I have outlet boxes on the brew rig where I plug in the pumps. The plugs on the brew rig use an outdoor extention cord as the wiring. I cut off the female and wired that end to the outlet. The other end plugs into my switched outlet. All of the plugs are in outdoor enclosures and water proof. If there was a spill, and I need to cut the electrictity, I can do it from a short distance away.
 
I hope you aren't using a wood frame with gas heating.

Will be lining the inner side of the wood with aluminum. I can show a design for it. Don't have the tools or experience to weld and wood will be cheaper. Also, have been doing research on more fire retardant type sealants/paints.
 
Yes. You need to protect the switches from spills and it needs to be away from anything wet. I have mine mounted on a wall and run the power from the switch to an outlet. I have outlet boxes on the brew rig where I plug in the pumps. The plugs on the brew rig use an outdoor extention cord as the wiring. I cut off the female and wired that end to the outlet. The other end plugs into my switched outlet. All of the plugs are in outdoor enclosures and water proof. If there was a spill, and I need to cut the electrictity, I can do it from a short distance away.

Awesome, thanks for the great advice. Don't know why I assumed I would put it underneath lol
 
Will be lining the inner side of the wood with aluminum. I can show a design for it. Don't have the tools or experience to weld and wood will be cheaper. Also, have been doing research on more fire retardant type sealants/paints.


Welding is not that hard to learn enough for some simple things. Also there are welders that like beer. Just putting a barrier next to something does not make it fire proof. I have concrete board between my rig and a wall the concrete board is offset from the wall by 2x4s. The burners produce a LOT of heat and you need a LOT of protection which a thin sheet of metal would not.
 
Welding is not that hard to learn enough for some simple things. Also there are welders that like beer. Just putting a barrier next to something does not make it fire proof. I have concrete board between my rig and a wall the concrete board is offset from the wall by 2x4s. The burners produce a LOT of heat and you need a LOT of protection which a thin sheet of metal would not.

Well please give me some recommendations. I am well open to ideas. Thanks!
 
Sorry! I forgot to update this!

Ended up doing power strut with 2 BG14 burners. Full SS brew tech set up. I will post some pictures asap!


****anyone who wants to do strut bars: make sure you do not get zinc platted!!!!!***** lol
 
jblank44, The system is looking Awesome! I have a couple of suggestions, if you're looking for any.

1. I would recommend taking the heads off your pumps and rotating them 90º so the intake is on the bottom, and the out is on the top. The reason being is it's easier to get the air out of the lines and pump for priming.

2. I have a similar system, and I've found if I don't have a lid on my mash tun when I'm circulating, then It drops in temperature way too fast, and I can't maintain the mash temp I want. The reason is that when it's cold outside, the "sprayer" on the bottom of that pipe going into your mash tun spreads the wort out so thin, and it's engulfed in cold air, that if chills instantly below your desired temp. What I did is drill a hole in the lid of my mash tun and run the pipe through it. I then even place a couple of towels on top of the lid.
 
Thanks for the suggestions! That explains why I hit a much lower mash than I expected. I was aiming for 149 but hit 146. I raised it to 147 and by the end I was at 145. This actually turned out to be great. With the lower mash I got much more fermentable sugars, it surpassed my estimated ABV but it is a nice dry finish with some good citrus notes. In dry hop phase now.

Anyways, this will have to stay in my mind because when I'm going for a stout/porter/brown, I'll need to be at 152-155 and I'll need to either do what you said or add even hotter strike and sparge water.
 
A couple of Things. You need some spill protection for the Pumps. I would also suggest a Trub Filter from Brewer's Hardware before the Plate Chiller.
 
Oh awesome okay, I'll look into that filter! And yes, I have sheet aluminum, haven't got around to cutting yet. I always store with aluminum wrapped and a bag over it.
 

Latest posts

Back
Top