Switching to eBIAB

Homebrew Talk - Beer, Wine, Mead, & Cider Brewing Discussion Forum

Help Support Homebrew Talk - Beer, Wine, Mead, & Cider Brewing Discussion Forum:

This site may earn a commission from merchant affiliate links, including eBay, Amazon, and others.

jjkeegan86

Super Bit Brewing
Joined
Jul 31, 2014
Messages
88
Reaction score
21
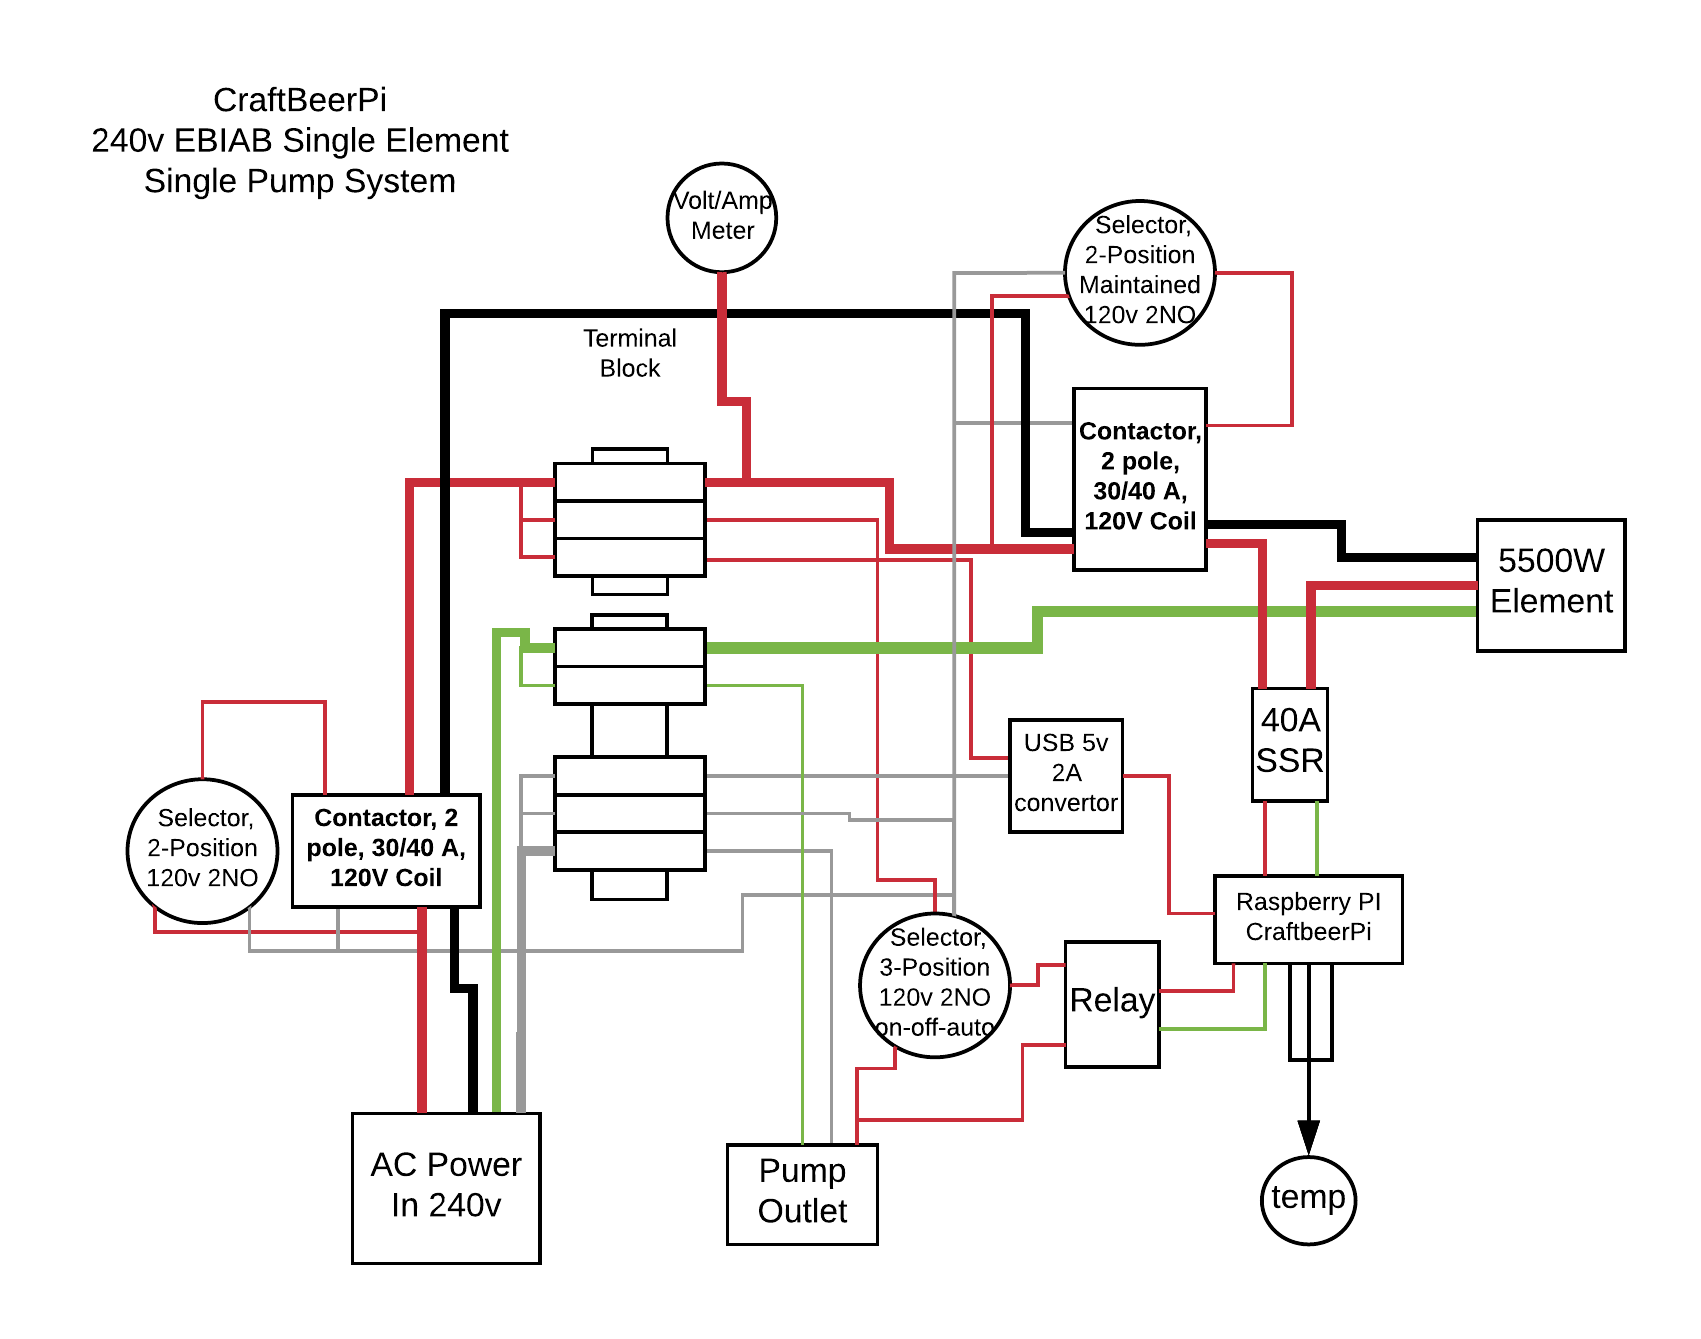
Making the move to electric. I have a 3 vessel keggle setup, but I need to shrink my brewing footprint. I toyed with keeping one keggle and adding a rims tube for mashing and then gas firing one keggle. But decided to go to a full ebiab setup. I've got a spike kettle on order and want to get started on a control panel.

I'll be using craftbeerpi instead of pids. I already have the raspberry pi.

I've attached a wiring diagram and the control box part list. I'm not sure about the enclosure. Didn't know if there was a reason not to go with plastic. Also not sure how to wire an on-off-auto switch for the pump. The way I have it does not seem right. Is there any reason to avoid using an ssr for a chugger pump? I could use a regular relay if needed.

Obligatory, yes this will be on a 30 amp GFCI breaker.

Any and all feed back is appreciated!

Partlist

brGz1Qi
 
Last edited:
congrats on upgrading to single vessel brewing!
i have no idea how raspberry pi/craft beer pi work and will look back here to see how it works
 
In general the schematic looks good. You show neutrals going into all three switches, but the switches don't need neutral connections (and have no place to connect neutral.)

The Auber three way switch is just two isolated single pole switches attached to a mechanism that closes one of the switch blocks when turned to the left, closes the other switch block when turned to the right, and when the switch is centered neither switch block is closed. So, wire 120V from one of the hot buses to one switch block, and connect 120V to the pump relay, the output of the pump relay to the other switch block. Then common the other side of each switch block and connect to the pump outlet.

Yes you can use an SSR to provide computer control of the pump.

Brew on :mug:
 
Alright I think I get it now, I'll update my diagram, the switches are illuminated ones from auber, will they need the neutral?
 
Yes, the illuminated switches will need a neutral (if 120V LED's) or the other hot (if 240V). The neutral, or extra hot, only connect to the LED. Wiring diagrams for the different options are shown on the bottom of this page. If the 3 way switch is lighted, that will probably need to be wired differently. Let me know if you need help with that.

Brew on :mug:
 
Last edited:
Downgrade?
eBIAB 1V brewing is 100% an UPGRADE!
get with the times!

To clarify right now I have a two vessel system that I have a keggle as a BK, but I and fitting my tallboy kettle to do BIAB and also have a triclamp in that for my heating element, so basically I can either do 5 gallon BIAB with my kettle, or do a 10 gallon recirculation batch that is based off of the Brewtus system, I only say downgrade because I would be going from a 10 to a 5, but I can see where the BIAB would actually be an upgrade because of fewer vessels to clean and shorter brew day
 
Well my kettle shipped today, and everything from auber should be here Thursday. It is getting exciting.
 
Well folks, always buy the bigger box, no way I'm putting everything in the box I bought, at least auber will let me exchange it
 
Masked off for spray paint. That giant hole saw got away from me a little
20190215_234024.jpeg
20190216_224539.jpeg
20190216_224546.jpeg
 
Looks like you drilled those with a dull sledgehammer. :p
Probably not, but I'm pretty sure it was not done on a drill press with the work piece properly clamped. Should be an example to other DIY'ers that drilling large holes in metal is best not done with a handheld drill.

Brew on :mug:
 
Lay it on a flat surface and tap the holes flush....Hit it with some rattlecan hammer paint and it never happened...Positive thinking
 
Probably not, but I'm pretty sure it was not done on a drill press with the work piece properly clamped. Should be an example to other DIY'ers that drilling large holes in metal is best not done with a handheld drill.

Brew on :mug:
Yeah it was my feet, and a handheld drill with various brewhardware step bits, and some Chinese hole saws.

The step bits were probably a little dulled from the like 15 holes I drilled in my old keggles. And one of the guide bits on the hole saws actually snapped in half after barely getting into anything.

I had to use my biggest step bit and then a metal file to get the hole to fit the element receptacle. It was a pain, but after the paint I'm happy with the result.

Now I get to move on to the fun part, wiring.
 
Started the front panel, grossly underestimated my need for terminals.

Happy with the layout thus far, anyone know how to take blocks off these auber switches. Can't seem to figure it out.
20190218_205227.jpeg
IMG_20190218_221901_01.jpeg
 
Got a photo of the where the switch/contact? From that view the look like these Allen-Bradley switches
IMG_1493.jpg


If its like these, theres a pocket for a flat head screw driver to push up and pry slightly away to lever the block of the switch

Hopefully someone that knows those specific switches will chime in
 
Ah ha, yeah they're similar, there's a tab on them for a flat head, thanks
 
Making progress on the wiring, just need to attach the outlets and wire the raspberry pi up
20190220_231926.jpeg
 
Finished up all the wiring. Anyone have a good checklist to go through before turning one of these on?

I've got a multimeter to check for continuity between points and such.

Just afraid to actually plug it in.
20190308_000720.jpeg
20190308_000652.jpeg
20190307_213411.jpeg
 
Yeah it was my feet, and a handheld drill with various brewhardware step bits, and some Chinese hole saws.

The step bits were probably a little dulled from the like 15 holes I drilled in my old keggles. And one of the guide bits on the hole saws actually snapped in half after barely getting into anything.

I had to use my biggest step bit and then a metal file to get the hole to fit the element receptacle. It was a pain, but after the paint I'm happy with the result.

Now I get to move on to the fun part, wiring.
Been there. Nice work.
 
Going to build a small cart to put the kettle on and mount the pump and control box.

Basically just a 2 ft cube with 3 inch locking casters on the bottom.

Going to add a drawer in the center.

I am afraid that the weight of the control box might be enough to tip the cart over though. Maybe the 4x4s will weigh enough?
20190311_180158.jpeg
Screenshot_20190311-175248_Chrome.jpeg
 
Pretty crazy to see plans come to life. Going to add a drawer at the top, sand it, stain it, put on some casters, then mount my control panel and pump
20190314_221519.jpeg
20190314_221529.jpeg
 
Couple shiny coats of polyurethane, mounted the panel, and threw on the casters. Coming along nicely.

Not sure if I like how low the panel is, might try to tilt where the bottom attaches to the cart to make it come up a bit. Or find a mount that will telescope up.

Should I be worried about splashing onto the low panel?

**Also pictured, the old 3 vessel gas system, and the kitchen cart that did not make the homebrew equipment cut.
20190320_213257.jpeg
20190320_213310.jpeg
 
Yes, you should try to find somewhere not at risk for splashes to mount the control panel.

Brew on :mug:
 
That kitchen cart is giving me ideas for this old bathroom cabinet I'm using... [emoji848]


Partially gut it, build a lower/sunken countertop, throw some casters on it... Still have the drawer for my salts and scale and the doors for storage of other things
 
Well, I messed this up somewhere, as soon as I switch the panel on all the 110 outlets are hot on both sides and the main contactor isn't turning on. I can't find any strange continuities between the plugs and the inlet so I don't think there's a short anywhere. I feel so defeated.
 
Back
Top