Show us your Kegerator

Homebrew Talk - Beer, Wine, Mead, & Cider Brewing Discussion Forum

Help Support Homebrew Talk - Beer, Wine, Mead, & Cider Brewing Discussion Forum:

This site may earn a commission from merchant affiliate links, including eBay, Amazon, and others.
Wow...... I can't believe that I can finally put myself in the good graces of those that have posted their beer dispensing masterpieces! :tank:

Here are a few pics of my work. Hope you like. I have a very extensive thread for this build if you care to folllow it. Cheers! :mug:

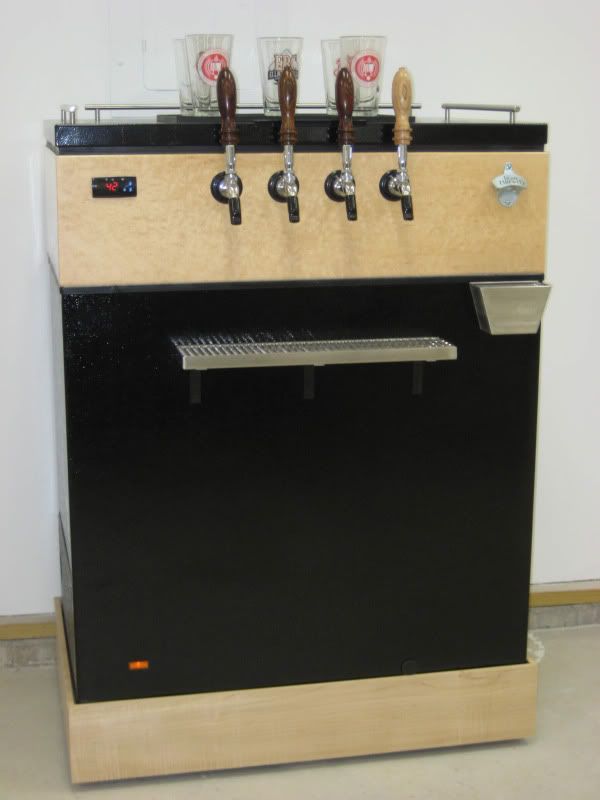
Sorry...the first pic is a mistake. It wasn't supposed to be part of this thread, but oh well.....
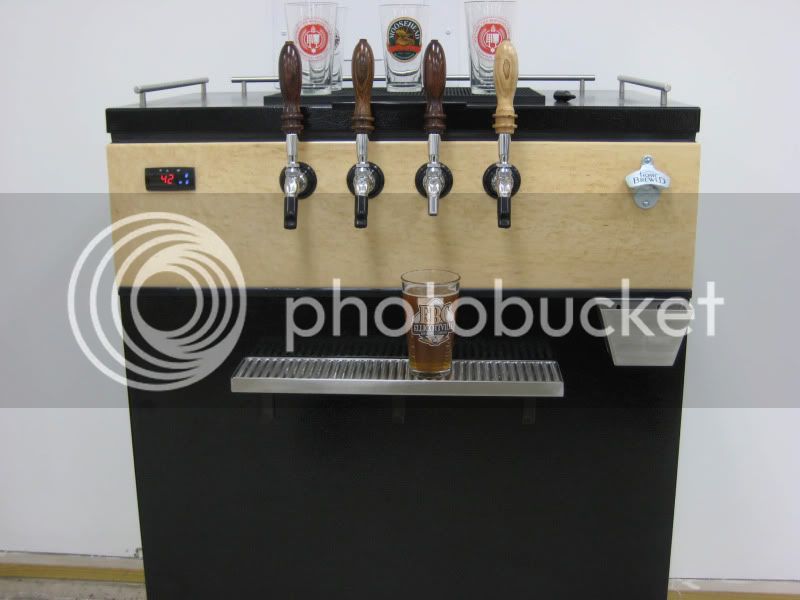
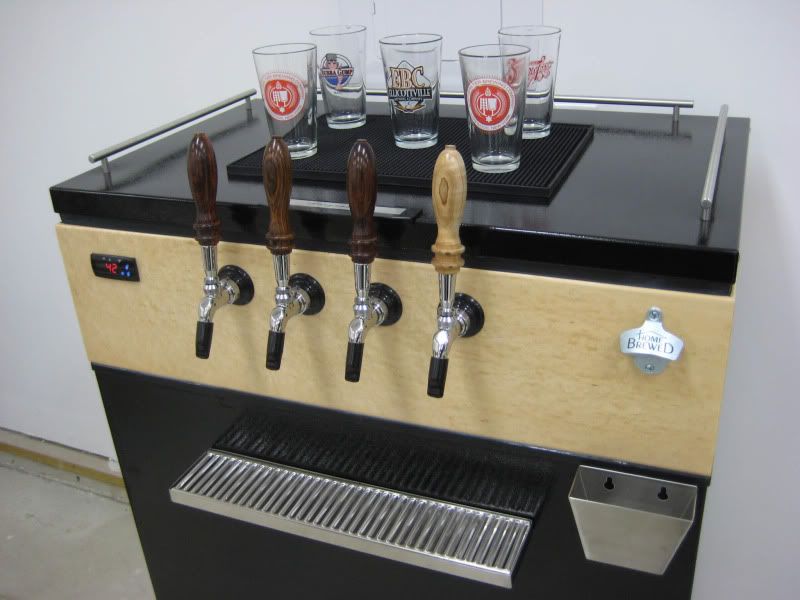
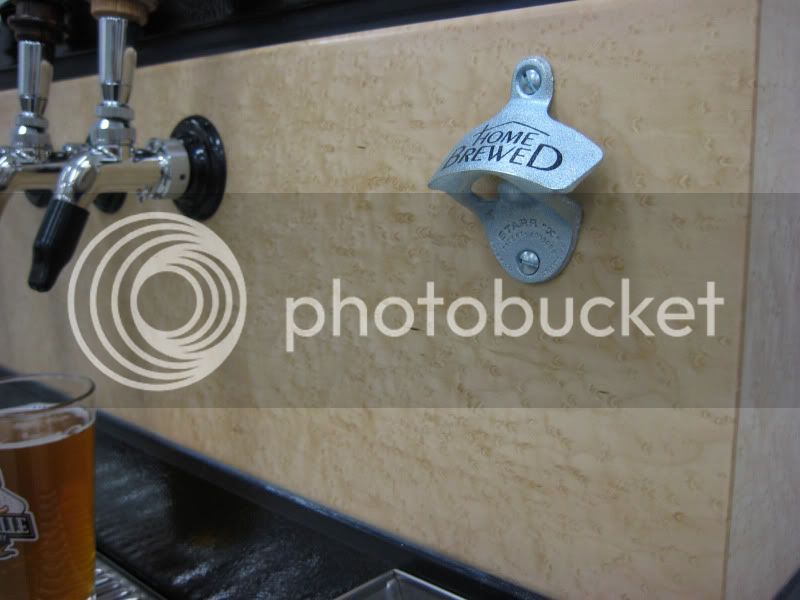
IMG_2064.jpg


IMG_2165.jpg


IMG_2166.jpg


IMG_2170.jpg
 
Just picked up the kegerator I had mentioned in the Introduction forum a few days back. The unit was MINT aside from a large gash on the side from what I suspect was a transport issue...nothing to affect the functioning of the unit itself though, and it won't even be visible where I plan on placing it so no concern there. However, in moving it from my car I managed to dent the door...dammit! Oh well, it is what it is. It won't house any of my brews until another month or so, and I still need to get the kegging equipment. I'm going to integrate it into my kitchen by removing a section of cabinet I don't use...excited for the end product :) I just wiped it down and staged it for the pic, nothing is actually installed yet.


PS- Wow, those 2 units above my post are amazing!
 
This is my keezer, currently with six faucets. I have the spaces to go to eight because I could fit eight corny kegs (I think). The top is tiled, and I poured the clear resin to make it glossy and smooth. The rest of the construction is all cheap wood painted black to best hide my numerous woodworking mistakes. The base is on wheels so I can slide it out from the wall to change kegs. 120mm PC case fan blowing into coffin keeps foam to a tolerable level on the first pour.

Currently on tap from left to right: Double Bastard Clone, 1/2 bbl Yuengling (cheap stuff for mostly for the heavy drinking visitors who don't really care what they drink), Gaelic Ale Clone, 1/6 bbl Magic Hat #9, 1/2 bbl Ranger IPA, empty.

IMG_0022.JPG


IMG_0026.JPG


IMG_0029.JPG


IMG_0030.JPG


IMG_0031.JPG


IMG_0035.JPG
 
proud to finally be posting on this thread. one or two minor things to complete on this beast - drip tray, painting the lid handle, etc. but it's functional and looking like i had it in mind. so here we have it.

went with the inner/outer collar approach. insulation board keeps us from losing too much efficiency. simple 2x4 for the inner collar. oak for the outer.

IMG_0451.jpg

black chalkboard paint on all sides.
perlicks with basic tap handles for now.
IMG_0456.jpg
IMG_0457.jpg

six more taps coming up! :ban:

edit: if you're curious about the build, you can see the process here: https://www.homebrewtalk.com/f51/keezer-build-under-way-235312/
 
This is my keezer, currently with six faucets. I have the spaces to go to eight because I could fit eight corny kegs (I think). The top is tiled, and I poured the clear resin to make it glossy and smooth. The rest of the construction is all cheap wood painted black to best hide my numerous woodworking mistakes. The base is on wheels so I can slide it out from the wall to change kegs. 120mm PC case fan blowing into coffin keeps foam to a tolerable level on the first pour.

Currently on tap from left to right: Double Bastard Clone, 1/2 bbl Yuengling (cheap stuff for mostly for the heavy drinking visitors who don't really care what they drink), Gaelic Ale Clone, 1/6 bbl Magic Hat #9, 1/2 bbl Ranger IPA, empty.

IMG_0022.JPG


IMG_0029.JPG


Jay, that hidden side compartment for the CO2 cylinder is one of the best ideas I've seen in a long time. I love how from the outside it completely looks like one unit.

If I ever build another I am definitely using this idea!
 
I posted these photos in the label design section, but I think this might be worthy of posting in here as well, since it shows the integration with my kegerator.

I've just finished building a custom kegerator and have been racking my brain trying to come up with a simple, clean solution to identifying whats on tap. I wanted to keep it simple, without crazy tap handles, etc.

I think i came up with a pretty good solution. I got some custom coaster printed from Katz Americas with my "brewery" logo on it. I left an area blank so I can write/stamp/etc. in the actual brew type or name. I then found a rubber shaker mat on ebay. After cutting out the little "nibs" in the bottom, the 4" coasters fit PERFECTLY in the mat and will now serve as my drip tray. I can replace the coasters as my brews change.

A simple, clean and inexpensive solution. Exactly what I was looking for!

DSC_7086.jpg

DSC_7087.jpg

DSC_7090.jpg

DSC_7092.jpg
 
Jay, that hidden side compartment for the CO2 cylinder is one of the best ideas I've seen in a long time. I love how from the outside it completely looks like one unit.

If I ever build another I am definitely using this idea!

That was not an original idea; I got it from someone else who posted here. I can't remember where though; I think I looked at every single keezer build on here while I was doing mine.

I didn't measure before I decided the width of the compartment, which was really dumb. My original 5lb tank fit well with plenty of room to spare, but my new 20lb is a very, very tight fit. I underestimated and failed to measure the width, even though I knew from the start I would upgrade to a 20 lb tank.


How in da heck you lift 15.5 gal kegs in there? :drunk:
Carefully and with a helper. Not a one man job. Probably the last time I have two 1/2bbls in there - it was so heavy we could barley slide the thing back to the wall, and it's on wheels!


is the lid insulated?

I agree that the c02 compartment is brilliant
No, I replaced the stock freezer lid with a sheet of 3/4" OSB and it is not insulated. The tile is glued directly on the OSB and the resin poured over the tile. I'm not a mathemescientist, so I'm not sure how much energy I am losing but it isn't much. The freezer doesn't run very often. I wanted to use the original lid and insulation, but the damn cabinet kept getting higher and higher up and I don't think it could be much taller and still be practical.

Jason
 
Throwing my build into the mix.

My keezer started out as a $100 white craigslist 14.8 chest freezer. I painted it black using appliance epoxy spray paint. I only needed 3 cans to pain the entire thing which only cost me $28. The collar was made using 1"x12" red oak and I stained it with a mahogany stain. I used 2" R10 foam board insulation on the inside of the collar to improve the collar insulation which ended up fitting perfectly on the inner lip of the freezer. The collar was secured using liquid nail and small angel brackets on the front and sides. I then added silicon to the outside and inside of the collar/freezer joint to help seal any gaps.

I added the trim to the collar as an afterthought because I didn't like seeing the collar/freezer seam or the grey lid gasket but nonetheless it improved the look of the keezer so I am glad I did it. Because the freezer did not have a flat bottom (there are 4 pumps on each corner for sliding across the floor) I couldn't mount the casters I wanted to add to make it more moveable, so the keezer is sitting on a "wheeled cart" I built out of two 2x6" and four 2x4" boards cut to length. The casters were then mounted to the 2x6" boards which run the length of the keezer. Once I put the freezer on the cart I didn't like that I could see under the freezer (due to the pumps) nor the hill billy looking cart I built so I added the bottom collar to hide all the ugly and stained it to match the collar.

The controller is a Love TSS2-2100 which I wired to a double gang box that is mounted on the back of the collar and is wired to 20Amp outlets, one for each relay in the controller. The freezer is then just plugged into the outlet that corresponds to the relay I need to use. I intend to add a bilge fan and a duct to circulate cold air up towards the taps to maintain a more consistent temp.

I have enough room for 8 corny kegs but only intend to have a total of 6 corny's on tap, 6 perlick and 1 stout creamer, unless I get another freezer just for keg conditioning and move to 8 taps. :)

I still need to add some additional items like a mount for the CO2 tank on the outside of the keezer on the back of the collar, the plumbing for the CO2 from the regulator to the 2 gas manifolds on the inside, a drip tray on the front and a tap marker on the lid which will be held in place with strong rare earth magnets.

When I get that stuff done I will take some additional pictures and update and/or start a "My build thread".

Cheers! :mug:

David

IMG_0377_scale.JPG


IMG_0378_scale.JPG


IMG_0379_scale.JPG


IMG_0380_scale.JPG
 
Just got my Keezer up and fully functional (minus drip tray). Currently is stocked with and ESB, Black Lager, IPA, and Lagering an American Lager. It has been difficult to not sample every day from each tap.

Love the tap handles. Did you make them or buy them somewhere?
 
Thanks Jafo28, those handle where custom made by my father and brother as a suprise birthday gift. I was putting labels on all my bottles that had a star as the main design/logo so they applied the design to the handles.
 
^^^

1. how did you attach those European bar pulls (is that the Frigidaire 7.2?)

2. also where did you find that mat?

Great looking keezer BTW.
 
^^^

1. how did you attach those European bar pulls (is that the Frigidaire 7.2?)

2. also where did you find that mat?

Great looking keezer BTW.


Yes, Frigidaire 7.2 cf.

1. I simply drilled a hole through the lid and fastened them using 2" ss bolts.

2. I bought the mat from Kegworks.com

Thanks.
 
So I put together this kegerator out of a sweet cl find for $50 on an all stainless steel milk fridge/freezer (combo unit)! From there I drilled two holes (a pina due to ss...), hooked up two 120mm case fans for in and out air flow, built a pretty basic 5 tap tower, insulated, added a light bulb for the glowing red "a" logo, used all ss shanks and pieces possible, forwarding sealing ss Perlick faucets (1 creamer faucet) hooked up to a 10lb co2 tank through 1 primary and then dual secondary's and one into a dual air manifold. This allows for 3 different psi adjustments and 4 taps with additional taps easily added with another air manifold. I then used 2 stout faucets through a "G-mix" or Nitro/co2 20lb tank and dual shut off manifold. The idea was to build the best system using the best parts for absolutely the cheapest you can. I found used stout taps (ebay for around 35-40 shipped), used tanks (about $45 each) and used ball-locks ($32 shipped each) from beverageconnection.com. the ss drip tray from barproducts.com for $20 shipped, and the rest of the new stuff came from kegconnection.com.

I spent just about $1100 on the dot including everything filled ready to pour. I have an excel sheet with the total cost and build blue-print if anyone needs it. Compared to my lhbs I saved well over $500 bucks (sorry guys).

The beers are all pretty damn good too and a special thanks to Paul (a damn fine brewer) for doing an AG IPA and Blonde with/for me (which went fast at our Annual Irish Olympics party last weekend)! btw the Irish Car Bomb (similar recipe can be found here somewhere), I did a Left Handed Milk Stout clone and tweaked it a bit and then added vanilla beans and Jameson into the secondary. Guys it's incredibly close tasting to the real thing and turned out fantastic on the nitrogen! Definitely a beer going into the keep on tap file!

It took more time to research where to buy all this than the 2 day build! Great thread and thanks everyone for the inspiration!

iphone 4-18-11 060.jpg


iphone 4-18-11 062.jpg


iphone 4-18-11 063.jpg


iphone 4-18-11 065.jpg


iphone 4-18-11 030.jpg
 
Here is my brand new keezer. The base is a 7.1 cu. ft. Avanti Freezer. I still need to frame in a drip tray and put a layer of clear epoxy enamel on the top, but it is functioning as of now.

3485-keezer-built.jpg
 
Back
Top