
ReeseAllen
Well-Known Member
I received a pin-lock corny keg from a friend recently. He'd had it in his garage for years. It was never properly cleaned after its last use, so it was filthy inside and out, and had lots of rust spots. Most people seem to think that stainless doesn't rust. It does. It's rust-resistant, but not rust-proof. Fortunately, the rust was limited to the posts, the fittings, and a few small spots around the top and the inside near the top.
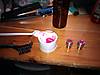
Today, I went to the hardware store to get a wire brush and some naval jelly. Naval jelly is a bright pink substance that has the same consistency as mucus. It turns rust (iron oxide) into ferric phosphate, which can then be brushed off easily leaving a pristine steel surface.
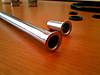
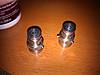
Here are some shots of the inside of one of the fittings after I removed it. It's damn near rusted shut, and the threads are very corroded. The other one wasn't quite as bad.


There was a bit of corrosion on the top around the lip of the main opening, so it got a slathering of naval jelly. I also filled both fittings with the jelly and then threaded them loosely onto the posts for the first soak.
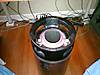
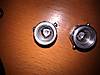
After letting it soak for about 15 minutes, I took the wire brush to the corroded areas. I had to repeat the soak-and-scour on the posts three or four times. As you can see in the photo below, the posts came out nearly spotless. You can also see a blob of naval jelly inside the keg which is taking care of some small rust spots I discovered in there.

The fittings and the gas dip tube needed to be filled with naval jelly, soaked, and then rinsed and wire-brushed three or four times. I managed to use a wooden dowel to get the jelly into the liquid dip tube, although I wasn't able to scrub the inside.
The photo below is the fittings and dip tubes after cleaning. Also pictured is the O-ring replacement kit I got from my LHBS. Keg lube is necessary for the o-rings, which isn't pictured.
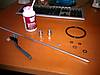
The fittings came out looking pretty good. The left fitting was the worse of the two at the beginning. Both still have a bit of corrosion I couldn't get out, but compared to the way they looked when I started, they look pretty damn good.

I've now cleaned and sanitized the keg and all its components. Now I just need to see if it'll hold pressure properly and then rack some beer into it...
Today, I went to the hardware store to get a wire brush and some naval jelly. Naval jelly is a bright pink substance that has the same consistency as mucus. It turns rust (iron oxide) into ferric phosphate, which can then be brushed off easily leaving a pristine steel surface.
Here are some shots of the inside of one of the fittings after I removed it. It's damn near rusted shut, and the threads are very corroded. The other one wasn't quite as bad.
There was a bit of corrosion on the top around the lip of the main opening, so it got a slathering of naval jelly. I also filled both fittings with the jelly and then threaded them loosely onto the posts for the first soak.
After letting it soak for about 15 minutes, I took the wire brush to the corroded areas. I had to repeat the soak-and-scour on the posts three or four times. As you can see in the photo below, the posts came out nearly spotless. You can also see a blob of naval jelly inside the keg which is taking care of some small rust spots I discovered in there.
The fittings and the gas dip tube needed to be filled with naval jelly, soaked, and then rinsed and wire-brushed three or four times. I managed to use a wooden dowel to get the jelly into the liquid dip tube, although I wasn't able to scrub the inside.
The photo below is the fittings and dip tubes after cleaning. Also pictured is the O-ring replacement kit I got from my LHBS. Keg lube is necessary for the o-rings, which isn't pictured.
The fittings came out looking pretty good. The left fitting was the worse of the two at the beginning. Both still have a bit of corrosion I couldn't get out, but compared to the way they looked when I started, they look pretty damn good.
I've now cleaned and sanitized the keg and all its components. Now I just need to see if it'll hold pressure properly and then rack some beer into it...
