Pump sizes?

Homebrew Talk - Beer, Wine, Mead, & Cider Brewing Discussion Forum

Help Support Homebrew Talk - Beer, Wine, Mead, & Cider Brewing Discussion Forum:

This site may earn a commission from merchant affiliate links, including eBay, Amazon, and others.

Fencdar

Supporting Member
HBT Supporter
Joined
Oct 22, 2013
Messages
91
Reaction score
11
Location
East Tokyo, Japan
Hey all. I'm working on a custom-made refrigeration chamber, the reasons for which I have discussed elsewhere and don't want to get into now.

Here is my design:
YQIYKoo.jpg

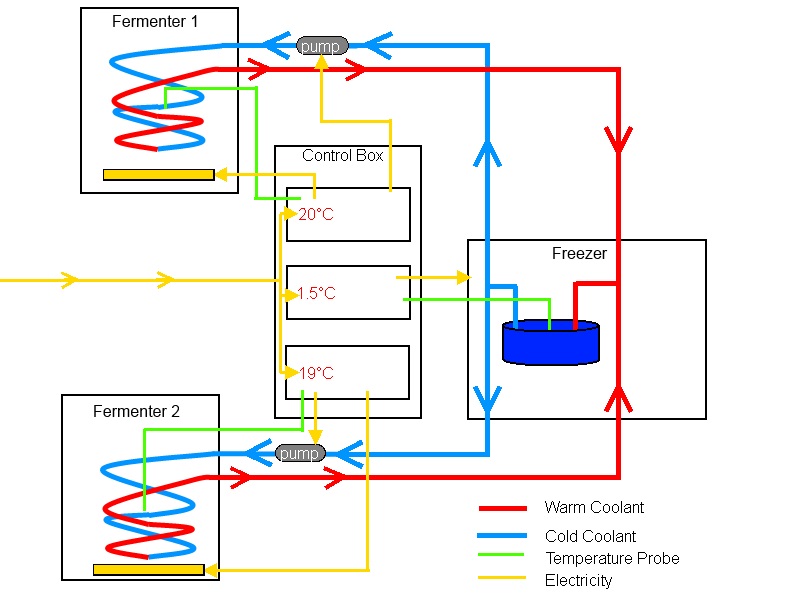
The frame of this monstrosity is a W40cm x L45cm x H130cm metal rack from the hardware store, with walls of styrofoam insulation.

Basically, I'll put a bucket of anti-freeze into a freezer, and pump it through vinyl tubes going around the outside of my fermenters to cool. Temperature monitoring and control will be provided by three STC-1000s, powering the freezer, pumps, and a couple of electric blankets. I will have a lot of room leftover in my freezer, so I am going to add another controller to the freezer to maintain it at 1.5 C, just above freezing, so I can store some yeast and hops in there. If I have room, I may even try to jam in a keg once I start kegging. :mug:

My questions are about the pumps.
1) How do I calculate the size/strength of pump I need?
2) I assume that pumping antifreeze instead of water will affect a pump's flow rate- is it likely to completely stop it?
3) Will most pumps have problems with pumping at near-freezing temperatures?
4) Will I be okay using an underwater pump in the antifreeze?

I'm looking at a couple of aquarium / fountain pumps and expensive inline pumps, but I'm not sure which to go with. I don't want to waste another chunk of change, after the $100 fridge that didn't fit in my beer closet.
 
I can't speak to calculating the exact pump power you need, but I can say others on here have used a similar chilling system for pumping anti-freeze through lines to continued beer line chilling. I know I read that someone made a 15ft or so climb with one of the submersible pond pumps from Harbor Freight.

I think a couple pond pumps is going to be the route you should take. I wouldn't worry about the temps because this guy had his sitting in his freezer and it worked like a charm. I'm sure his build thread is somewhere around here.
 
Wish i could help more, but have you thought about wrapping your fermenters in a bit of copper tubing and pumping from vinyl into that, then back out to vinyl to the pump?

Vinyl doesnt exactly have great thermo properties, its not going to be able to transfer nearly as much heat as copper...
 
Wish i could help more, but have you thought about wrapping your fermenters in a bit of copper tubing and pumping from vinyl into that, then back out to vinyl to the pump?

Vinyl doesnt exactly have great thermo properties, its not going to be able to transfer nearly as much heat as copper...


Yeah I did think of that, but a) copper is waaay more expensive than vinyl and b) inserting and removing fermenters would be tough.

I'm considering eventually switching to radiators to cool it, but those are pricey too.
 
If you stuck with vinyl, I might suggest to add some insulation on the exterior outside of the tubing. Maybe some reflex wrapped around the outside of the tubes to keep the cold in? That would aid in keep them in place too.
 
If you stuck with vinyl, I might suggest to add some insulation on the exterior outside of the tubing. Maybe some reflex wrapped around the outside of the tubes to keep the cold in? That would aid in keep them in place too.

Yup, I've already got foam insulation to cover the distance between the chamber and the freezer. Inside the fermentation chamber, wouldn't it just impede the heat transfer more than the vinyl alone, and hurt my efficiency?
 
The freezer was delivered yesterday while I was at work! I'm looking forward to fixing this up tomorrow while SWMBO is at her parents' house.

However, one look at the inside of the freezer shot down any ideas of ever using it for kegs. Mini-kegs, maybe. 19L kegs? Hell no.
 
I can't speak to calculating the exact pump power you need, but I can say others on here have used a similar chilling system for pumping anti-freeze through lines to continued beer line chilling. I know I read that someone made a 15ft or so climb with one of the submersible pond pumps from Harbor Freight.

I think a couple pond pumps is going to be the route you should take. I wouldn't worry about the temps because this guy had his sitting in his freezer and it worked like a charm. I'm sure his build thread is somewhere around here.

I just noticed your response- somehow it got skipped over earlier.

Thank you for giving me an idea what to look for. "Pond pump antifreeze" turned up some very useful threads, which I think answered my questions.

This thread was especially useful.
 
Moving liquid should not freeze, and your sump pump will generate some heat while running. Not sure on your pipe sizing or length of run, but look up submersible or pump sizing for some info...especially if your pipe length is 100' or more with less than 1/2" I D pipe
 
I just noticed your response- somehow it got skipped over earlier.

Thank you for giving me an idea what to look for. "Pond pump antifreeze" turned up some very useful threads, which I think answered my questions.

This thread was especially useful.

Ha glad you saw it. I guess if the liquid running through the lines is cold enough (anti-freeze), then even vinyl should be able to get the job done. I'd coil it a little tighter around the bucket than if using copper, but it still should work. Keep us posted.
 
First, here's my tiny little beer closet.
Photo%202014-02-01%2015%2052%2017.jpg

I have to get everything into this space that measures 85cm wide x 186cm long. The doorway into this space is only 44.5cm wide. Thus my $100 mistake prior to planning out this project. :drunk:
You can see my freezer on the right side. Unfortunately, my shelves apparently have a tiny slope to them, so it can fit under the shelves on this side, but not next to the ferm chamber as planned. I can just run the hoses under the shelf a little longer, but it's going to impact my efficiency. :(

First, I had to set up the frame.
Photo%202014-02-01%2015%2059%2042.jpg

Photo%202014-02-01%2016%2003%2007.jpg


Then cut the styrofoam insulation to fit. I found this interesting little tool at the local 100yen store (like a dollar store, but way better). It uses a "C" battery to heat up a wire, which lets you cut plastics like butter. I imagine it would work great on butter, too, come to think of it.
Photo%202014-02-01%2016%2004%2044.jpg

Photo%202014-02-01%2016%2006%2035.jpg

Photo%202014-02-01%2016%2014%2026.jpg

Photo%202014-02-01%2016%2027%2031.jpg

Photo%202014-02-01%2016%2030%2014.jpg


Done! Now to caulk it all together. This is the first time I have ever caulked in my life, so the results were... less than spectacular. :eek:
Photo%202014-02-01%2016%2049%2019.jpg

Photo%202014-02-01%2016%2049%2025.jpg

Photo%202014-02-01%2016%2049%2009.jpg


And clean up the hallway, so SWMBO doesn't kill me. Move everything back into the closet!
Photo%202014-02-01%2016%2056%2039.jpg

Construction, Day 1: complete. :tank:

Unfortunately Amazon apparently thinks these are STC-1000s, so I have to wait for a replacement to start on the wiring.
Photo%202014-02-01%2013%2009%2058.jpg

Photo%202014-02-01%2013%2010%2007.jpg
 
Finally got the STC-1000s in (from Hong Kong), so I wired up the controllers for the chamber last night. Check out my awesome cardboard box!
First, I cut out the holes I would need for 3 controllers, 6 plugs, and an input wire. The input was first, and by far least pretty.
I wired the plugs up as I attached them to the box, which overall worked out okay. They are fixed with zip ties. I cut the tails off my zip ties so they wouldn't get in the way.
aYMCUuoh

QrFRw3qy

M6d7LVjs

W8Q0zlNo


Break time.
d5b8z6T3


Next I wired up the controllers, plugs, and inputs. Rat nest of wiring appears as if by magic!
GRFaJt5G

Nv62hRgh

NIH6xrqt


Plug it in, amazingly it seems to work!
RnZmxEaN

N8bqQD5I


Realizing I don't know which plug or which sensor goes with which controller, I quickly devise a simple but ingenious method of color-coding. Some quick testing tells me which plug is heat and which is cool. All is well (ish).
ijsFRWFx

ns7cSQd5


It's now sitting by my (half-finished) ferm chamber, monitoring my tripel and the yeast/hop freezer.
 
Finally (mostly) finished it today! I was getting **** efficiency with the vinyl alone, so today I:

1. cut open the antifreeze pipes and attached them to radiators
2. added 120mm PC case fans
2. opened a hole in the back and routed power and antifreeze through there
3. insulated the antifreeze lines

The plan is to use AC adapters to power the fans, but one is still on a PC power supply (thus the "mostly"). Besides the missing AC adaptor, I also want to find a less intrusive way to mount the fans and radiators. Hanging in the middle is might be efficient, though...

Top Chamber
ImageUploadedByHome Brew1402721613.417371.jpg

Bottom Chamber
ImageUploadedByHome Brew1402721627.367057.jpg

Temp Controllers & outlets
ImageUploadedByHome Brew1402721643.333787.jpg

Inside the freezer
ImageUploadedByHome Brew1402721691.510572.jpg

With the "door" in place. Gotta fix this up somehow, too.
ImageUploadedByHome Brew1402721719.923867.jpg
 
Fencdar,

How is the fermenter working? What are your radiators from?
Made any further updates modifications?
It's given me some ideas about my own fermenting chamber- I was planning on using a window air conditioner for cooling, but now I see the benefit of having more than one fermenting chamber- allows for the fermenting of different beers- nice.

It looks like you are using umeshu bottles for fermenters- do you always brew small batches?

Noticed the malt in the corner- what are you using to mill it?

GB
 
Hey Guzz,

Yeah I haven't posted the biggest change. I dumped the radiators, because I couldn't get them to work quite right. I'm guessing real radiators have to be significantly colder than the 0-2C that I was using.

Instead, I decided to pump the glycol directly into a metal pipe in the beer. It's basically an immersion cooler, with the pumps controlling the cooling. I'll post some pictures soonish.
 
Fencdar,

That looks a lot more simple and direct than the radiators. I use similar pipe for the bottled water that runs through my keezer. What kind of pump is driving all that? You also mention glycol. What exactly are you using?

I'm thinking about how I can turn my "beer cellar (a 1m X 1m X 1m bermed concrete hole on the shady side of my house)- that gets a bit too warm in Kyushu summers into a space where I can ferment/ store beer. I was thinking about putting one of those old window-style air conditioners on the door and cooling the space that way, but I've got a currently unused commercial beer server that could provide the refrigerant- but then I'd have to come up with a way to pump it to the fermentors.
 
Fencdar,

Just an idea for you, I'm using car heater cores that i picked up for ~$20 off of amazon. I'm using 12v computer fans to move the air around and I'm able to get the individual chambers down to about 10 degrees F above the coolant temp, so i'm seeing about 40 degrees F in the chamber as my lowest temp. Here's a picture of how it's set up in the chamber.

IMG_0907.jpg

I'm using brewpi to control the set up and here's a view of how quickly the system ramps down the chamber temp. about 4-5 degrees F per minute.

Screen Shot 2015-04-09 at 8.17.33 PM.png
 
It's a small radiator thats a part of the HVAC system sits behind the dash of your car. The model i used was a Spectra 94621 heater core. It cost $19.99.

They were cheap, the right size and "relatively" easy to mount (i put a screw between a couple of fins and into the foam wall of my chamber. Another relatively cheap car part that may work well is a transmission cooler.

It took a little bit of trial and error to get the 1/2" lines i was using for my coolant loop hooked up, but once hooked up it works like a champ. To give an idea of performance, last night i had a change in my fermentation profile, planned drop in temp of 3 degrees F over 2 hours, it didn't even stress my chiller keeping up with the profile. I'm going to run a test when i cold crash this batch but i should be able to probably do 2-3 degrees F per hour in temperature change. I run my chiller coolant temp at 30 degrees F.

The thing that I like about this set up is that the cooling and heating are all external to the fermenter so i don't have to bother with disconnects, leaks potentially contaminating a batch, etc.
 
Back
Top