
I wrote this up for a fellow HBT'er who asked me about it after I responded to a post. Others have asked me about it too so I figured i'd post it in its entirety so I can link to it here.
Some of this might be redundant to other threads, and I don't claim any of these ideas to be novel or invented by me, but I think its a complete collection of processes to execute a pressurized fermentation with a closed loop transfer to the serving keg, that goes the extra mile to reduce oxygen ingress. I have had outstanding success with this technique. It is also fairly cost effective when you think about how inexpensive corny kegs are, even brand new.
This is essentially the LoDO method described in the divisive PDF. You can still use this method post-fermentation without practicing any of the hot-side LoDO process and will see an improvement in your kegged beers.

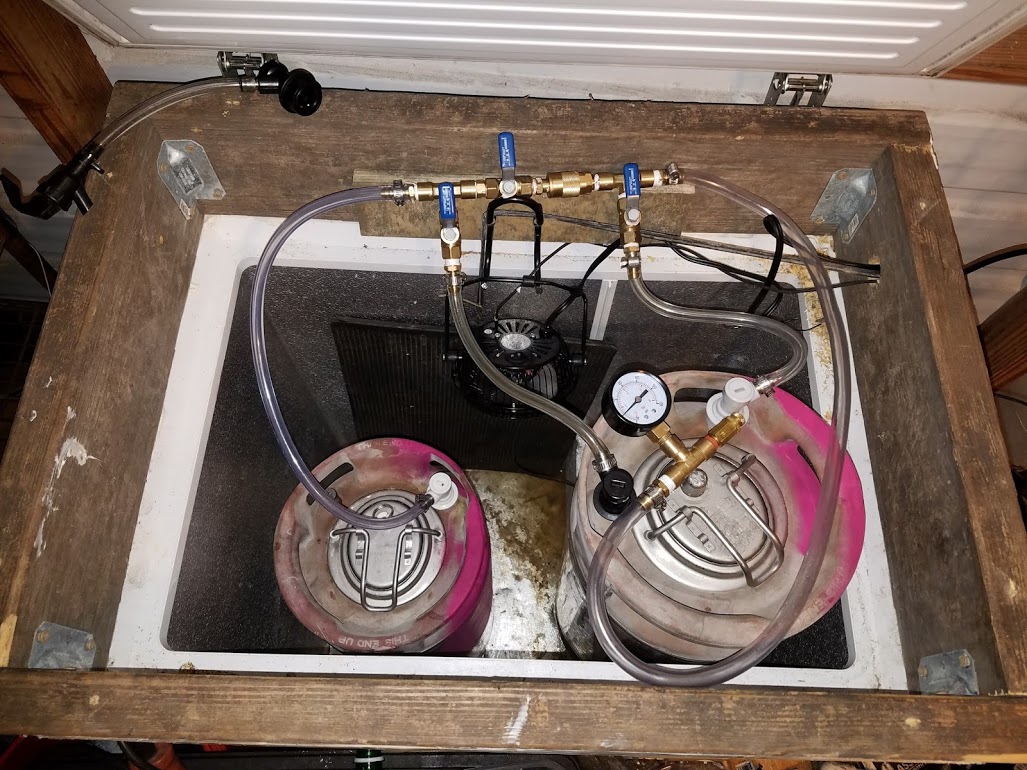
Figure 1: 3x5G of Bock Fermenting. Left 3 kegs are Fermentation Vessels. Right 3 kegs are water purged Serving Kegs being additionally purged by the fermentation gases.
 
The 3 FV kegs have custom made lids with welded in thermowell made by @Jaybird. See this thread.
Step 1: Turn 2 standard corny kegs into 1 of each a Fermentation Vesssel (FV) and Serving Keg (SK).

Figure 2: Converting standard keg to FV and SK
A. To make the FV first you need to bend the liquid dip tube to reach the side wall of the keg. This should put you about an inch off the bottom so you'll avoid all the yeast. If in doubt bend a little more and if you're leaving too much beer, then bend it further back. You may have to dial this in a little over a few batches.
Stainless tubing is hard to bend but you can do it with a vice and some force. Just spread your bend out over several inches and don’t put it all in 1 kink.
B. For both an SK and FV you want to cut the GAS dip tube flush with the inside of the keg. This equates to removing approx 1/2" of the dip tube. Keg models vary though so you’ll need to measure for yourself. Better to go a little too short than too long though.
This is very important for the SK because it’s going to allow you to do a complete water purge. In the FV it’s important because it gives you additional head space, which means less blow off, and more beer into the SK when you rack. The gas dip tube is nothing more than an o-ring holder.
Since I have so many kegs and didn’t own the right tools, I paid a shop to cut them for me. I’ve heard others suggest a dremel tool with the piece in a vice, or even a hack saw with the right blade (don’t want it embedding iron shavings into stainless).

Figure 3: Shortened gas dip tubes
Step 2: Water purge the SK
This is easier than it sounds and way more important than it seems. A standard keg has a huge pocket of air in the lid (several times more than will oxidize a beer). I do this a day or two ahead of time.
A. Clean the SK with PBW or whatever.
B. Fill the SK to the brim with water (Starsan is optional), then install the lid with PRV closed. Install a gas disconnect to the gas side, and liquid disconnect to the liquid side. The liquid side should be connected to a water source. I built a jumper hose (Figure 4) with the keg QD on one end and a camlock QD on the other end so it’s easy for my system.

Figure 4: Water supply to keg liquid post jumper
C. Tilt the SK to a 45 degree angle with the gas port on the top. Slowly fill the remaining portion of the keg with water until it starts squirting out the gas disconnect. It’ll take a few second before water comes out. Rock the keg around a few more times to ensure all the bubbles are out. Simultaneously pull off the liquid and gas QD. You now have a keg 99.99% full of water.
D. Use commercial CO2 at 10 psi to push all the water out of the liquid dip tube. You now have a keg 99.98% full of CO2 at 10 psi and a few drops of water at the bottom.
Step 3: Fermentation

Figure 5: Fermentation hose diagram
The idea of this set up is that you use all of the fermentation gas to continue to purge the serving keg. Also the SK will act to catch any blow off, protecting the spund valve from getting gunked up.
Don't have a spund valve? Try these threads. I'd recommend a 30 psi gauge. There are at least 3 different inexpensive pressure relief valves out there, and just know that all of them will slowly leak, so once fermentation ramps down you need to disconnect them and keep the keg sealed. You want to occasionally connect them to bleed off the excess pressure though.
https://www.homebrewtalk.com/showthread.php?t=245337
https://www.homebrewtalk.com/showthread.php?t=317333
https://www.homebrewtalk.com/showthread.php?t=579308
https://www.homebrewtalk.com/showthread.php?t=130237
A. Sanitize FV immediately prior to use and fill with chilled wort. Pitch yeast, oxygenate and install lid... note you've just filled the head space of the FV with oxygen and air.
B. Wait at least 4 hours for the yeast to consume the oxygen you've introduced. If you don't do this you'll mix the oxygen+air mixture back into the SK in the next step and your water purge results will be significantly impacted. I also like to CO2 purge the FV head space 3 times.
C. Attach jumper between the FV gas port and SK liquid port. Since the SK was pressurized when you purge it, this will pressurize the FV (some backflow may occur but don’t worry). You need this pressure to keep the lid sealed. Set spunding valve to target pressure.
I like about 3.5 psi, but you could experiment here. I’ve seen some some people report 15-25 psi.

Figure 6: Gas to Liquid Jumper used fermentation
Bonus: The added head pressure collapses the kraussen bubbles. My lager fermentations max at 1cm of kraussen, meaning i can nearly fill the keg to capacity. I fill the FV just past the top weld with wort.
If the recipe calls for dry hops I add them to the keg in a suspended nylon bag (or equivalent) with 4-6 SG points remaining. This is to scavenge any oxygen introduced by the dry hops. A few days later the beer will be at FG and the dry hops will have given their all. During this time pressure is maintained to minize loss of aromas as the last of the fermentation gasses escape.
Since there are no remaining fermentable sugars to naturally carbonate, add a priming liquid solution into the FV through the PRV hole with a funnel and wait until fermentation restarts (~1 hour). Then rack via the process below.
If the beer reached FG before it could be racked, follow this process of adding priming sugar as well. It has been demonstrated by others that the oxygen uptake from transfer will be minimized by having active yeast.
 
Step 4: Racking

Figure 7: Racking hose diagram
This is perhaps one of the best features of fermenting in kegs with this method and eliminates the need for a racking cane or external pressure. With a few gravity points to go (4-6 ideally, less if you fermented under higher pressure), it’s time to rack. You want to transfer at the tail end of active fermentation so the yeast will consume any stray oxygen picked up in transfer.
A. Purge the hoses you use in this step with gas saved in the SK (attach, use your finger or screwdriver to push the poppet). You could also purge with canister CO2 but I find it hard to connect the liquid-liquid jumper to that.
B. Elevate the FV above the SK. Connect the 2 liquid ports together. If you used the SK to purge the hoses you now have lower pressure in that keg relative to the FV. Flow will probably start on its own, but if it doesn’t, pull the PRV slightly on the SK until beer will start to flow. Then connect the gas sides together to equalize the head pressure.
C. Set timer for 30 minutes and walk away (or watch anxiously).
D. When you return you'll have the SK completely full and the FV empty. At this point i usually disconnect everything, and then top the pressure off in the kegs to ~5 psi to ensure a good lid seal. Then back to wherever to finish the last few points and naturally carbonate.
In Step D I also do a sanity check to make sure there weren’t any leaks that caused the transfer to stop. I’ve had that happen and didn’t realize it.
Some of this might be redundant to other threads, and I don't claim any of these ideas to be novel or invented by me, but I think its a complete collection of processes to execute a pressurized fermentation with a closed loop transfer to the serving keg, that goes the extra mile to reduce oxygen ingress. I have had outstanding success with this technique. It is also fairly cost effective when you think about how inexpensive corny kegs are, even brand new.
This is essentially the LoDO method described in the divisive PDF. You can still use this method post-fermentation without practicing any of the hot-side LoDO process and will see an improvement in your kegged beers.

Figure 1: 3x5G of Bock Fermenting. Left 3 kegs are Fermentation Vessels. Right 3 kegs are water purged Serving Kegs being additionally purged by the fermentation gases.
 
The 3 FV kegs have custom made lids with welded in thermowell made by @Jaybird. See this thread.
Step 1: Turn 2 standard corny kegs into 1 of each a Fermentation Vesssel (FV) and Serving Keg (SK).

Figure 2: Converting standard keg to FV and SK
A. To make the FV first you need to bend the liquid dip tube to reach the side wall of the keg. This should put you about an inch off the bottom so you'll avoid all the yeast. If in doubt bend a little more and if you're leaving too much beer, then bend it further back. You may have to dial this in a little over a few batches.
Stainless tubing is hard to bend but you can do it with a vice and some force. Just spread your bend out over several inches and don’t put it all in 1 kink.
B. For both an SK and FV you want to cut the GAS dip tube flush with the inside of the keg. This equates to removing approx 1/2" of the dip tube. Keg models vary though so you’ll need to measure for yourself. Better to go a little too short than too long though.
This is very important for the SK because it’s going to allow you to do a complete water purge. In the FV it’s important because it gives you additional head space, which means less blow off, and more beer into the SK when you rack. The gas dip tube is nothing more than an o-ring holder.
Since I have so many kegs and didn’t own the right tools, I paid a shop to cut them for me. I’ve heard others suggest a dremel tool with the piece in a vice, or even a hack saw with the right blade (don’t want it embedding iron shavings into stainless).

Figure 3: Shortened gas dip tubes
Step 2: Water purge the SK
This is easier than it sounds and way more important than it seems. A standard keg has a huge pocket of air in the lid (several times more than will oxidize a beer). I do this a day or two ahead of time.
A. Clean the SK with PBW or whatever.
B. Fill the SK to the brim with water (Starsan is optional), then install the lid with PRV closed. Install a gas disconnect to the gas side, and liquid disconnect to the liquid side. The liquid side should be connected to a water source. I built a jumper hose (Figure 4) with the keg QD on one end and a camlock QD on the other end so it’s easy for my system.

Figure 4: Water supply to keg liquid post jumper
C. Tilt the SK to a 45 degree angle with the gas port on the top. Slowly fill the remaining portion of the keg with water until it starts squirting out the gas disconnect. It’ll take a few second before water comes out. Rock the keg around a few more times to ensure all the bubbles are out. Simultaneously pull off the liquid and gas QD. You now have a keg 99.99% full of water.
D. Use commercial CO2 at 10 psi to push all the water out of the liquid dip tube. You now have a keg 99.98% full of CO2 at 10 psi and a few drops of water at the bottom.
Step 3: Fermentation

Figure 5: Fermentation hose diagram
The idea of this set up is that you use all of the fermentation gas to continue to purge the serving keg. Also the SK will act to catch any blow off, protecting the spund valve from getting gunked up.
Don't have a spund valve? Try these threads. I'd recommend a 30 psi gauge. There are at least 3 different inexpensive pressure relief valves out there, and just know that all of them will slowly leak, so once fermentation ramps down you need to disconnect them and keep the keg sealed. You want to occasionally connect them to bleed off the excess pressure though.
https://www.homebrewtalk.com/showthread.php?t=245337
https://www.homebrewtalk.com/showthread.php?t=317333
https://www.homebrewtalk.com/showthread.php?t=579308
https://www.homebrewtalk.com/showthread.php?t=130237
A. Sanitize FV immediately prior to use and fill with chilled wort. Pitch yeast, oxygenate and install lid... note you've just filled the head space of the FV with oxygen and air.
B. Wait at least 4 hours for the yeast to consume the oxygen you've introduced. If you don't do this you'll mix the oxygen+air mixture back into the SK in the next step and your water purge results will be significantly impacted. I also like to CO2 purge the FV head space 3 times.
C. Attach jumper between the FV gas port and SK liquid port. Since the SK was pressurized when you purge it, this will pressurize the FV (some backflow may occur but don’t worry). You need this pressure to keep the lid sealed. Set spunding valve to target pressure.
I like about 3.5 psi, but you could experiment here. I’ve seen some some people report 15-25 psi.

Figure 6: Gas to Liquid Jumper used fermentation
Bonus: The added head pressure collapses the kraussen bubbles. My lager fermentations max at 1cm of kraussen, meaning i can nearly fill the keg to capacity. I fill the FV just past the top weld with wort.
If the recipe calls for dry hops I add them to the keg in a suspended nylon bag (or equivalent) with 4-6 SG points remaining. This is to scavenge any oxygen introduced by the dry hops. A few days later the beer will be at FG and the dry hops will have given their all. During this time pressure is maintained to minize loss of aromas as the last of the fermentation gasses escape.
Since there are no remaining fermentable sugars to naturally carbonate, add a priming liquid solution into the FV through the PRV hole with a funnel and wait until fermentation restarts (~1 hour). Then rack via the process below.
If the beer reached FG before it could be racked, follow this process of adding priming sugar as well. It has been demonstrated by others that the oxygen uptake from transfer will be minimized by having active yeast.
 
Step 4: Racking
Figure 7: Racking hose diagram
This is perhaps one of the best features of fermenting in kegs with this method and eliminates the need for a racking cane or external pressure. With a few gravity points to go (4-6 ideally, less if you fermented under higher pressure), it’s time to rack. You want to transfer at the tail end of active fermentation so the yeast will consume any stray oxygen picked up in transfer.
A. Purge the hoses you use in this step with gas saved in the SK (attach, use your finger or screwdriver to push the poppet). You could also purge with canister CO2 but I find it hard to connect the liquid-liquid jumper to that.
B. Elevate the FV above the SK. Connect the 2 liquid ports together. If you used the SK to purge the hoses you now have lower pressure in that keg relative to the FV. Flow will probably start on its own, but if it doesn’t, pull the PRV slightly on the SK until beer will start to flow. Then connect the gas sides together to equalize the head pressure.
C. Set timer for 30 minutes and walk away (or watch anxiously).
D. When you return you'll have the SK completely full and the FV empty. At this point i usually disconnect everything, and then top the pressure off in the kegs to ~5 psi to ensure a good lid seal. Then back to wherever to finish the last few points and naturally carbonate.
In Step D I also do a sanity check to make sure there weren’t any leaks that caused the transfer to stop. I’ve had that happen and didn’t realize it.
 ).
).

