Possible cheap and large 30 gallon fermenters...

Homebrew Talk - Beer, Wine, Mead, & Cider Brewing Discussion Forum

Help Support Homebrew Talk - Beer, Wine, Mead, & Cider Brewing Discussion Forum:

This site may earn a commission from merchant affiliate links, including eBay, Amazon, and others.

Zamial

Well-Known Member
Joined
Apr 4, 2010
Messages
3,170
Reaction score
194
Location
WI
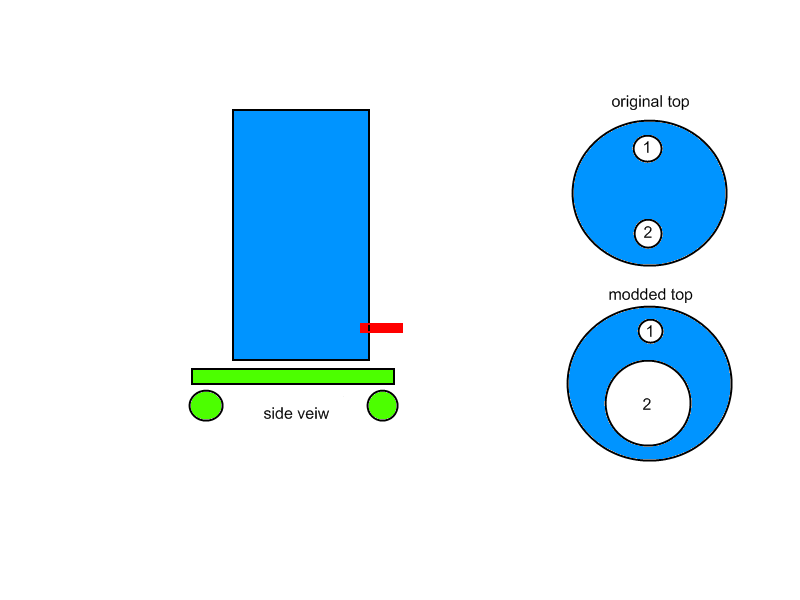
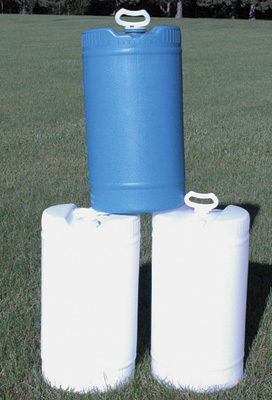
Ok so I jumped the gun as normal and bought 4-30 gallon HDPE #2 drums. They were originally used to hold syrups/concentrates, mostly apple. :D They are marked w/ lines for every 5 gallons up the side, have 2 screw type caps/ openings in the top and are a blue in color.

I was thinking that I could use these as fermenters. I am very close to be moving outside onto a make-shift brew stand but that will be set before these; and should be ready soon.

I also have started looking into a few hydrolic "lift carts" to aid with transfers.

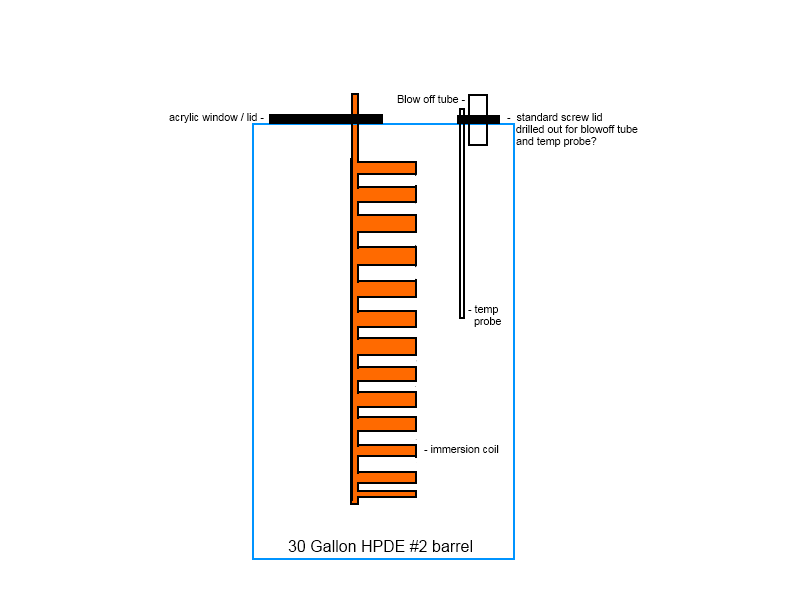
I will further plan to cut an off-center hole, in the top that will be a window/ access lid inside for inspections,cleaning and mounting a spigot near the bottom. I will then use the other "cap/lid" to have a blow off tube.

My questions are:
-Other than the obvious things like weight limits, be sure to clean/sanitize them and some oxygen permeability are there any other issues I should be concerned about?

- If others are also using these, what spigot/ball valve would be a good choice to install in the bottoms for transfers (I am thinking SS like the keggles...)?

any other advice?

BTW The score was pretty good even if they are near worthless for brewing, I only paid $50.00 for everything: 4-30 gallons and 2-55 gallons (the 55's are for a different project...)
 
Do you have something big enough for temp control?

I assume the answer is yes. I have "the chamber" aka the computer room that is kept at on constant 63 degrees F (+/- 1 deg. and can be set lower if it really needed to.) This is where I do all my fermenting at. Oddly the beer, like me, does not see ANY sunlight in here.

I do understand that the fermentation temp will be slightly higher than the ambient but I have not had any issues with 6 gallon batches so far.

I may need to remain semi-mobil; so I can not build a structure to hold them at this time.
 
Ok I hope this works...

30galbbl.png


The green part is a hydrolic lift/cart. like : http://www.harborfreight.com/1000-lb-capacity-hydraulic-scissor-table-cart-93116.html That would hold both 30 gal Barrels on it with ease
The red part is the spigot.

The holes:
1's "cap/screw in lid" will get drilled out and fitted with a large diameter hose, probably vinyl, for the blow off tube.

2 will get cut open for an inspection window. I am still thinking this part over. I am thinking a gasket and some stainless bolts/wingnuts with an acrylic window? It will be an inspection window to verify the cleanliness of the barrel or to just take a peak at the fermentation. It will probably end up covered by the blow off bucket 90% of the time; it may also be the "fill port"?

I think this is a good idea for a 30 gallon fermentation vessel for a pittance of a price. When the keggle is done, I believe that set up can easily handle 12-13 gallon batches?, I can make a double batch that should be an easy 24-26 gallons of beer all ready at one time.

IMO doing a large double batch x2 in 1 weekend (1 for me and 1 for SWMBO)every 4-6 weeks is much more controllable and obtainable, than to continue down the path I am on now: brewing every other weekend and sometimes during the week, juggling carboys and ale pails. It is however a bit of an inconvenience to SWMBO's plans for me...lol. I love brewing but being able to hammer out a massive brew weekend on the above schedule seems much easier to plan for.

Also, if I do ever decide to go off the deep end and open a small brew pub this would be a very manageable system for minimal dollars...I think...
 
How are you going to boil the 30 gallons of wort? lol

LOL I will not be boiling the 30 gallons all at 1 time I will be doing "split boils' of about 12-13 gallon batches in a keggle system, these are simply fermentation vessels, think gigantic Ale Pail ...
 
LOL I will not be boiling the 30 gallons all at 1 time I will be doing "split boils' of about 12-13 gallon batches in a keggle system, these are simply fermentation vessels, think gigantic Ale Pail ...

So you will do a 13 gallon batch put it in the chamber then do another 13 gallon batch the same day and also add it to the chamber then pitch?
 
So you will do a 13 gallon batch put it in the chamber then do another 13 gallon batch the same day and also add it to the chamber then pitch?

yes, basically that is my plan or very close to it..
 
do a cheap batch for you first one HDPE is notorious for flavor scapling and ruining that much beer would be horrible
 
A couple thoughts...

Your design shows a drain near the bottom. Have you thought about how you will get the beer out of that thing after fermentation? You won't be able to lift it. You'll likely need a pump.

Make sure your seals are sealed.
 
do a cheap batch for you first one HDPE is notorious for flavor scapling and ruining that much beer would be horrible

No doubt, pre-used HDPE wants to retain some funk. It takes some effort but it can be cleaned without sacrificing any precious cargo.
 
A couple thoughts...

Your design shows a drain near the bottom. Have you thought about how you will get the beer out of that thing after fermentation? You won't be able to lift it. You'll likely need a pump.

Make sure your seals are sealed.

Random thought...make sure you account for 13 or 26 gallons worth of trub when placing the drain
 
A couple thoughts...

Your design shows a drain near the bottom. Have you thought about how you will get the beer out of that thing after fermentation? You won't be able to lift it. You'll likely need a pump.

Make sure your seals are sealed.

it looks like he is going to use a scissor lift cart to elevate, then its just gravity into kegs, I have the same cart at work, I use it for lifting engines up to be mounted to the stands for overhauling
 
it looks like he is going to use a scissor lift cart to elevate, then its just gravity into kegs, I have the same cart at work, I use it for lifting engines up to be mounted to the stands for overhauling

Yes, this is the plan. I should be able to use a lift to get the fermenters up high enough to gravity fill kegs/ a bottling bucket/ ect.

I am even thinking of building an elevated stand (if possible) that would let me "slide" a full fermenter onto it, lower the cart and place an empty barrel onto the cart to fill for secondaries if/when needed.

As for "trub" there is little I can do about that. I am actually still deciding the distance from the bottom of the barrel to place the valve and if I should have some sort of: filter, tube or just leave in flushish to the bulkhead...

Ty also for the flavor scalping post. I plan on actually trying to play into those. EXAMPLE: I am currently soaking a "White Russian" barrel in oxy clean free, then rinse really well and sanitize. Thankfully it smells NOTHING like a White Russian but more like whiskey and cream! So, I am thinking of running a stout through it as its 1st batch. So if the flaovor does scalp a bit into the beer everyone will think I did it intentionally! I will "give" the apple barrel to my mother so she can use it to make apfelwine.(Yes, I will be doing all the work for that...but she makes the wines...)

Well, It looks like I have a "Go" from everyone so far, so I will probably start the build in a few weeks. I even talked to SWMBO to take some pics.
 
Just an fyi, the only batch I ever had to dump was from using a hdpe barrel that had been used for soda syrup, I could never get it clean enough to use as a fermenter. And I tried everything.
 
Just an fyi, the only batch I ever had to dump was from using a hdpe barrel that had been used for soda syrup, I could never get it clean enough to use as a fermenter. And I tried everything.

Just out of curiosity was it a brown soda? like cola or root beer? I hear root beer is FOREVER.

Cool, I definitely will be cautious of that. I will only build, test and brew 1 30 gallon fermenter and batch. Should this work, I will construct another one ect,ect.

I did an oxy free soak over night and rinsed it REALLY well. I can not smell, no matter how hard I try, any of the original smell at this point. I will now star san it overnight, then rinse and allow to full dry, then "construct it" in a few weeks.

On a side note...What if I were to intentionally permeate the barrel with some super cheap, gut rot, whiskey and oak chips and then dilute it down. I MAY be able to simulate a whiskey oak barrel, at least for a batch or two...any thoughts?

Also ty for all the responses!!! :rockin:
 
I'm not convinced with containers this size that simply keeping the environment at a certain temperature will give you the control you need. There's a lot more heat generated by 20 - 25 gallons fermenting than five, and the ratio of liquid to the surface of the container exposed to the ambient temperature is far, far lower than with the 7 gal. buckets I use to ferment......and that plastic is not a particularly good conductor of heat. I'm afraid you may experience excessive temperatures in your fermenting wort, regardless of the 63F air surrounding it.
 
I'm not convinced with containers this size that simply keeping the environment at a certain temperature will give you the control you need. There's a lot more heat generated by 20 - 25 gallons fermenting than five, and the ratio of liquid to the surface of the container exposed to the ambient temperature is far, far lower than with the 7 gal. buckets I use to ferment......and that plastic is not a particularly good conductor of heat. I'm afraid you may experience excessive temperatures in your fermenting wort, regardless of the 63F air surrounding it.

Should I have a really bad time of temp control I do have 55 gallon barrels on standby that could be turned into swamp coolers. I do think that this is a desperate attempt to salvage a bad situation but it is the back up plan.

To date I have had no issues so far but like you stated there is a big difference in 6 gallons vs. 25ish... This is why I have created this post...I am pretty sure that more than 1 person has done this or attempted it at the very least and may give some good pointers or come in screaming "DON"T DO THIS!!!!!! FOR X REASON!!!!!!!" but so far this has not been the case.

Unless someone does come in and tells me I am on a fools errand and this needs to be stopped now, I am pretty sure that it is at least worth a shot...
 
It was Dr. Pepper. And the smell was gone after extensive cleaning, but it showed back up in my beer.
 
It was Dr. Pepper. And the smell was gone after extensive cleaning, but it showed back up in my beer.

TY this is, at this point, one of my largest concerns. I am fortunate that the 1st barrel to try this on/in is a "white russian" that smelled of whiskey and cream, not really what I think a white russian smells like.

I have found some of the Jack Daniel's wood chips (made from old whiskey barrels). I am SERIOUSLY thinking about adding in 1 full bag + 1 bottle of the cheapest whiskey I can find and some REALLY hot water and let that "cook in" the barrel for 24 hours. Followed by 1 last oxy, rinse and sanitize.

I am also thinking that I am going to try a super cheap SMaSH brew for the 1st batch through. This should allow me to spot any "wild off flavors" right away.
 
I'm not convinced with containers this size that simply keeping the environment at a certain temperature will give you the control you need. There's a lot more heat generated by 20 - 25 gallons fermenting than five, and the ratio of liquid to the surface of the container exposed to the ambient temperature is far, far lower than with the 7 gal. buckets I use to ferment......and that plastic is not a particularly good conductor of heat. I'm afraid you may experience excessive temperatures in your fermenting wort, regardless of the 63F air surrounding it.

While I hear this concern once in a while, I've never seen anyone post saying that it is a problem they are having. I know we have people on this board regularly fermenting 20-45 gallons at a time. People using inductor tanks mounted in fridges, etc.. I would love to hear from some one that has experience doing this.

There is a thread around here that talks about the temp raise being about 5 degrees for a standard 5g batch.. What's a consensus on how much a 10g or 15g or 40g batch will raise in temp?

I have eventual plans to run double batches as well, and am very curious about this.

I have been reading here and other places and I think my eyes are about to bleed...:cross:

Anyways, I have read about guys doing 45-50 gallon batches (in HDPE 55 gallon bbls) that use a walk-in fridge set in the mid 50's to hold the temps in range for ales and claim to "never have had a problem."

If I "split the difference" and brew 25 gallons maybe I only need to drop the ambient a few more degrees??? say to 60 F vs. 64 F???

I do realize that temps vary on ALOT of different things like: volume, gravity, yeast strain, thermal conductivity and shape of the vessel but I agree, This is not like I am reinventing Tesla coils here...so I guess I will need to wait to see if a large batch brewer comments here OR I just build it and use it knowing I may have 25 gallons of bratwurst precooking beer...or a bad idea followed by a 25 gallon dump...

I am going to also throw this in at this point. I am NOT trying to hold specific temps within a degree or 2, I am looking to stay "in range" of temps for ale. As long as it turns out tasty that is just fine by me. I have no plans on entering competitions or "going pro" just to brew less often but drink the same! :tank:
 
I bought one of the 15G ones from US plastics.com Used it for the 3rd time yesterday. I modified it by cutting the top off. The top makes it a PITA to clean and empty because when upside down (for dumping out) the raised sides besides the threaded openings catch all the water and don't let it drain. I had a lid from a 10G red cooler that fits well enough.
 
I think you should be good, just put a thermowell or probe into the middle of the batch and keep track of how 'warm' the middle stays during fermentation. If it is a little high for your 'ale range' then crank down the ac or take other measures. If it stays in the area you want, fire up the production line. :D

Data acquisition tends to settle most arguments.
 
i bought one of the 15g ones from us plastics.com used it for the 3rd time yesterday. I modified it by cutting the top off. The top makes it a pita to clean and empty because when upside down (for dumping out) the raised sides besides the threaded openings catch all the water and don't let it drain. I had a lid from a 10g red cooler that fits well enough.

pics!
 
Like you said, just brew a cheap batch. If it tastes good you have succeeded. If it tastes bad you have either failed, or more likely, have some tweaking to do. I like the idea of 30 gallons of beer in one fell swoop though, so would you please do us all the pleasure of letting us know what comes of this? ^^^pictures too would be nice.
 
Like you said, just brew a cheap batch. If it tastes good you have succeeded. If it tastes bad you have either failed, or more likely, have some tweaking to do. I like the idea of 30 gallons of beer in one fell swoop though, so would you please do us all the pleasure of letting us know what comes of this? ^^^pictures too would be nice.

Yes, Yes and yes! There are some family medical things that I will need to attend to at some point in the near future and I also need to make my keggle so, it will be a few weeks before this really gets the attention it deserves as an FYI. Then it will be the wait for fermentation and all the joys of that! but I will post back here as this gets done.

If anyone else wants to "power through" and do this before me, have at. OR if someone else HAS ALREADY done or is doing this, please do tell all. ty.

:tank:
 
Ok after a restless night trying to think of how to control temps, someone rezzed a thread in the DIY section that was about cheap temp control for a carboy or 2 inside of a cooler using; a temp controller, a cooler of ice + water and pond pump. I posted the ty for the inspiration and came up with the idea of a cross breed of that project and a wort chiller.

so what are the thoughts about this? (other than I am NOT an artist...)

plans20.png


I plan on building a cheap "stretched out version of a wort chiller. I do not think I need 20psi or tight coils as this is just to try to control the temps. I can swap out a couple of 2 liters of frozen water out of the cooler and the rest should be fairly automated...

This should nip the temp control concerns in the bud...and I MAY even be able to lager? we will see...:mug:

To address the concerns of the trub I will place the ball valve after the 1st run and I can always siphon off the rest if need be...

I have a spare cooler and can get a decent deal on the copper tubing but this will raise the overall cost considerably. I will have to pass on the scissor lift cart at this point and use some old end tables made of 2x6 (they are really sturdy but ugly...so SWMBO let me have them...:p). If this works, I can repeat the build and make a few more! as well as adding in the scissor lift cart.

So no one can get really upset and I do not waste a bunch of my time/money and heaven forbid beer:
- I am planning to do a VERY cheap session beer in this to see if I get any horrible off flavors from scalping...
- I will NOT mod the barrel or screw with it in anyway other than to make a blow off tube.
- For the 1st run I will end up siphoning this bad boy...PITA!!! but better than wasting a bunch of cash on parts+time for a potentially bad DIY...this will also give me some idea of the trub line and were to place the ball valve as well as a test run of my keggle system!

any thoughts???
 
The only thing with the immersion coil in the fermenter is that you don't want it to be copper. Copper is great until fermentation, then you don't want to use it. At least that's what I've picked up from reading.

I'm really hoping that someone regularly fermenting 40g+ will chime in...
 
IregularPulse, I've got a few of those barrels as well keep thinking of fun things to do with them. I think I'll make an MLT out of one. I figure its practice before making a MLT out of 55gallon food safe barrel. I'm also looking at making a honey extractor out of one... They are great vessels and home brew shops go through them..
 
To start off with TY for all the useful help you guys have provided!!!

I also did follow + read that link there was some decent info there. My main issue is that SWMBO is not going to be ok with me building a refrigeration chamber in the house and the garage is a no go as well (we rent). The added cost of one of these refrigeration units plus the cost to run it would be more than I care to tackle at this point...one day at MY house maybe...

I also would have a hard time loading and unloading 300lbs of beer in and out of any fridge or freezer (I could move that much but not pick it up very high for very long lol). I have a bad back but I can lift 150ish with no issues...

I am now looking at the same idea as the original wort chiller/ice box combo as before but in SS. (ty for the heads up on copper) I think the space and cost to operate this will be MUCH MUCH less vs a dedicated fridge/freezer...however, I also think that this is going to turn into a "relatively cheap fermenter with temp control" vs a "cheap fermenter" at this point.

Just getting the basic items and wort chiller the bill is circling about $250 dollars... this is including temp control as well...in comparison an ale pail w/ airlock is at most $20.00. x 5 for the same volume and it turns out these are cheaper but there is no temp control...if we look at glass carboys of the same size this IS a better deal...so "relatively" comes into play...

My goals for things done by the end of this weekend are: flavoring the drum and my keggle, since I need both for this project. I will post the plans for "flavoring" tonight and then wait until Friday to start it for feed back...
 
This is a project update.

Keggle + stir plate is completed.

I did add the "flavoring" to the barrel yesterday as well. This is 2 large bottles of Lord Calvert Canadian whiskey, I refilled these bottles 3 times each with water and added 1 package of Jack Daniels oak barrel chips in a mesh bag. It smells like a whiskey barrel inside it now for sure. (This step cost me about $25.00.) My thought is the "solution" in the barrel should be around 10-20% ABV. This should not only "leech" any off flavors out of the barrel it should also add the oak + whiskey flavor to it! (dare I sample a shot at the end of the week???)

Personal note/fyi, I do not drink this brand of whiskey, it just happened to be the cheapest in the mega-grocery store's liquor section.

I will leave this in the barrel, "swish" it around and roll the barrel 2 times a day for 1 week. I am hoping that in a couple of weeks I will be all ready for the 1st test run on the new equipment. Target brew/launch day is the 14-15 of Aug.

I am supposed to receive my 50' SS wort chiller today and I got a stellar deal on a 480 GPH "pond pump" from Menards for only $35.00 on sale. I should get my "ebay aquarium controller" some time next week.

I also picked up a sheet of 24x24 acrylic for my window. I am thinking my window will be roughly 12 inches round or maybe just a tad bigger. I had a "genius" engineering moment while in Home Depot. I was looking for a way to seal the window but to keep it removable, like a giant o-ring or a gasket. I looked at everything and asked multiple employee's if they knew where I could get one that was 10-13 inches (the wort chiller coils are 9.25) and they all said "good luck" and had no ideas. Then on my way to the checkout *bam* it hits me. There are large "o-rings" inside the Home Depot orange lids. I race over and measure it and it is 11.25 inches! perfect and cheap! I was able to easily remove it from the lid with little effort. (The HD lids seem more flexible than others.) I get it out and it is "squishy" I assume it is actually a small rubber tube the way it acts but this is perfect for a good seal with minimal pressure. :)

I am much more optimistic about this project and am getting "itchy" to get it all done and to make my 1st batch with/in it!

As for the 1st batch, I am planning a cheapo Oktoberfest-ish beer. My LHBS has Munich malt for under .80 a pound and this is the recipe that I am thinking about.

(Remember this is split in 1/2 as I will be doing 2 - 13 gallon batches.)

55# Munich malt
10# 2-row
5# Carmel 40l (this is also on sale)
(I will need to look at what hops I have but I am thinking a low AA hops...Mt.Hood???)
4 oz @ 60 min
4 oz @ 20 min

(4 oz is optimal for me as this is the quantity that the hops comes in and it is going to be drank by many different people, so I really do not feel the need to hop slap them since they drink mostly BMCish beers...The other cool thing is it will be ready for either the end of September for Oktoberfest or worst case scenario a week-ish or 2 later for my Birthday!)

:tank:
 
I am waiting for my temp controller. I think it is literally on the slow boat from China. I will be building as much as possible this weekend and over labor day weekend. I am hoping that the temp controller shows soon, with out it the project is stalled...I am hoping to have it ready for the 1st batch before the end of Sept.

I will also be taking pics and posting them soon as well. Stay tuned...:tank:
 
The only thing with the immersion coil in the fermenter is that you don't want it to be copper. Copper is great until fermentation, then you don't want to use it. At least that's what I've picked up from reading.

I'm really hoping that someone regularly fermenting 40g+ will chime in...

I don't know either, but I thought their are European breweries that have been using cooper fermenters for hundreds of years...
 
Just spent a left arm for stainless hardware. Not all for this project but much of it was. The other was for my new HLT + MLT keggles (just picked up 2 of the nicest looking 1/2 bbls I have ever seen for $50.00 off CL), quick disconnects, and silicon tubing. All the SS parts did come from Barginfittings.com (another shameless plug...) :mug:
I had an issue with shipping (my error) and then with my bank (whom I hate) so it will be a few weeks on the temp controllers but worth the wait (If I tell myself that enough I hate my bank less).

So, the parts list for this project, up to date as follows:

1) 1-30 gallon drum: $10.00
2) 1-24x24 sheet acrylic: $15.00
3) #-flavoring: $25.00
4) 2-1/2" NPT Female x 1/2" hose barb: $10.00
5) 2-1/2” ss camlock F style QD: $7.90
6) 4-1/2’ NPTx3/8” tube compression adapter: $56.00
7) 2-1/2” ss camlock D style fitting QD: $12.40
8) 2-1/2” NPT coupling: $8.00
9) 1-cooler weldless bulkhead kit w/ 2 piece ss ball valve: $23.00
10) 1-Ebay temp controller: $20.00
11) 1- $5.00 tool box from harbor freight (cheaper than a project box)
sub total: $192.30

I have also bought a ss wort chiller that will be used inside the ferm chamber. I will be brewing when the ferm chamber is empty so I can use the QDs on it and then use it for an actual wort chiller, this is a needed component but I will be able to dual purpose it. :D

I also have old computer power cords to salvage for the temp controller and wiring its controlled outlet. (That is what the tool box is for.) :)

Plus there is a needed 1-1/2" NPT male 1/2" hose barb needed. I have one that will be getting replaced with a QD so it is not included either. It was $5.00ish.

Pics coming when hardware arrives. Stay tuned...:tank:
 
Back
Top