My Stirplate... Cheap and Easy Build...

Homebrew Talk - Beer, Wine, Mead, & Cider Brewing Discussion Forum

Help Support Homebrew Talk - Beer, Wine, Mead, & Cider Brewing Discussion Forum:

This site may earn a commission from merchant affiliate links, including eBay, Amazon, and others.
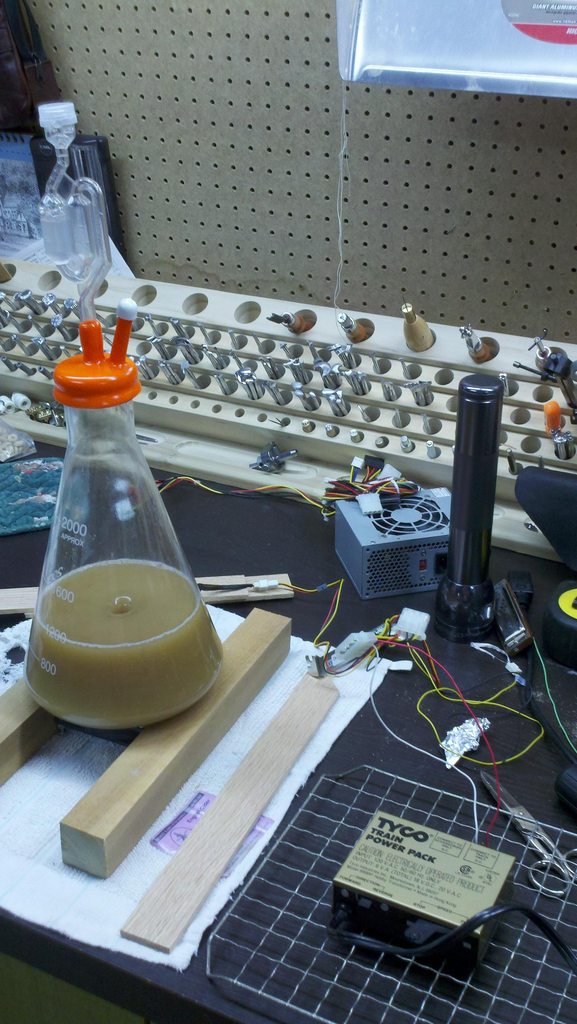
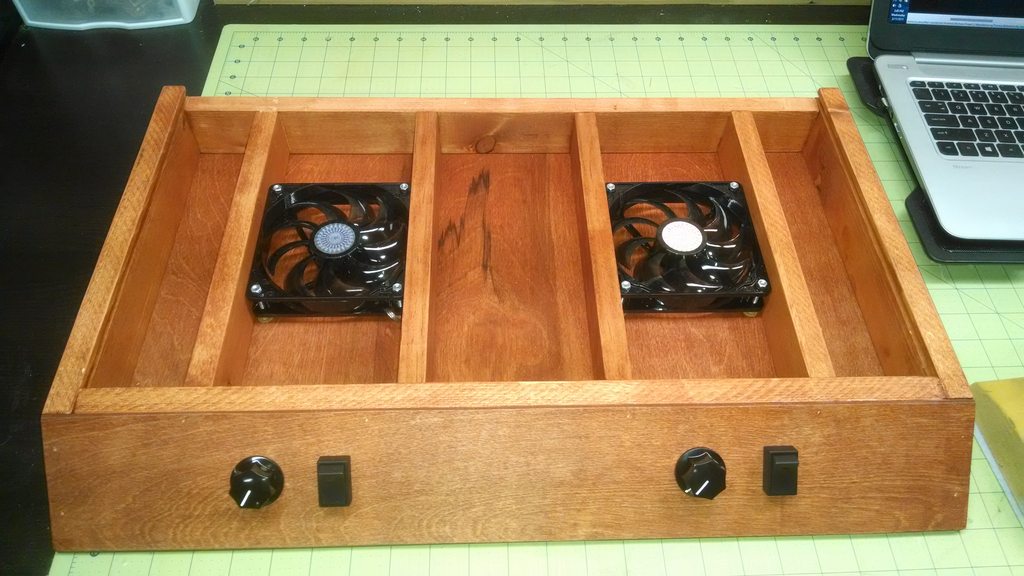
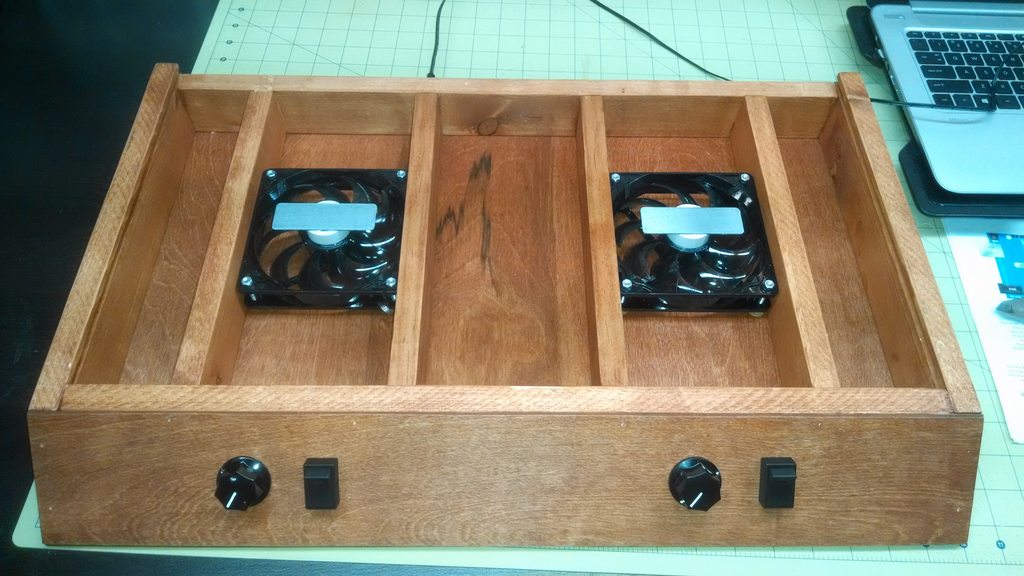
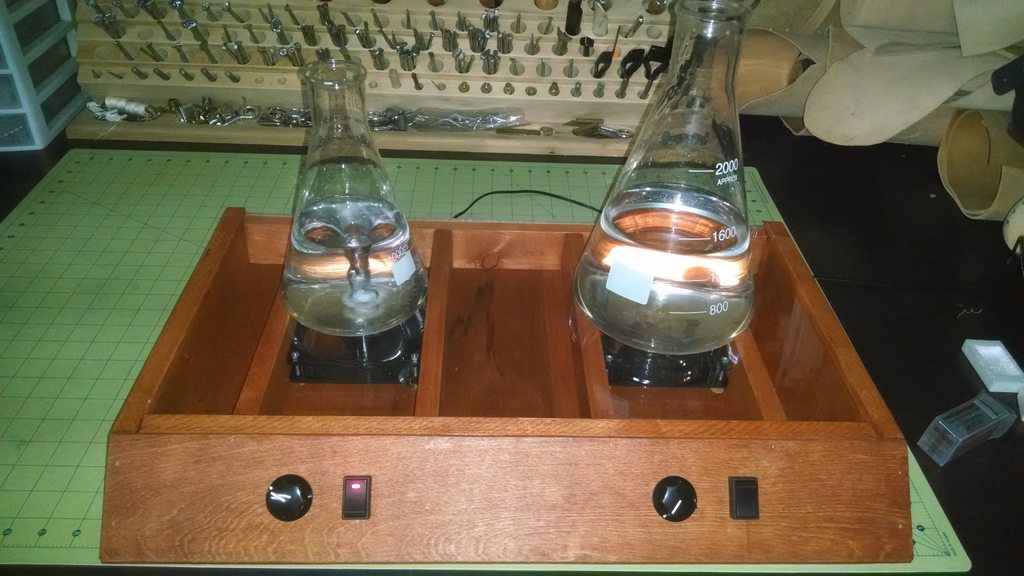
Do you want to go faster or slower? I made the same build and it can go so fast it throws the stirbar and can also send voltage so low it won't power the fan on. Realistically you don't need a whole lot more than a good medium pace swirl if you're just using it for yeast starters.

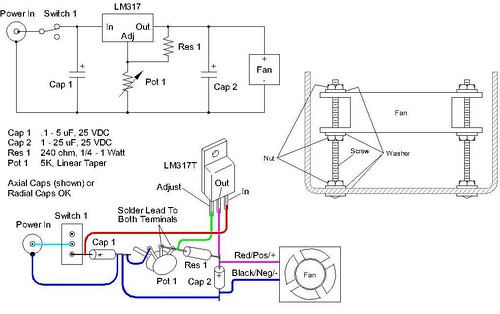
If you want more control over speed, I've heard you have to add a voltage regulator lm317.
 
I keep reading how people are able to slow it down to almost a stop, as you said. That's what I was anticipating, but can't even come close. I have not yet made a starter, but I was able to get somewhat of a vortex with water. I have a 2L flask and am waiting for my stir bar to arrive. For now I am using a divided shelf peg, which I believe is 3/4". It may work just fine, but like I said, I was anticipating the results I have been seeing here. I do have a lm317; Maybe I'll try to figure out how to add it...
 
I keep reading how people are able to slow it down to almost a stop, as you said. That's what I was anticipating, but can't even come close. I have not yet made a starter, but I was able to get somewhat of a vortex with water. I have a 2L flask and am waiting for my stir bar to arrive. For now I am using a divided shelf peg, which I believe is 3/4". It may work just fine, but like I said, I was anticipating the results I have been seeing here. I do have a lm317; Maybe I'll try to figure out how to add it...

This post has a wiring diagram with a LM317:
https://www.homebrewtalk.com/f255/my-stirplate-cheap-easy-build-86252/index106.html#post3899452
 
That link just brings me to this same page. Is it somewhere in this thread? If so, I'll dig through and find it. To be clear, we are talking about this right?

sku_157206_2.jpg
 
Yes, it is on this thread - post 1059.

Here is the quote:
This is a fool proof wiring diagram. All parts is obtainable from your local Radio Shack.

2746854079_cc609a0d77.jpg


This will allow for perfect speed control. Using just a potentiometer will work at first but wont last and last. You wont get good speed control and using lower volt DC adapters for speed control is silly. Don't do it, build it right.

Also checkout this handy link: http://www.stirstarters.com/instructions.html

If you like DIY then build one if not just order one from here, it is much easier and only marginally more expensive than parting and building it yourself.

Cheers to happy yeasty beasties! :mug:


Yes, that is an LM317.

Good Luck!
 
What do they mean that the potentiometer won't last?

Mellow52 does not clarify his statement, but I think he means that the potentiometer will last longer if it is paired with the voltage regulator. The potentiometer's load is smaller if it is controlling a voltage regulator rather than the voltage itself. Think of it like using a shovel as a prybar. It will work as long as the load is very small. If the load gets too big - or the load is right at the limit of what a part will handle - something will break - eventually. There are a lot of people using the original design (without the LM317) with no problems, so I would say adding the regulator is at your discretion. I put it on mine, but I don't know if it is absolutely necessary.

Good Luck,

Cody
 
First off, thanks to everyone who took the time on this thread to share so much information. I put one of these together using this thread, but I don't seem to have much speed range. I am also planning to make another, but want to get this one right first. I was trying to troubleshoot this on my own with my zero electrical knowledge, and am thinking it may be related to the rheostat. Could someone please explain in layman terms why we are using a 25 Ohm 3 Watt rheostat? I went looking for different sizes, but really can't figure out what the numbers mean in relation to their use...

I'm having the same problem with my build (6v power source, 25ohm POT, and 12v fan). Went back to RadioShack and got a 5K ohm (had read multiple places that it would allow for more adjustment of the speed) and that did basically the opposite of what I wanted and I ended up having basically an on/off switch and when the fan is on it's like hyper speed.

I think I'll go back to RadioShack and try to throw a resistor in the loop and drop the voltage before it gets to the POT.

Edit: The issue I'm having with speed is that my lowest speed seems to be a little too fast still, so hopefully dropping the voltage will give me some more control.
 
UPDATE: I think I've gotten my stir plate set up just how I want it. I have no way to measure the RPMs or anything, so I'm really just eyeballing the speed.

The problem I was having earlier with not being able to lower the speed anymore using just the pot were solved by adding in a resistor to the system before the pot. Now I've got the ability to lower the speed down to a near stop and then up to faster than I think would be needed for my purpose (1-1.5L starters).

Here's a couple pictures of the finished project with details on the parts.

StirPlateDetails.jpg


2015-02-28 17.15.14.jpg
 
UPDATE: I think I've gotten my stir plate set up just how I want it. I have no way to measure the RPMs or anything, so I'm really just eyeballing the speed.

The problem I was having earlier with not being able to lower the speed anymore using just the pot were solved by adding in a resistor to the system before the pot. Now I've got the ability to lower the speed down to a near stop and then up to faster than I think would be needed for my purpose (1-1.5L starters).

Here's a couple pictures of the finished project with details on the parts.

Nice! I'll have to try that with mine. I built another one with a different fan to see if that was the problem, but it seems to be the same.
 
Took a while but I've read through all the posts and am inspired to build one myself. Great builds to everyone who has posted pics! Just waiting for a few more supplies before I start. BTW, with RS going bankrupt, got some amazing deals on supplies while the few remaining brick/mortor stores try to liquidate what's left.

Question, for those of you who have done it or otherwise know, if you had a choice to build/use a pwm vs lm317 voltage regulator, which is best in this setup? I'm considering both at the moment and not sure which way to go.

PS, thanks to the OP for starting this thread, it's going on how many years now and influences hundreds more I'm sure!
 
Built mine today. I had everything I needed for the plate lying around the house except for a potentiometer, but I got 6 of them (with hardware and knobs) for $7 shipped.

[ame]https://www.youtube.com/watch?v=dbKTOIg4WUw[/ame]

I used an old external HD enclosure. I mounted the fan on the bottom so I would have a nice, smooth surface on top for the flask. So far... it seems to be running great. It is surprisingly nice and quiet compared to the ones I've used in chem lab which could get pretty loud with the rattling. It could definitely be improved... I'll add an on/off switch eventually.
 
I have been using a little piecemeal stir plate formed out of a computer fan and an old model train controller:
avdNLzth.jpg


I wanted something that is:
(1) stable
(2) decent looking
(3) capable of do two six liter starters simultaneously.

Here is what I came up with:

Sketchup pictures:
2ZvYNC0h.jpg

PWeMtHRh.jpg

yP1mGLLh.jpg

lqikMdNh.jpg


Mocking up the electronic portions:
yu0jJcYh.jpg


Basic assembly and stain:
Front:
3M0vvQgh.jpg


Back:
fyV89m8h.jpg


Base:
DI8sbiih.jpg


Testing the acrylic fit:
qJoaBGXh.jpg


Spacers and bars attached:
M69eaNvh.jpg


Magnets set and acrylic installed:
Front:
xQIFrxJh.jpg


Top:
Pnxg3Ceh.jpg


Side:
sZw3Uwgh.jpg


Back:
duugyC9h.jpg


Test run:
RpsZZDeh.jpg


Theoretical maximum usage:
Front:
0P5uPSNh.jpg


Side:
uyed2UMh.jpg


I still need to disassemble and put a varnish coat on the wood parts, but it is up and running. If I were doing the project again, I would increase the height from 2.5" to 6". This would give me more opportunity for adjustment.

I like this design a lot. Where did you hide the wires? I couldn't see any. I think I would like to copy this design for my next one. I usually do a mead or a cider during my mash so it'd be nice to have two starters going at once.
 
I like this design a lot. Where did you hide the wires? I couldn't see any. I think I would like to copy this design for my next one. I usually do a mead or a cider during my mash so it'd be nice to have two starters going at once.

It looks like he is routing his wires through the dados in the bottom of his cross members and the space behind the beveled switch plate.

Yes, the wires are routed in under the support pieces and behind the faceplate. Also, unlike my sketchup drawing, you only need to create a groove on the bottom of the two inside support pieces. This can be done with a dado, a router, a very careful hand with a skil saw, or even by hand. The bottom plate of the unit is attached with Brass Standard Wood Insert Lock Nuts so it can be removed and the wiring accessed. I used the wiring diagram from post 1059 on this thread. If I built it again, I would increase the height from 2 3/4" to about 6". The added height would give me some adjustment room for my magnets and fans. Mine works, but I think a little more room would allow the fans and magnets to get a little farther apart. I think this would translate into a little more power.

I also picked up a couple overflow catchers in the garden department of the dollar store (they are plant watering bases):
ABEACOJh.jpg

5Jk8FYGh.jpg
 
Awesome. Thanks. That's kind of how I thought they were hidden but wasn't completely sure. I'm hoping to build one soonish.
 
Just finished mine today and it's working. Not sure I'm getting enough of a vortex. Doesn't pull all the way down at max speed. Got the Cigar box free at the local Gas Station that I go to all the time. Just asked if he had any empties and he happened to have one right there at the counter. Got the fan off of e-bay 12V was going to build a box with a clear top. Magnets are rare earth magnets that we have at work. Rest of the parts are from Radio Shack but they didn't have the exact parts. 2L Pyrex Flask off of Amazon is worth the few extra bucks (just feels solid).

Do I need to add holes to the board the fan is attached to??? It has bolts sticking out the bottom to raise it up so everything tucks up nicely under.

Should I use a different kind of spacer to raise the magnets off the fan. Right now there on about a 1/2" nylon washer?

Stir Plate 1.jpg


Stir Plate 2.jpg


Stir Plate 3.jpg


Stir Plate 4.jpeg
 
Just finished mine today and it's working. Not sure I'm getting enough of a vortex. Doesn't pull all the way down at max speed. Got the Cigar box free at the local Gas Station that I go to all the time. Just asked if he had any empties and he happened to have one right there at the counter. Got the fan off of e-bay 12V was going to build a box with a clear top. Magnets are rare earth magnets that we have at work. Rest of the parts are from Radio Shack but they didn't have the exact parts. 2L Pyrex Flask off of Amazon is worth the few extra bucks (just feels solid).

Do I need to add holes to the board the fan is attached to??? It has bolts sticking out the bottom to raise it up so everything tucks up nicely under.

Should I use a different kind of spacer to raise the magnets off the fan. Right now there on about a 1/2" nylon washer?

-From what I've learned, you don't need this huge gnarly vortex to get the effects. I've been told you simply need enough force to make a small divot in the surface to get the yeasties enough aeration. From your picture, you could probably even back the speed down a bit.

-Definitely go with the Pyrex flask. I got the cheap one initially and immediately returned it. It felt really cheap and there was no way I was going to attempt to put it over an open flame. The Pyrex replacement was worth the few extra dollars.

-I wouldn't worry about putting holes in the box. I'm sure it's fine how it is.

-It's best to get the magnets as close to the surface that the flask will be sitting on so that you get the best "bond" between magnets and stir bar and you'll have less chance of throwing your bar.
 
Thanks mikerunsmountains. I tested for about 4-5 hours and it didn't get hot. So, I don't think I'll put holes in it. I bought the Pyrex after looking at the cheaper ones and I'm glad I did. Magnets are right under the lid. I can even open the lid and put the piece of plexiglass on it for looks if I want. Pretty cool looking with just water in the dark.

Stir plate 5.jpg
 
Looks good! Just make sure those wires are secured in a way there's no risk of them getting into the fan. The one other thing that I did was put some hot glue around the power source cord on the inside of the box so that it couldn't get pulled on. Or find a tight rubber grommet or something.
 
Just got my stir bar in the mail and could wait to fire it up trying to harvest some ommagang yeast.

It's really loud. And I can't start it on the plate. I have to hold it up a quarter of an inch and turn it on. The fan won't turn because of the strong connection. Once it gets going I can set it down. I put about ten napkins underneath but it's still clicks and clacks. Any suggestions?
 
I have some really strong magnets on mine and I don't have an issue with them being too strong. As far as the noise goes, you don't really have to have the stir bar dead center in the flask bottom. Mine is loud in certain positions. I just slid the flask around till it got quite and left it in that position and it made a huge difference in the noise. It could have been as far as an inch off center. There's also stir bars with a rib or ring in the center that I was told make less noise but I haven't tried them.

Do you have a picture? Did you make the stir plate? Maybe the fan is too close to the top?
 
Adam, like ibrewmyown mentioned, try using a stirbar that has the rib/ring around the middle of it (if you're not already). I ended up putting a piece of that anti-skid drawer liner stuff under my flask and that quieted it down a bit. I also noticed that once I got my Pyrex brand flask, as opposed to the cheap off-brand one I had borrowed from a friend, that it got much quieter also.

The top picture is right after I put it on the stirplate and the second is about 19 hours later just before I put it into the fridge. Worked great for my Pliny clone!

2015-03-14 21.06.27.jpg


2015-03-15 14.30.19.jpg
 
I think my stir bar needs to be a bit longer. I think the two poles are fighting making it click. And yes I do have a pivot point on it
 
I also noticed that once I got my Pyrex brand flask, as opposed to the cheap off-brand one I had borrowed from a friend, that it got much quieter also.

I have found the same thing using cheaper flasks but like I posted earlier, try sliding the flask around to see if you can find a quiet or more quiet spot. I have a couple 1000 ml good quality flasks and were quiet. I wanted to step the size up and I bought four 2000 ml off brand flasks for $15 each and one of them is loud with the bar in the center but when I slide it around, I can find a quiet spot and leave it there. It may be an inch or so from the center but the vortex is just fine. I believe my stir bars are 1.25 inches and they are smooth. I would think the larger the bar, the louder it would be?

What do you mean by the poles are fighting each other? If there are two separate magnets on stir plate, that may be what happening? I placed my magnet in the center of the computer fan. My magnets came from large server hard drives and they are very strong. They where hard to remove once stuck to something. I was able to just let the magnet stick to the fan and turn it on to make sure it was centered and not vibrate then marked and super glued it.
 
I think my stir bar needs to be a bit longer. I think the two poles are fighting making it click. And yes I do have a pivot point on it

If you are using the dual magnet setup the best way to get them in the right position is to stick the stir bar you will be using directly onto the magnets and position them so that they do not extend beyond the length of your stir bar. That worked for me. And also try ibrewmyown's suggestion of moving the flask around a bit.
 
I'm using 2 hard drive magnets stacked on top of each other. My thought was maybe it's only getting a good connection on one of the poles at a time and keeps jumping back and forth. I'll have to do some test after my ommagang is done
 
Here a question for you guys. I'm worried about leaving the stir plate on while I sleep or im at work. I left it on last night but I did get up 3 times to make sure it wasn't over heating or anything. Besides less propagation any problem in running it for 12 hours stopping for 8 and running again?
 
I run all four of mine at the same time from one power supply all night/day and it doesn't even get warm. That being said, if you're worried about it, do as you said and turn it off for a while then on when you're awake. You'll likely get less cells formed but if you run it long enough you should be fine. There's nothing combustible on mine so I'm not worried about it.
View attachment ImageUploadedByHome Brew1426820505.839265.jpg
 
I wouldn't worry about it. I ran mine for four solid days just to see. Granted I work 12 hour shifts so I was off all four days and was checking on it periodically. Didn't even warm up a bit at all.
 
Here a question for you guys. I'm worried about leaving the stir plate on while I sleep or im at work. I left it on last night but I did get up 3 times to make sure it wasn't over heating or anything. Besides less propagation any problem in running it for 12 hours stopping for 8 and running again?

I was kind of worried about that myself since when I originally built mine I wired it wrong and it would smoke if it wasn't going full blast. But after I wired it correctly... I never smelled the smoke again. I let mine run for 48 hours the first time without incident. I'm going to go for 72 this next time, but since it is in a hard drive enclosure that is vented on three of the 4 sides... I think it will be just fine.
 
On the noisy stir bar dealio: I use a stir bar with the rib in the center, and they make a little racket.
I took some small, tight fitting O-rings, ( one for each end of bar), and placed them equidistant from the ends, which quietened it down considerably.
 
Back
Top