My insane 25 Gal, 100 Percent Hard Plumbed Tri-Clover, Automated Tippy Build

Homebrew Talk - Beer, Wine, Mead, & Cider Brewing Discussion Forum

Help Support Homebrew Talk - Beer, Wine, Mead, & Cider Brewing Discussion Forum:

This site may earn a commission from merchant affiliate links, including eBay, Amazon, and others.
ha thanks for taking notice!

That is the port for the volume sensor tube, I will have a stainless tube running through that to the bottom of the tank. What you see is the inside of a TC with an end cap mounted.
 
kickflip_mj said:
SOO MUCH WORK.lol

Ya... but if I was able to afford a DIY of this magnitude, I would be OCD about every over the top detail too. This thread reminds me that there are people out there, like me, who will do it the SUPER hard way just because its their idea of perfect. Beautiful build man, mind if I live vicariously through you?
 
Ya... but if I was able to afford a DIY of this magnitude, I would be OCD about every over the top detail too. This thread reminds me that there are people out there, like me, who will do it the SUPER hard way just because its their idea of perfect. Beautiful build man, mind if I live vicariously through you?

Im starting to wonder if I can afford this build.lol

I definitely have OCD, I realized if I did it half a@@ed I would regret it. sometimes I wonder If i should have just gone with really large tanks and hoses.lol

And yes live vicariously through me, let me know if I am missing anything, or see something I should add or change.
 
Just received a package to work on some of my water lines and electrical.

2 Pressure sensors, three more valves, some wiring, connectors, hosing etc.

image-856189351.jpg
 
Who knows how to connect wires to the bottom of those three prong dis- connects?
 
holy cow man nice build, this is absolutely ridiculously stainless! and a little coppery too, amazing work tho man congrats on this almost finished rig
 
holy cow man nice build, this is absolutely ridiculously stainless! and a little coppery too, amazing work tho man congrats on this almost finished rig

Thanks! This project has definitely been a labor of love. Now i'm getting into the hard stuff for me... THE ELECTRICAL.lol
 
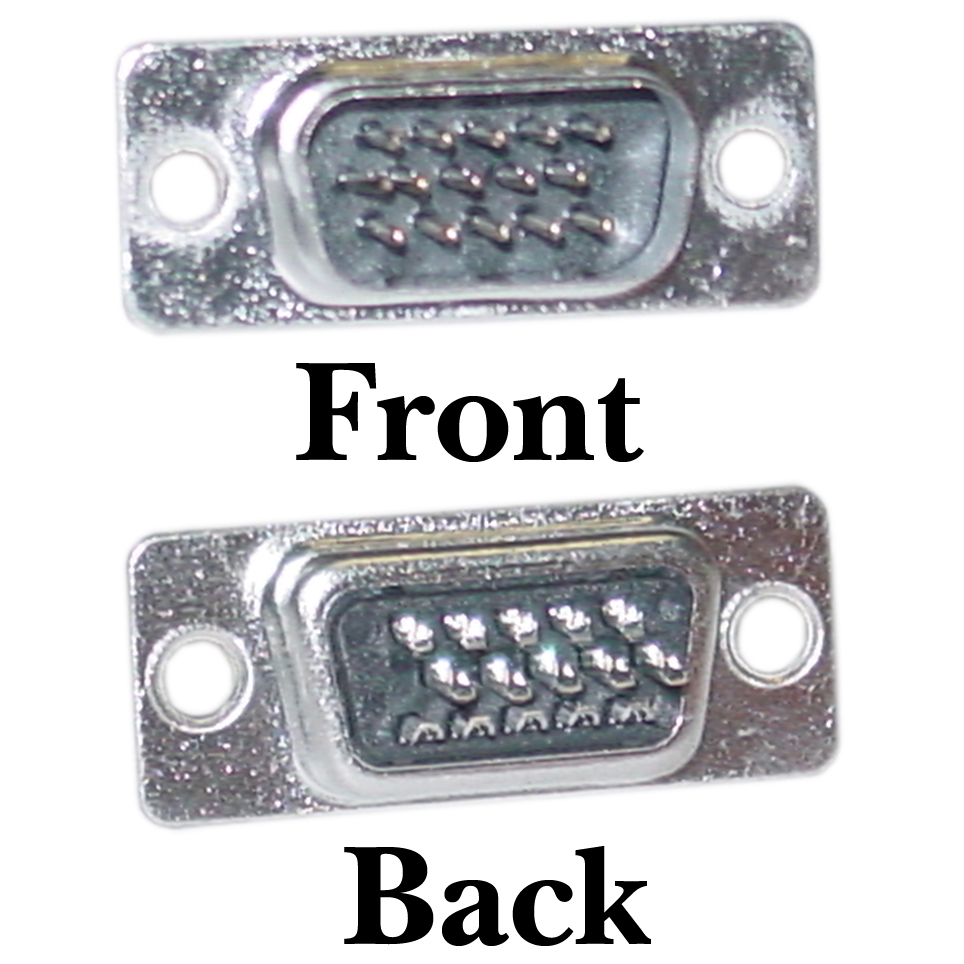
Tin both the tags and the wire tips. Trim the tips to length and bring the tips and tags together with a bit of heat.

Not my pics and it's a different plug but the same principal

Tinned tags
3530-11115.jpg


Tinned tips
wiring2_engadget_howto.jpg


End result
F56Z75RFEJ2G9JB.MEDIUM.jpg

Thank you for the detailed explanation! I was assuming that I would solder them, I just wasn't sure if there was something I was missing. Well this is going to take a while.lol
 
Sorry guys for zero progress update, I injured my back wakeboarding and I have just been dealing with that. Finances have definitely been a hold up too. Next week I will be in the shop getting back to building.
 
kickflip_mj said:
Sorry guys for zero progress update, I injured my back wakeboarding and I have just been dealing with that. Finances have definitely been a hold up too. Next week I will be in the shop getting back to building.

I feel for you. Back pain is the worst.

Hope you heal fast!

I've enjoyed following this and getting lots of great ideas for my setup.
 
Its going to be a while before I am healed, possible back surgery and im on steroids at the moment. FML But I can still function like a normal human being, but my right leg aches and is numb.
 
kickflip_mj said:
Its going to be a while before I am healed, possible back surgery and im on steroids at the moment. FML But I can still function like a normal human being, but my right leg aches and is numb.

Damn! Get better soon. Try not to push your luck on recovery as it will only lengthen the amount of time that you are out of commission (spoken from experience!)
 
I stopped wakeboarding and all heavy lifting. Hopefully I can get better with the roids.lol (prescription)
 
So I put some work in last night! I finished my water line-ins equipped with actuator valves and thanks Marcb for the filter housing, it worked perfectly!

image-3189435198.jpg

I also added new hinges on one tank and thanks to a new friend that made this possible! (You know who you are) now I have three more to go!


image-1534627231.jpg
 
They are having a hard time figuring out what I have.. I have had two MRIs and a few Xrays. I either hemorrhaged my disc creating a cyst or I have a cyst in my spinal column for no reason and it is cutting off my Sciatic nerve.
 
They are having a hard time figuring out what I have.. I have had two MRIs and a few Xrays. I either hemorrhaged my disc creating a cyst or I have a cyst in my spinal column for no reason and it is cutting off my Sciatic nerve.

You have all my sympathy. I have had similar problems for many years. One day life is great and I can do almost anything and the next, for no discernible reason, I suffer hours of almost uncontrollable pain.
 
Yeah since im only 28 the surgeons don't think the problem is permanent, but we will see. If my state doesn't change I will be going into surgery in a few weeks.
 
Spent way to long fabricating today, removed the handles from my lids and moved them, added hinges to all three lids. Sorry about my dirt garage. Haha

image-923822996.jpg


image-2412722459.jpg
 
they hinges work great! They bind slightly, but just enough so they lock in the vertical position. I drilled holes in the underside of the lid, clamped a 1' bar on the other side sandwiching the hing and lid flat. Then rosebud welded about 30 holes. (over exaggeration)
 
Last night I made some frame mount quick disconnect plates for the valves out of stainless sheet. The reason I did this is so I can take the plumbing off simply.

image-1039924538.jpg


image-86144075.jpg


image-1912142541.jpg
 
Last night I stripped the frame of everything to clean up and get it ready for some paint! What did you guys do to get the frame ready? Did you sand it?

image-156494684.jpg


image-3809307511.jpg
 
Depends on how you are going to paint it. If you are rattle canning the thing with some Rustoleum you are fine doing nothing more than wiping it down with some lacquer thinner or similar degreaser to get your paw prints off that will inhibit paint adhesion. I'm shooting mine with automotive paint (figure it takes so much time and money to build a brewery may as well not have the finishing touch be a $5 rattle can). So if you take the route of putting down a good paint job you would do a bit more work...the day before I'm ready to paint I will hit the entire frame with a flap disk to get it all nice and shiny. Day of, I will hit it with a metal etching primer, basecoat, mid-coats, and then clear followed by color sanding and buffing...as Doc Brown said, "The way I see it, if you are going to build a time machine into a car, you may as well do it with some style."
 
Yeah but auto paint wont stand up to heat?

Oh yeah, you are direct firing...

Just remember that whatever imperfections in the metal will show through your high temp paint. If you don't care, it doesn't matter, if it will annoy you, get a flap disk for your grinder and go to town. Something like a 60 grit is plenty good to get the weld seem from the foundry smoothed down (if you were like me and didn't think to put the weld seem down when fabricating) and polish up the scuffs from grinding your welds. Then go over with a 120 grit, wipe down with a degreaser, and spray with a high temp paint that has a rust inhibitor in it
 
Frankly im not even pleased with painted mild steel, Im sure I will move to stainless in the next year or so. But in the mean time it is good enough.

I did flap all the "flat" weld, then used 120 polishing grit, then scotch bright wheeled them all.lol I may be a little excessive when I do things sometimes, but I try to get it right the first time. Im not extremly impressed by the weld quality anyways due to my crappy weld pak ten. Just undercutting and pinholes that never seem to go away. But if I do it again it will be stainless and with a nice tig welder (next investment is a syncwave)

That's too bad your welds didn't come out the best...pinholes make me think you have a shielding gas issue more than anything, are you running pure CO2 or mix? I have a Lincoln 140C that did great on 14 gauge tube and even some 3/16" plate brackets I joined to the tube, using 75/25 gas. I would love me a tig welder too, just don't see myself justifying the cost unless I could make money with it. Anyway, if you do some good prep work on the mild and take your time with the rattle can you should be able to get some nice results. But, I think your biggest barrier is that you have to use high temp paints with that direct fire system which really limits things. Going electric, the sky is the limit for me so I'm going black base with copper pearl over the top, so as long as it looks the color of a nice Oktoberfest I don't care what is underneath :).
 
Hey Kick this is super inspiring and a thing of brewing beauty. I am currently rolling a poor mans brewtus style set up using a 1 & 2 burner converted camp chef turkey fryer style stoves and have been thinking about getting my own welder. This thread sold me on the idea!!!!! Long live the custom diy stand, newbie welder dream!! Very cool in all respects, your dedication to it, the over the topness and your perfectionist motivation to name a few. I bow to your overbuilt, shinny robotic greatness, a thousand thank yous for the excellent motivation here.....

Now if I may return the favor: Regarding your back depending on the injury you may want to look into this: www.svaroopayorga.org. I dont know the nature of your injury ie compresional or torsional impact, structural malformation finally gave out etc. But do know this stuff is my fountain of youth and continues to keep an otherwise debilitating back issue of mine completely and comfortably in the rearview mirror. I know it is "yoga", not the most "brewer-man masculine" of recovery strategies and no medical journal research endorsing it..... but if you have a practitioner nearby I would be tell you anyone considering surgery would be foolish not to take a two or three week gamble with some private sessions. I'm no way connected to this organization other than the 20 minute routine I do every day or so. Other than the MRI to diagnose the cause of my pain It has done far more for me than the chirpractor, back doctor, physical therapist and steroids combined Good luck amigo and keep on posting!
 
Bensiff, I think the pinholes came from gaps between parts of the frame that I filled. Its not a big deal and I can touch them up with the tig machine, its just something that I don't want to do.lol

Common, thank you so much for all the complements, It took a lot of devotion to get where I am now and it means a lot to know people appreciate my hard work. I have some past welding experience from a friends grandpa, but nothing you couldn't learn by trial and error. All I can say is read up, and practice, practice, practice.

Thank you for the information about my back, its been an awful road and anything will help. I feel pretty normal right now, but I definitely have my days.
 

Latest posts

Back
Top