Mini Mash System for Extract Brewers

Homebrew Talk - Beer, Wine, Mead, & Cider Brewing Discussion Forum

Help Support Homebrew Talk - Beer, Wine, Mead, & Cider Brewing Discussion Forum:

This site may earn a commission from merchant affiliate links, including eBay, Amazon, and others.
I'll be out of town this week ( I'll be in long beach CA :ban: ) but when I return I'm going to experiment with the cooler I bought from Walmart. I'll post results.
 
RichBrewer said:
This idea came to me while posting in this thread:
https://www.homebrewtalk.com/showthread.php?t=8748
I think we as a team should figure out how to design and build a mini mash system that extract brewers could use to do partial mashes when they brew.
I want to say right off the top that this isn't intended to slam extract brewers. If you enjoy the hobby by doing extract only then by all means stay with it but if you are doing extract with steeped grains this method might not be much more difficult or take much longer. If it works it will make your home brew better.
We need input from everyone.
From the extract brewers:
- Would you be interested in a mini mash system?
- How much would you be willing to spend to build this system?
- What would you want this system to do for you?
From AG and experienced brewers:
-Would a mini mash system even work?
- What procedures and equipment would work best?
- Would the addition of a bit of pale 2 row help in the mash? (Maybe 1 or 2 pounds)
- What would its limitations be? (adjuncts may not work too well)

I think this system should:
1. Not be too costly to assemble so there is not a big expense to step up to PM.
2. Create about 2 to 3 gallons of wort. The malt extract could be added to this in a fairly small brew pot.
3. Be fairly simple to use and not extend the brewing session too long.
4. Strait forward assembly with parts that would be easy to get.

Brewsmith found this link for a 2 gallon cooler. I think this is a good start. for the mash/Lauter tun.
http://www.igloo-store.com/product_detail.asp?T1=IGL+LEG+2G+BLUE&HDR=personbeverage
The cooler will need to contain 3 to 5 pounds of grain and the strike water needed to mash it. (5 pounds of grain would take about 1 1/4 to 1 1/2 gallon of water)
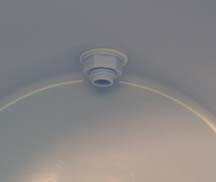
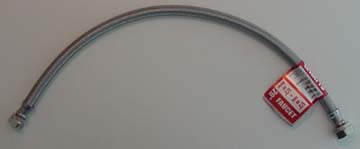
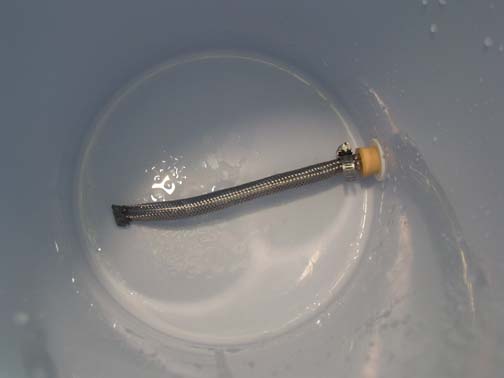
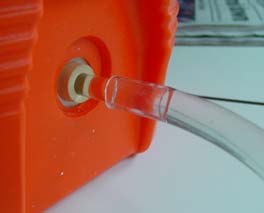
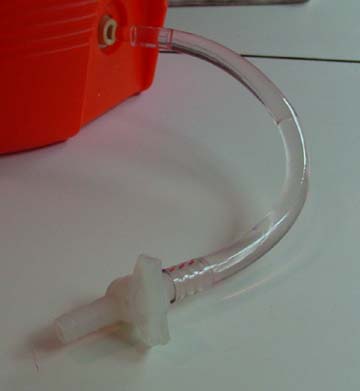
A false bottom is needed to strain the wort. What would be best? stainless steel braided hose? A type of false bottom? a manifold made from copper pipe? Any other suggestions? (Thanks again Brewersmith)

What procedures would make this work best? I would say a simple infusion mash at about 150 to 155 degrees and batch sparging with 170 degree water. After the sparge is done the brewing session would be the same as pure extract.

If this would work, I think it would be a system for brewers who either don't have the time or don't want to hassle with doing a full all grain brew. It might be good as well for anyone who wants to step up to AG but wants to first learn through PM brewing.
I would love to get input from everyone. :mug:


I have a 10 gallon rubbermaid cooler but I don't see why it can't be done with any cooler with a threaded removable spigot.

I removed the rubbermaid cooler spigot , added a primary bucket Spigot ($3), added a nylon straight T which threaded into the end of the spigot ($2), 2 - nylon barbed adapters threaded into into the T's for the SS braid ($2), 2 - hose clamps to hold the SS braid ($2), 21" Sink SS braided supplyline ($8) = $17. Heat your transfer hose in boiling water and slip it over the spigot and cut to length.

You might be able to use the orginal spigot but mine had a little rubber bubble thing that I didn't trust for really hot water.

Wal-Mart should be having coolers on sale anytime now.

Everything but the spigot came from ACE Hardware. Bring the spigot to the store so you can match threads to the T for the correct fit.

It would cost almost as much as a 5 gallon setup. If you can find one of the Gatorade coolers on sale I'd go for the 5 gallon cooler.

Infusion mash would be the way to go ... but then aren't we going Mini AG?
 
RichBrewer said:
I'm not looking at cost alone. The 5 gallon is a viable option for someone who knows they are going AG but even then, the 5 gallon may be too big for PM brews. The grain bed might be be too shallow. Experts chime in here. :mug:
If the 5 gallon cooler works for PM then great. I will caution everyone though. For all grain brewing the 10 gallon cooler works much better. A 5 gallon Mash/Lauter tun can be too small for big beers.

I was also looking for a smaller cooler that takes up less room for folks who are limited on space. I would think the 3 gallon would be better for home brewers who don't plan on going AG for awhile or at all.


If you are thinking about AG but want to do a small batch in a 5 gallon cooler you could take up the space to provide for a deep grainbed by putting a large water filled plastic mayonaise or prezel jar in the middle of the braid to take up space. I've done that with my 10 gallon cooler - it works. Just make sure it's the white plastic or it will melt.

:eek:
 
I just made the jump and here is what I did:
Target 5 gallon rubbermaid cooler = 15 bucks
LHBS cooler convert with valve attached = 30 bucks
homey for hot water heater braided line (this stuff is 1 1/4 wide and fits over the cooler convert stem rather than on a pipe extension) = 15 bucks
have a turkey fryer with propane tanks and a canning pot to heat sparge water in.

I do two mini mash recipes right now both call for between 7 and 8 lbs of grain so I was pushing the pot and strainer system and figured since I was going to jump up anyway to bigger batches eventually I would go ahead and get the cooler converter setup and move it to a bigger cooler when the time came. I am waiting for a free day to break it in and see how it goes, but it holds water without leaking so I figure it will be fine.

MP Wall
 
All it takes to do mini-mashes in extract equipment is a really big grain bag. Mine is as large at the kettle. I mash in the bag, dump in the rest of the hot water, stir gently for five minutes and drain like a teabag. No sparging, no hassles.
 
david_42 said:
All it takes to do mini-mashes in extract equipment is a really big grain bag. Mine is as large at the kettle. I mash in the bag, dump in the rest of the hot water, stir gently for five minutes and drain like a teabag. No sparging, no hassles.
That's fine for you and I'm sure that you enjoy the process.
You do understand that your efficiency will be very low using this method. A mini-mash system that I'm looking at isn't a hassle at all and only takes a bit longer to do. The equipment won't take up much space and it will increase the efficiency of the mash as opposed to a grain bag or just steeping the grains. I also think it will make better beer.
 
I just completed my PM setup a couple months ago. I tried to consider the fact that I might one day desire to upgrade to AG and chose equipment that I'll still be able to use in the future with AG.

5 gal Igloo cooler - $20 (WalMart)
Bulkhead fitting for cooler - $10.95 (hoptech.com)
Phil's Phalse bottom - $18.95 (hoptech)
In-line ball valve - $2.50 (hoptech)

So with S&H everything totaled about $60. I do a batch sparge so I don't use a sparge arm yet. Haven't had any trouble with a shallow grain bed using 5 lbs of grain. But I'm not sold on the plastic false bottom just because it floats. Will probably eventually get as SS one.

SP
 
ok, step one complete...

i bought a 30 qt cooler for about 10 bucks at walmart. BUT... here in euro-land, the selection is'nt near as good, so i couldn't find one with a built in spigot. now i have to do some drilling, and visit my local "home depot" substitute to get some conversion supplies. the question is whether i can go all plastic, as in the type of spigot that fits on a bottling bucket, or if i need to get a metal ball valve thing? i cant say that i'm that handy to know what to buy and how to install something like that, so i am hoping that plastic components that screw together, with rubber gaskets will also work as well. can anyone reccomend any links for this type of conversion? or at least say how necessary a metal fitting is?

thanks
bob
 
I have finally got the prototype finished. The following is how I made it. So far I have less than $25.00 invested. I'm sure that it can be made cheaper if you can find the cooler on sale.
Take a look.

Here is the spigot that came with the cooler. It needs to be removed. I put a wrench on the nut and turned the spigot and it came right off.

2967-Spogotinside.jpg


Here is the SS braided water line I used. It is 20" which is too long but it was the shortest one I could find. I just cut off the ends using a flex pipe cutter then removed the vinyl tubing that is inside. The braided tubing comes off much easier if you push it off as apposed to pulling. When you pull it only gets tighter.
2967-BraidedFaucetLine.jpg

2967-Pullingtubingoutofstainlessbraid.jpg


I cut the braided SS as shown and crimped one end over. the other end slipped over a piece of old hard plastic racking cane tubing that I had. A tubing clamp was used to secure the SS to the plastic tubing which is about 3 inches long and goes through a drilled rubber stopper that seals the outlet. The stopper is pressed into the hole where the original spigot was until it is secure. (I used the original rubber seal that came with the cooler.)

2967-Installedbraidedline.jpg


Continued in the next post...
 
EDIT: Prototype Mini Mash/Lauter Tun Continued...

Here you can see the hard plastic tubing leaving the mini mash/lauter tun. 3/8 vinyl tubing fits snugly over it. You can see the drilled rubber stopper poking out of the cooler. I tested it and it didn't leak.

2967-Exittubing.jpg


3/8" vinyl tubing finishes off the mini mash/lauter tun along with a plastic valve. The tubing can be cut to whatever size meets your needs

2967-Drainhosewithvalve.jpg


I'm not very handy with hardware so this isn't perfect. I would love to hear from folks who might have a better way to do this.
I'm going to attempt to do a brew with this next weekend. I will post photos and describe the process
 
EDIT: Look at the last 2 posts at the end of page 5 for how I built the prototype mini mash/lauter tun.

This is what I'm looking at brewing as a test batch.
I want to use my 20 quart SS pot and do the boil on the stove.

05-24-2006 McDermott's Irish Ale

A ProMash Brewing Session Report
--------------------------------

Recipe: McDermott's Irish Ale

Recipe Specifics
----------------

Batch Size (Gal): 5.00 Wort Size (Gal): 5.00
Total Grain (Lbs): 8.13
Anticipated OG: 1.056 Plato: 13.81
Anticipated SRM: 14.9
Anticipated IBU: 41.0
Brewhouse Efficiency: 75 %
Wort Boil Time: 60 Minutes

Anticipated Points From Mash: 28.42

Grain/Extract/Sugar

% Amount Name Origin Potential SRM
-----------------------------------------------------------------------------
49.2 4.00 lbs. American 2-row America 1.038 2
36.9 3.00 lbs. Generic DME - Light Generic 1.046 8
12.3 1.00 lbs. Crystal 55L Great Britian 1.034 55
1.5 0.13 lbs. Roasted Barley America 1.028 450

Potential represented as SG per pound per gallon.


Hops

Amount Name Form Alpha IBU Boil Time
-----------------------------------------------------------------------------
1.00 oz. Cascade Whole 7.00 30.4 60 min.
1.00 oz. Fuggle Whole 4.75 10.5 30 min.

Mash Schedule
-------------

Mash Type: Single Step

Grain Lbs: 5.13
Water Qts: 6.00 - Before Additional Infusions
Water Gal: 1.50 - Before Additional Infusions

Qts Water Per Lbs Grain: 1.17

Tun Thermal Mass: 0.00
Grain Temp: 68 F

Dough In Temp: 169 Time: 0
Saccharification Rest Temp: 154 Time: 60
Mash-out Rest Temp: 168 Time: 10
Sparge Temp: 168 Time:


Total Mash Volume Gal: 1.91 - After Additional Infusions

All temperature measurements are degrees Fahrenheit.


Water Needed For Brewing Session
--------------------------------

Sparge Amount: 2.50 Sparge Deadspace: 0.00 Total Into Mash: 2.50

Total Grain Lbs: 5.13 Qts Per Lbs: 1.17 Total From Mash: 0.88
Mash Gallons: 1.50
Grain Absorption: 0.62

Amount Lost in Lauter Tun Deadspace,
Grant and Misc. to Kettle: 0.50

Top Up Water Added to Kettle: 0.00
Amount into Kettle: 2.88

Boil Time (min): 60.00 Evaporation Rate: 15.00
Amount after Boil: 2.45

Left in Kettle Deadspace: 1.00
Left in Hopback: 0.00
Left in Counterflow Chiller: 0.00
Left in Other Equipment / Other Absorption: 0.00

Amount to Chillers: 1.45
Amount After Cooling (4 perc.): 1.39


Grain absorption rate is: 0.12 (Gallons Per Lbs)

Evaporation rate is Percent per Hour

This formulation will yield 1.39 gallons of fermentable wort.

You will need 4.00 gallons of water for the complete brewing session.
 
Im going to go ahead and make one of these. It seems easy enough to build.

And I was going over recipes on the recipator, and it looks like it will eventually pay for itself with what i would save from not having to buy so much extract.
 
RichBrewer said:
I cut the braided SS as shown and crimped one end over. the other end slipped over a piece of old hard plastic racking cane tubing that I had. A tubing clamp was used to secure the SS to the plastic tubing which is about 3 inches long and goes through a drilled rubber stopper that seals the outlet. The stopper is pressed into the hole where the original spigot was until it is secure. (I used the original rubber seal that came with the cooler.)

2967-Installedbraidedline.jpg


Continued in the next post...

The only thing I would change is to use a piece of copper tube with a slight bend in it to reach lower into the cooler... other than that it looks like what I've seen the "big boys" do with 5 and 10 gallon coolers...

Way ta go!!!!

later,
mikey
 
Mykel Obvious said:
The only thing I would change is to use a piece of copper tube with a slight bend in it to reach lower into the cooler... other than that it looks like what I've seen the "big boys" do with 5 and 10 gallon coolers...

Way ta go!!!!

later,
mikey
Now that is a great idea!
 
Chimone said:
Im going to go ahead and make one of these. It seems easy enough to build.

And I was going over recipes on the recipator, and it looks like it will eventually pay for itself with what i would save from not having to buy so much extract.
Yes it will pay for itself and I'm hoping it won't be very difficult or time consuming to do. It will also save on space for those folks who don't have much room.
OK. OK I've said it about 10 times now. :mug:
 
Just got back from Wally World. They have 5 gallon Igloo coolers for 20 bucks.I went ahead and picked one up. My only concern is this though.....since I got the 5 gallon, and Im only going to be doing PM at the moment, will the extra air space at the top of the cooler let the temp drop too much?
 
Chimone said:
Just got back from Wally World. They have 5 gallon Igloo coolers for 20 bucks.I went ahead and picked one up. My only concern is this though.....since I got the 5 gallon, and Im only going to be doing PM at the moment, will the extra air space at the top of the cooler let the temp drop too much?
The temp might drop in a larger cooler. Be sure to pre-heat the cooler before you add your strike water. Also, heat your strike water about 5 degrees higher than your target. That way the cooler will absorb heat and minimize temp drop. In other words, if you are looking for a strike temp of 170, heat the water to 175. Let it cool to 170 then add the grain. The temp will stabilize at about 153 or 154.
 
I could use this cooler to do a single infusion AG as well. Hmm...I should of started this sooner.
 
RichBrewer said:
The temp might drop in a larger cooler. Be sure to pre-heat the cooler before you add your strike water. Also, heat your strike water about 5 degrees higher than your target. That way the cooler will absorb heat and minimize temp drop. In other words, if you are looking for a strike temp of 170, heat the water to 175. Let it cool to 170 then add the grain. The temp will stabilize at about 153 or 154.

Also think about cutting a piece of foam insulation to fit snugly in the cooler and cover the top of the grain bed during mashing... glue on something for a handle and poke a hole in it to fit your thermometer through... then just lift it out if you need to add water or stir or whatever... won't be perfect, but could keep temp a little more stable if you have a big air space above the grain... Oh, and the thicker the foam the better... I'd shoot for 2 inches or more if you can get it (maybe glue several 1 inch pieces together???)

Heck, I may do that with my 10 gallon cooler for 5 gallon batches... hmmm
:mug:

Just a thought,
mikey
 
Ok, I just finished mine. Total price, 27 bucks. Im kind of hesitant using it with the rubber stopper. it didn't leak, but I could see it getting knocked loose while stirring. I may eventually get a weldless cooler valve like this one. Its about 30 bucks.
4192.jpg


Other downside I see is that its about 3/4" or so above the bottom of the cooler. But I guess I could always tip it forward to get the rest of the wort out.

I pretty much spent my day at work looking over PM recipes. (yea I work for the gov't so its time well spent) I found one I think I'd like to try. This will be my first attempt at PM so let me know what you guys think, or if you have another PM recipe for a Nut Brown that may be a bit easier for a first run, please let me know.

http://hbd.org/cgi-bin/recipator/recipator?group=9&item=2893
I think I'll change up the hops to Fuggle/Challenger though


thanks
 
Chimone said:
I pretty much spent my day at work looking over PM recipes. (yea I work for the gov't so its time well spent) I found one I think I'd like to try. This will be my first attempt at PM so let me know what you guys think, or if you have another PM recipe for a Nut Brown that may be a bit easier for a first run, please let me know.

http://hbd.org/cgi-bin/recipator/recipator?group=9&item=2893


thanks
That is a LOT of crystal malt! I've used up to 2 pound but most folks use about 1/2 pound max. That will be one malty beer.
The recipe calls for 1 LB of light malt extract. I would be tempted to go AG with this one and just add more 2 row to make up for the extract or you could go with the grain bill in the recipe without the extract.
Running it through Pro Mash I get a starting gravity of 1.056 with just the grains if I include the extract I get 1.063 assuming 75% efficiency.
If it were me, I would reduce the crystal to 1 pound, up the 2 row to 9, and up the chocolate to 1/4 pound. I would eliminate the extract completely. But as I said that would be my preference.
 
I think you're right. Ok good thing I checked back here, I got my grain bill in the shopping cart on another page. Im going to go with what you suggested, and we'll see how it turns out.
 
you may want to do a wet run with water only on that stopper. they have a tendency to become flacid at 165°. something like this is easily constructed from the original pushbutton on that cooler

tubing%20012.jpg
 
brewhead said:
you may want to do a wet run with water only on that stopper. they have a tendency to become flacid at 165°.[/IMG]
My AG Mash Tun had the same stopper and it worked well. Only problem I had was once I lifted it and didn't realize that I was stepping on the tubing. The stopper pulled out and..... wasted wort and quite a mess.
With this smaller system I don't think it will be a problem.
 
on the the end of the push buttons you have a rubber grommet holding the pushbutton shaft in place. if you take a pair of needle nose pliers and pull the grommet off the back of the push button assembly - it will all fall out. you can then drill out the pushbutton guide hole slightly to accommodate a 3/8" od PVC tube. when i say slightly i mean slightly - i had to take a mallet and hammer in the PVC tube. no leaks!

your inside may look diff with a bazooka but it's the same principle, quick n easy.

tubing%20005.jpg
 
Right on, thanks bro. Just finished it up, and it looks and feels like it's going to work out great. No extra cost too. I cut an old racking cane and am using that instead of a pvc tube.


RichBrewer and brewhead....you guys rock. Thanks fellas
 
brewhead said:
on the the end of the push buttons you have a rubber grommet holding the pushbutton shaft in place. if you take a pair of needle nose pliers and pull the grommet off the back of the push button assembly - it will all fall out. you can then drill out the pushbutton guide hole slightly to accommodate a 3/8" od PVC tube. when i say slightly i mean slightly - i had to take a mallet and hammer in the PVC tube. no leaks!

your inside may look diff with a bazooka but it's the same principle, quick n easy.

tubing%20005.jpg

uhh... is that a floor scrubbing pad or am I drunk???

:drunk:

later,
mikey
 
you are correct that is a 3m 4100 floor scrubbing pad. produces very clear wort. the center hole should be in place as well - it is out to show false bottom
 
question about partial mashing.....

Ok, Im going to be replacing 3 pounds of DME with 4.5 lbs of 2 row. I have 2.5 lbs of other specialty grains (chocolate, special, crystal 90) which I would normally steep. Now I know most of the specialty provide flavor and coloring, while the 2 row provides the fermentable sugars. But Ill be throwing the specialty grains in with the 2 row and mash all together right? I wont have to steep those seperately will I?

Thanks
 
Chimone said:
question about partial mashing.....

Ok, Im going to be replacing 3 pounds of DME with 4.5 lbs of 2 row. I have 2.5 lbs of other specialty grains (chocolate, special, crystal 90) which I would normally steep. Now I know most of the specialty provide flavor and coloring, while the 2 row provides the fermentable sugars. But Ill be throwing the specialty grains in with the 2 row and mash all together right? I wont have to steep those seperately will I?

Thanks
Correct. You will mash all of the grains together. A total of 7 pounds which will require about 1 3/4 to 2 gallons for the mash and about 3 1/2 gallons for the sparge. About .7 gallons will be absorbed by the grains so figure about 4 1/2 gallons into the brew pot.:mug:
 
I will be making the move from Extract to All grain in the next few weeks. I have been absorbing as much info as possible from here and other sites. I will make
a lauter-tun as per previous posts and this site :

http://cruisenews.net/brewing/infusion/page1.php

I do have have a few questions about this..and will ask once i get the 5 gallon
cooler. Hopefully in a few weeks I will be able to to give a total breakdown of parts and hopefully success. I figure the tun will cost about $75.00 CDN for the whole tun system. I may start a new thread once I get going...as this will be an AG and may not fit the mini-mash/extract thread topic.

Cheers at all for the valuable info thus far !
:mug:
 
Axegod said:
I
http://cruisenews.net/brewing/infusion/page1.php

I do have have a few questions about this..and will ask once i get the 5 gallon
cooler. Hopefully in a few weeks I will be able to to give a total breakdown of parts and hopefully success. I figure the tun will cost about $75.00 CDN for the whole tun system. I may start a new thread once I get going...as this will be an AG and may not fit the mini-mash/extract thread topic.

Cheers at all for the valuable info thus far !
:mug:


Actually RichBrewer and I spent a grand total of about 25 bucks. And instead of going with a design like the one in your link and use a rubber stopper I would opt to drill out the cooler's spigot and shove a short piece of racking cane into the hole.

Oh, you said Canadian.....I have no idea how much that is in dollars. But good luck, and let us know how it turns out
 
Well this isn't going to work. Well it will, it just looks too ghetto. i went to ACE hardware to find a nylon valve. Well noone could find the one I needed so being the impulse shopper i am I went with brass. Yea......lol the more I look at it the more I realize I just should of just went somewhere else.


lesson learned


3394-Valve.jpg
 
but brass is the shizzle yo...


...you did the right thing, now just get a through wall fitting, yeah, you know what you want...


...just do it, do it, do it, do it.........do it!


:cross:
 
$75 CDN inlcudes tax..
The cooler I was eyeing was about $35.00....stainless steel braid $15.00..
misc. tubing/valves....plus tax..and a six pack to keep hydrated....
I still got to research a bit more and make something that will be good for now,
and for the future.

Cheers
 
Back
Top