
The_Shocker
New Member
- Joined
- Aug 19, 2016
- Messages
- 1
- Reaction score
- 8
Hello all. This is actually my first post here on the forum but I have been brewing for about 1 1/2 years now. When I first started out brewing, I immediately went to kegging. I knew bottling wasn't for me and knowing that I would want to have multiple beers on tap, went straight to building a keezer with a collar that has 6 taps, 6 kegs, and individual regulators for each keg. I wanted to make sure that everything was carbonated right for style and would pour correctly with appropriate serving line lengths. I went straight to the SS Brewtech 15 gallon boil kettle, 10 gallon Igloo Cooler mash tun, and made a keggle to use as a hot liquor tun out of a keg that a friend found on the side of their house when they bought it. Obviously, I am the guy that gets into something and immediately goes straight for the "best" option. I have wasted a lot of money in the past on different hobbies slowly buying and trading up to what I wanted in the first place. I learned my lesson and now just acquire what I know I'll probably wind up with in the end anyways.
I typically brew with grains I mill at the LHBS but I have been getting 60-70% extract efficiency in my mash. I use Beersmith (probably the most useful and cheapest improvement one can make to their brewing) and consistently hit my mash temps and volumes. I hold for over 60 mins since after my alarm goes off, I ignore it and keep doing whatever I'm occupied with at the time, so my extraction potential should be higher with a longer mash. My PH has been appropriate during the mash as well, which left me wondering if the milling was the problem. So I did a bunch of research and, voila, the grind makes a difference in my efficiency. So of course I'm going to get the 3 roller mill. But $300 for the front runner mill seemed like an awful lot, even for me.
I'm not a machinist, but I am a woodworker that makes furniture with hand planes, hand saws, and chisels, I worked construction for years, and now work as a fireman. I know how stuff goes together, comes apart, and I can tell right away if something quality is in my hand. That said, I wasn't convinced that $300 for a 3 roller mill was worth it for such a simple machine.
I took a chance on the Kegco 3 roller adjustable mill. At $150 it was awfully attractive. But nobody knew anything about it. So what did I do? I had about a half a dozen 8+% homebrews and hit "Buy" on Amazon. (Don't judge. I'm sure I'm not the only one)
2 days later it was on my porch. And it was heavy. I opened it up on my workbench, inspected it, and was actually impressed. I heard that there were "bronze bushings" in this roller but that was not the case.

Actual bearings are used in this model, which I was pleased with. I measured the ID of the bearing with my micrometer. I couldn't detect any slop in the fit of the rollers, bearings, and frame. There was one roller that did have some side to side play between the frame, but I don't think this would have any impact on the operation of the mill.

Then the OD of the roller stem

Hmmm. Pretty good.
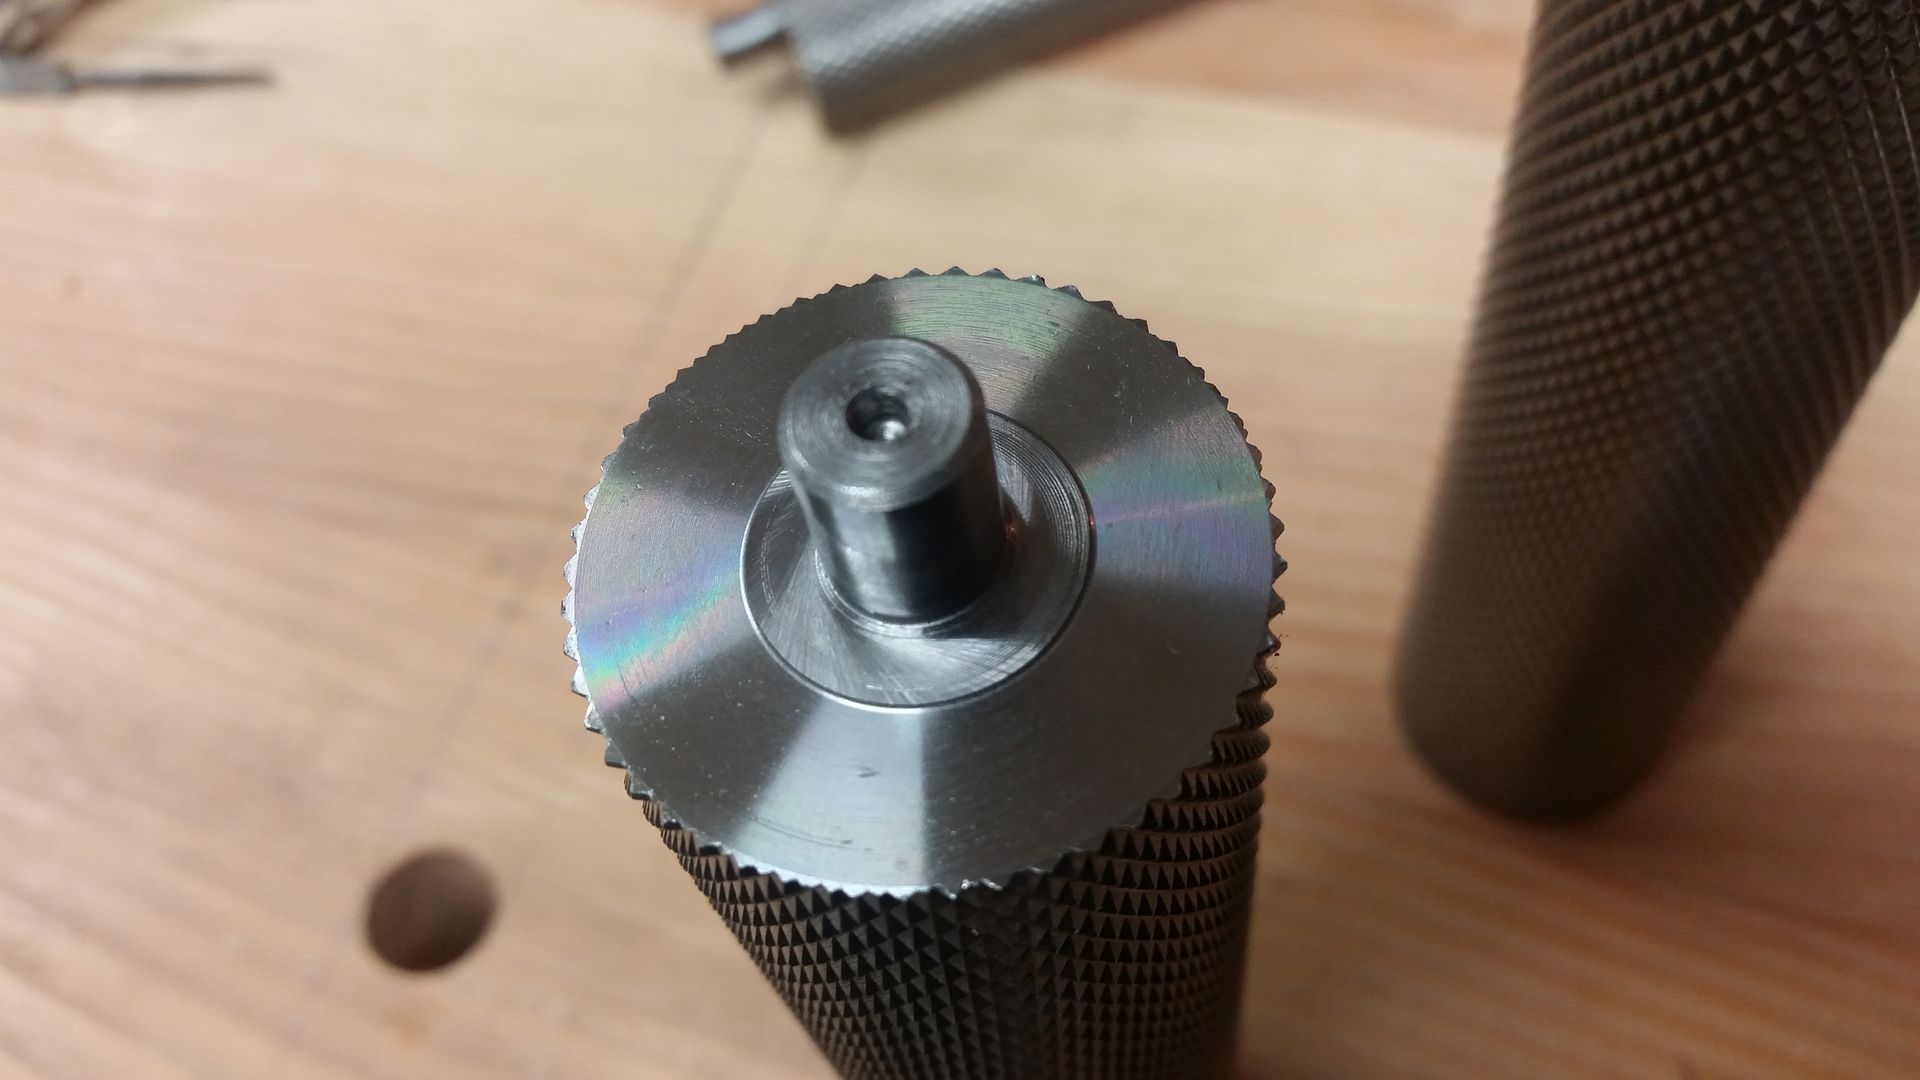
There is a larger bearing located on the side that the drive stem is located, which is 1/2" drive in case you want to use a drill. This means that there is only one way this thing goes together.
The adjustable roller has no stem. The adjustment knob is eccentric and has the stem. The roller itself has the bearing pressed in. I was able to adjust the roller to the "credit card" gap by assembling the mill completely and sticking an old gift card (.03" micd) cut in half in between the fixed and adjustable roller. This took maybe 15 seconds. The eyebolts that hold this setting were easy to snug up tight.

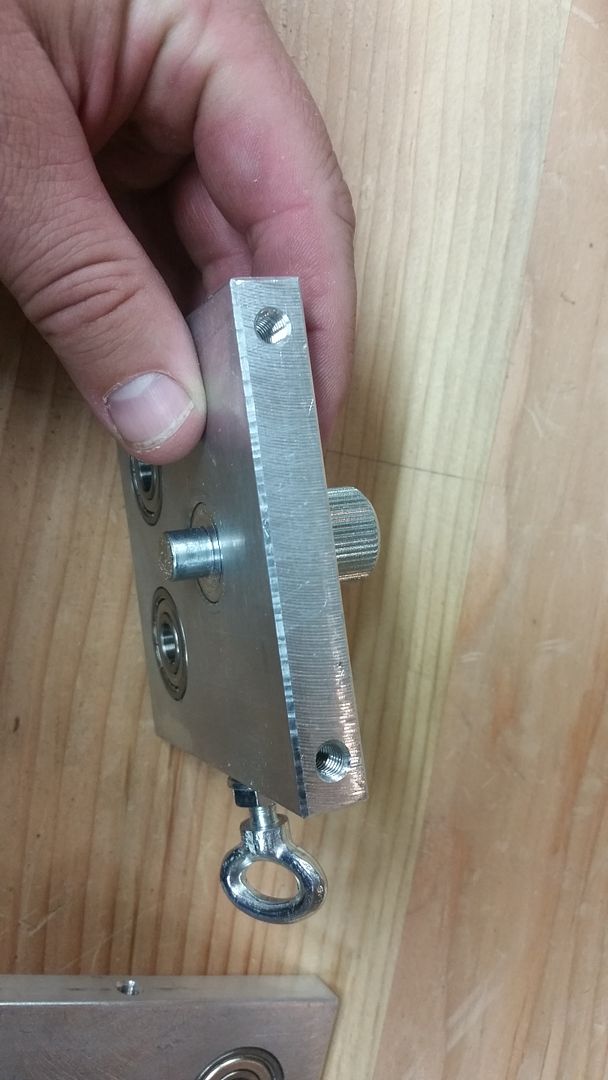
The frame itself is cut from what looks like 1/4" aluminum stock and the cut ends are beveled and tapped for bolts.
The rollers were quite stout and the machining appears fairly well done. Certainly good enough to crush grain.

The only thing that "might" make a difference in durability is the RC hardness of the rollers themselves. I cannot measure this but I would think that for my own personal purposes, whatever the RC measurement is is probably fine. As such, getting the teeth redone at a machine shop would take about 15 minutes, so the cost would be fairly low.
The bin is made of punched sheet aluminum wrapped in that blue protective plastic.

I had heard that it might be a PITA to get off, leaving residue all over that would require serious elbow grease, an acetone/alcohol/goo-gone/SimpleGreen/aircraft remover bath to get off. But nope. The protective layers peeled right off leaving nothing behind but shiny aluminum. I guess my only nemesis now is peeling that silver barrier off the new peanut butter jar in one piece. (One day, peanut butter. Soon.) The holes all lined up perfectly as well. Since the hopper pieces are stamped, I had to make a quick pass with my deburring tool to smooth everything out. This took about 48.675 seconds after I removed all the protective plastic.
The package of hardware actually comes with nylon insert nuts, which was a surprise. I was expecting to have to put blue threadlocker on all the bolts. The nuts on mine were 7mm. Time will tell if they actually hold up, though.

My only gripe is that I had to buy the 4 bolts to mount the frame. $2. I used 1/2" MDF so I had to cut the bolts down to fit in the tapped mounting holes on the bottom. I didn't measure exactly but I figure that I cut about 1/4" off these.

The mill comes with a machined handle, which I'm not going to use in favor of my corded drill, but I'll include the pics here for reference. Overall pretty good.


I laid out the bottom opening on the MDF as well as the screw hole locations and cut everything out. I had some 1/4" washers laying around so I used those before applying threadlocker and tightening everything down.

I attached the bin to the frame and this is the finished product. The base is 16"x16" to fit on the food grade, 20qt plastic bins from Smart and Final.


Overall, I think that this is fairly well put together. If you take a step back for a moment and think about what a grain mill is, there's not much to it. 2 pieces of aluminum cut to size, drilled for either bushings or bearings, and tapped for mounting to a board as well as mounting the hopper. This process itself is not that hard, and could be done by anyone with a drill press and a bandsaw in an hour or two in their garage. Besides, aluminum is cheap so the materials cost is pretty low. I could buy these bearings at Grainger for maybe a buck a piece. I imagine a bulk discount would bring these costs down significantly.
The rollers are machined fairly well also, and if this is your only job in the shop, or it's being done by CNC, I would think the time to crank the rollers out would be fairly minimal. Besides, the steel for the rollers would be fairly cheap. I think any excess costs would come from heat treating and hardening the steel, which would be beneficial if you mill a lot of grain. I'm not sure yet if that can be justified on a homebrew scale quite yet.
I had a tough time convincing myself to shell out $300 for a 3 roller grain mill when I know that this is really a simple machine. But for me, $150 is well worth it. I'm going to try my hand in the next couple weeks milling the grains at home. I will be conditioning the grains was well, since that process makes a lot of sense to me and I can do it while I heat of my mash water. I'll post pics of the milled grains when I do so we can all see the results.
I typically brew with grains I mill at the LHBS but I have been getting 60-70% extract efficiency in my mash. I use Beersmith (probably the most useful and cheapest improvement one can make to their brewing) and consistently hit my mash temps and volumes. I hold for over 60 mins since after my alarm goes off, I ignore it and keep doing whatever I'm occupied with at the time, so my extraction potential should be higher with a longer mash. My PH has been appropriate during the mash as well, which left me wondering if the milling was the problem. So I did a bunch of research and, voila, the grind makes a difference in my efficiency. So of course I'm going to get the 3 roller mill. But $300 for the front runner mill seemed like an awful lot, even for me.
I'm not a machinist, but I am a woodworker that makes furniture with hand planes, hand saws, and chisels, I worked construction for years, and now work as a fireman. I know how stuff goes together, comes apart, and I can tell right away if something quality is in my hand. That said, I wasn't convinced that $300 for a 3 roller mill was worth it for such a simple machine.
I took a chance on the Kegco 3 roller adjustable mill. At $150 it was awfully attractive. But nobody knew anything about it. So what did I do? I had about a half a dozen 8+% homebrews and hit "Buy" on Amazon. (Don't judge. I'm sure I'm not the only one)
2 days later it was on my porch. And it was heavy. I opened it up on my workbench, inspected it, and was actually impressed. I heard that there were "bronze bushings" in this roller but that was not the case.

Actual bearings are used in this model, which I was pleased with. I measured the ID of the bearing with my micrometer. I couldn't detect any slop in the fit of the rollers, bearings, and frame. There was one roller that did have some side to side play between the frame, but I don't think this would have any impact on the operation of the mill.

Then the OD of the roller stem

Hmmm. Pretty good.

There is a larger bearing located on the side that the drive stem is located, which is 1/2" drive in case you want to use a drill. This means that there is only one way this thing goes together.
The adjustable roller has no stem. The adjustment knob is eccentric and has the stem. The roller itself has the bearing pressed in. I was able to adjust the roller to the "credit card" gap by assembling the mill completely and sticking an old gift card (.03" micd) cut in half in between the fixed and adjustable roller. This took maybe 15 seconds. The eyebolts that hold this setting were easy to snug up tight.

The frame itself is cut from what looks like 1/4" aluminum stock and the cut ends are beveled and tapped for bolts.

The rollers were quite stout and the machining appears fairly well done. Certainly good enough to crush grain.

The only thing that "might" make a difference in durability is the RC hardness of the rollers themselves. I cannot measure this but I would think that for my own personal purposes, whatever the RC measurement is is probably fine. As such, getting the teeth redone at a machine shop would take about 15 minutes, so the cost would be fairly low.
The bin is made of punched sheet aluminum wrapped in that blue protective plastic.

I had heard that it might be a PITA to get off, leaving residue all over that would require serious elbow grease, an acetone/alcohol/goo-gone/SimpleGreen/aircraft remover bath to get off. But nope. The protective layers peeled right off leaving nothing behind but shiny aluminum. I guess my only nemesis now is peeling that silver barrier off the new peanut butter jar in one piece. (One day, peanut butter. Soon.) The holes all lined up perfectly as well. Since the hopper pieces are stamped, I had to make a quick pass with my deburring tool to smooth everything out. This took about 48.675 seconds after I removed all the protective plastic.
The package of hardware actually comes with nylon insert nuts, which was a surprise. I was expecting to have to put blue threadlocker on all the bolts. The nuts on mine were 7mm. Time will tell if they actually hold up, though.

My only gripe is that I had to buy the 4 bolts to mount the frame. $2. I used 1/2" MDF so I had to cut the bolts down to fit in the tapped mounting holes on the bottom. I didn't measure exactly but I figure that I cut about 1/4" off these.

The mill comes with a machined handle, which I'm not going to use in favor of my corded drill, but I'll include the pics here for reference. Overall pretty good.


I laid out the bottom opening on the MDF as well as the screw hole locations and cut everything out. I had some 1/4" washers laying around so I used those before applying threadlocker and tightening everything down.

I attached the bin to the frame and this is the finished product. The base is 16"x16" to fit on the food grade, 20qt plastic bins from Smart and Final.


Overall, I think that this is fairly well put together. If you take a step back for a moment and think about what a grain mill is, there's not much to it. 2 pieces of aluminum cut to size, drilled for either bushings or bearings, and tapped for mounting to a board as well as mounting the hopper. This process itself is not that hard, and could be done by anyone with a drill press and a bandsaw in an hour or two in their garage. Besides, aluminum is cheap so the materials cost is pretty low. I could buy these bearings at Grainger for maybe a buck a piece. I imagine a bulk discount would bring these costs down significantly.
The rollers are machined fairly well also, and if this is your only job in the shop, or it's being done by CNC, I would think the time to crank the rollers out would be fairly minimal. Besides, the steel for the rollers would be fairly cheap. I think any excess costs would come from heat treating and hardening the steel, which would be beneficial if you mill a lot of grain. I'm not sure yet if that can be justified on a homebrew scale quite yet.
I had a tough time convincing myself to shell out $300 for a 3 roller grain mill when I know that this is really a simple machine. But for me, $150 is well worth it. I'm going to try my hand in the next couple weeks milling the grains at home. I will be conditioning the grains was well, since that process makes a lot of sense to me and I can do it while I heat of my mash water. I'll post pics of the milled grains when I do so we can all see the results.

 After a couple batches I can go back and do a nicer job.
")