HOWTO - Make a BrewPi Fermentation Controller For Cheap

Homebrew Talk - Beer, Wine, Mead, & Cider Brewing Discussion Forum

Help Support Homebrew Talk - Beer, Wine, Mead, & Cider Brewing Discussion Forum:

This site may earn a commission from merchant affiliate links, including eBay, Amazon, and others.
Status
Not open for further replies.
Ok, you hooked me: where can you select the shield version? For all I know it's defaulting to the Rev A shield.

And is the only Build Events configuration that works the Active(Debug) version?

Excellent! :mug: What's your best guess what was wrong? I was thinking the cron.d instancing stuff...

Cheers!


I'll have to open her back up and take a look. I believe it's a config.h thing. I didn't use it like that and just changed the appropriate lines in defaultConfig.h or whatever it's called. But If I remember correctly u can choose which shield revision to build for towards the top of that file. I didn't look into that much. I just kept it as is. And I believe it's set to build for revc but don't quote me on that.

As for the multi instance problems I think it was a combination of some cron problems and the fact that I forgot that I needed pi user to join the other groups. After reading your walk through it jumped out at me as I had to do it when I built my vm with 1 arduino last time. Before I found that all I had to do to install on a non-pi was edit the install script to not run the raspberry pi update, which always killed the script on non-pi setups. After I get all this up and running I might look into building an install script that will build out up to 4 instances without the user having to go through all this.
 
config.h line 57:

//////////////////////////////////////////////////////////////////////////
//
// Define which brewpi shield is used.
// BREWPI_SHIELD_REV_A The RevA shield (ca. Feb 2013), two OneWire buses, door, heat, cool.
// BREWPI_SHIELD_REV_C The RevC shield (ca. May 2013). One common ONeWire bus, 4 actuators. Dynaconfig.
//
// #ifndef BREWPI_STATIC_CONFIG
// #define BREWPI_STATIC_CONFIG BREWPI_SHIELD_REV_A
// #define BREWPI_STATIC_CONFIG BREWPI_SHIELD_REV_C
// #endif
//
//////////////////////////////////////////////////////////////////////////
 
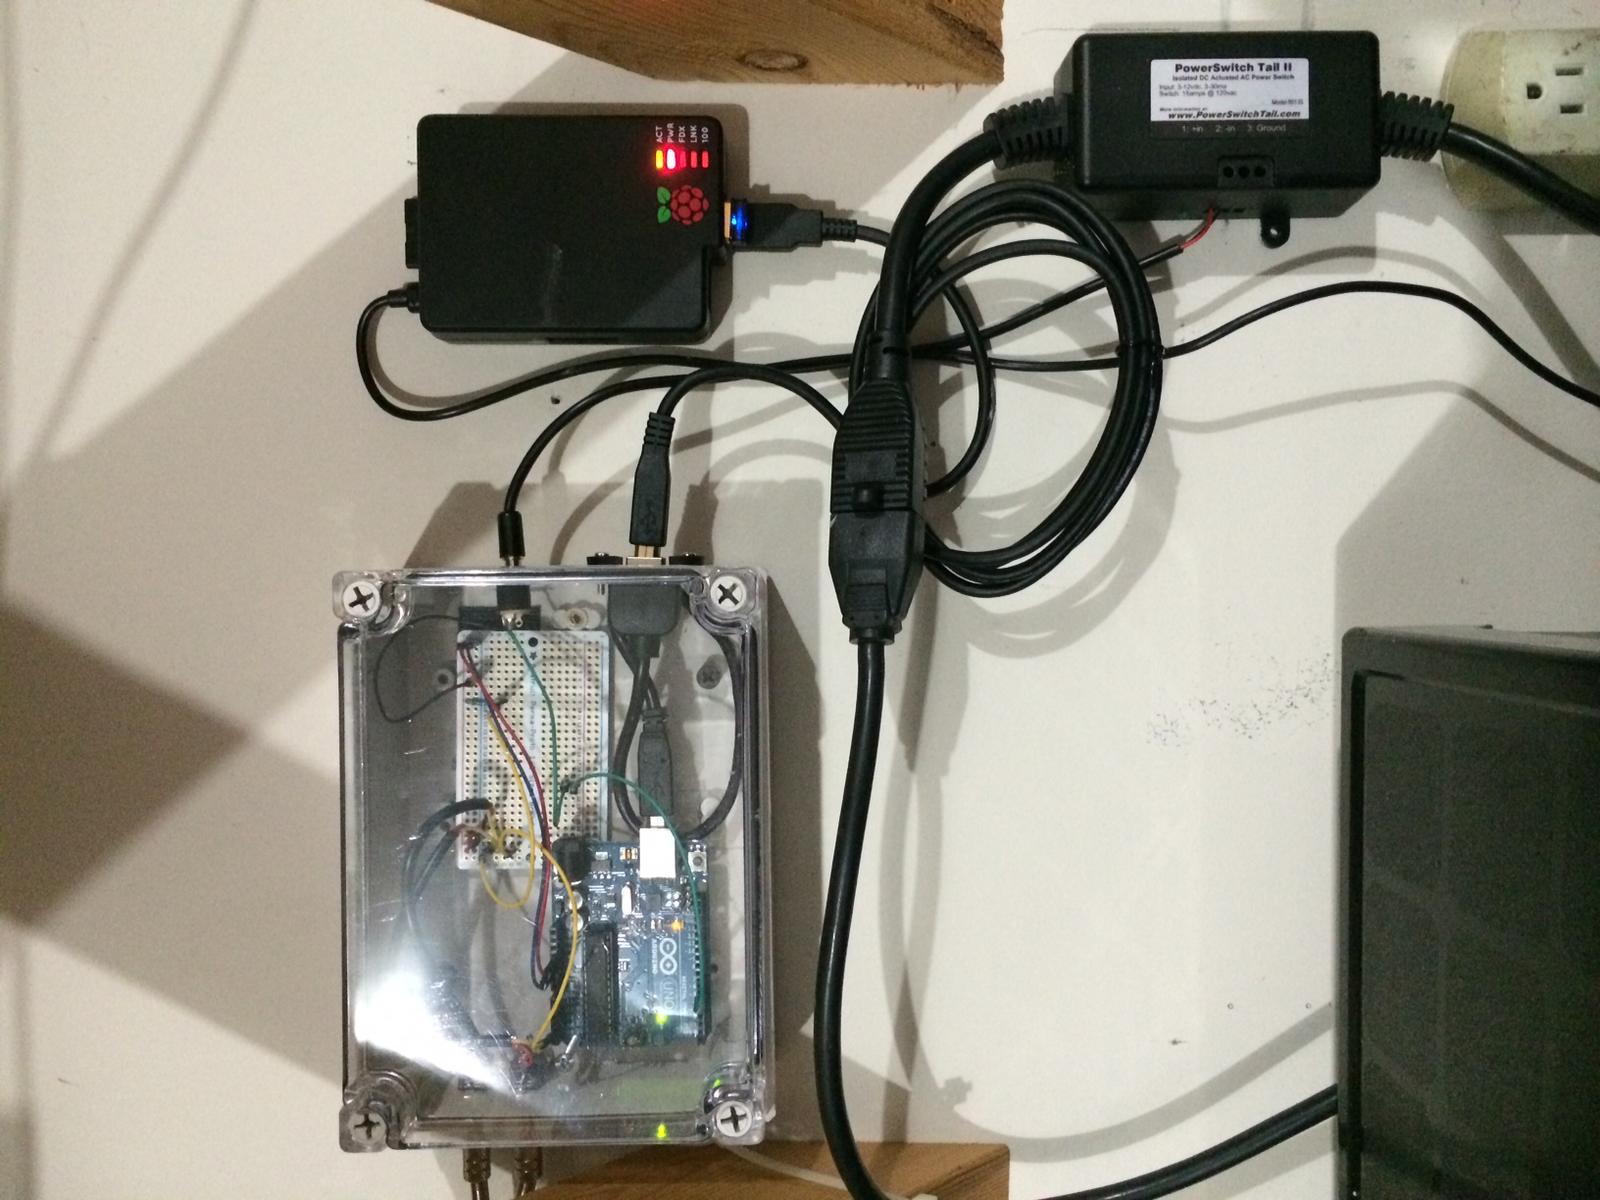
Got my BrewPi setup done, using a Raspberry Pi, Arduino Uno and a PowerSwitch Tail II.

Why are my images sideways??

brewpi.jpg
 
Thanks mongooseman! Used your how to and set a webcam up to spy on my brew in the shed Bought one of these. Ebay Mini Stylish USB 2.0 5M Meter Retractable Clip WebCam Web Camera Laptop SL item 301253251844. thanks!

Camera was low quality but good enough for this job. $3. Lead is only about 0.5m not 5 m
 
Thanks mongooseman! Used your how to and set a webcam up to spy on my brew in the shed Bought one of these. Ebay Mini Stylish USB 2.0 5M Meter Retractable Clip WebCam Web Camera Laptop SL item 301253251844. thanks!

Nice! Glad it worked for someone else.
 
OK, so in each web folder (top1, top2, bottom1, bottom2) create a file called "lcd.php", with the following contents:
Code:
<?php
/* Copyright 2012 BrewPi/Elco Jacobs.
 * This file is part of BrewPi.

 * BrewPi is free software: you can redistribute it and/or modify
 * it under the terms of the GNU General Public License as published by
 * the Free Software Foundation, either version 3 of the License, or
 * (at your option) any later version.

 * BrewPi is distributed in the hope that it will be useful,
 * but WITHOUT ANY WARRANTY; without even the implied warranty of
 * MERCHANTABILITY or FITNESS FOR A PARTICULAR PURPOSE.  See the
 * GNU General Public License for more details.

 * You should have received a copy of the GNU General Public License
 * along with BrewPi.  If not, see <http://www.gnu.org/licenses/>.
 */

// load default settings from file
$defaultSettings = file_get_contents('defaultSettings.json');
if($defaultSettings == false){
	die("Cannot open default settings file: defaultSettings.json");
}
$settingsArray = json_decode(prepareJSON($defaultSettings), true);
if(is_null($settingsArray)){
	die("Cannot decode defaultSettings.json");
}
// overwrite default settings with user settings
if(file_exists('userSettings.json')){
	$userSettings = file_get_contents('userSettings.json');
	if($userSettings == false){
		die("Error opening settings file userSettings.json");
	}
	$userSettingsArray = json_decode(prepareJSON($userSettings), true);
	if(is_null($settingsArray)){
		die("Cannot decode userSettings.json");
	}
	foreach ($userSettingsArray as $key => $value) {
		$settingsArray[$key] = $userSettingsArray[$key];
	}
}

$beerName = $settingsArray["beerName"];
$tempFormat = $settingsArray["tempFormat"];
$profileName = $settingsArray["profileName"];
$dateTimeFormat = $settingsArray["dateTimeFormat"];
$dateTimeFormatDisplay = $settingsArray["dateTimeFormatDisplay"];

function prepareJSON($input) {
    //This will convert ASCII/ISO-8859-1 to UTF-8.
    //Be careful with the third parameter (encoding detect list), because
    //if set wrong, some input encodings will get garbled (including UTF-8!)
    $input = mb_convert_encoding($input, 'UTF-8', 'ASCII,UTF-8,ISO-8859-1');

    //Remove UTF-8 BOM if present, json_decode() does not like it.
    if(substr($input, 0, 3) == pack("CCC", 0xEF, 0xBB, 0xBF)) $input = substr($input, 3);

    return $input;
}

?>
<!DOCTYPE html >
<html>
	<head>
		<meta http-equiv="content-type" content="text/html; charset=utf-8" />
		<title>BrewPi reporting for duty!</title>
		<link type="text/css" href="css/redmond/jquery-ui-1.10.3.custom.css" rel="stylesheet" />
		<link type="text/css" href="css/style.css" rel="stylesheet"/>
		<link rel="apple-touch-icon" href="touch-icon-iphone.png">
        <link rel="apple-touch-icon" sizes="76x76" href="touch-icon-ipad.png">
        <link rel="apple-touch-icon" sizes="120x120" href="touch-icon-iphone-retina.png">
        <link rel="apple-touch-icon" sizes="152x152" href="touch-icon-ipad-retina.png">
        <meta name="apple-mobile-web-app-title" content="BrewPi">
        <meta name="apple-mobile-web-app-capable" content="yes" />
        <link rel="apple-touch-startup-image" href="splash.png" />
	</head>
	<body>
		
		<div id="lcd" class="lcddisplay"><span class="lcd-text">
		<span class="lcd-line" id="lcd-line-0">Live LCD waiting</span>
		<span class="lcd-line" id="lcd-line-1">for update from</span>
		<span class="lcd-line" id="lcd-line-2">script...</span>
		<span class="lcd-line" id="lcd-line-3"></span>

		</div>
		<script type="text/javascript" src="js/jquery-1.11.0.min.js"></script>
		<script type="text/javascript" src="js/jquery-ui-1.10.3.custom.min.js"></script>
		<script type="text/javascript" src="js/jquery-ui-timepicker-addon.js"></script>
		<script type="text/javascript" src="js/spin.js"></script>
		<script type="text/javascript" src="js/dygraph-combined.js"></script>
		<script type="text/javascript">
			// pass parameters to JavaScript
			window.tempFormat = <?php echo "'$tempFormat'" ?>;
			window.beerName = <?php echo "\"$beerName\""?>;
			window.profileName = <?php echo "\"$profileName\""?>;
			window.dateTimeFormat = <?php echo "\"$dateTimeFormat\""?>;
			window.dateTimeFormatDisplay = <?php echo "\"$dateTimeFormatDisplay\""?>;
		</script>
		<script type="text/javascript" src="js/main.js"></script>
		<script type="text/javascript" src="js/device-config.js"></script>
		<script type="text/javascript" src="js/control-panel.js"></script>
		<script type="text/javascript" src="js/maintenance-panel.js"></script>
		<script type="text/javascript" src="js/beer-chart.js"></script>
		<script type="text/javascript" src="js/profile-table.js"></script>
		
	</body>
</html>

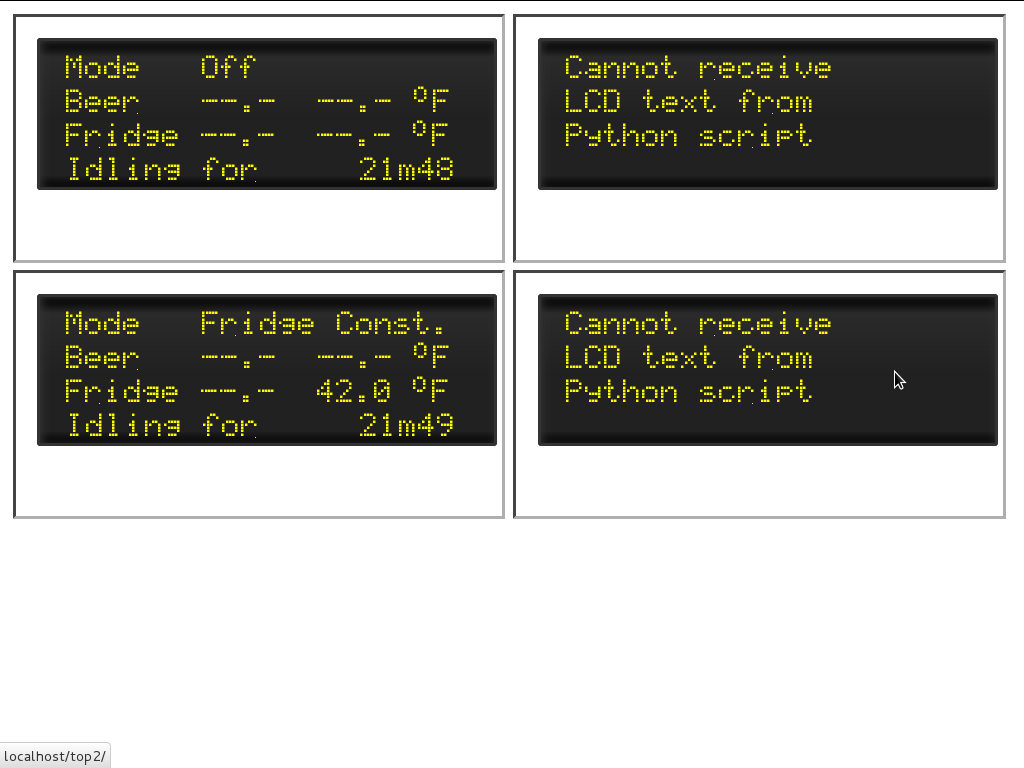
Then, in one of the folders (whichever you want), create a file called "multiLCD.html" (or whatever you want), and put the following code in it:
Code:
<html>
<body>
<iframe src="http://192.168.1.18/top1/lcd.php"></iframe>
<iframe src="http://192.168.1.18/top2/lcd.php"></iframe><br/>
<iframe src="http://192.168.1.18/bottom1/lcd.php"></iframe>
<iframe src="http://192.168.1.18/bottom2/lcd.php"></iframe>
</body>
</html>

Then, go to http://192.168.1.18/top1/multiLCD.html (assuming "top1" is the folder you put the multiLCD file in) and be happy with yourself :D

Should work...


thanks for all the help. i changed some code in the multilcd.html to remove scroll bars and make it work with dynamic ip should that ever be an issue. Couldnit have done the php work though so thanks again

I put the file in my root www folder
here is my multilcd code

Code:
<html>
<body>
<iframe src="../top1/lcd.php" scrolling="no" seamless="seamless"></iframe>
<iframe src="../top2/lcd.php" scrolling="no" seamless="seamless"></iframe><br/>
<iframe src="../bottom1/lcd.php" scrolling="no" seamless="seamless"></iframe>
<iframe src="../bottom2/lcd.php" scrolling="no" seamless="seamless"></iframe>
</body>
</html>

raspberry pi brewpi2.png
 
So in this setup all of the chambers are connected via a USB hub? or they just all go back to the computer running them?
 
Hey guys, I am having trouble getting brewpi to install.

When i try to run the install.sh file, it says there is nothing there, and it won't run from the graphic interface either,

Do I need to reclone the thing from GitHub?
 
Hey guys, I am having trouble getting brewpi to install.

When i try to run the install.sh file, it says there is nothing there, and it won't run from the graphic interface either,

Do I need to reclone the thing from GitHub?

Not a computer guy, but if you're talking about the following command.

sudo ~/brewpi-tools/install.sh

I would double check the spacing and spelling.
When I had problems it was one of those two things.

Good luck
 
Thats the one...

I must've tried it 10 or 15 times, i wish I was sitting there with it right now. I'll try again tonight and post then. Thanks
 
So in this setup all of the chambers are connected via a USB hub? or they just all go back to the computer running them?


Waiting on the hub to come in from amazon and a couple more temp probes. It'll be on a hub then. So I can have a mini keyboard hub and 5th uno for rpints. Till then I just have 2 hooked up for testing and a third setup running my fridge already. Once they get the multi ferment figured out it looks like I'll be able to dial this back to 2 arduinos and then I won't need the hub.
 
Thats the one...

I must've tried it 10 or 15 times, i wish I was sitting there with it right now. I'll try again tonight and post then. Thanks

My guess is you cloned the directory in the wrong directory and not from the users home directory :)
 
Thats the one...

I must've tried it 10 or 15 times, i wish I was sitting there with it right now. I'll try again tonight and post then. Thanks


you can also try

locate install.sh

that should return all of the instances of install.sh on the machine and their full path. Then using the full path you can sun the script.

For example

locate install.sh
/usr/share/git/brew-pi/install.sh

then you can do

sudo /usr/share/git/brew-pi/install.sh
 
Hi all, I have my brewPi software running on my Rpi. However, I am unable to see my devices. I have 2 DS18D20 temperature sensors and they are wired exactly as the diagram shows. Listed are Device 0-4 none of which have the Arduino pin as A4. So there is not ones listed as device type temperature sensor. Is there a better way to test and see what is going on with my devices?
 
Hi all, I have my brewPi software running on my Rpi. However, I am unable to see my devices. I have 2 DS18D20 temperature sensors and they are wired exactly as the diagram shows. Listed are Device 0-4 none of which have the Arduino pin as A4. So there is not ones listed as device type temperature sensor. Is there a better way to test and see what is going on with my devices?

Do you have a 4.7k resistor inline between positive and the data (yellow) wire?
 
Yellow is ground on mine.are u sure you have them wired correctly
 
Ok, well the color of the wires aside, do you have a 4.7k resistor inline from the 3.3V (or 5V) to the data wire?

2-Layout1.jpg
 
Ok, well the color of the wires aside, do you have a 4.7k resistor inline from the 3.3V (or 5V) to the data wire?

2-Layout1.jpg

I think the problem is that I don't have the data input going into the digital 4, but rather the analog 4 like the diagram in the initial post of this thread. So then where do the leads connect to the Sain Smart 2 channel relay?

Thanks a ton, I was mislead by the original connection.
 
I'm using the analog pin on my setup...works perfectly. I'm using Digital Pin 6 to send the signal to my PowerSwitch Tail (relay).
 
@ Ryan your wiring diagram shows it into the digital pin 4 though. I do have mine exactly the way they are laid out in the original diagram.
 
That's just a diagram I grabbed off google...my sensors data wires go to Analog Pin 4. I just used that diagram for reference for the pull up resistor.
 
Status
Not open for further replies.
Back
Top