How to build a control panel (part 1)

Homebrew Talk - Beer, Wine, Mead, & Cider Brewing Discussion Forum

Help Support Homebrew Talk - Beer, Wine, Mead, & Cider Brewing Discussion Forum:

This site may earn a commission from merchant affiliate links, including eBay, Amazon, and others.
Just curious, you sound surprised you were featured in the magazine.. Did you know know you were going to be featured? I got mine yesterday too.. Pretty nice you got on the radio and featured in a mag after you started selling your control panels.

I bet the radio and mag were planned so in a way you can market it.
I wasn't sure when it would happen but they said they'd use the pictures. They first contacted me back in November 2011 through a PM on this forum to have my setup featured. Magazines typically have a really long cycle time.

Kal
 
FWIW, My kegerator appeared in the drool section, I sent them info, about 6 months later they contacted me and put it in the mag.
 
Hopstopper question for Kal or anyone else who is using this setup. There is a smattering of hop material that managed to get inside the screen and I flushed and flushed and can't seem to get it out. Anyone else have luck with this?
 
I built a homemade hopstopper for this reason (and just because I like to do everything myself). I left one side of the screen open, and use a clamp to close it every brew session. When done, I can just unplug it, and wash it out in the sink from the open side.
 
Hopstopper question for Kal or anyone else who is using this setup. There is a smattering of hop material that managed to get inside the screen and I flushed and flushed and can't seem to get it out. Anyone else have luck with this?

Don't worry about it.

I always have a tiny bit of hop material inside. A tiny bit of new stuff get in with each brew while at the same time some comes out when I spray wash it hard. Impossible to get 100% of it out, but there's no need to since it doesn't do any harm.

Kal
 
Don't worry about it.

I always have a tiny bit of hop material inside. A tiny bit of new stuff get in with each brew while at the same time some comes out when I spray wash it hard. Impossible to get 100% of it out, but there's no need to since it doesn't do any harm.

Kal

Thanks, Kal

I was planning on taking that route but feel better after hearing from the master.

BTW: I was smart enough to read your brew day blog and used the sparge water to flush my RIMS tube while sparging. As simple as this is, I would not have thought of it and only noted it since one poster asked why you hooked up your hoses that way. Not only does it save an ass load of cleanup time, there are less hoses to switch and since I went tri-clover vs quick release, that means a lot.

BTW2: My F-I-L thinks I'm a ******* for not going quick release, but I still like the look and feel of the tri-clovers. We'll see if I still feel that way after batch 100.

80% efficiency my first try, about five points above my all time record on my old system. I know I can do better.
 
I just got the new 'Brew Your Own' in the mail. Congrats on the write up Kal! Very cool to see you in there.

:mug:
 
BTW: I was smart enough to read your brew day blog and used the sparge water to flush my RIMS tube while sparging. As simple as this is, I would not have thought of it and only noted it since one poster asked why you hooked up your hoses that way. Not only does it save an ass load of cleanup time, there are less hoses to switch and since I went tri-clover vs quick release, that means a lot.
With RIMS you wouldn't have as much sweet wort in there, but in my case with a 50' HERMS coil, that's 1/2 gallon of really sugary stuff that I don't want to lose! I can't take credit for the idea however ... I read about it here and I thought it was just brilliant in application and simplicity.

80% efficiency my first try, about five points above my all time record on my old system. I know I can do better.
Aim high! 95%! That said, worry first about consistent efficiency instead of high efficiency. High efficiency is (IMHO) overrrated.

I just got the new 'Brew Your Own' in the mail. Congrats on the write up Kal! Very cool to see you in there.
Thanks! They didn't print my Electric APA recipe unfortunately ... it's one of my favs too!

Kal
 
I used the efficincy calculator on brewheads.com, but there are tons out there. You need your grain bill and you preboil SG and volume
 
Whats the best way to figure efficiency?

The best way is to let software do it because it has the patience for compensating the volumes for temperature and other such tedium. The latest issue of Brew Your Own magazine compares various software packages. My favorite is Beer Tools Pro.

To me the Brew House Efficiency is the most interesting, which determines the overall efficiency of your brewery, from strike/sparge water and grain to the fermenter. It is of utmost importance to do the measurements correctly for both volumes and specific gravity. I think it is common to miss-read the hydrometer as I did for years and get an artificially high OG. Calibrate the hydrometer with tap water at the correct calibration temperature. The hydrometer zero line will tell you where on the curved water surface to read the scale, or read it at the top of the meniscus and write down the value so you can subtract this from future measurements.
 
To me the Brew House Efficiency is the most interesting, which determines the overall efficiency of your brewery, from strike/sparge water and grain to the fermenter. It is of utmost importance to do the measurements correctly for both volumes and specific gravity. I think it is common to miss-read the hydrometer as I did for years and get an artificially high OG. Calibrate the hydrometer with tap water at the correct calibration temperature. The hydrometer zero line will tell you where on the curved water surface to read the scale, or read it at the top of the meniscus and write down the value so you can subtract this from future measurements.
Yup, extremely important to take readings consistently. A one gravity difference (1.051 instead of 1.052) can easily change the perceived brewhouse efficiency by 2%.

So that said, I think that when people post brewhouse efficiencies they should be taken with a +/- factor of at least 5%.

Kal
 
Yup, extremely important to take readings consistently. A one gravity difference (1.051 instead of 1.052) can easily change the perceived brewhouse efficiency by 2%.

So that said, I think that when people post brewhouse efficiencies they should be taken with a +/- factor of at least 5%.

Kal

Yes, and my numbers are bobbing up and down by several percent. I hope that my electric brewery will tighten up my numbers a bit. Consistency, not necessarily efficiency.

In retrospect I need to adjust my comment a little. The strike/sparge water volumes are only interesting if you try to hit a mash temperature without electric assist, and you want to only heat enough water, not more. This also can be interesting for troubleshooting the process. Of course A HERMS or RIMS will take care of the mash temperature automatically. When it comes down to it, the only volume that really matters for brew house efficiency (accuracy of calculation) is final volume in the fermenter and its OG.
 
Yes, and my numbers are bobbing up and down by several percent. I hope that my electric brewery will tighten up my numbers a bit. Consistency, not necessarily efficiency.
I think so, assuming your process and measuring techniques are consistent.

I had a few ups and downs by 2-3% when I first starting using my setup - mostly because I wan't adjusting my water for the first few batches so my sugar extraction wasn't always exactly as planned. It still didn't amount to a large efficiency change (I was getting 92% instead of 95%). Now that I'm doing the same thing consistently (and adjusting mash pH), I'm hitting 95% every single time, batch after batch.

To this day it still surprises me when I sit down and formulate a recipe to make a 1.055 wort to see that number exactly at the end of the brew day after I chill and compensate for temperature. Not 1.054, not 1.056. Exactly 1.055. It's kind of freaky.

Kal
 
Yes, and my numbers are bobbing up and down by several percent. I hope that my electric brewery will tighten up my numbers a bit. Consistency, not necessarily efficiency.

In retrospect I need to adjust my comment a little. The strike/sparge water volumes are only interesting if you try to hit a mash temperature without electric assist, and you want to only heat enough water, not more. This also can be interesting for troubleshooting the process. Of course A HERMS or RIMS will take care of the mash temperature automatically. When it comes down to it, the only volume that really matters for brew house efficiency (accuracy of calculation) is final volume in the fermenter and its OG.


So your saying when I figure how much water I need in my HLT to mash in, the HLT should only have the amount of water I need to mash in, no more?
 
The posting below was also posted in the electric brewery forum as well.

Hello All,

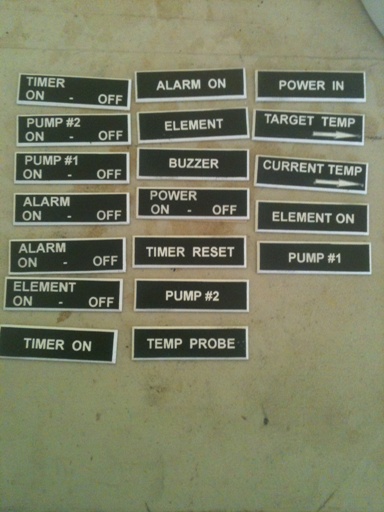
I have a bunch of panel tags to get rid of.. I placed my first order for them through signs, banners, and tags and 7 of them came in wrong. I just got my replacements yesterday and not only did they replace the 7 that were wrong but they replaced my whole order. I don't know why they did that but I now have a bunch of extra tags. I'm not selling these, i'm just giving them away. If you have any beer or brewery related stuff that you may have extra of, I will trade for them as well. If not, I will just give them away.

Just post here what you want and if you have anything for trade. First come first serve.

The ones that were wrong are the "ON - OFF" tags. The lettering needed to be center aligned but is left aligned. These tags are for a RIMS system so thats why they don't match up to what you see on Kals panel. I also labeled my pumps #1 and #2 so down the road if I upgrade or change something the tags are not wrong.

41911 001.JPG
 
So your saying when I figure how much water I need in my HLT to mash in, the HLT should only have the amount of water I need to mash in, no more?

Well, that's how I do it. First the exact volume for mash-in, then for good margin I aim to have 1/2 gallon of liquid left in the MLT at the end of the sparge. I adjust the grain water absorption coefficient in Beer Tools Pro until its prediction of remaining liquor matches what I got. On the next brew day I get close to 1/2 gallon remaining when I have drawn what I need for the BK. My method is a holdover from troubleshooting my process where I ran out of liquor and/or overflowed the MLT. If you have way more liquor than needed it can be used for cleanup so it is not so important.
 
I fill my hlt, you need a mass of water after doughing in at target temp for the herms. I use a sight guage and have marked out each gallon with silicon orings.
 
Another hopstopper issue came up last night. I lost the siphon when the level dropped down to the nozel leaving about 1-2 gallons in the bottom. I thought I cranked that mo-fo on pretty tight, but I am wondering if a compression fitting is really the right design for something that is taken on and off with every brew day.
 
I've been using a compression fitting on the dip-tube of my mash tun for awhile now and I've never had that problem. There must be something wrong with the connection to make it lose siphon like that.
I just ordered a hopstopper for my BK so I hope mine doesn't do the same!
 
Have you tried taking the ferrules out and using a couple silicone o-rings? I did that with my compression fittings that require removal and re-installation, and I've had no problems. I think that's what Kal does too, if I'm not mistaken.

TB
 
Another hopstopper issue came up last night. I lost the siphon when the level dropped down to the nozel leaving about 1-2 gallons in the bottom. I thought I cranked that mo-fo on pretty tight, but I am wondering if a compression fitting is really the right design for something that is taken on and off with every brew day.

Slow the flow right down once the hopstopper gets exposed to air, otherwise you can create a funnel which sucks in air.

Kal
 
Have you tried taking the ferrules out and using a couple silicone o-rings? I did that with my compression fittings that require removal and re-installation, and I've had no problems. I think that's what Kal does too, if I'm not mistaken.

TB

Kal does that for the CFC connections and I copied that. Works well. I'd need smaller diameter ones for the HS.

Slow the flow right down once the hopstopper gets exposed to air, otherwise you can create a funnel which sucks in air.

Kal

I was going fairly slow at the time.
 
Another hopstopper issue came up last night. I lost the siphon when the level dropped down to the nozel leaving about 1-2 gallons in the bottom. I thought I cranked that mo-fo on pretty tight, but I am wondering if a compression fitting is really the right design for something that is taken on and off with every brew day.

I'm using a compression and it works great for all the tests I've done.
 
I need some opinions. Right now I have 3 15 gallon blichmanns. When I convert someday to Kal's electric brewery, I want to do 1o gallon batches still. Will i be able to pull it off with the 15 gallon system?

I am thinking about doing 10 gallons in the HLT and 10 gallons BK. Heat to strike water temp for both. Transfer bk water volume needed to mlt, and the remaining volume to hlt. Then continue using Kal's process.
I don't really understand what you mean by the second part, but as for the first question: Keggles are 15 gallons and many keggle owners I know do 10 gallon batches.

IMHO it's a bit tight (you have to be careful about boil overs) but it can be done.

Kal
 
With your technique for your system don't you heat up 20 gallons at once in the hlt and transfer what you need to the mlt? Then you use the water in the HLT to keep a constant temp in the mlt, then sparge?

Doing 10 gallon batches in 15 gallon pot would force me to use two pots to heat up sparge and strike water because I usually need 20 gallons of water for 10 gallon batches.

Since the MLT on the electric brewery system does not have an electric element, I would be forced to heat up 20 gallons of water in the BK and the HLT.

So, I would need to heat up in strike water in the bk and transfer it to the mlt. At the same time I would need to heat up water for the sparge and for keeping the mash temp constant while recirculating.
 
With your technique for your system don't you heat up 20 gallons at once in the hlt and transfer what you need to the mlt? Then you use the water in the HLT to keep a constant temp in the mlt, then sparge?

Yup!

Doing 10 gallon batches in 15 gallon pot would force me to use two pots to heat up sparge and strike water because I usually need 20 gallons of water for 10 gallon batches.

Here's what I'd do: I would just add the strike water to the MLT, and the sparge water to the HLT. Then follow my process. The MLT will heat through the HERMS coil. Simple.

I did this myself once when I did a massive batch of 12% barley wine that used a massive 40 lbs of grain. It worked fine. It's not any slower to heat up either than just having it all in the HLT.

It's not possible to use the HLT and BK to heat water at the same time anyway since my setup (as designed) canot have both elements on at once. This was done on purpose to keep the power requirements manageable (30A service).

IMHO the only downside to doing it separately like this is that if your using city water with chlorine/chloramine, you need to add about 250 mg of potassium metabisulphite (half a campden tablet) to both pots instead of more or less one whole tablet to the HLT. About 2 minutes of extra work.

Kal
 
I have 15 gallon commercial kettles (other than my 25 gallon BK) and I can probably do a 1.070 beer, max, before I have to get creative, at 80% efficiency. You guys are all talking water, but my constraint is the grain bed itself.

Hope that helps.
 
MAN! I love this!

Thank you so much for you time and effort! This is an amazing piece of work!

*APPLAUSE*
 
Maybe someone can help me here.

For my RIMS system and control panel build, I got my heating element mounted in the tube, got the PID and SSR wired up. Turn the power on and the control powers up as well as the PID. To turn the element on I have to turn another switch. After I turn the element on, about 2 minutes later my 7 amp fuse blows. I replaced it and it did the same thing. So I put a 10 amp fuse in and then about 4 minutes later it had blown. This fuse I use is to protect everything on the control panel except for the heating element, the element has it's own 15 amp fuse.

Can anyone offer some insight on whats going on. It's acting as if I have that 7 amp fuse on the element. I don't get it.
 
P-J, i knew that question was gonna come up. I don't have a wiring diagram posted anywhere and I would have to make one. If I can find some time I will do that. Basically, i used kals website to get most of my information and I had a buddy who is very smart with electrical stuff hook it up. Obviously Kals build is not for a RIMS build but I applied most of his control panel build information to mine. My buddy is coming over next week to finish it up but I figured in the mean time I can try and find the solution. He's got some electronic testers and stuff like that we can use to figure where the problem is coming from..

On another note, a question about the autotune process. When I go to do it, what should I set my target value to? Should it be 30-40 degrees above the actual temp or should be 2-3 degrees above the actual temp?

Example, if your actual temp was 70 degrees would you set the target temp to 73 degrees or 100 degrees.
 
I'd set the PID to whatever temp you plan on achieving when you finish and use your rig. Your temp probe placement is an important factor as well.
 
Back
Top