alexlark
Well-Known Member
Yea I was going to PM you and ask if you were still using SSRs

Yea I was going to PM you and ask if you were still using SSRs
rial port
Jun 03 2017 04:08:15 Errors while opening serial port:
[Errno 2] could not open port /dev/ttyUSB0: [Errno 2] No such file or directory: '/dev/ttyUSB0'
[...]
")
Just a quick question, I'm using Thorrak's amazing ESP8266 build and recently had LCD scrambling. I read from circa. page 70 of this thread, where there is mention of LCD scrambling, and then not a big mention of it after that. Is this an issue for anyone still? Cheers
Didn't let the magic blue smoke out of the pi. Do you think I should format the sd card and start over?Ok, WTH? Someone's hardware having a stroke?
Yes - seems like the nano and pi are not talking to each other. The nano's leds will respond when I hit the reprogram controller button on the brew pi screen.Not based on what you've posted - didn't you say you had it working over Wifi?
Use Xloader to install the hex file.
I was never able to get the Nano clone loaded using the BrewPi gui.
Then use the BrewPi gui to reset/clear the eeprom and you should be good to go...
Cheers!
[Then use the BrewPi gui to reset/clear the eeprom/QUOTE] I Tried that a couple of times. what setting in Xloader?
I tried using the Uno selection the first time but it was taking forever and I got impatient and pulled the plug. I did get a steady short red blast from theTXD LED so it must have been doing it's thing.I'll try again and let it go till it stopsI actually used the Uno/Mega328 selection right below.
The chip is a Mega328 either way, I figured the hex file was generated for an Uno, so...
Cheers!
@Mikmonken any chance of a photo of your build with SSRs?
Same results with 9v.5V at the barrel connector is never gonna work.
I've done tons of experimenting with input power while hunting for the elusive LCD Scramble, and anything below 9V at the input is asking for reliability problems...
Cheers!
UPDATE:
The pot was way out of range.I had to turn it 20 revolutions before I got an image.
https://www.homebrewtalk.com/showpost.php?p=7981055&postcount=1091is there any schematic in order to print a board on coper-board instead of breadboard or protoshield?
pcb print here in Greece is too expensive.....
https://www.homebrewtalk.com/showpost.php?p=7981055&postcount=1091
I have a few boards available.
This is what I received from @day_trippr . Any mistakes are mine from transcription:Built the 3D case from Lee Bussy and it's BEAUTIFUL! Thanks to everyone that worked on this project.
One question about powering the Arduino/shield: I have the power supply board specified in the project connected to the 5v pin on the shield and all works well. The question is, can I also plug in the RaspberryPi into the USB port of the Arduino? Or do I need to disconnect the 5V from the power supply first? I just don't want to damage the Arduino/shield or the Rpi...

I just got my BrewPi up and running and wanted to add an LCD to be able to check temps at a glance. It was quite the chore to get the BrewPi software up and running correctly since Im using a new Pi Zero W and there was a compatibility issue with the OS.
I found the thread describing what seems to be a pretty simple way to install an LCD display.
https://www.homebrewtalk.com/showthre...510036&page=31
Im just curious if anyone has done this recently. The post is from 2015 and some of the links that are referenced in the thread are a bit out dated or no longer exist.
If I use one of those .hex files referenced in post, is that going to mess up the BrewPi software?
Oh and I did get a rotary encoder since it seemed relatively easy to wire up according to the post by jcscott
Thanks day_trippr for the help so far and suggesting that I post this question on this thread

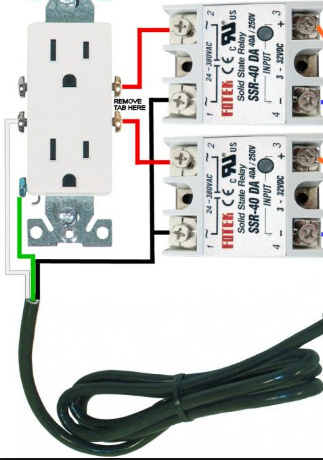
Re-posting this image for panzo rather than try to find it in this thread
View attachment 419457
Cheers!

Enter your email address to join: