Herms in a tube?

Homebrew Talk - Beer, Wine, Mead, & Cider Brewing Discussion Forum

Help Support Homebrew Talk - Beer, Wine, Mead, & Cider Brewing Discussion Forum:

This site may earn a commission from merchant affiliate links, including eBay, Amazon, and others.

Elfmaze

Well-Known Member
Joined
Oct 22, 2008
Messages
635
Reaction score
27
Location
Pittsburgh
Part of my switch to electric brewing seems to be a push toward HERMS vs RIMS that I was using on my gas fired brewery.

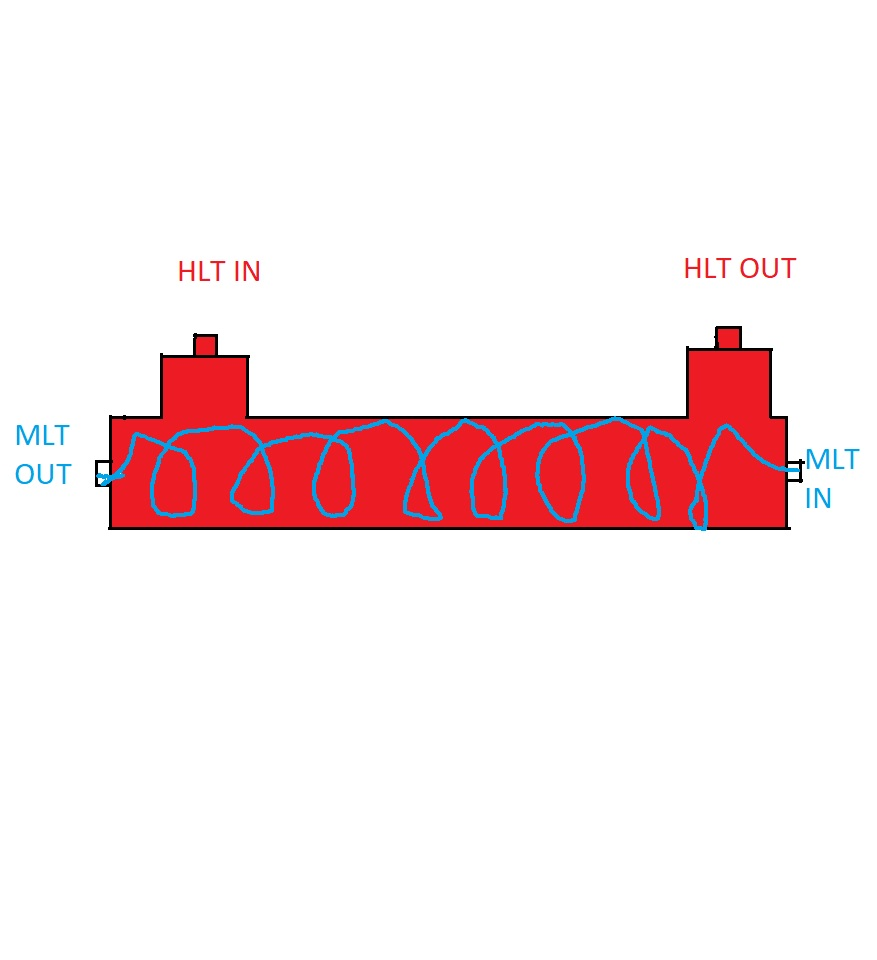
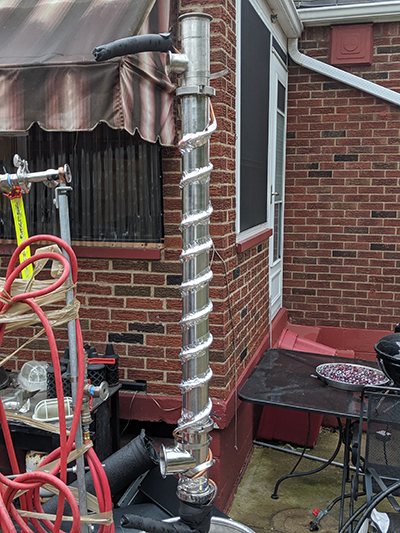
My HLT is a bit "cluttered" already and drilling and welding new holes in it is possible, but I have another idea. Since I am already recirculating the HLT. can I pass the HLT through this spare 3" x 36" triclamp tube I have and use two tees on either end with a 50ft coiled 1/2" SS tube to pass the Mash recirc through?

Biggest problem I see is more metal equals more heat loss to atmosphere and not sure how coiling 1/2 SS to 3" OD would work out. column would hold about one gallon of HLT water minus the volume of the SS tube.
upload_2019-9-23_10-27-55.png
 
I think the column was used most recently as a yeast propagation tube hence the external temp management coil
 
I can't quite figure out what you are already circulating, but if you are going to rely on heated water inside that tube to transfer to the coil outside I doubt that it would be at all efficient. The air would have more effect on the coil than the heated water inside - IMO.
 
This is the idea, ignore the outer copper coil, I'm going to remove that... Hopefully my bending skills are better than my paint skills
upload_2019-9-23_11-8-25.png
 
It will work to some extent but the heat transfer will almost surely be way too slow for any multi-step mashing. Of course I'm assuming you're going to wrap a ton of insulation around it all, otherwise you might not even manage to simply hold temperatures because of the massive losses.
 
It will work to some extent but the heat transfer will almost surely be way too slow for any multi-step mashing. Of course I'm assuming you're going to wrap a ton of insulation around it all, otherwise you might not even manage to simply hold temperatures because of the massive losses.

Yeah probably have to wrap it, what would be the difference in efficiency of a coil in the HLT vs a tube? I know the previous owner of this system abandoned a HERMS exchanger due to slow ramp times. but can't figure what the difference would be. Just too much loss in the plumbing?
 
Yeah probably have to wrap it, what would be the difference in efficiency of a coil in the HLT vs a tube? I know the previous owner of this system abandoned a HERMS exchanger due to slow ramp times. but can't figure what the difference would be. Just too much loss in the plumbing?
Simple, in an immersion coil 100% of the surface is exchanging heat with the liquid, in this alternative setup the contact surface with be just a fraction and you also have the added wall thickness because of the 3" tube, which will probably have quite thick walls to achieve structural stability.

EDIT: just realized you want to place the exchanger coil inside the tube so all I wrote up to this point is moot... But yes, without good insulation you will have additional losses as you will still be increasing the overall exposed surface.
 
Last edited:
How much tubing can you fit inside a 3" tube compared to inside the HLT. I wouldn't think you could get much in there and the coils would be too close together to be very efficient in heat transfer. There is also more mass of water in the HLT so temperature fluctuations would be less.
 
You don't have to drill any more holes in your HLT; you could just plop a heat exchanger in it and use that. That seems simpler to me than what you propose, and would allow for better heat transfer.
 
Simple, in an immersion coil 100% of the surface is exchanging heat with the liquid, in this alternative setup the contact surface with be just a fraction and you also have the added wall thickness because of the 3" tube, which will probably have quite thick walls to achieve structural stability.

Not using the outer coil, taking that off. putting new coil INSIDE the pipe
 
How much tubing can you fit inside a 3" tube compared to inside the HLT. I wouldn't think you could get much in there and the coils would be too close together to be very efficient in heat transfer. There is also more mass of water in the HLT so temperature fluctuations would be less.

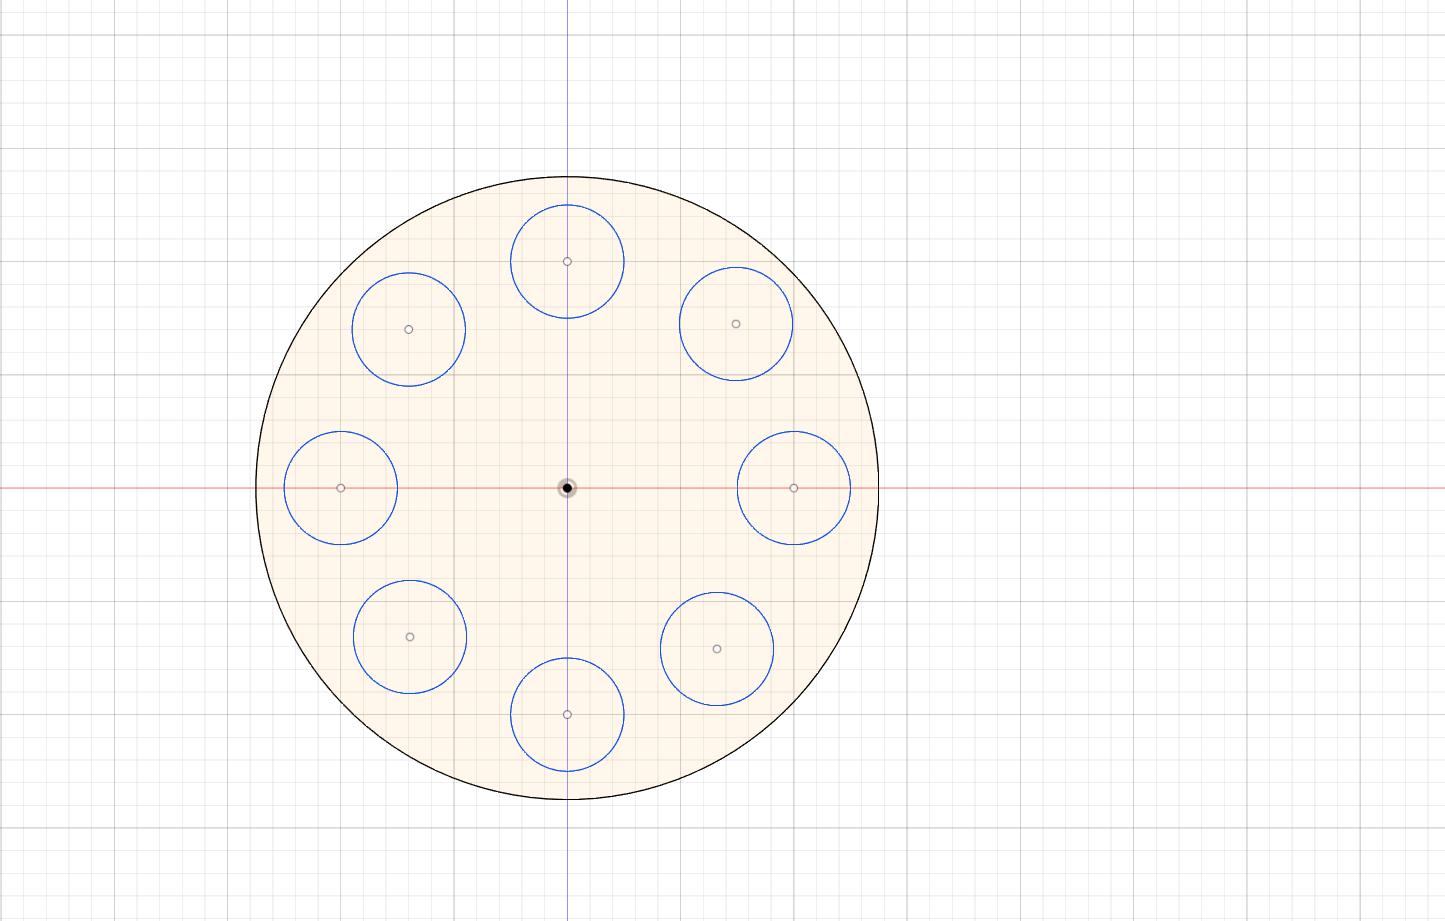
With .75" pitch spacing, 1/2" tube and 40 turns would be around 30ft of coil... BUT sounds like its tough to turn SS coil much tighter than 6"
 
Instead of coiling you could do double elbows at each end and prob fit in 3 runs long ways. You could also try soldering/brazing washers to a single central pipe.
 
Last edited:
Instead of coiling you could do double elbows at each end and prob fit in 3 runs long ways. You could also try soldering/brazing washers to a single central pipe.

I suppose four to five runs of 4ft each would give me 20ft of tube in the heat exchange. I think I saw a post about optimal length somewhere i need to dig up. obviously I could do the experimenting... But apparently straight tube is not cheap... almost more than coiled it seems. The turns at the ends will still be a problem, but might be able to connect them with silicon tubes for the turns.

Edit: BrewPI did the math. they came out with 25ft as the ideal length. https://www.brewpi.com/what-is-ideal-herms-coil-length-theory-experiments/
 
Last edited:
looks like there is plenty enough room for at least eight "passes", buying from stainless brewing for example would cost $40 for eight 3' sections. though I do need an odd number to exit on the far side. Its preboil so not sure how much I care about the idea of silicon tubing for the turns.

upload_2019-9-23_16-56-22.png
 
Last edited:
Yes this will work, and work well. It is called a Shell & Tube heat exchanger. I have two chillers I made this way... and I added a blocking tube in the center to make sure the heating liquid doesn't pass straight through but is forced to turbulently move around the coil.

Somewhere in this forum is my post on how I built these. Edit: found it: https://www.homebrewtalk.com/forum/threads/pvc-tube-shell-chiller.542263/


Well that put me down a Google rabbit hole... Looks like 25' of 1/2" SStube has a surface area of 3.27 sqft. This companies 3 ton chiller claims 3.55 Sqft of chiller area... And in a much smaller footprint. I can't honestly say mine will cost much less than 1 - 2 hundred when done anyway. I can upsize to the 3.5 and still stay in a reasonable price range. I see you moved to a commercial unit as well, recomendations? seems your unit is massive compared to these numbers i'm getting. https://chillxchillers.com/heat-exc...WuoNZdZXatqwTAbYdyDefgOegi1aRY2BoC010QAvD_BwE
stainless-steel-shell-and-tube-heat-exchanger-both-shell-port-configs-no-text-800x800-compressed.png
 
Last edited:
It would work... Its also a lot of extra effort with no advantage over a herms and the same disadvantages the herms has vs a rims... It would be fun to play with though.
Might want to consider wrapping an external heat wrap around the outside of the pipe as an option vs relying on HLT temps/ supply if your trying to just avoid using an ulwd density immersion element for some reason. there was a member named trimdiver who did that a while back and it seemed to work well with external collar heaters.
 
Well that put me down a Google rabbit hole... Looks like 25' of 1/2" SStube has a surface area of 3.27 sqft. This companies 3 ton chiller claims 3.55 Sqft of chiller area... And in a much smaller footprint. I can't honestly say mine will cost much less than 1 - 2 hundred when done anyway. I can upsize to the 3.5 and still stay in a reasonable price range. I see you moved to a commercial unit as well, recomendations? seems your unit is massive compared to these numbers i'm getting. https://chillxchillers.com/heat-exc...WuoNZdZXatqwTAbYdyDefgOegi1aRY2BoC010QAvD_BwE
stainless-steel-shell-and-tube-heat-exchanger-both-shell-port-configs-no-text-800x800-compressed.png
you could also use a plate chiller in this fashion as long as you false bottom works well to filter grain out. you could also just have your hlt water pump into a smaller kettle with a coil in it and recirulate back into the HLT for heating too... would work better and be more practical but maybe not as fun to build.
 
Kind of sucks that Copper in general is more expensive than SS... But I can get 1/2 copper tube for $1 per foot. SS has to be ordered and its
It would work... Its also a lot of extra effort with no advantage over a herms and the same disadvantages the herms has vs a rims... It would be fun to play with though.
Might want to consider wrapping an external heat wrap around the outside of the pipe as an option vs relying on HLT temps/ supply if your trying to just avoid using an ulwd density immersion element for some reason. there was a member named trimdiver who did that a while back and it seemed to work well with external collar heaters.

Trimixdiver1, I actually have his old IRIMS and his kettles. Problem I'm having is fuguring out how to power it with common Electric brewing panels. I like Kals panel. But it doesn't support RIMS esp at 240V
psrGtlcslefyyy5WntcMyCIjIiX2ZktYW53eugWQXatphs0x0RoW8R8FN5kODNBaqeFkoWQb8vIUZB2PmzTiA5i3b34xpdM1EOSuA25OaGyCmOJMSGe9NBLdJt2yioB_NW34Tsz5vGw-RBKC_QC0AJru1odfSH7pfzAMi6i_jN7mtCpP9j-Iwi7lqHHu4ePl_7_ItZdECHAsqgfEgi10znfDtqoSaOXKYCFvTlagOlcVjDODrrOLvzbLOhl-HpGN0YGIYuHCR0L8DyO1Etv73egRqZ0fwGoQnTQhCyRIakd5ifLfqyqEnn0yLmInKcWIQ0pWDI6j6XauUj33f3G6tWNrY3-zmLY1l0OdYCZDBEuciLn9kmO1VapciYm16iVUsZYE9oPMU07b_F1HiPcWhcsMatF-_ajdnFzvUU06lQyujHU4wiDpJaeM2oEpN_FdGF1TFffIcqgXptO3V57wtmSfyi14urPPjXSGxznoaeMua0-h4F4sfCYjCgZUbnQOF36lkMGeXLgeI_B0yc_BcZY3_ITMZ9lPsdmrNpPbB8bGE0QanD-2dSGPL945JuHQhwH53zcFAY_5Hf26lPzvQLYtxRzhmf1PllkIZxubdhG0cDCSH-lHDHJZ8scIH5CBBTm25kP2H0cmynNw8AMNWBrjz-es4fDcam_7J0BHGKlXPYoIDUyh3Js=w1186-h889-no
 
Kind of sucks that Copper in general is more expensive than SS... But I can get 1/2 copper tube for $1 per foot. SS has to be ordered and its


Trimixdiver1, I actually have his old IRIMS and his kettles. Problem I'm having is fuguring out how to power it with common Electric brewing panels. I like Kals panel. But it doesn't support RIMS esp at 240V
psrGtlcslefyyy5WntcMyCIjIiX2ZktYW53eugWQXatphs0x0RoW8R8FN5kODNBaqeFkoWQb8vIUZB2PmzTiA5i3b34xpdM1EOSuA25OaGyCmOJMSGe9NBLdJt2yioB_NW34Tsz5vGw-RBKC_QC0AJru1odfSH7pfzAMi6i_jN7mtCpP9j-Iwi7lqHHu4ePl_7_ItZdECHAsqgfEgi10znfDtqoSaOXKYCFvTlagOlcVjDODrrOLvzbLOhl-HpGN0YGIYuHCR0L8DyO1Etv73egRqZ0fwGoQnTQhCyRIakd5ifLfqyqEnn0yLmInKcWIQ0pWDI6j6XauUj33f3G6tWNrY3-zmLY1l0OdYCZDBEuciLn9kmO1VapciYm16iVUsZYE9oPMU07b_F1HiPcWhcsMatF-_ajdnFzvUU06lQyujHU4wiDpJaeM2oEpN_FdGF1TFffIcqgXptO3V57wtmSfyi14urPPjXSGxznoaeMua0-h4F4sfCYjCgZUbnQOF36lkMGeXLgeI_B0yc_BcZY3_ITMZ9lPsdmrNpPbB8bGE0QanD-2dSGPL945JuHQhwH53zcFAY_5Hf26lPzvQLYtxRzhmf1PllkIZxubdhG0cDCSH-lHDHJZ8scIH5CBBTm25kP2H0cmynNw8AMNWBrjz-es4fDcam_7J0BHGKlXPYoIDUyh3Js=w1186-h889-no
How ironic that you have his stuff...

kals panel can power multiple 240v elements... all you need to do is calibrate the boil kettle pid to use the rims temp probe and when you want to boil you simple swap element cord along with temp probes (optional) if you want since for the boil kettle the pid function is pointless and youll be using it in manual mode anyway to control the boil.

the panel in my avatar pic was a $300 budget build that supported 3 240v elements with temp control and 3 dc pumps with speed control and timers with alarms for any of the three so its certainly possible to through something together for a simple 240v rims.

I have a lot to learn to build my own panel design in 240v. I've tried building 120v ones in the past and didn't have great success... But I'm open to options. to get Kals panel is going to be at least a year away as I'm planning this out(girlfriends in grad school, money tight). Also boil kettles don't really need much programming... just percentage power output. So I've got multiple directions I can go with the parts on hand. Just trying to find the path of least resistance ($$$)
 
@Elfmaze did Trimixdriver1 get out of brewing, upgrade, or?!? His rig was ridiculous (in a great way)!

He ended up having to move to a new city and I'm guessing the idea of setting it all up again after tearing it all down was not high on his priorities list. Plus I think he enjoyed building the system more than the actual brewing side. A lot of the PLC stuff ended up in different systems of his house this time around, coal stove automation, hot water heater lines etc.
 
He ended up having to move to a new city and I'm guessing the idea of setting it all up again after tearing it all down was not high on his priorities list. Plus I think he enjoyed building the system more than the actual brewing side. A lot of the PLC stuff ended up in different systems of his house this time around, coal stove automation, hot water heater lines etc.

Ha, well lucky for you... those kettles and things, all the piping... a very nice foundation to build from!

:mug:
 
I have a lot to learn to build my own panel design in 240v. I've tried building 120v ones in the past and didn't have great success... But I'm open to options. to get Kals panel is going to be at least a year away as I'm planning this out(girlfriends in grad school, money tight). Also boil kettles don't really need much programming... just percentage power output. So I've got multiple directions I can go with the parts on hand. Just trying to find the path of least resistance ($$$)
it seems intimidating. trust me I know. but its really easy to build 240v rims temp control. your looking at like $75 in hardware and an hour or two to wire it all into a box. no need to go nuts all at once. lots of ways to approach this. in the long run, you will most likely end up back here so why not waste time and resources on work arounds..there is a huge amount of money to be saved just doing it yourself. and later you will be thankful time and time again when you want to change or solve an issue. You wont have the fear of the unknown holding you back.
If you want everything in one large control box I suggest buying a used control panel box on ebay and add to it one thing at a time. think about this, if you want to keep it cheap and simple? a mypin or inkbird pid works just as well as any for a rims.. either cost about $30 and a decent ssr with heatsink will cost you about $15... the rest goes towards plugs and wire.. if you need help wiring it up just ask, I will help as much as I can and one of the mods here Doug, is very helpful with wiring schematics.
 
Last edited:
this is why i'm a bit concerned about my panel building ability... This was my last "attempt" sitting in pieces for years... Can't think of why I gave up on it. Looks like I was building it for my 120v RIMS loop. Has a switch for a pump and an dAuber SYL2362 in it. two outlets in the back fuse and XLR input.

EDIT: I think i remember now.. the Computer style input plug I put in there was 10 amp rated and I needed 15 amps... Didn't know how to fix it at the time

dk2a7S-LcrGsMWEZiPopqB5929Sqpw8dJpk8T9TrLeRmPY1pzpCCnKf_u5BYxeoJa_MyqRvap4M4BvRNPAKEFts-xPX8pmonilsCNVFlNYRKHYFr0DDSk9hoqlZ5zeAlXTnvamx3ENtQc5HzAZ0nAV4rT8pexbW3K3rTjKh9tpYmVumN_UAzlLlLIOvfwE9n4Dn-bf3KcsZRKwodLVVwskmzoUK34Ml6MJmIFd0YXY60sGiq3C2xi-Yeg_kO_2efrwIREbxIExX_KRwien_UNZo3w68sW3Zhbf9SDudew3V10lFwKAuyZfrRQ9rFPBwB88vvV6H7YERHzqDpdVmPYlLHyl014m7rmjXE9W3CT3iIyFVa1iGU6_ZZe84s40wegQkEkHx-xu7sBWdmrR7RO6x4frjZTuLfvz4NtXmYKg9ut3q8GwKOIYD93o3c6HvVn1rnboDhSz9rlmzOMYnvETy7emX8_dFjvXqD6vzROQi_Rt2WE23r7xeoSqdZ-Dqw1FKxUIu8gF6OOTjf1sGQBWWn63aXK6VlmPMRy_-VTsDfLWyZw-q5f8RnQMRa-BVSKKWg1pRy_JydCQkskoHBnbXt0lZ0DLm7ckdqzfghJ9uDknDb-lA2gw-CwDanIJkpqvp5nwFbgTQHf4EAbG7VPFUUocSIIh3k7svKHWsxJaoOuXKePkVteXA=w666-h888-no

GKu2iAktZlCfWfv6PUpI0T0Qexz3Y5Npj5ZKfU2Zx4NXBO6rmwaQ-f0ZGLlWZuRFQx01XlV-FbzP1SQHZls3U3JvFhmiUuxOuSmOrQ52np2IgthhD9E5acQ7U9QVrIQ-OAv4X7Mah3kSeTyQA-5VB4WkNH6oEPI4nStmtV6WA0F6QEllhQiSKPd_NN6jPglH5xanLRJJpLrD-5W_WX7hXDkZjXOf9GeQIqHj8AU2oOCaZmh87scZ7xnZh5e_m-VBNSEzhxGOOhm8nINqBHrTP_rCoLyTC2-xS_sXxuO2pO-aC59tv7hhLMEWmbqh-SNdZ6iT37r0ZtzdVdqCrJVHAzT0pGF2fclPNTuNaxITVDj2ueuL5w88c-MhZgj7BSElDnC6iZhw1bJQjGlpM8T0J6Dtadb9abju8ClzDE87nkMq-uINITNQzT5tYR2LXXWxI3LxfXdQw216-t4M4JLxq6DN9D4vyfsUu7jhTLpRMxnwU7PYLKq9GOZD9v68C55HUt5dZ5oxUi58l52PGDdfaFzZRbrltoEOvRdtoFq6KtzQkTY44owPC2mF7W0FOha6ryyOFTD4qA0eHlIju1LemaiKwmL7V9bKnIS45g0j2IwfweBI8OC5ES_D6XZ-Zk6Mj5werXWmU-VewlEzbBDajv9mFJ86SKITfoxRaaDhWv9rajwnX4MLNEM=w666-h888-no
 
Well that put me down a Google rabbit hole... Looks like 25' of 1/2" SStube has a surface area of 3.27 sqft. This companies 3 ton chiller claims 3.55 Sqft of chiller area... And in a much smaller footprint. I can't honestly say mine will cost much less than 1 - 2 hundred when done anyway. I can upsize to the 3.5 and still stay in a reasonable price range. I see you moved to a commercial unit as well, recomendations? seems your unit is massive compared to these numbers i'm getting. https://chillxchillers.com/heat-exc...WuoNZdZXatqwTAbYdyDefgOegi1aRY2BoC010QAvD_BwE
stainless-steel-shell-and-tube-heat-exchanger-both-shell-port-configs-no-text-800x800-compressed.png

Avoid this... not long enough between the flush ports.
 
Regarding Kal's panel and RIMs or 240v... i originally built out the dual element 50amp panel and moved to RIMs later. I simply glued another SSR at the top and dropped in another contactor switch... already had a PID for "mash" that isn't used in Kal's design.

Mine is now a bit customized, but it runs the 240v 2500watt RIMs tube just fine. I can even turn on the HLT 3500watt element, 25000 watt RIMs, and 5500watt HLT at the same time for when i'm double batching. I also wired a second 5500watt element in the HLT that can be turned on if the HLT is off... so I can bring HLT water up to temp much faster.

The panels are what you make of them.

cubv5shEkGNSL4yPjU3ni4JqSEL7B-EhEIGCPmeb5_PsHluVu7rXqSzZ8VXrMNY6cWwePWHF496W4gRHiQx4mebyxps91pmq8EDOKWn1IQZ0pQjEj3t51kv6neEo2kuMKCxGzCa-nQ=w2400

That is EXACTLY what I need. How do you handle switching the second HLT element on and off without blowing the 50amp limit? Any chance a shot at the front of your panel for your interface layout? looks like you fond some smaller Contactors and DC supplies? Its a shame that Kal is charging $100 more than Auber for the same panel... But Auber doesn't offer the one drilled for four Elements, Haven't tried calling them yet though. Are you running a DC water pump?
 
Last edited:
That is EXACTLY what I need. How do you handle switching the second HLT element on and off without blowing the 50amp limit? Any chance a shot at the front of your panel for your interface layout? looks like you fond some smaller Contactors and DC supplies? Its a shame that Kal is charging $100 more than Auber for the same panel... But Auber doesn't offer the one drilled for four Elements, Haven't tried calling them yet though. Are you running a DC water pump?

I ran the power the enables the 2nd HLT's contactor through the boil kettles switch but with the Normally Closed attachment. you can fit two of those NO or NC dongles on the back, but you can stack more. so I ran a circuit that basically only enables the contractor for the 2nd element if the BK is "off" as safety. then I made my primary element in HLT a 3500watt. that with the 2500 RIMS and 5500 HLT is just about 47amps.

this let's me start my brew day by using 9kw to heat the strike up while I hookup hoses.

you could do something similar with a single element panel by just borrowing the BK plug and connecting it to a second element in the HLT. the main thing is to calc the total watts/amps and make sure you don't exceed any components. I have a 50amp wall GFCI, a 60amp main contactor, then 25 amp contractors on each of the 4x elements and 25amp breaker on each. this hopefully protects the wiring, and me from myself.
 
when I get back I'll post some more detailed shots... I swapped all the normal stuff out for DIN so it would be tighter... was running out of room. also easier to replace bad parts (fingers crossed). plus, things like another 12vdc supply for a small water pump slide in.
 
when I get back I'll post some more detailed shots... I swapped all the normal stuff out for DIN so it would be tighter... was running out of room. also easier to replace bad parts (fingers crossed). plus, things like another 12vdc supply for a small water pump slide in.

I've been looking at Kals 30+ gallon Box for the past week or so... It seems with the larger contactors even with the DIN components there is not quite room for four contactors, I had given up on the dual element HLT plan But had figured out how to fit three elements worth of breakers etc on the Rail. With the smaller components you found looks like four DOES fit!
 
I ran the power the enables the 2nd HLT's contactor through the boil kettles switch but with the Normally Closed attachment. you can fit two of those NO or NC dongles on the back, but you can stack more. so I ran a circuit that basically only enables the contractor for the 2nd element if the BK is "off" as safety. then I made my primary element in HLT a 3500watt. that with the 2500 RIMS and 5500 HLT is just about 47amps.

Looks like my HLT is 2 x 4500w, RIMS is 4500w and BK is 4500w. So even with only one HLT element firing that's still 62Amps on my system. Guess I need to give up on that dream unless I want to hardwire to a dedicated panel. BUT, if I had an HTL1/RIMS switch and a BK/HLT2 switch I could get pretty good flexibility on the system while staying around 41Amps draw for the main burners.
 
I ran the power the enables the 2nd HLT's contactor through the boil kettles switch but with the Normally Closed attachment. you can fit two of those NO or NC dongles on the back, but you can stack more. so I ran a circuit that basically only enables the contractor for the 2nd element if the BK is "off" as safety. then I made my primary element in HLT a 3500watt. that with the 2500 RIMS and 5500 HLT is just about 47amps.

this let's me start my brew day by using 9kw to heat the strike up while I hookup hoses.

you could do something similar with a single element panel by just borrowing the BK plug and connecting it to a second element in the HLT. the main thing is to calc the total watts/amps and make sure you don't exceed any components. I have a 50amp wall GFCI, a 60amp main contactor, then 25 amp contractors on each of the 4x elements and 25amp breaker on each. this hopefully protects the wiring, and me from myself.
this is also what I'm doing on both my systems. at home I use a 4500w HLT and a 1800w rims and both are on at the same time running off a 30a circuit. (If the rims was 120v it would draw twice the amps making this impossible)
my 5500w BK is using the NO/NC relay contacts to only allow either my hlt/rims to be active or BK at one time.

at the brewpub I have 2 60a feeds and needed to do the same due to 120a of power and 206amps of total element draw if they were all on at once.
 
Looks like my HLT is 2 x 4500w, RIMS is 4500w and BK is 4500w. So even with only one HLT element firing that's still 62Amps on my system. Guess I need to give up on that dream unless I want to hardwire to a dedicated panel. BUT, if I had an HTL1/RIMS switch and a BK/HLT2 switch I could get pretty good flexibility on the system while staying around 41Amps draw for the main burners.
if your 4500w rims is a 240v element then it only draws about 18 amps... with one HLT firing to raise to sparge temps while your 4500w rims is going your only looking at 34-36 amp draw total... I used to run a 2000w rims at the same time as my 4500w HLT and even with the panel and pumps it was always below 30a.

there has never been a point in my brewing history where I needed to have my HLT ,rims and BK all on at the same time... The only time you would is if your doing a double batch brewday...

If you heat up your HLT water hot enough you probably would never need that scenario. I can't mix hot/cold water because i'm using RO... so i need my HLT to be the strike or sparge temp if i'm doing any kind of double batching. Single batch brew day would be fine... once the wort sparge/runoff allowed turning the BK element on I would probably not need HLT heating anymore. I used to have a 50amp dual element setup and did single 10-15gallon batches. I found myself doing more back-to-back 5g batches... usually 3x in a brewday so i can vary malt bills or have different styles going. That led to redoing the panel to allow back-to-back (having everything be able to be "on" but only one element, rather than firing two 5500watt elements in HLT or BK).

I usually do at least 2 brews a day, so when doing back-to-back brewing i'll have my BK boiling, my RIMs tube maintaining a mash, and the HLT 3500w element keeping hot water at 170degF and/or the strike of the next mash-in. It's nice to be able to have all 3x... i could probably insulate the HLT, or heat it to 212 and turn it off if i had a mixing valve with cold RO water.
 
I've been looking at Kals 30+ gallon Box for the past week or so... It seems with the larger contactors even with the DIN components there is not quite room for four contactors, I had given up on the dual element HLT plan But had figured out how to fit three elements worth of breakers etc on the Rail. With the smaller components you found looks like four DOES fit!

I believe Kal offers the kits with DIN components now, and they're prob a lot cleaner than my setup. You can def fit all the breakers and contactors no problem, i was able to put them on a single rail. That allowed me room for the 120V breaker, safe-lock, and Power Supplies on the top of the box.

Some things I did differently...
1) adding another SSR at the top for the RIMs, wiring this to the "mash" PID through a flow switch using a stereo headphone connector (got idea from Auggie). This way the RIMs element only fires if flow is present, less risk of scorching
2) Changed out the element switches for ones that have LEDs in them so i could have more room for more switches. Now the LED for the switch fires with the element. Having an element "on" LED next to a switch took up too much room.
3) Created a "HLT 2" for the 2nd element in HLT... wired it through a NC block on the BK switch so either BK 5500w is on or the HLT 5500w is on. The safe-lock circuit also goes through here to protect me from myself
4) Added a 3rd pump... for HLT, i used one of those little 12vdc pumps to recirc water in the HLT, used a DIN rail power supply and a little head-phone jack sized power plug for this.

I ordered my DIN components from a mixture of places.. I know i got some from Kal, amazon, ebrewhardware, and ebay.. The rest i sourced from amazon/ebay... looking at model numbers to get dimensions. It's not as tight as I thought it was going to be. The biggest space savings was using 25amp relays and contactors... 30 was slightly bigger and i'm not firing that much off one port anyway. You can even extend the DIN rail past the back sheet if you needed to... but by converting all the components to DIN i saved a ton of space

Here's the links for the stuff I bought that I can find in my history, in case it helps:

12V DC:
https://www.amazon.com/gp/product/B00DECZVY6/ref=ppx_yo_dt_b_search_asin_title?ie=UTF8&psc=1

5V DC:
https://www.amazon.com/gp/product/B005T6RBSO/ref=ppx_yo_dt_b_search_asin_title?ie=UTF8&psc=1

25A Breaker i used for each element was this one (type "C"
ALTECH 2BU25R 25 AMP CIRCUIT BREAKER - 2 POLE, 25A, DIN RAIL, 480Y/277 VAC

6A breaker i used for the 120v stuff:
ALTECH 2BU25R 25 AMP CIRCUIT BREAKER - 2 POLE, 25A, DIN RAIL, 480Y/277 VAC

the 25A contactors i ordered:
https://www.amazon.com/gp/product/B01EJ38RDA/ref=ppx_yo_dt_b_search_asin_title?ie=UTF8&psc=1


I can't find the 63a, but i don't recall the spacing/sizing being crazy on any of those. I def purchased the safe-lock from Kal and din rails themselves. I'll see if i can find a pic of the bottom and top to throw in here if it help.

Pic of the front:
wFZkvURpzSYZHNpSH2haYQUrzRRDkksY0IR9gcxnifnDvqZhL0IZC5Srk5ZBKJqcOFlo3E86C4hKnFKMWKDffZDIiC2_-m5KoSIAzo1FXnKus0rKMVxkVyy-Rfi89p70rgi4nxWDrQ=w2400


Panel before converting:
c4f5h-oHjF_IcoXSdQaa2_9VBrHPHszyYw8mb3mYbI4T0da7sjohWxnlFHcjAizEToWeciSlFdXq7pz4ql1nkH9_rG_TxXORlD-wI_0zQuXeqoJ1HLnzXynUqJ4N_HjsvXO42q2Mew=w2400


Panel after DIN upgrade:
htK7p6ZNROBBdnnzmqz5seZQVYNk3H1jxAq1Ay2V1qvz941EyFOiwXIct8uhZ_aAnyA_fG3pD1Pgbmyr2Bhq7bsz4EGuzchjRa6TMC60CkIPrU4NF8Hcb3aeFP4cjVomvGKdguXOUQ=w2400
 
Thanks Postalbunny! that has been incredibly helpful! I Have a list of parts basically together. A mixed order between Auber and Kal's shop. I will be using the four 22mm holes in the bottom for element indicator lights, HLT1, HLT2, BK, and RIMS. top row will be a lighted switch for Water pump, HTL1/RIMS selector, HTL2/ BOIL selector, and Lighted switch for Wort pump. I am thinking of swapping out the "alarm" LED for a "System ready" light inline with the safety interlock. Debating if I want to buy all new EZBoil controllers or stick with the normal PIDs, But the EzBoils have a built in alarm(I think), so alarm circuit might be redundant and I will not be buying a timer or the volt amp meter just yet to save some upfront cash. . My 240v Rail will be identical to your setup.

I will be ordering the panel from Auber. their heat sink is already drilled for three sinks. and included with handles for $150 less than Kal... Only problem is I will have to drill the bottom myself as Auber only sells a panel for the 30amp setup. A bit of elbow grease will be needed but at least the front panel will be ready to go.
 
sounds like fun... as for the PID, I'd recommend going with the ezboil. the knob makes adjusting temp easier, and there are some more fun things you can do like ramp, etc. I got mine in a kit from Kal so I had the basic setup. I replaced then timer with one from auber because I had it already and liked it better (alarms for each addition, programmable additions)
 
Back
Top