Getting back into brewing, want to upgrade system

Homebrew Talk - Beer, Wine, Mead, & Cider Brewing Discussion Forum

Help Support Homebrew Talk - Beer, Wine, Mead, & Cider Brewing Discussion Forum:

This site may earn a commission from merchant affiliate links, including eBay, Amazon, and others.

r8rphan

Well-Known Member
Joined
Dec 5, 2010
Messages
2,104
Reaction score
59
Location
Shingletown
It's been about two and a half years since I brewed, but I want to upgrade my system and start again..

I've always hated the inconsistency of using a cooler for a mash tun, and the hassle of cleaning it out and all... I'm also getting kind of old and have some spine issues, so I want to avoid the heavy lifting as much as possible..

Anyways, I want to go to an all electric, single kettle BIAB system.. and save the propane set up for the event of a SHTF/societal collapse/zombie apocalypse.. I can use it to make bottle bombs.. lol

Anyways, I have an extra sanke keg that I want to use as my kettle if possible to avoid buying one..

So my plan is to use the tapper connection as a drain/outlet on the bottom.. I plan to turn the keg upside down, use a tri clover fitting to attach the plumbing and then cut the entire bottom off of the keg (now the top) just below where the handle ring is welded, using an angle grinder.. I will have probably 5-6" underneath the basket for a heating element and false bottom (full immersion of basket), so I hope that is enough....

This will allow me enough room to use the turkey fryer basket that came with my turkey fryer (that I bought for brewing way back in the beginning many years ago), and a mesh bag to hold the grains (should hold about 30 lbs or so)

My plan is to build a metal frame structure with a little I beam or unistrut track/trolley on it so I can just pull a block and tackle mounted on the trolley to lift the grains, trolley to next to the kettle, grab the mesh bag and go dump them in the compost bin.. easy peasy...

So, I need to buy a chugger pump ($150), and a PID/SS Relay/heat sink/Temp Probe kit ($40) from amazon, and heater element... I am also tired of dealing with heavy glass carboys.. So I want to buy one of the cheap plastic 15G conicals I see on various Ag or plastic suppliers ($60 plus shipping) and pump directly from the brew kettle (after chilling) into the fermenter which will be on a stand inside my fermentation chamber... I also will need a heater element, but I'm not sure what size is sufficient (I was thinking 5500kw?)


Before I get into my other questions, I wanted to post a flow chart/diagram of brew day and run it past you guys, so that I would not make any 'big' mistakes at the concept level...


After that is nailed down, I'll get into some of my other questions regarding logistical problems I need to solve and nitty gritty of equipment, fittings, parts, etc......

So here is the flow chart... Tell me if you see any problems...
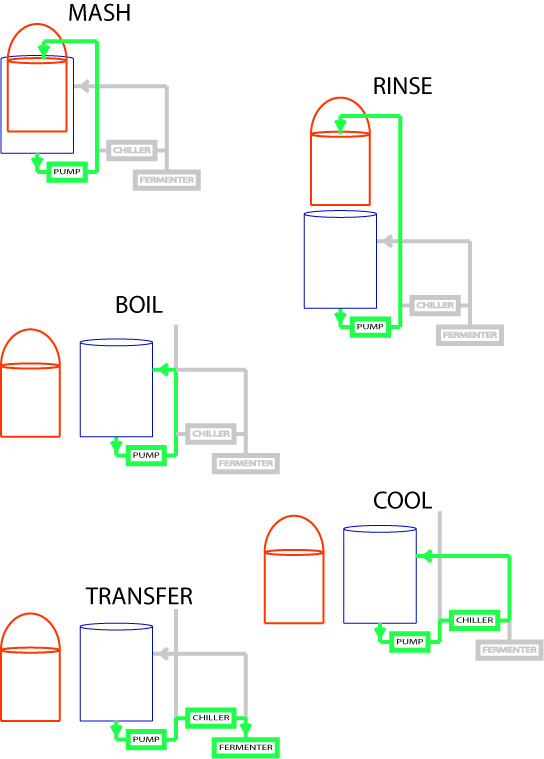
BIAB system.jpg
 
The rinse step isn't doing anything for you, at least when it comes to extraction. I could see it being a Vorlauf perhaps, but if it were me I'd skip it. The benefits are debatable.

Edit: no need to circulate while boiling unless you want to sanitize your chiller and pump before you kill the heat.
 
For the basket, give these guys a call: https://utahbiodieselsupply.com/brewingfilters.php#biab. They can custom make a BIAB basket to your specs, you can even tell them how high you want the stand off legs to be to clear the electric element.

As for cutting out the bottom (now the top) of the keg, I did the same when I built my bottom draining Mash Tun. I drilled a small pilot hole directly in the center of the keg bottom. I then used a wood jig that had a bolt going through it to hold the grinder. I inserted the bolt that was sticking out of the jig into the hole I drilled into the center of the jig and lined up my grinder. That's how I cut out a perfectly centered hole in mine. Try not to cut to much off the top, you'll want a bit of a lip to hold a lid. I used a Pizza pan and let the bottom of the pan sit into the top. I also used 1/2 inch silicone hose, sliced it down the middle and installed it around the edge of the kettle where it was cut out from to form a seal between the pizza pan and keg.

I bought this from Bobby at brewhardware for the bottom drain: https://www.brewhardware.com/product_p/sankebdrain5.htm. the seal he includes with the kit is flat on one side (to mate up with the keg neck) and ribbed on the other side (to mate up with the triclover side).

As for elements, use a 5500watt one. Bobby has those too. There is this one where you'll need to wire it and use an element housing around the electrical connection: https://www.brewhardware.com/product_p/element5500_ripple.htm, and these are the housings: https://www.brewhardware.com/category_s/1895.htm

Or this element that has a TC integrated in it that you use a plug on it, no housing needed: https://www.brewhardware.com/product_p/element5500_ripple_tc.htm.

Both elements are stainless steel so no worries about corrosion.

If you really want to get fancy, you can purchase an enclosure that is pre punched for you to house your SSR, switches, lights and PID: http://www.auberins.com/index.php?main_page=product_info&cPath=34&products_id=501. This one is for BIAB. they even have a tag set for it: http://www.auberins.com/index.php?main_page=product_info&cPath=34&products_id=566


If you want to reference what I did with my mash tun, check out my build process here: https://www.homebrewtalk.com/showthread.php?t=528153

Hope that helps!
 
The rinse step isn't doing anything for you, at least when it comes to extraction. I could see it being a Vorlauf perhaps, but if it were me I'd skip it. The benefits are debatable.


I was always under the understanding that the wort/water temp had to be raised up to as close to 170 without going over as possible in order to 'release' the sugars/enzymes that the mash process extracted.. This is not the case?

Either way, it doesn't change the plumbing, as it's the same for both steps... I am most concerned with making sure I have all routed all the plumbing necessary for the new setup...


I'll have to revisit that idea later, though so thinks.. Something more to look into.. (y)

Edit: no need to circulate while boiling unless you want to sanitize your chiller and pump before you kill the heat.

I just thought it would help with consistency of temp throughout the keggle...

Interesting point about using the hot wort to do the sterilizing.. Maybe I'll plan on doing it through the chiller and everything for the last fifteen minutes or so of the boil regardless for that very purpose...
 
For the basket, give these guys a call: https://utahbiodieselsupply.com/brewingfilters.php#biab. They can custom make a BIAB basket to your specs, you can even tell them how high you want the stand off legs to be to clear the electric element.

Why wouldn't the fry basket that came with my first bayou classic kettle work? Those are pretty dang pricey...


As for cutting out the bottom (now the top) of the keg, I did the same when I built my bottom draining Mash Tun. I drilled a small pilot hole directly in the center of the keg bottom. I then used a wood jig that had a bolt going through it to hold the grinder. I inserted the bolt that was sticking out of the jig into the hole I drilled into the center of the jig and lined up my grinder. That's how I cut out a perfectly centered hole in mine. Try not to cut to much off the top, you'll want a bit of a lip to hold a lid. I used a Pizza pan and let the bottom of the pan sit into the top. I also used 1/2 inch silicone hose, sliced it down the middle and installed it around the edge of the kettle where it was cut out from to form a seal between the pizza pan and keg.

You're not really understanding.. That method won't leave enough of an opening for the grain basket to drop in....

I plan to turn it upside down, and cut the 'entire top' off (from the outside of the keg).. cut the handle ring and dome and all off... cut it right where the handle ring meets the keg... I may or may not weld new handles on the outside.. I won't really ever have any reason to lift it though from where it sits...

I plan to use the old tap fitting as a drain on the bottom of the keg...

I bought this from Bobby at brewhardware for the bottom drain: https://www.brewhardware.com/product_p/sankebdrain5.htm. the seal he includes with the kit is flat on one side (to mate up with the keg neck) and ribbed on the other side (to mate up with the triclover side).

As for elements, use a 5500watt one. Bobby has those too. There is this one where you'll need to wire it and use an element housing around the electrical connection: https://www.brewhardware.com/product_p/element5500_ripple.htm, and these are the housings: https://www.brewhardware.com/category_s/1895.htm

Last time I visited his site, he was just selling sight glasses and a few other odds and ends.. I'll have to visit his site and look over his offerings, suggestions, and prices...

Or this element that has a TC integrated in it that you use a plug on it, no housing needed: https://www.brewhardware.com/product_p/element5500_ripple_tc.htm.

Both elements are stainless steel so no worries about corrosion.

If you really want to get fancy, you can purchase an enclosure that is pre punched for you to house your SSR, switches, lights and PID: http://www.auberins.com/index.php?main_page=product_info&cPath=34&products_id=501. This one is for BIAB. they even have a tag set for it: http://www.auberins.com/index.php?main_page=product_info&cPath=34&products_id=566

I plan to make something custom that integrates into my existing brew platform/stand... I just need to tile the top (that holds the hidden chiller), repaint it, and build a metal cage to hold the kettle and trolley/track for lifting the grains out of the kettle and to the side.. I have a CNC router I can use to make something nice....

If you want to reference what I did with my mash tun, check out my build process here: https://www.homebrewtalk.com/showthread.php?t=528153

Hope that helps!

:mug:
 
Next issue....

I have an enclosed patio that I 'really' enjoy brewing on.. I routed some hot and cold water out there with freeze proof hose bibs a couple years ago...

My fermentation chamber (an old upright freezer I converted) is in the rec room off the patio..

The idea is to not be hauling heavy buckets full of wort, or heavy glass carboys filled with wort all over the place, so I want to pump the chilled post boiled wort from the chiller to a plastic conical in the fermentation chamber...

I have three choices...

1) Leave the stand where it is, and move the fermentation chamber out to the porch, but it's gets well over 90-100 for long stretches in the summer, and well below freezing in the winter.. I don't think cooling would be such an issue (except maybe during cold crash phase), but heating during the winter might, as I currently just use a 60w light bulb encased in a coffee can to heat it with the chamber sitting indoors, inside the rec room..

Anyone have experience with cold climate fermenting? ie their chamber outside in a garage or patio when it's freezing outside?

2) I can move the operation indoors.. Now that it's electric, I don't have to worry about fumes, but steam is still an issue, plus it will be yet another huge thing sitting in the rec room... It will also be more hassle to run the 220v circuit there as I will then be cutting into walls, patching, and painting and all that... I can get hot/cold water from the bar sink...

3) I can brew outside and then pump the wort all the way inside to the fermentation chamber.. It's about 45 feet..

Is that too far? Will it be problematic for wort temp? Since it's already chilled, would silicone tubing still be needed for sanitary purposes (stuff is pretty pricey when talking about such long lengths) or would I be fine with clear vinyl tubing?

Has anyone pumped wort this far? What issues did they run into?.. I guess I'd need to lift the tubing up to drain remaining wort in the tube into the fermenter once the pump stops pumping...

Also, where in this system should I install the temp probe? Can I have it all in one place for all phases, or will I need it in more than one place (ie in the keggle for boil/mash and somewhere else for chilling?

Finally (for this post), I want to think about adding oxygen later, so I want to allow for installing that later on... Where in the system should that be located...

Oh, one more thing.. I have a hops randall, and I'd like to also be able to possibly use that during the chilling phase to add more 'flavor/aroma to the finished beer... If I were to do such a thing, would it be better to put it in the system during chill or during the pump to fermenter phase? Where should it be located in the system during chill phase, pre or post fermenter? Near the brew station or near the fermenter if during pump out phase?
 
Or this element that has a TC integrated in it that you use a plug on it, no housing needed: https://www.brewhardware.com/product_p/element5500_ripple_tc.htm.

I 'really' like that!

Any pictures anywhere of how it mounts and looks installed?

I'm having a little trouble understand how the TC flange attaches to the keg...

Also, will four or five inches of vertical height in the kettle to the bottom of the grains basket be enough room for both the heating element and false bottom?


I'm assuming the false bottom will go 'above' the heating element with some sort of standoff, right?
 
Ah now I understand, you are going to cut off the top below the handles.

As for the fry basket, it will work but i think the holes are to big and will allow grains to pass through. You can use a Brew in the Bag inside of the fry basket (https://www.brewhardware.com/product_p/biab15.htm), like how he is doing it in this tutorial: [ame]https://www.youtube.com/watch?v=tlz_858ooWE[/ame]).

In order to use that TC flange integrated heating element with the plug, you'll need to install a TC flange on the kettle like this: https://www.brewhardware.com/product_p/tc15wlf.htm. It's a weldless one so all you need to do is drill the appropriate home where you want the element to be and install this fitting onto the keggle. To clear the element you might need a falsbottom with legs on it to keep the fry basket or biab bag off of the element (https://www.brewhardware.com/category_s/1826.htm). Talk to Bobby, he'll have a solution for you.

To tag Bobby, I think it's just @bobby_m.
 
I 'really' like that!

Any pictures anywhere of how it mounts and looks installed?

I'm having a little trouble understand how the TC flange attaches to the keg...

Also, will four or five inches of vertical height in the kettle to the bottom of the grains basket be enough room for both the heating element and false bottom?


I'm assuming the false bottom will go 'above' the heating element with some sort of standoff, right?

You need a TC flange soldered/welded/screwed to the side of your keggle to mount the heating element. Best option for someone with good DIY skills is the radiused solder flange that Bobby sells.

You won't need a false bottom if you are using a bag in basket for mashing.

You want to get the element as low in the keggle as possible, and also the bottom of the basket as low as possible, otherwise you will have problems with smaller batches. You only need about 2" - 2.5" between the bottom of the basket and bottom of the kettle. You just want to be sure the bottom of the basket doesn't touch the element.

Brew on :mug:
 
I brew and ferment in my unheated garage. I use an upright freezer and have a little 200w space heater, http://www.amazon.com/dp/B003XDTWN2/?tag=skimlinks_replacement-20. We had a week of single digit temperatures here and it held 65 deg. just fine. If you don't open the door it will hold the temperature very well. My least favorite part in winter brewing is trying to keep my jacket dry when cleaning.

I bought a 100' 1/2" food grade tubing from amazon, to pump my wort 25'. It works very well. I soak it in my starsan batch I had already made to sanitize the kegs for the batch that was coming out of the fermenter. I still used my boiling wort to sanitize my chiller but hooked up vinyl tubing just before transferring.

I would get a $20 ebay pump if I were you. I really find the chugger pump more useful when transferring mash water from hlt to mash tun and whirlpooling at the end of boil. I much prefer my ebay pump for every thing else. Their so quiet and I'm not blocking half the flow to get the flow that I like. The 24v ones are better, http://www.ebay.com/itm/36116338235...49&var=630516827839&ssPageName=STRK:MEBIDX:IT. I use this to power 2 of them and have had no issues: http://www.ebay.com/itm/AC-110V-220...hash=item235fa849ed:m:mGHQzsM2zsbvEUasc4rRv6Q
 
Last edited by a moderator:
I was always under the understanding that the wort/water temp had to be raised up to as close to 170 without going over as possible in order to 'release' the sugars/enzymes that the mash process extracted.. This is not the case?


I just thought it would help with consistency of temp throughout the keggle...

Nope. Not the case at all. The reason people raise the temp to 170F (which is called a mash out) is to denature the enzymes that convert the sugars and halts the conversion process. People who fly sparge are the only ones who typically use this method as their mash times can be very long and it allows them to "lock in" a desired sugar profile (preventing over attenuation).

On the temp consistency issue, boiling is boiling. 212F at sea level. Can't get much more consistent :)

Edit: forgot to mention, if you want, you can rinse the grains with fresh water after pulling the basket. It will increase your efficiency.
 
That's exactly what I was planning to do with the fry basket.. only buy paint strainer bags at the local big box store...

I'll have to look closer and see how he's holding it up in the fray basket.. I was planning on using a large SS band clamp I found on line, but perhaps what he's doing is a better method..


I was looking on his site, and they have some sweat on TC fittings that look really nice..

That heating element is about 3 times what I was planning on paying, but it's so nice, I think I'll budget for it..

Then I just have to pick up a 10/3 wG twist lock extension cord, cut it in two and I can use it to both plug into the outlet on the wall and supply power to the load center on the cart, and also power from the controller to the heater element...
 
Edit: forgot to mention, if you want, you can rinse the grains with fresh water after pulling the basket. It will increase your efficiency.

That's kinda what I was envisioning in the rinse picture I used.. I figured I could run some of the wort through it to kinda knock things loose (maybe stirring it a little as I slowly pull the basket up), and then run the makeup water through it when I fill the kettle to pre boil level...
 
You won't need a false bottom if you are using a bag in basket for mashing.


You know what.. It 'has' been a while.. I don't use one in my current method either.. I collect the mach in buckets and then pour it n, and I had a little contraption I made out of a hops bag, a band clamp, 4 3" to 4" pvc adapter, and a length of copper pipe, and I never had any issues....

Okay cool... That just made up most of the cost in my budget for the upgraded heater element and the sweat on TC fitting....


I've never soldered SS before though.. Only brass and copper.. Is it the same flux and solder as I use for copper sweating?
 
I would get a $20 ebay pump if I were you. I really find the chugger pump more useful when transferring mash water from hlt to mash tun and whirlpooling at the end of boil. I much prefer my ebay pump for every thing else. Their so quiet and I'm not blocking half the flow to get the flow that I like. The 24v ones are better, http://www.ebay.com/itm/36116338235...49&var=630516827839&ssPageName=STRK:MEBIDX:IT. I use this to power 2 of them and have had no issues: http://www.ebay.com/itm/AC-110V-220...hash=item235fa849ed:m:mGHQzsM2zsbvEUasc4rRv6Q

I'm gonna need something like that regardless as my well pumps into a 1000g holding tank and in the summer the water gets warm sitting in the sun.. So when I run the cooling water through the chiller in the summer, once it's gets down to about 75 degrees it's really hard to get it lower and I have to stick the wort in the ferm chamber and cool it for a while before I add yeast...

So the plan is to get a small plate chiller, and once I get the wort down to the mid seventies with the well water, I figured I'd have a small cooler with ice and water in it and I'd use a cheap pump (was even considering a cheap sump pump) to push the ice water through the plate chiller to get the wort down to 66-68 degrees before pitching wort...

One of the advantages I was hoping to do with this set up, is once it hits pitching temp, to pitch the yeast right into the keggle and let it circulate through the fermenter/wort pump for a few minutes with all the chill water turned off to mix the yeast in real good...

I guess this would also be a good time to inject oxygen too???
 
You need a TC flange soldered/welded/screwed to the side of your keggle to mount the heating element. Best option for someone with good DIY skills is the radiused solder flange that Bobby sells.

You won't need a false bottom if you are using a bag in basket for mashing.

You want to get the element as low in the keggle as possible, and also the bottom of the basket as low as possible, otherwise you will have problems with smaller batches. You only need about 2" - 2.5" between the bottom of the basket and bottom of the kettle. You just want to be sure the bottom of the basket doesn't touch the element.

Brew on :mug:

The false bottom in this case is not to keep the grain bed but to keep the fry basket / BIAB bag from sitting on top of the heating element he wants to use in the keggle. Without some sort of "shelf" in there, then the full with of the grains will be sitting directly on that element and that won't be good.

It doesn't have to be a false bottom, could be some stainless pieces bolted onto the fry basket to make "legs" to keep the basket above the element.
 
Have you ball parked your financial investment into this project?

If so, have you considered the Grainfather for around $800?

http://www.grainfather.com/#!home/mainPage

For the most part, around $500... including the conical fermenter (but not the stuff to modify/plumb it)

The Grainfather's all seem to be 5G batches.. I want to do 10-12 like I was before...

For the parts that I will need to get me to what the grainfather does, I'm looking at about $300-350, and bigger batches...
 
The false bottom in this case is not to keep the grain bed but to keep the fry basket / BIAB bag from sitting on top of the heating element he wants to use in the keggle. Without some sort of "shelf" in there, then the full with of the grains will be sitting directly on that element and that won't be good.

It doesn't have to be a false bottom, could be some stainless pieces bolted onto the fry basket to make "legs" to keep the basket above the element.

That's a good point,but I can do that other easier ways.. even by just lowering the basket down to the height I want with the pulley, and tying it off there...
 
That's a good point,but I can do that other easier ways.. even by just lowering the basket down to the height I want with the pulley, and tying it off there...

You could do that, make a mark on the side of the basket to the safest lowered point so you know when to stop lowering.
 
The false bottom in this case is not to keep the grain bed but to keep the fry basket / BIAB bag from sitting on top of the heating element he wants to use in the keggle. Without some sort of "shelf" in there, then the full with of the grains will be sitting directly on that element and that won't be good.

It doesn't have to be a false bottom, could be some stainless pieces bolted onto the fry basket to make "legs" to keep the basket above the element.

Yeah, you need to keep the basket off of the element. SS bolts make good standoff legs.

Brew on :mug:
 
Now I just need to find a deal on a 2 pole 50A or 30A GFCI breaker...

About the cheapest way to get that that I've found so far is via a midwest spa load center which comes with a 50A GFCI for around $70 bucks at lowes or homey D...

I need to put a sub panel on the porch anyways, so I can take the GFCI breaker in there and use it as a main for the whole panel, and then install a 30A 2P to feed the brew stand..

Maybe use the midwest load center on the brew cart with another 30A 2P breaker in it as it has enough space in it for another 15A 1P breaker for the electronics/pump, etc...
 
Oh, and just to make sure, I'm planning on using a 5500w, 240v heating element, and a 40 amp Solid State relay with heat sink, this...

40A SSR Relay with Heat sink

and a PID controller like this....

PID controller and thermocouple

That all sounds sufficient for 15G boils (10G - 11G Batches), right?
That PID appears to be a Mypin TA4, which does not have the manual mode you will need for boil control. You need a TD4 if you want to stick with a Mypin. See this thread.

Brew on :mug:
 
Last edited by a moderator:
That PID appears to be a Mypin TA4, which does not have the manual mode you will need for boil control. You need a TD4 if you want to stick with a Mypin. See this thread.

Brew on :mug:

Good thing I asked! :mug:

So I'm guessing that means you can't set it to 100 degrees and let that be boil? (or here, it would be about 97 since I'm at about 4200')..

But I suppose it's better just to get the right part...
:fro:
 
Good thing I asked! :mug:

So I'm guessing that means you can't set it to 100 degrees and let that be boil? (or here, it would be about 97 since I'm at about 4200')..

But I suppose it's better just to get the right part...
:fro:

PID's (in PID mode) don't do well at controlling boil intensity. They are basically useless for this task. You need to be able to control the % of power, which is what a manual mode allows.

Brew on :mug:
 
You need to be able to control the % of power, which is what a manual mode allows.

That makes sense.. basically like a rheostat so that I can kind of set the right amount of power to keep it boiling but not boiling over... I can just get it there at full power and then back it off to a nice rolling boil...

So, is the last one I posted the version I need?
 
That makes sense.. basically like a rheostat so that I can kind of set the right amount of power to keep it boiling but not boiling over... I can just get it there at full power and then back it off to a nice rolling boil...

So, is the last one I posted the version I need?

Yes.

Brew on :mug:
 
Cool.. So I dug out the old Keg, depressurized it, removed the check valve, and rinsed it out.. Ready to cut the bottom off of it over the next couple days..

I Like the theory of silver soldering the TC fitting on it, and I'm hoping that they make similar sweat on fittings with 1/2 MIP threads for the thermocouple, a sight glass, and another aux fitting or two...

Once I decide how I'm gonna do all that, I'll order it all from Bobby, and then get to work on modifying the keg...

Will pick up some hardibacker, mortar, and grout to tile the top of my brew cart/chiller, and then pick up some 1" square steel tubing to get to work on the cage...

That's enough to keep me busy for a while while I start scrounging up the stuff to install a sub panel out on the porch, and outlet for the brewery, and three or four 120v utility outlets so that ten I can call the porch 'wired' something I've been meaning to do for several years... With even enough power for a future hot tub..

:tank:

So where should the thermocouple be mounted, and how far into the keggle? I could use the sight glass tee, but I'm thinking about installing an analog thermometer there.. I am thinking of mounting that 90 degrees to the heating element.. Should I mount the thermocouple 180 degrees from that?
 
Question about pump elevation...

If the pump is lower than the keggle, but a few inches higher (like 6-12") than the lowest point of the chiller, will it still be able to evacuate the chiller during the transfer phase of brew day?

I know it has to be gravity primed, but once primed is it able to 'suck up' the wort from a point lower than itself until the liquid upstream of it is all gone?
 
Cut the bottom off of the keg, and saved it.. Will probably convert it to a lid at some point...

Basket fits nicely in it...

Putting may shopping list together from brew hardware.. Trying to figure out how many ports I need to solder into the thing...

Would love to find a discount code for this purchase if there are any out there....

Do I want to think about adding a port for whirlpooling down near the bottom somewhere? Is there any advantage to whirlpooling in my set up?....

Still wondering about my pump question in the previous post, if anyone knows...
 
Ordered pump and most of the fittings, heater, etc. from Bobby last night.. Unable to get a hold of him via phone or email, which sucks as I wanted to add some items to the order, but now I got a notice that it shipped...

So anyways, I'm in process of putting together an order on amazon for the PID, relay, heat sink, and probe...

and I want to double check that I am getting the right PID, Probe, and Relay

This is the PID....

PID

and this is the Relay...

Relay/Heatsink

I could not find any probes that have a 1/4" thread for use with Bobby's site glass kit.. (or is it 3/8" thread?), so seeing as I ordered an extra 1/2 spud for the keggle, I'm thinking I could use this Probe... Please advise if this is what I want, as I can not find any info on the PID as to probe requirements, nor output voltage for the Relay...

I want to make sure all of these parts are simpatico..

2" Temperature Probe with 1/2" thread

and these are the spuds that I bought from Bobby..

1/2" Weld Spud

If I could have gotten a hold of him, I could have switched out the sight glass to the 1/2" version which would have given me more options... Hoping this still can happen somehow... Besides, he'll get to sell more stuff this way... ;)
 
Last edited by a moderator:
So just got my order all sorted out with Brew Hardware, and now it's a matter of waiting (which is the hardest part ;) )

Ordered a pump, a TC mounted element with the integral twist lock, a 10/3 pig tail, a sight glass, some spuds and what not, and some misc TC fittings/clamps..

Ordered a needle bearing washer and a couple thrust washers off of amazon to use in building the swing arm that I will use to hoist the grain bucket out of the wort and set it to the side (opted for that instead of a trolley, as it will be cheaper and much more compact)...

Found a great deal on a 2P 50A GFCI Breaker from Amazon...

Tomorrow or the day after I'll be ordering the rest of the electrics.. going with an EZboil controller from auber instruments... and a Mager 40A SSR.... will also be ordering a probe with detachable wires from them, and some switches/lights and possibly a contactor if I decide to go that way...

So now, I just need to pick up some 1" steel square tube to make the support frame/crane, a load center to hold the breakers, a box to mount everything in, make/buy a 10/4 power pigtail to feed the control unit, pick up some ball valves and sweat together the copper plumbing for the system and a few other odds and ends... Also gotta pick up some hardibacker and mortar so I can start tiling the top of the brewstand...

So, while I'm waiting, it's time to get to work on the kettle.. It had some pretty serious stains/deposits baked onto the inside of it, and there's a label on the outside I want to take off.... I started sanding the inside clean by hand yesterday, which works well, but I'm thinking it will be too big of a PITA by the time I get down to the inside and it won't be a good method for the label.. So time to dig out the bigger angle grinder and a wire wheel for it....

If I can find the colors in high temp paint that will work, I'm thinking of painting the outside of the keggle, the frame, and and the wooden enclosure that will hold the control box as well as another box for the pump, all in green and brown camo... Maybe even the fermentation chamber that's already in the house too... It will all be very area appropriate then.. ;)

I'm off to the races now!
I guess it's about time to start a build thread too...

I'll probably use the glass carboys for the first brew or two, then look into the plastic conical and making life easier on that end of things too...
:mug:
 
Cool..

Picked up the steel and subpanel yesterday, as well as the stuff to tile the brew stand, and some ball valves and quick disconnects..

Just finished ordering the SSR and heat sink on ebay, as well as the controller, probe, contactor and all the lights and switches I need to make the control box from auber instruments..

Just need to order the main power supply whip from Amazon, and gather up some more plumbing stuff, a couple of push button circuit breakers for device protection in the control box, and then I should have almost everything on the brewing side over the next couple weeks...

I need to come up with some kind of a workable box to put it all in, but I want everything here in front of me before I even consider that...

Once I get a couple brews under my belt in the new system, I can concentrate on upgrading the fermenting side of things, then later on in the summer go through upgrading my kegerator and kegging/bottling process....

Sweet.... :ban:

Now, to concentrate on the steel crane/kettle stand, tiling the brew stand, and cleaning up the keggle...

:mug:
 
Used the angle grinder with a wire brush to clean out all the stains on the inside of the keg that resulted from leaving a keg sitting in the sun for ten years with a little beer in it.. lol

Removed the label from the outside (had to use the angle grinder/wire wheel for that too)

Might polish the thing up a little.. maybe... Maybe now, or maybe later on down the road after I've been using it for a while....

50A GFCI breaker arrived Saturday, so I ran conduit and installed the subpanel out on the porch this afternoon. I now have a 50A GFCI protected panel out there.. Gotta pick up a L14-30R receptacle some J boxes, plaster rings, duplex receptacles, outdoor covers, and what not to finish wiring the porch out...

Ordered some more parts for the basket lift crane assy...

The electronics arrived from Auber Intruments today.. Mildly surprised at how small everything is... That will make things easier.. Evidently, one of the indicator lights I ordered, I ordered the wrong voltage for... Might reorder one, or just find something locally...

Waiting on parts now... All the kettle hardware and the pump should be arriving from Brew Hardware day after tomorrow...

Need to pick up a couple odds and ends before I can tile the brew cart...

Found a source for the push button panel mount breakers I want to use.. So I will probably order them tonight....

The major thing I am waiting on before I can start on the control panel is the SSR/Heatsink I ordered... It's coming from China.. Same with the terminal strips.. I may order both from a US source anyways, as I want to have an extra SSR just in case, and I can always use terminal strips elsewhere...

I have to nail down a couple of items before I can start fabricating the crane structure, but I'm waiting for a stretch of favorable weather before I dive into that anyways...

Now that I have all the electronics, I can start on a schematic...


Starting to get to the point where I can make a lot of progress.. Pictures to come..

:mug:
 
Back
Top