Finished my motorized mill

Homebrew Talk - Beer, Wine, Mead, & Cider Brewing Discussion Forum

Help Support Homebrew Talk - Beer, Wine, Mead, & Cider Brewing Discussion Forum:

This site may earn a commission from merchant affiliate links, including eBay, Amazon, and others.
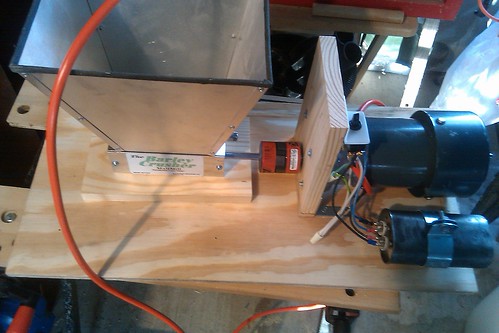
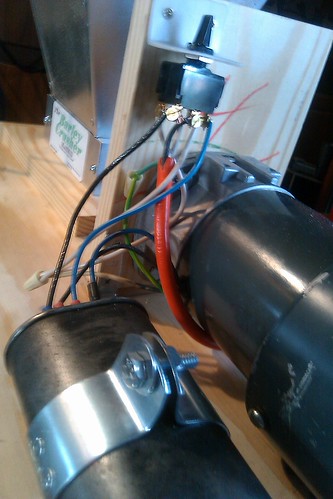
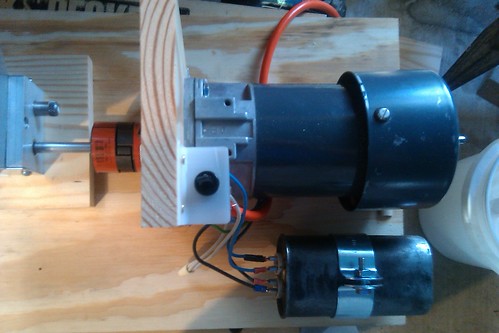
Once the motor is on can you fill the hopper with grain and it still works? I need a motor, would like direct drive just don't know if I should get a bigger motor. If you had to do it over would you get a bigger motor?


I start my motor then fill to the grain to the top of my hopper. I have the 14lb hopper. Motor runs fine with 14lbs of grain in hopper.
 
sweeeeeeet. UPS tracking number says my motor was dropped off a little while ago at my house.

Guess what I'll be doing tonight?
 
I had a pretty frantic shopping trip to Lowe's last night. Their website said they closed at 10pm, and I rolled into the parking lot at 8:45pm only to find that they ACTUALLY closed at 9pm.

I had planned to have more time to meander around and weigh some options and get what I needed for this project, but instead it turned into a mad dash through the store with 8' long pieces of lumber slung over my shoulder.... trying to think fast and hopefully get everything I needed in one shot.

I was mostly successful, but forgot a couple things that resulted in me only really being able to build the cart last night and not tackling the motor mounting. I went light-weight here and built it out of 2x2's and 1x3's, because 2x4's seemed a little too much. I did splurge on a piece of particle board for the top, though. I'm happy to say that my 210 fat ass was able to stand on top of this thing with no issues. :D

motomill_cart0.jpg


The cramped shopping trip actually turned out to be a good thing I think. Since I couldn't mount the motor last night, I had time to play around with the placement of things and really sit and look at it.

I've found that if I flip the motor up-side down, then the drive shaft on it lines up perfectly with the shaft on my JSP MaltMill, so I should be able to build it without any extra pedestal under the mill or motor. I am going the route of mounting the mill on a vertical piece of wood like Tim did here (and that's what I forgot last night... the longer bolts to attach the motor head to the wood.)
 
Nice job on motorizing your mill.

Thats a cool looking thumb you got there. Did you get it stitched up?

No. I carved a trench through it, and a chunk went flying. Too much flesh gone to stitch it. Docs just blasted me with antibiotics, numbed it, dug out the metal shavings, and sent me on my way.

The ER visit cost more than the mill project. :mad:
 
No. I carved a trench through it, and a chunk went flying. Too much flesh gone to stitch it. Docs just blasted me with antibiotics, numbed it, dug out the metal shavings, and sent me on my way.

The ER visit cost more than the mill project. :mad:

You broke safety rule number one;

Never place your fingers where you wouldn't put your pecker.

I hope you heal up quickly plus didn't cut the digital nerve resulting in a numb thumb on one side. All the best bro on a speedy recovery.
You had better change your avitar to a nurses outfit, red garter included.
 
I've never used my pecker to try and hold a small piece of metal while drilling a hole in it, but to each is own

-=Jason=-
 
Sorry about your finger though.

Could have been MUCH worse. Could have lost the whole end of it.... or it could have been my pecker.

I consider myself lucky.

Anyway... enough derailing of this thread. Mill is motorized. Mission accomplished.
 
Walker, congrats on the build and keeping your pecker!
But what were you using that in the build for anyway?!
 
what exactly did you do??

See that plastic electrical wall plate with my switch installed in it?

I originally had a stainless steel one. While drilling through it (and holding the thing down with my hand like a dip****), the drill bit seized in the hole and the plate started spinning like a sawblade.
 
We have all been down that road of drilling disasters too many times.
Hope you have a speedy recovery.

It has slowed me down a little, but hasn't stopped me.

My buddy had a better bottle with a crack in the the bottom. I pulled it out of his recycling bin and did this with it. 6 gallon hopper.

mill_hopper.jpg
 
It has slowed me down a little, but hasn't stopped me.

My buddy had a better bottle with a crack in the the bottom. I pulled it out of his recycling bin and did this with it. 6 gallon hopper.

Nice. What's the RPM of the motor?
 
It has slowed me down a little, but hasn't stopped me.

My buddy had a better bottle with a crack in the the bottom. I pulled it out of his recycling bin and did this with it. 6 gallon hopper.

mill_hopper.jpg

Great idea, just curious though, what the heck did he do to his BB to crack it. I have dropped mine full, empty, partially full, and nothing.

Back on topic, lets say you put roughly 20 lbs in your hopper, how long would it take you to mill it? Reason I'm asking, is that I was thinking about mounting, and motorizing my mill, but it would just be another thing that would be stationary in my garage. I mean, I can grind roughly 24lbs in under 10 minutes with my current hand drill setup, and it takes up little to no space. Just wanted your pro/cons of motorizing. :mug:
 
what the heck did he do to his BB to crack it. I have dropped mine full, empty, partially full, and nothing.
I have no idea how he cracked it.

Credit where it is due: HBT member "Boston" brought over a motorized mill for a group gathering we had last year, and he had used a 5 gallon water bottle as the hopper. I didn't come up with any of this crap on my own.

Back on topic, lets say you put roughly 20 lbs in your hopper, how long would it take you to mill it? Reason I'm asking, is that I was thinking about mounting, and motorizing my mill, but it would just be another thing that would be stationary in my garage. I mean, I can grind roughly 24lbs in under 10 minutes with my current hand drill setup, and it takes up little to no space. Just wanted your pro/cons of motorizing. :mug:

I haven't used it yet, so I don't know how long it will take.

The reason I wanted to motorize was because the mill was taking it's toll on my cordless drill. The drill is a cheap piece of junk and the gears were getting stripped. Plus, the battery sucks and would barely make it through the milling of 12# of grain.

Plus... it's f**king cool. :D
 
That's a really good price on that motor. Did you have to order the coupler on-line or were you able to source it locally?

Grainger carries the lovejoy couplings, but I just ordered them from McMaster. Shipping was only $5, which I would have spent on gas to drive to Raleigh and back to get them.
 
Grainger carries the lovejoy couplings, but I just ordered them from McMaster. Shipping was only $5, which I would have spent on gas to drive to Raleigh and back to get them.

I wonder if they have additional square footage? That's my problem now. I don't think I could fit another thing in the garage. I need a brew building.
 
Nearly finished mine....just some finishing work to do. I'm going to attach a swing leg under the motor so the whole thing will sit right on my grain bucket.

Wired with a SPDT switch so that it's off or forward or reverse

IMAG0038 by chezhedgeo
 
I removed the rubber pads from the original board and put them under this one so it sits in the bucket just like the other one. That's why all my electrical is on top as well. This way I store it and it doesn't take up much more room than the mill did...board measures 12" x 24". I fabricated the capacitor mount from a 2" pipe clamp that attaches to slot racking. I just bent it to fit. You could also buy a capacitor mount from your local HVAC repair shop and mount it directly on the board. Mine is elevated.
Switch bracket is a plastic corner protector from strapping skids.

My motor is mounted "upside down" as the nameplate is underneath. This way I only had to add a piece of 1x to elevate the shaft on the mill.


IMAG0039
 
Ok, This guy has it rght!
Same Mill, Same Motor...
Tried pulleys and belt; no good.
Tried sprockets and chain; no good.
Found this thread and this one on this thread:
http://www.lamabrewery.com/the_mill.htm

WORKS GREAT!!!!!
Had machine shop next door mill a 1" stainless spacer below the mill to line up the motor output shaft to mill input shaft heights.
We wanted 400 rpm but will settle for 177rpm BECAUSE IT WORKS!
Wired the same way with fwd & rvrs switch.

If you are contemplating this project....DO IT!
 
Motor and capacitor arrived yesterday. already have the direct drive parts. next a trip to Lowes for the switches. Plenty of excess lumber in the garage. i'll be putting this on a MM-3 roller
 
Thought you guys might like this.

I am not brewing until tomorrow, but decided to go ahead and try the mill out tonight... just in case. I didn't want to start off tomorrow evening's brewing with a debug session on the thing.

Turned the motor on, dumped the grain into the hopper, and everything went beautifully. As an afterthought, I pulled out the cell phone to take a video. I didn't record the entire grind, but I would estimate that it took less than 3 minutes for 8.5# to go through the thing.

sorry for the crappy quality.... chinsy blackberry video...

 
Last edited by a moderator:
Nice. Just keep your hands away from the moving parts. But you already knew that....
 
I used a 2-1/8" hole saw to cut through a piece of wood that forms a lid for the mill.

The better bottle has a couple of big ribs around the neck. The top rib was pushed through the hole all the way with some decent, but not excessive, force.

That leaves the 1st rib securely under the wooden top of the hopper and the 2nd rib on top of the wooden top. The ribs hug the wood pretty good.

With a little force, I can take the bottle off and re-insert it.

I was expecting to have to do some more work to attach the bottle, but it just worked out really well and stays there with no extra parts.
 
Finished motorizing my MM-3 today. I was all set to build a cabinet, and I stumbled on an old Oak computer stand we bought at Costco some 20 years ago, when we bought our first PC. its perfectly sized for the Mill, has casters. I removed the slide out keyboard shelf, and the printer shelf. It was a nice piece of furniture so we never got rid of it, wife was just storing junk in it, so I hijacked it. I rigged it up like the examples on this thread, and ran a pound of wheat malt through it. it cut through it like butter, the motor never slowed, and the grind looked good

mill-3.jpg


mill-2.jpg


mill-1.JPG
 
I used a 2-1/8" hole saw to cut through a piece of wood that forms a lid for the mill.

The better bottle has a couple of big ribs around the neck. The top rib was pushed through the hole all the way with some decent, but not excessive, force.

That leaves the 1st rib securely under the wooden top of the hopper and the 2nd rib on top of the wooden top. The ribs hug the wood pretty good.

With a little force, I can take the bottle off and re-insert it.

I was expecting to have to do some more work to attach the bottle, but it just worked out really well and stays there with no extra parts.

Thanx Walker, this will be my newest upgrade.
 

Latest posts

Back
Top