(Final Attempt) Switch to AG: Worried

Homebrew Talk - Beer, Wine, Mead, & Cider Brewing Discussion Forum

Help Support Homebrew Talk - Beer, Wine, Mead, & Cider Brewing Discussion Forum:

This site may earn a commission from merchant affiliate links, including eBay, Amazon, and others.
For getting started on recipes, Homebrewtalk has good ones. I have used a few from Ed Wort that were great. I like my Beersmith and you can do almost computer prototypes before you waste time and ingredients. After only two years of using other people's recipes, I feel confident to do my own, even using up leftover ingredients. Again-plugging into Beersmith lets you predict what it will be like. Watch your IBU's! One of the brewers from Deshutes told me that for homebrewing, the bitterness and hop flavor almost always undershoots the expected. So make sure that you are using plenty of fresh hops.
 
Just read as much as you can. Lots of really good information out there.

For rehydrating dry yeast....if your tap water has tons of chlorine, use bottled spring water that you have boiled and cooled to needed temps.

I use bottled spring water for all yeast hydration and yeast starters.

Works nicely.


Sent from my iPad using Home Brew
 
CADJockey, I just wanted to chime in and say that you are getting very good advice here, and that I know that feeling of (a) information overload, and (b) wanting your perfectly drinkable homebrew to be something truly great, that you're really pumped about and eager to share with friends.

Last year I had one of these "I need to up my game" episodes as well. My beers are now coming out of the fermenter better and better each time because of the changes that are being suggested to you here. It's so much more enjoyable once you're over that hump and all the work becomes worth it. You CAN do it!

If you can, stick with your known brewing methods for the time being and work, as has been wisely suggested, on the fermentation side of things: Temp and yeast pitch rate. You can learn the ins and outs of using your new mash tun once you get a really good confidence-booting batch of tasty brew out of your existing methods.

In my case, I built a fermentation chamber (plywood box lined with 3" housing insulation, heated by light bulb in a paint can controlled by a Johnson II controller), started making solid yeast starters using a stir plate (even pitching a Wyyeast smack pack into 4 cups of water cooled after boiling for 15 mins with 2/3 cups DME, 24 hours before your brew session, would be a huge improvement over your current method). These changes yielded a noticeable improvement in the first batch.

As a die hard hop-head, learning to add the bulk of my hops very late in the boil, or after the boil in a hop stand period in order to make an IPA that POPPED with hop aroma was at least as gratifying as graduating from graduate school. Seriously.

Do yourself one more favor - while this next batch is bubbling away in the fermenter, check the sticky in the Yeast forum about "yeast washing." Bam. There's your pitch rate issue solved for the batch after this one.

^ This means the world to me. My questions always end up so annoying and turn into a downward spiral of one dumb question after another. The thread has helped a ton already though. I'll read through that yeast washing... not sure what to expect. I am going to try rehydrating at least. I have never considered making my own insulated ferm chamber like that... I can handle woodworking no problem. I just kept thinking I need a freezer and to get into plumbing and stuff. I'd like to know more about what you did.

Yesterday before the football games started, I was out shopping with my wife and noticed our lhbs was open. So I told her I wanted to stop to pick up a wine thief for the hard cider I started. She doesn't drink beer, or at least I haven't found one that she likes yet...I'm trying. She does help me make beer though, and this was the first time I've taken her to the store. After my obligatory couple laps around the little store looking at equipment I can not afford (let alone have room for), I grabbed the wine thief and put it on the counter. Next thing I know, my wife puts next to it a bag of campden tabs, some 1" tubing, a new airlock, a pound of crystal malt and a bag of caps with little apples printed on them. Then pulls me away to show me the 100 quart brewpot they have and says we should get that when we have room.

I was floored. There was also a lady working the store that day that I have never seen. A little older than the young guys that work there when I normally come; I assume she is the owner or owners wife. She was amazing! Very sociable and knew so much...Told us a few stories and made us laugh, then gave me a hop candy to try before sending us on our way. I felt like a little kid in a candy store yesterday. Time to get some recipes together and do work.

Thanks everyone for the encouragement :mug:
 
Glad you had a good experience. As tempting as it can be to order everything online to save $$, your local home-brew shop survives on your business, and can be an incredible resource of knowledge and advice.

Here's to supportive spouses, too! :mug:
 
If you have temp issues then a Fermentation chamber is needed as an upgrade to your setup. I honestly would not brew if i didn't have one.
 
Nobody talked about aeration yet. Doesn't require new equipment. After transferring to fermenter, seal it up (sanitized hand works fine) and give it a good shaking. Let the foam settle, and do it again. You won't get as much dissolved O2 as with an aeration stone and pure O2 source, but it is sufficient for most beers.

As for ferm temps... when I first started, I took a tiny dorm fridge and made an extension for it out of 2" rigid foam insulation and ducktape. Probably cost 25 bucks for the whole thing, as I already had the fridge. And, it looked beautiful. In an ironic sort of way.

Essentially, I made a box out of the insulation with a removable bottom. Cut a whole in the side that fit the opening of the fridge (with the fridge door removed). Make sure to seal the seams well with duct tape. Also, if you can get the pink panther brand insulation, leave the logo on the outside. It really tied the room together :)

pinkPanther.png


I'd put the carboy or bucket on the removable bottom, put the fridge next to it, and the rest of the box just drops on, so the opening fits the fridge and the bottom is snug in the box.

I ran it with a homemade STC controller, worked really well and made a big difference in my beers. That was still in my extract days too.

What sort of beers are you interested in making? I'm sure everybody would help you build a recipe that fits your tastes perfectly. I'm a big fan of malt-forward IPAs, and its hard to find one that isn't 9% ABV or more, so I made (and tinkered with) a recipe that is exactly what I'm looking for. You can do the same sort of thing. Think of exactly what it is you want in your beer, and folks here will help you achieve that.
 
Nobody talked about aeration yet. Doesn't require new equipment. After transferring to fermenter, seal it up (sanitized hand works fine) and give it a good shaking. Let the foam settle, and do it again. You won't get as much dissolved O2 as with an aeration stone and pure O2 source, but it is sufficient for most beers.

As for ferm temps... when I first started, I took a tiny dorm fridge and made an extension for it out of 2" rigid foam insulation and ducktape. Probably cost 25 bucks for the whole thing, as I already had the fridge. And, it looked beautiful. In an ironic sort of way.

Essentially, I made a box out of the insulation with a removable bottom. Cut a whole in the side that fit the opening of the fridge (with the fridge door removed). Make sure to seal the seams well with duct tape. Also, if you can get the pink panther brand insulation, leave the logo on the outside. It really tied the room together :)

What sort of beers are you interested in making? I'm sure everybody would help you build a recipe that fits your tastes perfectly. I'm a big fan of malt-forward IPAs, and its hard to find one that isn't 9% ABV or more, so I made (and tinkered with) a recipe that is exactly what I'm looking for. You can do the same sort of thing. Think of exactly what it is you want in your beer, and folks here will help you achieve that.

This is pretty amazing. I've read all these threads on ferm temps and people have crazy builds. I'm so burnt out from designing for this aerospace company all day that when I get home and think about fermentation, I just don't want to. I never imagined something so simple. I know I have room to pop the door off a mini fridge and make an insulated chamber. Thought it had to be so much more. I'll have to look into the STC controllers everyone is mentioning though.

As far as beer goes, man I love all beers. I've made a pale ale, IPA, hefe and wheat beer. The best beer to me, is what you said though.. a malt forward IPA. I've had a few hoppy brown ales lately, I think Magic Hat and Sierra Nevada but neither as good as one I had on my honeymoon in November. The bar gave me one on tap that was labeled Hopcity. I expected a bomb but it was literally the perfect malt/hop combo, although I don't know if it was perfect because of taste or if it just tasted perfect because I was on honeymoon with no responsibility, drinking a beer at noon in another country. That being said, I would like to try to make a coffee or breakfast stout some time as well.
 
Do yourself one more favor - while this next batch is bubbling away in the fermenter, check the sticky in the Yeast forum about "yeast washing." Bam. There's your pitch rate issue solved for the batch after this one.

So I read about 10 pages of that thread. It just made more questions but that is way easier than I had imagined. I do just use the little packets of dry yeast though, they are only 2-3 dollars I think; it was never really an issue to me. I do however want to try pouring a new wort right on top of a cake that was just used though. That sounds really interesting to me. I have kind of been thinking about trying a cider or something on top of a cake from a pale or ipa. That way its a cheap experiment if it doesn't work out.
 
Recipe this months brew your own magazine has an Anchor Steam recipe for liberty ale it's a SMaSH recipe 12.5 lbs of pale 2 row and 3 ounces of cascade hops

I am at work and don't have the recipe in front of me I brewed this yesterday very easy to do. I started extract brewing to get basics down sanitation temp control and did a lot of reading on the science and asked questions here. Went partial mash and did about 8-9 recipes that route getting the "mashing" process down all the while adding a larger brew kettle adding a wort chiller a little at a time to finally all grain.

I still do extract and partial mash when it gets to cold to sit in garage though. There have been a ton of great tips and questions and answers here. I am glad I wasn't the only one who was very tentative when taking this on.
 
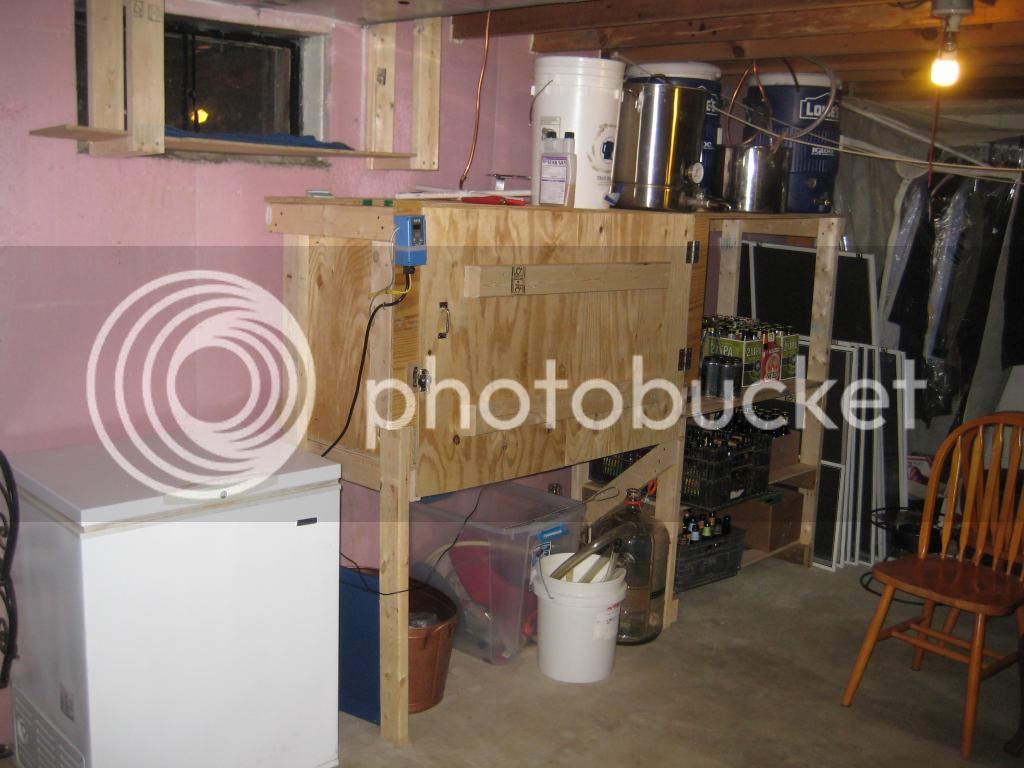
Here's my ferm chamber. I just built a really basic basement shelf system out of 2x4s and plywood from Lowes. One quarter of the shelf area I boxed in. There's room for supplies underneath and on top, and for bottles and finished beer on the right:
IMG_0058_zpse8881f5e.jpg


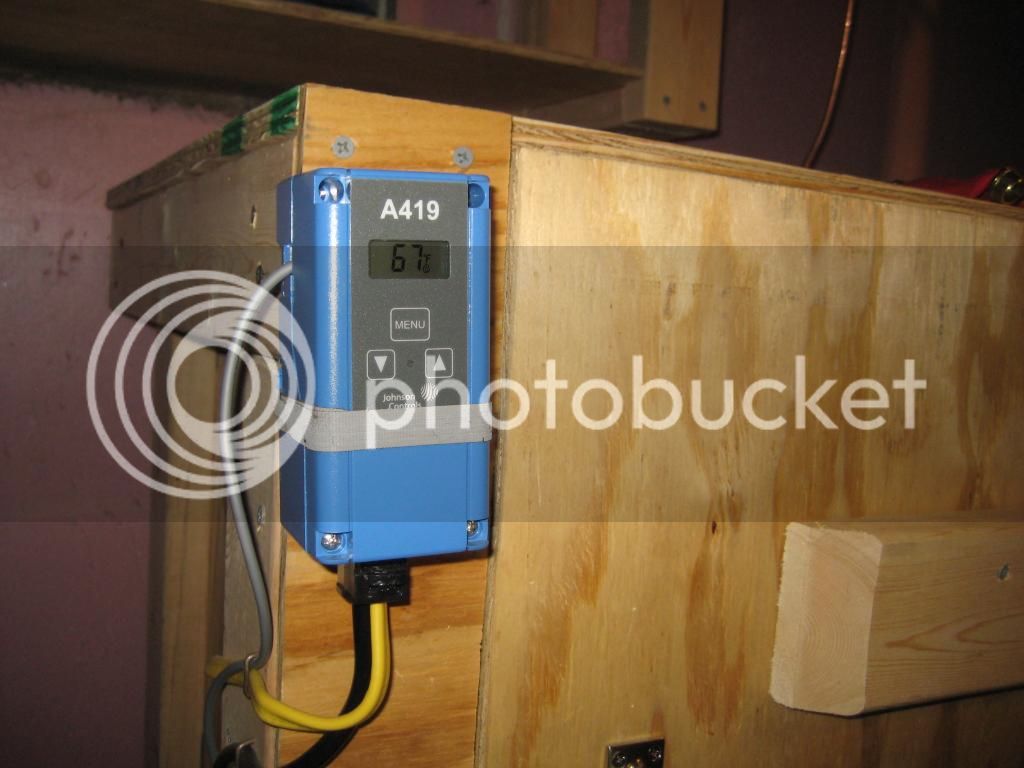
Here's the temp controller, available from any major online brewing retailer. I set the temp and basically forget it. When it senses the temp dropping below the set point, it turns on a light bulb mounted inside a paint can which is inside the chamber. It's a pretty meak heating element, but works just fine for this small, sealed environment.

IMG_0059_zpsaefb704e.jpg


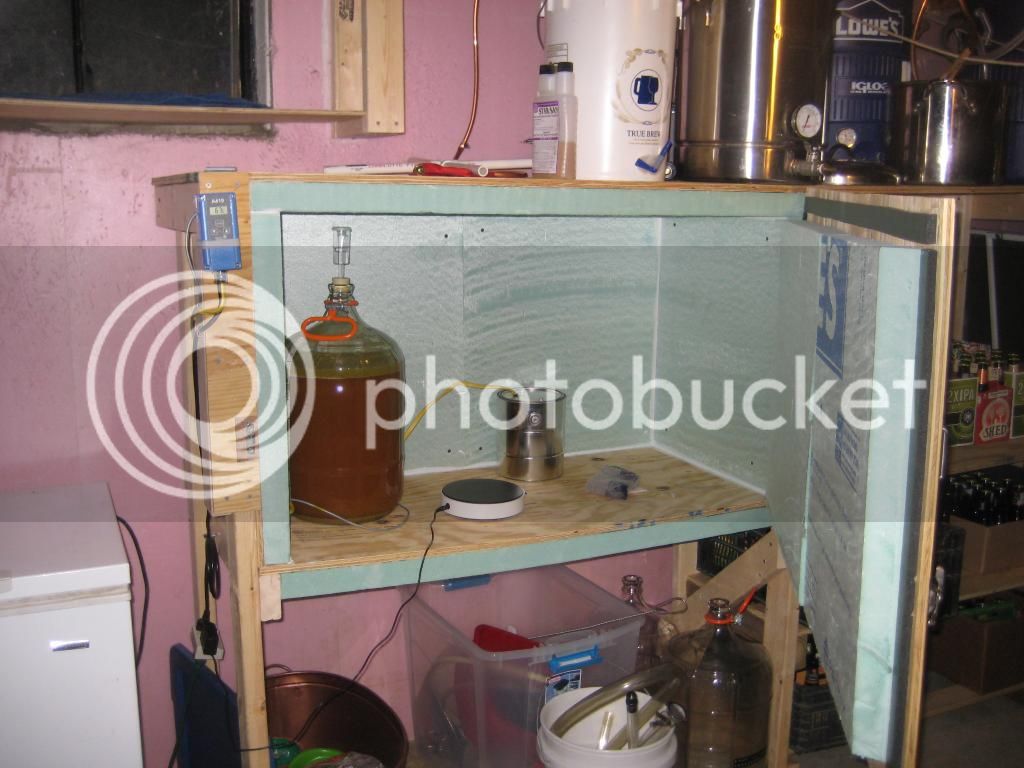
Finally, the inside view. That's a 5 gal carboy, but a 6.5 with blowoff fits, too. Stirplate is still in there from the last starter I was putting together, and you can see the paint can. There's plenty of room for a couple of carboys, and I also put my bottled beer in there for two weeks so the yeast still has that nice happy temp to work with for carbonation. Two weeks in there is plenty, then it goes on the shelf to the right for cooler storage.

IMG_0060_zpscf46381e.jpg
 
Here's my ferm chamber. I just built a really basic basement shelf system out of 2x4s and plywood from Lowes. One quarter of the shelf area I boxed in. There's room for supplies underneath and on top, and for bottles and finished beer on the right:

Here's the temp controller, available from any major online brewing retailer. I set the temp and basically forget it. When it senses the temp dropping below the set point, it turns on a light bulb mounted inside a paint can which is inside the chamber. It's a pretty meak heating element, but works just fine for this small, sealed environment.

Finally, the inside view. That's a 5 gal carboy, but a 6.5 with blowoff fits, too. Stirplate is still in there from the last starter I was putting together, and you can see the paint can. There's plenty of room for a couple of carboys, and I also put my bottled beer in there for two weeks so the yeast still has that nice happy temp to work with for carbonation. Two weeks in there is plenty, then it goes on the shelf to the right for cooler storage.

What a great idea, thank you. Sure wish I had a basement. Soon! Maybe I can make something similar that she can store her endless supply of shoes under so I don't have to kick her out of the little bit of room we have left.
 
^ This means the world to me. My questions always end up so annoying and turn into a downward spiral of one dumb question after another. The thread has helped a ton already though. I'll read through that yeast washing... not sure what to expect. I am going to try rehydrating at least. I have never considered making my own insulated ferm chamber like that... I can handle woodworking no problem. I just kept thinking I need a freezer and to get into plumbing and stuff. I'd like to know more about what you did.

Yesterday before the football games started, I was out shopping with my wife and noticed our lhbs was open. So I told her I wanted to stop to pick up a wine thief for the hard cider I started. She doesn't drink beer, or at least I haven't found one that she likes yet...I'm trying. She does help me make beer though, and this was the first time I've taken her to the store. After my obligatory couple laps around the little store looking at equipment I can not afford (let alone have room for), I grabbed the wine thief and put it on the counter. Next thing I know, my wife puts next to it a bag of campden tabs, some 1" tubing, a new airlock, a pound of crystal malt and a bag of caps with little apples printed on them. Then pulls me away to show me the 100 quart brewpot they have and says we should get that when we have room.

I was floored. There was also a lady working the store that day that I have never seen. A little older than the young guys that work there when I normally come; I assume she is the owner or owners wife. She was amazing! Very sociable and knew so much...Told us a few stories and made us laugh, then gave me a hop candy to try before sending us on our way. I felt like a little kid in a candy store yesterday. Time to get some recipes together and do work.

Thanks everyone for the encouragement :mug:

Glad to hear your wife has bigger dreams for your brewing than you do! Haha. If only my fiancee had dreams of upgrading my equipment.

That's the owner that you were talking to. She's pointed me in the right direction several times when I didn't know what to substitute.
 
Glad to hear your wife has bigger dreams for your brewing than you do! Haha. If only my fiancee had dreams of upgrading my equipment.

That's the owner that you were talking to. She's pointed me in the right direction several times when I didn't know what to substitute.

Oh I've got the dreams, I just live in the reality where we have no room to put anything while she lives in the one where she will pack that house until we can no longer get in the door :) If she was the owner then, I have so much more respect and love for that store. It makes me feel all warm and fuzzy to go in there.

I can't wait to brew tonight, I was going to last night but the kitchen was out of shape. Spent the evening cooking, cleaning, and got everything set up so when I get home from work all I have to do is light the fire. I also used brewersfriend.com for the first time; huge fan!
 
I just moved last summer from a 1000 sq ft condo with no closets, garage, basement, or storage. It was a huge change to suddenly have room for everything. My wife gave me the basement to do with as I please. I have a dedicated brewing space, woodworking shop, and enough room left over for a giant TV and couch. Now she is mad I never leave the basement.

Good luck on the brew today. If questions pop up mid-brew, people are usually fast to respond.

Thats sweet! I found a house for sale near where we work that has a completely finished basement and a FULL bar. The previous owner definitely loved his space. Pushing real hard to make it happen but its all pretty fast after just getting married in Nov.

The only question I think I have left is whether or not to rehydrate my yeast. I've found information going both ways for US-05. There are a lot of people that just say to pitch it right from the packet. A few people that have rehydrated it have had issues. Because of the conflicting ideas with this yeast, I may just pitch as usual and start with the other two small changes: campden tablets and swamp cooler for cooler temperatures. I've always pitched 05 dry and fermentation has always started within a few hours.
 
I'm not proud, but I've just dumped the yeast in without rehydrating. I haven't noticed any problems. I only use dry for ipas though, where the yeast doesn't seem critical as long as it attenuates and doesn't ferment too hot
 
I have a DIPA sitting on S-05 right now that is chugging along in the basement. I haven't had issues with it before with just sprinkling it in, even with a higher gravity.
 
Any thoughts whether or not 3 oz whole leaf nugget hops is enough for 5gal APA? I know you can't really measure or know what to expect from whole leaf. But brewers friend said it too much.
 
I assume you mean that it did not fit the style on Brewer's Friend. (Such a great tool. I love playing with recipes and all the calculators on there...) That may be true. Personally, I wouldn't make an ale with so few hops, but that's me. :) I wouldn't worry about it a bit.
 
Any thoughts whether or not 3 oz whole leaf nugget hops is enough for 5gal APA? I know you can't really measure or know what to expect from whole leaf. But brewers friend said it too much.

For bittering? I'd say that for my beer that would be 3 times what would be needed. I don't like my beers extra bitter.
 
Thanks for the input guys. Had a really smooth go making a SMaSH last night to give the homegrown Nugget hops a test run. Also, it is the first time I used campden tabs and a swamp cooler to control fermentation temps. I've got ferm temp sitting perfectly at 60* whereas previous beers sat with an ambient temp of 72* or higher. I also took the hot wort outside last night in a water bath and got it chilled to 60* real fast before pitching the yeast! Again, previously I was never able to chill it that low before pitching. I hope these are big steps in making a better beer.

It is now 9 hours later and there is no visible activity in the airlock. I am not really concerned yet, I hope to see some action by the time I get home from work later but it is the first time US05 has not kicked it into high gear overnight for me. The one concern I do have though, is that I messed up my recipe slightly... I had made the recipe on Brewersfriend with 6 pounds of DME... I did this because I was sure that is what I had at home. It wasn't until I was in full swing that I realized I only had 5 pounds. That being said, the recipe predicted 1.054 OG and in actuality I ended up at 1.042. Is this going to have a negative effect on the final product, or will it simply mean a lower ABV?

At 60 degrees it may take up to 30 hours to show signs of fermentation. That's the downside of starting the ferment so cool. The upside is better flavors in your beer. It's been reported that US-05 will give a "peachy" flavor at 60 degrees so you might want to let it warm up to 65.

I don't think you'll notice much difference in your beer's flavor with the lower OG but you will have less alcohol in it. Just call it a session beer.:mug:

Aww man I don't want peeeachy! Nobody wants peachy! I thought I was solid getting a steady fermentation temperature at 60*. I'll take the ice jug out when I get home then. I'm thinking that should let it come up a few more degrees and should sit around 65* then.
 
...... There was also a lady working the store that day that I have never seen. A little older than the young guys that work there when I normally come; I assume she is the owner or owners wife. She was amazing! Very sociable and knew so much...Told us a few stories and made us laugh, then gave me a hop candy to try before sending us on our way. I felt like a little kid in a candy store yesterday. Time to get some recipes together and do work.

I found it very intimidating the first few times i went in to my LHBS. At that time it was staffed with younger guys, and i always felt like they were trying to prove to you how much they know about everything without listening to you or helping you understand much as a beginner. One day i was lucky enough to go in when the owner was there and had an experience very similar to yours.

Glad you found the love for brewing again and good luck on your quest to brew better beer. After all isn't that why most of us are on this forum in the first place?

:mug:
 
Thanks guy. I'm having so much fun. I do find it stressful. There is just so much info to be had and when I think I progress, I realize I still could've done something better.
 
I think we're all here to learn something new and improve our techniques. I brew fairly frequent and have been keeping logs of when I do everything just to see what I can improve upon. At least then I can identify where I may have screwed up and fix it the next time.
Brewing's our hobby, not our job. Don't stress out so much over it. RDWHAHB.
 
Excellent post. I think you need to go through a full brew a couple of times until the process is more or less clear in your mind and then the stress level drops considerably. I also keep a detailed sort of journal that helps avoid making the same mistake twice, and is a great place to write down ideas that occur to you that you might forget between brews, observations about your fermentation, etc. Once you start to feel like you're getting it right, it becomes a pleasure - sure, it's complicated and there are a lot of steps but each one takes you one step closer to your delicious end result.

It's like what building one of those kit airplanes must be like; sure, you could freak out about the complexity and the importance of not screwing up along the way, or you could just take your time and enjoy doing every little step just right because you know that at the end of the process, you're going to have this kick *ss toy to play with. :D
 
I recently gave brewing another try this September when I joined HBT and......

- If there is any absolutely necessary equipment I am missing or things to look out for.
- If anyone has any suggestion as to a great recipe to start with. My previous AG attempt was a Hefe, in the middle of summer with unmanageable ferment temps. (result was 60 gushing bottles that tasted like an over-carbonated cider, if you could salvage any of it).

Take a look at this post
https://www.homebrewtalk.com/f36/way-i-brew-beer-all-grain-504231/
 
Hi! Sorry, I did not end up going all grain yet. I realized I did not have the equipment. The keg of nugget smash went really well, had a little leaking but I think it will be an easy fix.

However, I got a 10 gallon igloo with false bottom and fittings for Xmas as well as a picnic tap and a couple kegs. I'm going to get a bigger brew pot and some sort of burner to move off the stove and step up my game. Now I just need to find my first AG recipe. I'm so excited and nervous but no longer stressed. Everyone's help has really lead me to dial in my process and fix fermentation temp issues.

It's go time now.
 
I agree with Foosier. My first attempt at AG ended with 53 12oz gushers(one actually touched the ceiling from the sink) had nothing to do with AG and everything to do with sanitation.
 
Have you thought about getting a Ward Labs water report? The cheaper W-6 kit will contain all the mineral levels you'd care about for brewing. There are plenty of knowledgeable folks around here to point out any water issues you might have, or even just suggest a style that your water profile is most suited for. There are also some great excel spreadsheets out there for you to punch in your results and help you make adjustments. EZ water, brun water, MpH water calculator, etc are all good options.
 
Back
Top