- Joined
- Mar 28, 2010
- Messages
- 501
- Reaction score
- 48
This is too cool, thanks for posting!


'Fraid not. It does not update as your dispense (yet).
Problem is, the cheapest reliable food-safe flow meters with decent precision are $60 ea, plus import fees and shipping. That's more than the price of a corny keg for most of the US!
If you're interested in live keg updates, check out the Kegbot project. So far, they're limited to 2 kegs on a flow meters, and they require an Android tablet for display. Talk about expensive!
If I could find a source of reliable, cheap food-grade flow meters, I'd consider developing based around an Adafruit sheild add-on. Unfortunately, the market just isn't there yet. Sorry.
I have a cheaper solution.
Measure beer going into keg as you keg it. Use a steel sanitized dipstick to gauge.
Tell computer how much beer is in there.
Do the calculation on how much beer flows per second out of your taps at a given pressure. Tell computer this as well.
Install a sensor that lets the computer know when the tap handle isn't in the closed position. Perhaps something as simple as a piece of metal on the back of the tap handle that forms a connection between two wires.
When tap handle breaks the connection, the computer starts counting. Then it does the math and deducts that amount just poured from the total amount.
Would give you a pretty close estimation of what's left in the keg.
")
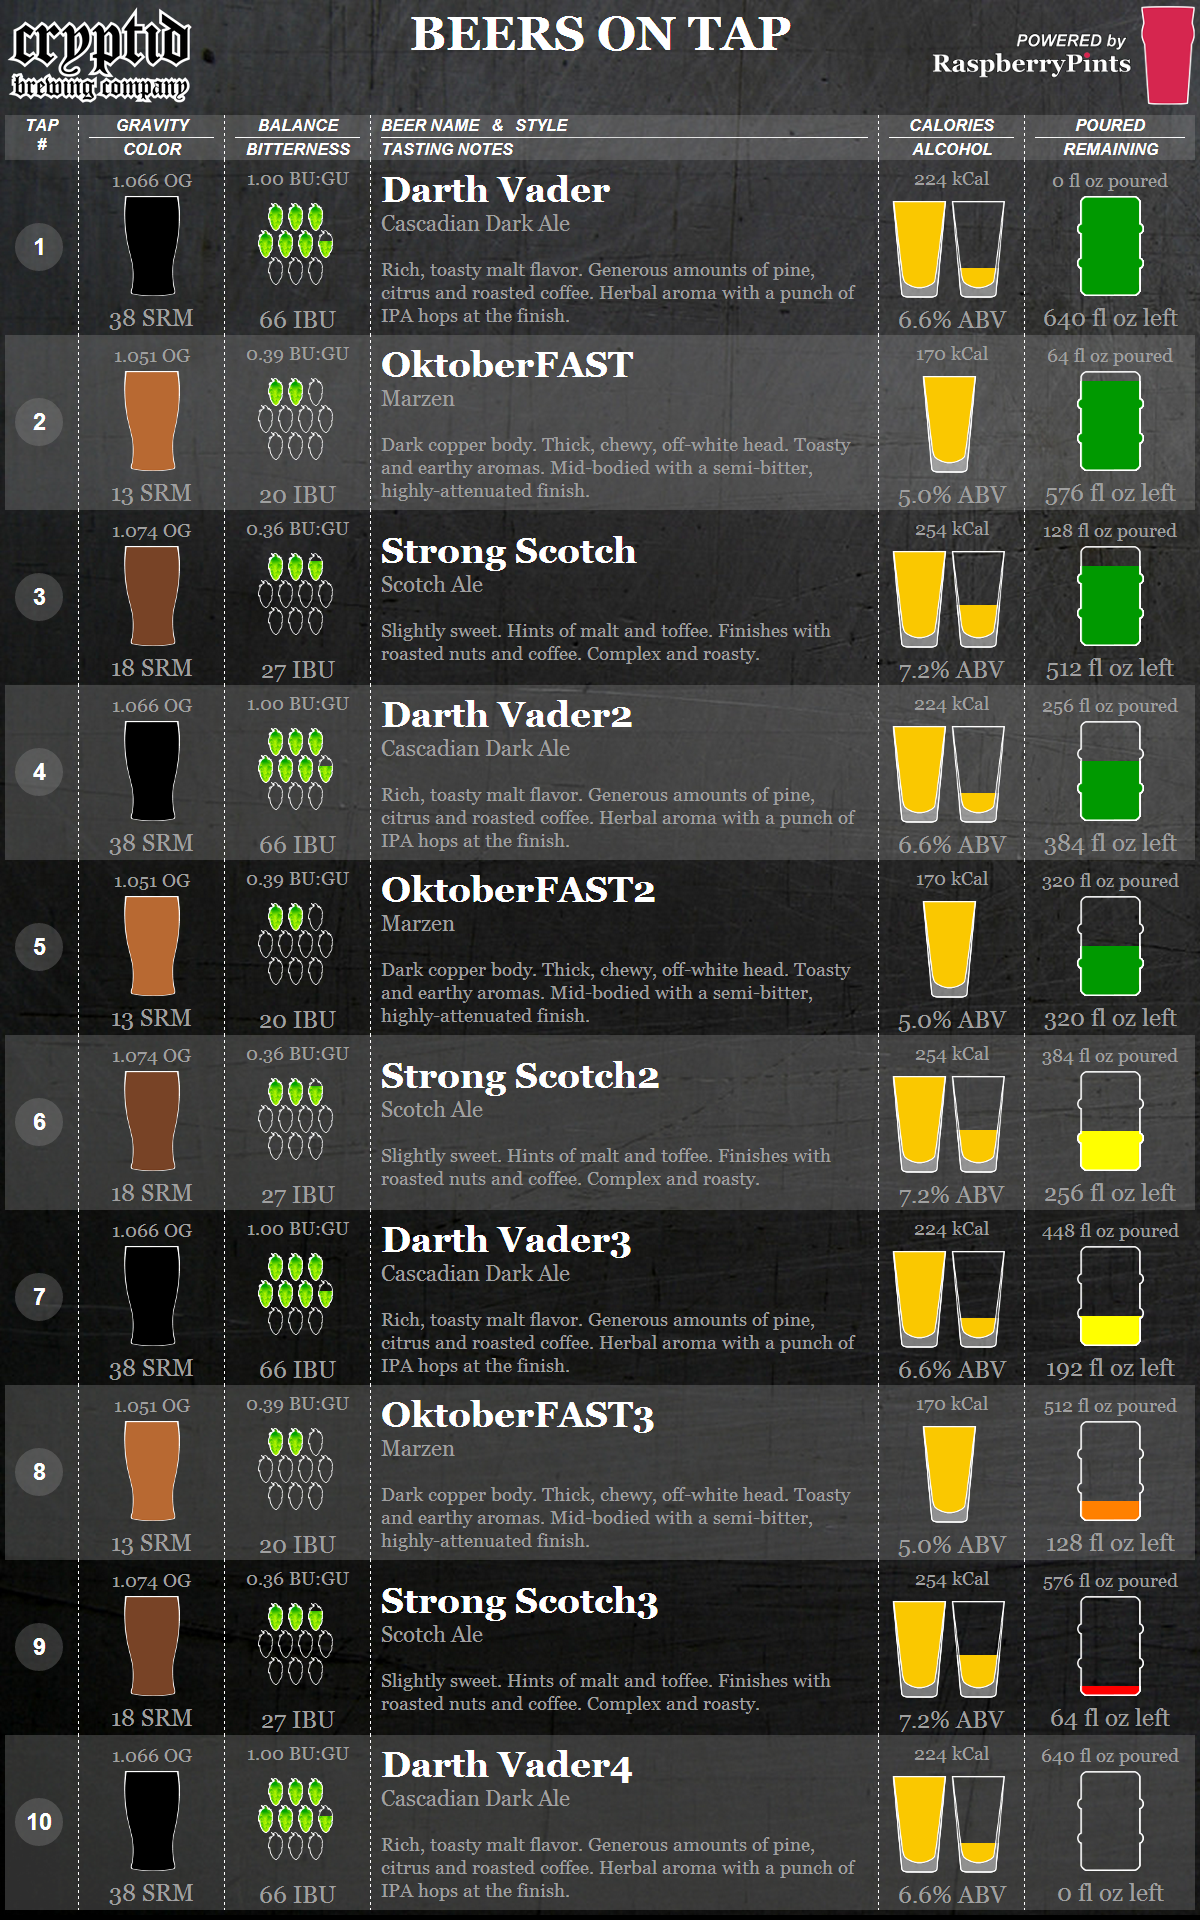
Ok, so I grabbed a copy of this off of Github and it is installed and working on my debian server.
I haven't put it on the raspberry yet as I still have to get that up and configured.
I added two of my own beers and deactivated the three that were in. It is fairly straight forward.
I do have a couple of questions/suggestions....
First is the Calories. That information is not included with most of the kits I have bought, so really, I'm picking numbers out of thin air and putting that in. If its unneeded, the calories field could probably be done away with.
My other question is balance. What is it exactly and how do you decide what the number should be? Again, this is an arbitrary number I just picked out of thin air...
Not to come across as a complete moron, but once this project is completed, would this be doable by someone with no experience?
I noticed that in the css you're calling the images from /img as opposed to img
This works if your digital tap list is in the top of your domain but not if it's in a folder.
Sent from my SAMSUNG-SGH-I337 using Home Brew mobile app
aaahhh...the pains of version control. I should have probably mentioned that you need to do a pull from master before trying to push. That way you can work through any conflicts. Having a bunch of people touch the same file is an exercise in frustration.
If you can't get hold of the "Swiss Flow Meters" are their any alternatives that can be used?
For anyone not sure about the flow meters, and not willing to jump on the ebay train, there's another company that sells refurbished meters for $25 each.
http://swissflowmeters.com/

 . I've never had a single failure or weirdness on any of them. All of them have come beautifully packaged, dust-free, and with zero stuck/deal pixels or scratches.
I have a cheaper solution.
Measure beer going into keg as you keg it. Use a steel sanitized dipstick to gauge.
Tell computer how much beer is in there.
Do the calculation on how much beer flows per second out of your taps at a given pressure. Tell computer this as well.
Install a sensor that lets the computer know when the tap handle isn't in the closed position. Perhaps something as simple as a piece of metal on the back of the tap handle that forms a connection between two wires.
When tap handle breaks the connection, the computer starts counting. Then it does the math and deducts that amount just poured from the total amount.
Would give you a pretty close estimation of what's left in the keg.
A... what? All screens are flat these days. We haven't had bulbous screens since CRTs went the way of the dinosaur.
Updates for today.
www.thadius856.servebeer.com
Table formatting has been fixed. Everything looks normal again.
Project has taken on a new name: RaspberryPints. You can see the new logo in the top-right.
The link doesn't work for me.
I'm confused. Do you mean initially?For this project, the method for determining how much beer is in the keg will likely be by weight, since most of us have a grain scale that can weigh a full keg already.
I'm confused. Do you mean initially?
I thought you said you couldn't use weight because your kegs are touching each other so that would mess up the weights?
And I thought the flow meters were what was going to determine the volume remaining?
My bad, I meant a flat screen tv instead of computer monitor. Thats what I get for posting at work...
The link doesn't work for me.
What displays in the far right "poured/remaining" column if we don't intend to use the flow meter feature?
Are we able to disable/replace the RaspberryPints logo and branding text?
Remove the www. from the front of the link.
I'm confused. Do you mean initially?
I thought you said you couldn't use weight because your kegs are touching each other so that would mess up the weights?
And I thought the flow meters were what was going to determine the volume remaining?
I think he means the initial amount in the keg.
Sent from my SAMSUNG-SGH-I337 using Home Brew mobile app
Got it. I don't have a grain scale, but I have a bathroom scale that would work. Anyway, that sounds great. Thanks.I do mean initially, for determining the starting amount. Putting a new keg in the keezer? Toss it on the grain scale. I'll probably also include a place where you can enter a gallon figure, in case you just want to eyeball it.
The flow meters will have a calibration method and should be accurate to within 1-2%, so the "fl oz poured" will always be right. But without knowing the starting amount in the keg, the image will always be off.
Enter your email address to join:
