Erlenmeyer flask necessary for a stir plate starter? Why not use any?

Homebrew Talk - Beer, Wine, Mead, & Cider Brewing Discussion Forum

Help Support Homebrew Talk - Beer, Wine, Mead, & Cider Brewing Discussion Forum:

This site may earn a commission from merchant affiliate links, including eBay, Amazon, and others.

Brew_Meister_General

Well-Known Member
Joined
Aug 27, 2015
Messages
256
Reaction score
14
Wouldn't it be better to use a beaker or a jug which has a much wider wide body?

What's significant about the erlenmeyer flask when it comes to a yeast starter?

Thanks.
 
Couple things, they just look sciency. They have a flat bottom, they can be boiled and directly immersed in ice water for cooling, they have a narrow neck for a plug of sorts, they are designed for stir agitating......etc etc
 
Couple things, they just look sciency. They have a flat bottom, they can be boiled and directly immersed in ice water for cooling, they have a narrow neck for a plug of sorts, they are designed for stir agitating......etc etc

I think you're right in saying that its designed for stirring, but with a stir plate I imagine there wouldn't be any concern for splashing.

Other than that I can't really see the appeal, it has a thin bottom for the stir plate but how important is that?

I should also mention that they cost about £50 for a 5 litre.
 
I think you're right in saying that its designed for stirring, but with a stir plate I imagine there wouldn't be any concern for splashing.

Other than that I can't really see the appeal, it has a thin bottom for the stir plate but how important is that?

I should also mention that they cost about £50 for a 5 litre, which supposedly has a 65cm diameter so that wouldn't even fit on a stir plate.

Erlenmeyers have the nice flat bottom and are supposed to be from borosiliacate glass so they can be direct heated on a gas flame. That would make them the ideal vessel for making a yeast starter except for some uncomfortable facts.
1. Not all Erlenmeyer flasks are borosilicate glass and may break.
2. As you mentioned, they are somewhat expensive.
3. Erlenmeyer flasks are prone to becoming volcanoes when the boil starts.
4. Stir plates make for a lot of reproductions in yeast...but so does intermittent shaking. Shaking just takes more time.
5. For the same volume, Erlenmeyer flasks are a bear to store. I can fit a couple quart jars in the same space and since I'm not in a hurry, they work just as good with intermittent shaking.

Take a look at this article and let it help you decide if you need an Erlenmeyer flask and stir plate.
http://www.woodlandbrew.com/2015/02/yeast-starters-stirred-vs-not.html
 
Good points above.

Anything you have that has a pretty flat bottom and your stir bar will spin and stay in the middle will work great. I have a one gallon jug that the bottom is pretty flat and it works awesome.

Plenty of items will work, just have to try them.

Out of everything I have used I have broken two different Erlenmeyer flasks, and nothing else.

Don't temp shock whatever your using and you're good to go.

Na Zdrowie!
 
I use a 5000 mL Erlenmeyer Flask for my yeast starters. It fits just fine on my StirStarter stir plate. Yes, there's considerable overhang around all edges, but so what? The stir bar just sits in the middle and works just fine. The narrow mouth makes it easy to prevent contaminants from entering (I cover it with sanitized foil held in place with a rubber band).

I use a regular beaker when rehydrating dry yeast. It also accommodates a stir bar just fine. I still cover it with sanitized foil during rehydration, but since this procedure only takes 45 - 60 minutes (rather than multiple days for the liquid yeast starter), I'm less concerned about contaminants entering through the wider opening.
 
Stir plates make for a lot of reproductions in yeast...but so does intermittent shaking

I came across this on Mr. Malty, what is a good example of intermittent shaking?

When I compared it to a stirrer I found that the stirrer reduced my required starter by 35% on all gravities.

I heard mixing in the flask is a bad idea as the dry DME leaches itself to the glass and therefore should be mixed and boiled in a separate pot, however a funnel might a way around this.
 
Couple things, they just look sciency...
That. I bought two 3 qt. (1500 ml) flasks when some company had them on sale for about $20 with shipping. These are rather thin walled and I wouldn't do the burner to freezer thing with them. I made my stir plate and it kinda works with them (maybe a bigger magnet?), but it works best with a 2 qt ice tea pitcher. The biggest starter I made was about 1500 ml and that was in the flask.
 
Good points above.

Anything you have that has a pretty flat bottom and your stir bar will spin and stay in the middle will work great. I have a one gallon jug that the bottom is pretty flat and it works awesome.

Plenty of items will work, just have to try them.

Out of everything I have used I have broken two different Erlenmeyer flasks, and nothing else.

Na Zdrowie!

The funny thing is, I'm thinking I could just use a flat-bottom plastic jug/beaker instead as it would be as thin as a flask. Worst come to worst I have a 5 litre jug, perfect for home brewing!

Not to mention having to buy an expensive magnetic stirrer, why not just have a look around the shops for something that swivels like a record player (but isn't actually a record player).
 
This is my yeast starter container. Cost was $6.00.
https://www.homebrewtalk.com/photo/new-yeast-starter-container-61619.html
Stir plate in this picture has since failed. Ordered a Stirstarter last night.

I agree, at first I thought of using a 1 gallon demijohn, but then it occurred to me that I'm simply limiting my usage space, why not use a 10 litre fermenting bin so that I have plenty of space for making a big starter and also lots of head space for oxygen when I'm making a starter of 2.5 litres.

Even then I could get a 25 litre bin (with swing arm) so that it has other uses too, or hell why not both, then when I'm not using the demijohn I can use it as a GIANT BOTTLE OF BEER
 
I came across this on Mr. Malty, what is a good example of intermittent shaking?

When I compared it to a stirrer I found that the stirrer reduced my required starter by 35% on all gravities.

I heard mixing in the flask is a bad idea as the dry DME leaches itself to the glass and therefore should be mixed and boiled in a separate pot, however a funnel might a way around this.

How did you do the count to know that yo had 35% more yeast cells?

This experiment by Woodland Brews is where I got my info.
http://www.woodlandbrew.com/2015/02/yeast-starters-stirred-vs-not.html
 
I heard mixing in the flask is a bad idea as the dry DME leaches itself to the glass and therefore should be mixed and boiled in a separate pot, however a funnel might a way around this.

Using a flask is not a new idea. There's a reason they've been used in labs for a billion years. Also, around here, nearly everyone uses a flask to do this exact thing. No leeches have ever appeared :) No problem with the flask. Just put your DME in there while the flask is dry, then add water and stir bar. A funnel is still a great idea, it's what I use.

(this post/thread feels like deja vu; must be a ripple in the matrix)
 
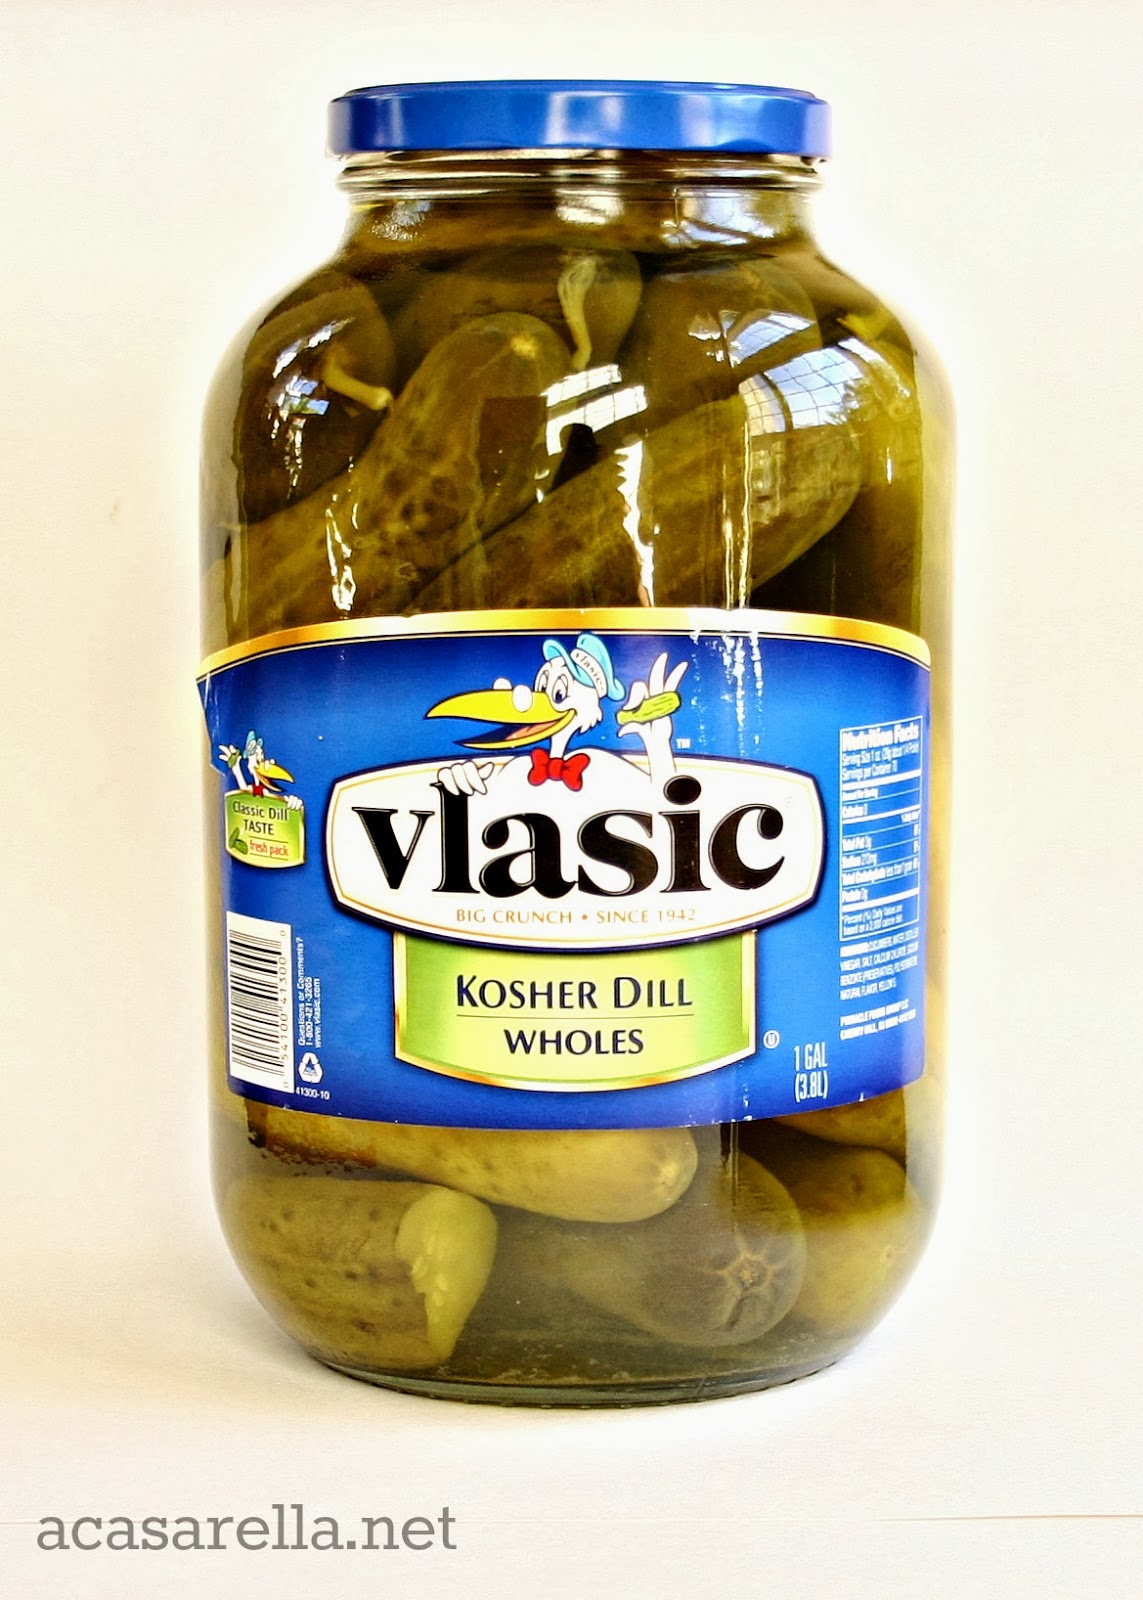
Get yourself one of these. Eat the pickles and you've got a 1 gallon container for making starters.

b.jpg
 
As others have said, the key is a flat bottom. Without it your stir bar will fly everywhere and not stay centered no matter how powerful your magnet is...
 
I have one and may never use it but I look bad ass when I bring it out of the beer closet. Hell, I may sit it on top of the kegger for display! :)
 
BMG, You don't have to buy an expensive mag stirrer. There's a DIY thread on here about how to make it out of a computer fan, a rheostat, some old hard drive magnets, etc. on the cheap. I think mine cost me about $15 USD (thanks IT guys!). Okay I also bought the stir bar. Still not much more than $15.
 
How did you do the count to know that yo had 35% more yeast cells?

This experiment by Woodland Brews is where I got my info.
http://www.woodlandbrew.com/2015/02/yeast-starters-stirred-vs-not.html

Oh I just compared the two on Mr. Malty, only to give me an idea of course, I don't intend to publish these results:

Intermittent Splash vs. Stirrer

1 Liquid Yeast Packet with 22l (6gal) wort:

1.050

IS 1.7ltr
Stir 1.1ltr

1.060

IS 2.5ltr
Stir 1.6ltr

1.080

IS 4.7ltr
Stir 3ltr

1.100

2 Yeast Packets:

IS 3ltr
Stir 2ltr

1.120

IS 4.4
Stir 2.9ltr

= -35% starter (approximately)

Mr. Malty is a pessimist. According to the data from Woodland Brews, the stirred starters will make yeast cells faster but if you can wait a bit longer, the intermittent stirred ones will nearly equal the reproduction. Mr. Malty also wants a much larger starter than necessary. Compare the results from other pitch rate calculators. Mr. Malty also assumes that your smack pack will have much lower viability over time. Woodland Brews has shown that properly refrigerated smack packs lose very little viability.
 
Compare the results from other pitch rate calculators. Mr. Malty also assumes that your smack pack will have much lower viability over time. Woodland Brews has shown that properly refrigerated smack packs lose very little viability.

That is very interesting and good to know. How do you "properly refrigerate" smack packs? Any trick to it or just pop them in the fridge?

Properly refrigerating means that they stay cool from packaging to when you are ready to use them. Shipping them across Texas in the summer and leaving them in the mailbox for half a day would not be good, nor would allowing them to freeze. Mostly, if your LHBS has them in the refrigerator, you keep them as cool as reasonably possible on the way home and then pop them into the refrigerator.
 
Properly refrigerating means that they stay cool from packaging to when you are ready to use them. Shipping them across Texas in the summer and leaving them in the mailbox for half a day would not be good, nor would allowing them to freeze. Mostly, if your LHBS has them in the refrigerator, you keep them as cool as reasonably possible on the way home and then pop them into the refrigerator.

Of course they're not refrigerated during shipping from the manufacturer to the LHBS, and this could be an extended period of time.
 
Id recommend the flask for the ease of use. One container to mix the water and dme, boil it, cool it, and stir it, and pitch it. No cleaning and sanitizing different contsiners and risking bugs.


I have one and may never use it but I look bad ass when I bring it out of the beer closet. Hell, I may sit it on top of the kegger for display! :)

Hey now, who is this?
 
Does anyone use beakers? I'm looking to get a 5000ml so I don't have to step up so much for lagers and was thinking this might be an option.
 
Does anyone use beakers? I'm looking to get a 5000ml so I don't have to step up so much for lagers and was thinking this might be an option.

I had looked at beakers before I went to the inexpensive plastic. The tall borosilicate beakers, which would more stable on my small stir plate, were just to expensive.
 

That experiment was done with a Belgian Pale Ale, which implies it features the kind of flavours I'm generally trying to minimize in the first place (estery, cloves, banana), and his conclusion even admits elevated esters (even above what would already be expected in a Belgian) in the underpitched sample.

I prefer "clean" beers, and any "thinness" referenced in his crude experiment can easily be compensated for by a slight modification to the grain bill or mash temperature. I will continue to overpitch. :)

I'm curious about folks who claim to have a krausen within an hour or two. I've never had that, to my knowledge, but I'm not sure how I'd even know if I did. I aerate my wort with a Fizz-X rod which results in considerable foam (usually right up to the mouth of the carboy), which takes several hours, or even a couple of days, to subside. At a certain point, I notice little brown flecks (i.e., yeast) speckling the foam, and that's my confirmation that fermentation has begun, but that's usually not until at least 10-12 hours later.

How do you distinguish between residual aeration foam and active krausen?

Very nice assessment of that. Seems to be a few other flaws in the method too. I couldn't aggree with you more on the clean flavors. These are the kind of beers I'm am making more of and generally buy.

I use the Brewunited calculator which uses Braukaiser's data. But I too am happier to err on the side of too much rather than too little healthy yeast using the calculators in question.

I like to stack the deck in my favor, use my stir-plate at full throttle, oxygenate every batch, pitch cool, control fermentation temperatures closely.

I don't find the foam from oxygenation sticks around very long though.
 
Why not a 5L flask rather than a 5L beaker?

Well, that's what he's asking but in reserve. He's putting forward the idea that using a beaker may be more beneficial in some ways but not in others, therefore seeking advice in order to make a more informed decision.
 
Does anyone use beakers? I'm looking to get a 5000ml so I don't have to step up so much for lagers and was thinking this might be an option.

I was also thinking of buying a 5 litre flat-bottomed plastic beaker with the preposition that if it doesn't work, I still have a 5 litre beaker to brew with!
 
Mr. Malty is a pessimist. According to the data from Woodland Brews, the stirred starters will make yeast cells faster but if you can wait a bit longer, the intermittent stirred ones will nearly equal the reproduction. Mr. Malty also wants a much larger starter than necessary. Compare the results from other pitch rate calculators. Mr. Malty also assumes that your smack pack will have much lower viability over time. Woodland Brews has shown that properly refrigerated smack packs lose very little viability.

You know what, I agree. I should look up some other calculators instead, do you have links? I googled Woodland Brews but couldn't find a website.
 
Why not a 5L flask rather than a 5L beaker?

The main reason is I found a beaker for about $20 less. But I'm wondering if decanting is more difficult with the straight sides.

Boiling would also seem to be less volcanic in that shape (I use fermcap but still baby those 2l boils)
 
the flask shape vs a cylindrical beaker is advantageous geometrically for both heat conduction and for decanting reasons. I would think the only disadvantage would be increased tendency to boil/foam over due to decreased surface area farther up the neck
 
That experiment was done with a Belgian Pale Ale, which implies it features the kind of flavours I'm generally trying to minimize in the first place (estery, cloves, banana), and his conclusion even admits elevated esters (even above what would already be expected in a Belgian) in the underpitched sample.

I prefer "clean" beers, and any "thinness" referenced in his crude experiment can easily be compensated for by a slight modification to the grain bill or mash temperature. I will continue to overpitch. :)

I'm curious about folks who claim to have a krausen within an hour or two. I've never had that, to my knowledge, but I'm not sure how I'd even know if I did. I aerate my wort with a Fizz-X rod which results in considerable foam (usually right up to the mouth of the carboy), which takes several hours, or even a couple of days, to subside. At a certain point, I notice little brown flecks (i.e., yeast) speckling the foam, and that's my confirmation that fermentation has begun, but that's usually not until at least 10-12 hours later.

How do you distinguish between residual aeration foam and active krausen?
You're right, its just a matter of preference, I imagine overpitching is better suited for lagers say, but like you said even that can be compensated via mashing.

A Fizz-X!? I thought that was for removing gas! Maybe you just turned it upside down :p so how long do you aerate the wort for? Until primary has more-or-less finished?

The only thing I can think of is the brown gunk that sticks to the side of the fermenter as a result of the krausen. Other than that, just the fact that the krausen normally occurs when the bubbling has begun, but even bubbling is not an accurate indication of adaption and attenuation, at least not on its own.
 
Back
Top