asthepenguinflies
Member
For the record, I got my controller from mixtea. It came with the probe. However, it seems to have shipped somewhat more slowly that it did for other people.

FYI, I ordered 3 110v STC-1000s on June 28 from hkaquarium2010. He shipped my controllers the next day and I received them on July 9th. His listing states:
One Set Included
1 x Mini-Temperature Controller
1 x Temperature sensor probe with cable
Wiring diagram for installation
Standard Factory Package
I paid $21/controller. $63 total for 3 controllers. I didn't find any other 110v STC-1000s for cheaper. His current listing is $22/ctrl. I'd recommend this seller to others.
redman67 said:Anyone know if you can extend the wire that the factory probe came with without messing up it's accuracy?
and if so do you need a certain kind/guage of wire?
Thanks!
Anyone know if you can extend the wire that the factory probe came with without messing up it's accuracy?
and if so do you need a certain kind/guage of wire?
Thanks!
DeNomad said:Just wondering how everyone has been routing the probe into their kegerators and keezers. Drill a hole or just open the door and squeeze it against the gasket?
Look forward to pics emjay. I am considering running my probe under the backside of the tower on my kegerator and filling the tower with expanding foam insulation. Anyone have thoughts on that?
What happens years down the line when you decide it's time to replace the beer lines in the tower?
")
And don't forget, you could use an interposing relay with a higher contact rating if this one has the features you want. In fact an interposing relay is always a good idea in a control circuit, it will protect your controller if something goes wrong with your freezer or wiring. Then you just replace the relay, not the controller.
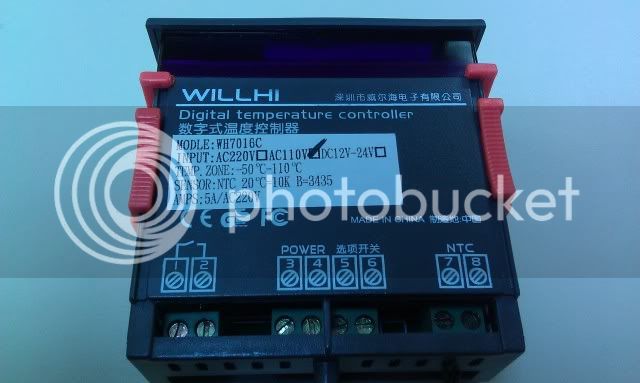
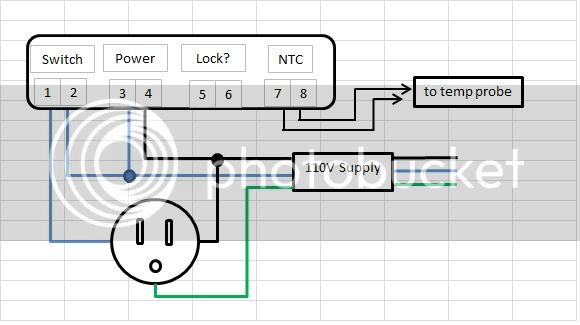
The first diagram looks to be correct for the controller you posted the picture of.
5 amps at 220 V = 10 amps at 110 V. You should not have to use an external relay.
Good luck.
The first diagram looks to be correct for the controller you posted the picture of.
5 amps at 220 V = 10 amps at 110 V. You should not have to use an external relay.
Good luck.
220 @ 5 amps is the same as 110 @ 10 amps.
According to Ohm's law, yes. But when you're talking relays, amps don't scale. If a relay can handle 5 amps at 220 volts, it can also only handle 5 amps at 110 volts. I know the watts are different between those two conditions, but it's the ability for the contacts to make and break connections, (assuming it's not an SSR inside there, but they are usually contact relays...you can hear them "click"). Way back in this very thread this argument raged for the other temp controller, which lists 10A at 220, leading people to think it could handle 20A at 110. It can't...it can handle 10A only....you go much higher and you'll get the contacts fusing.
(To make this point clear...what if you take it to the extreme...do you think this thing could handle 100 amps at only 10 volts?)
^YES! Those are only maximum ratings...you can have any combination of currents voltages, as long as you don't exceed either of the maximums.
And 10A is more than enough for most keggorators, fermentation chambers, ect. That's a steady state current...starting current may be higher, but it's momentary and most contact are designed to handle that large out of phase current.
So with the above comments - will this work for my chest freezer conversion for ferm chamber?
I may have missed something, but if it's 220V, and you're in a 110V location... I think you need the proper controller, or swap out the relay in the controller for a 110V one.
So with the above comments - will this work for my chest freezer conversion for ferm chamber?
As I stated previously, you will need to find the current draw of the freezer. It is usually on the compressor itself, but sometimes the info is on the serial/product number plate as well.
If the rated run/continuous draw is very close to 5 amps, you have to decide how much margin of safety you need to be able to sleep at night. If it is over 5 amps, you should use an external solenoid.
If you are going to keep your ferm chamber where ambient temps will drop below ferm temps, like a garage in winter, you might as well buy the 2 stage controller that is the subject of this thread. You can always use the single stage one you currently have as a thermometer, or for a serving chest since they typically don't need heating.

Anyone order their controller from Skiesmall360 with success? I'm going to try this out.
I did... havent gotten it yet, hopefully it works out my thermostat on the old fridge took a dump and im getting tired of frozen beer in my kegerator!
How long ago did you order it. He has the cheapest price on there, but mixtea seems to have good reviews on here. Just keep me posted.
only been a couple days ago that I ordered it and I have already got a tracking number from USPS... I'll keep you posted on how long it takes.
For people who have built everything into a box, what did you do for strain relief on the main power cord and temperature probe cable?
I'd really be interested in building this if I could figure out how. Is there a parts list somewhere? I don't have the time or patience to go through 180 pages of comments to find them. Thanks for any help!
i just wrapped a bunch of electrical tape around the cord on the inside of the box so it couldn't escape, works just fine.
For people who have built everything into a box, what did you do for strain relief on the main power cord and temperature probe cable?
Enter your email address to join:
