Closed-system pressurized fermentation technique!

Homebrew Talk - Beer, Wine, Mead, & Cider Brewing Discussion Forum

Help Support Homebrew Talk - Beer, Wine, Mead, & Cider Brewing Discussion Forum:

This site may earn a commission from merchant affiliate links, including eBay, Amazon, and others.

What do you guys think about pressure fermentations? Time for a poll.

  • I've done it and I liked it just fine!

  • I've done it, nothing wrong with it, but prefer normal fermentation techniques.

  • I've done it, hate it, and never will do it again!

  • I've never done it, but it is on my list!

  • I've never done anything. I only brew beer in my mind.


Results are only viewable after voting.
A belated (but very enthusiastic) update:

Pressurized fermentation works great for bottlers, too!

My first pressurized batch didn't turn out so well, but only because of gross user error. I dry hopped with a stainless tea ball, but apparently didn't latch the thing properly because I ended up clogging everything with hop debris.

On the 6th of January, I brewed another batch, this time of my house brown ale. Ten days at fermentation temperatures, five days at 32, and then bottle directly from fermentor with a blichmann beer gun. It worked perfectly! The beer was cloudy for the first 12 ounces or so, but quickly cleared. It's two weeks from grain and I've got clean, perfectly carbonated beer in bottles ready to drink.

This is a standard recipe of mine, so I was able to do a side-by-side with a bottle that I did the traditional way. They were quite close, with no noticeable quality differences to speak of. What subtle differences there are all seem attributable to age. The pressurized batch seems to have a slightly cleaner yeast profile, though I suspect that I could just up the temperature into the low 70s if I wanted more esters.

All in all, I am thrilled, and completely converted. A summary of the perks:
* Time, obviously, is the huge advantage. Two weeks grain to glass, rather than five or six via bottle conditioning.
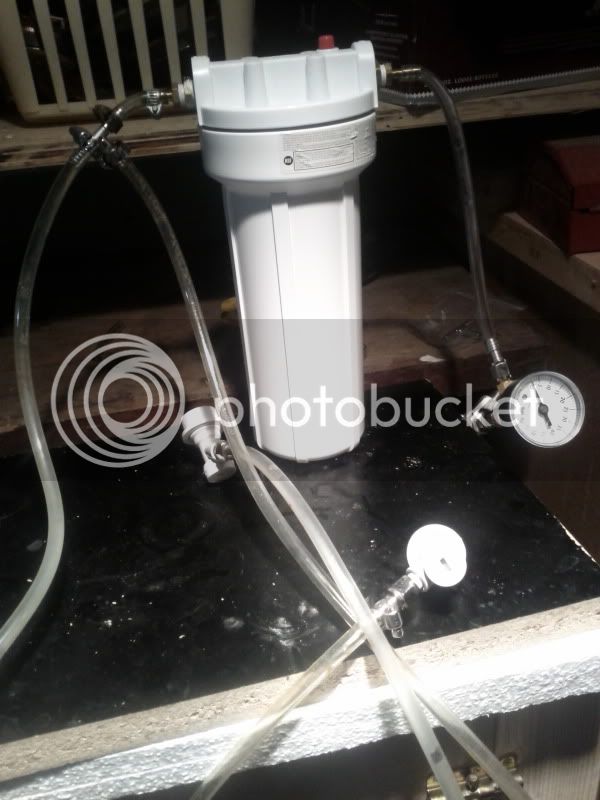
* The beer gets extremely little handling. I transfer from kettle to corny through my recirculation line, ferment in stainless, and then push through the beer gun. There are very, very few opportunities for contamination or oxidation.
* To oxygenate, I hooked up my welding bottle directly to the liquid post on my keg and bubbled some O2 through. I need to sit down and do the math, but filling the headspace to a particular pressure should give me a measurable and consistent level of oxygenation. This way uses a lot less of my tank, too.
* I'm only using my CO2 tank to drive the bottling and (if needed) to top off the carb level during cold crash. This saves me CO2, which is actually a reasonably big deal since I live in Manhattan and getting a tank refilled is a bit of a PITA.

I just ordered two more cornies and will be scrapping my better bottles as soon as they show up!

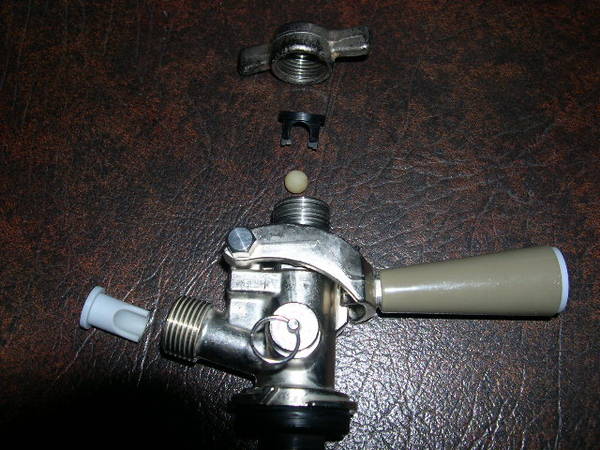
My only reservation is that it seems easy to over or undershoot target pressure levels if I'm not careful, especially since the spunding valve adjustment runs blind. I wonder how much something like this digital relief valve would run. With an accurate flowmeter, it might even be possible to accurately gauge the gravity of the fermenting beer without pulling a sample.
 
MalFet, great news! I have been thinking of doing a write-up for BYO, Basic Brewing Radio, etc for some time now and am going to compile all the data/information to make it as informative as possible. I am approaching the article as I have in this thread, that is as a different way of doing things and not necessarily better (however I will show the time savings and other stuff that allow people to see it may be). I would love to take this system to every brewer so we can really get more feedback on the homebrew scale. I can think of no other way than with the larger media mediums. MalFet, you summed it up very nicely for the reasons I love this technique. It doesn't make better beer, it makes beer easier to make (IMHO).
 
Wortmonger, I'm personally more excited about pressurized fermenation because of the ability to prevent oxidation. I guess you can do it without running up the pressure but I think you might as well get the benefits of rapid fermentation while you're at it.

MalFet, how does a spunding valve run blind? Do you not have a gauge on it? And how do you propose to check gravity via pressure? I'm supposing you are talking about determining when the gas is done coming out?
 
Lennie said:
MalFet, how does a spunding valve run blind? Do you not have a gauge on it? And how do you propose to check gravity via pressure? I'm supposing you are talking about determining when the gas is done coming out?
I do have a gauge, but it only tells me what the pressure is at, not what I have the relief valve set to. If I want to set at 10psi, for example, I have to guess how far to close my valve and check back later. Perhaps I'll get more accurate as time goes on.

As far as estimating gravity goes, a flow meter would tell me how much total CO2 has been expelled, and from this it should be possible to figure our how much sugar has been fermented. Sure would be nice if it works!
 
Wortmonger, I'm personally more excited about pressurized fermenation because of the ability to prevent oxidation. I guess you can do it without running up the pressure but I think you might as well get the benefits of rapid fermentation while you're at it.

I agree with you on the keeping of O2 out through positive CO2 pressure, even if it is at zero it has done its job. As far as more rapid fermentation, I don't really get that myself. I say it is a faster fermentation time, due to the fact you are doing three things at once in the same vessel faster than they would be done each on its own. Fermentation, carbonation, and yeast clean-up/maturation. I know people carbonate fast with forced carbonation, but it takes the beer a while to truly accept the gas and lose that carbonic bite. Still, with this pressurized method and a healthy pitch and O2, you can be over and done with everything in a week. Then crash cool, transfer, and serve the beer in a minimum of two weeks (specific beer dependent of course). I am just responding because I don't see it speed up the rate at which yeast eats sugar.
 
Thanks wort, thought they did but I could not find anything saying that on their website. Found a long thread however with plenty of people taking them up up high in pressure. Sounds more like a legal thing why they don't market the crap out of that feature...
 
To register them as a pressure vessel can be quite an expensive endeavour, taking a couple of months. However, here in Ontario, as long as it is below 15 PSIG, the regulating body isn't interested.
 
MalFet said:
As far as estimating gravity goes, a flow meter would tell me how much total CO2 has been expelled, and from this it should be possible to figure our how much sugar has been fermented. Sure would be nice if it works!

That's a tall order. First you would have to figure out how much gas had become soluble in the beer at that temperature and pressure.
 
WortMonger said:
I agree with you on the keeping of O2 out through positive CO2 pressure, even if it is at zero it has done its job. As far as more rapid fermentation, I don't really get that myself. I say it is a faster fermentation time, due to the fact you are doing three things at once in the same vessel faster than they would be done each on its own. Fermentation, carbonation, and yeast clean-up/maturation. I know people carbonate fast with forced carbonation, but it takes the beer a while to truly accept the gas and lose that carbonic bite. Still, with this pressurized method and a healthy pitch and O2, you can be over and done with everything in a week. Then crash cool, transfer, and serve the beer in a minimum of two weeks (specific beer dependent of course). I am just responding because I don't see it speed up the rate at which yeast eats sugar.

I think you can save some time on byproduct cleanup. I am speaking way outside of my area of expertise but I recall hearing something about partial gas pressure. It occurs in pressurized fermentation tanks and near the bottom of very tall tanks where head pressure is high. I'm not sure what you can reduce. Phenols? Esters? I think you can reduce sulfur. The pressure holds it within the cell wall. Does it get digested by the cell at any point?
 
jeepinjeepin said:
That's a tall order. First you would have to figure out how much gas had become soluble in the beer at that temperature and pressure.

That's pretty simple, actually, and is a calculation that is inherent in every carbonation calculator out there. For pressurized ferments, it's actually quite a bit easier because you don't have to worry about supersaturation.

The real ambiguity would be with carbon sequestered in increased yeast mass. So long as pitching rates are roughly constant though, my hunch is that there wouldn't be a huge amount of variation.
 
I started my first cornie keg pressure ferment last night, 3gal of a British Bitter. Pitched a WLP002 starter and by 6AM it was building pressure, when I swirled the keg it went to 7psi. My challenge on this one is ferm temp, barely enough to keep the high-floc British yeast in suspension. I'm running the house at 65F and hoping the pressure will bring that up a few degrees.
 
MalFet said:
That's pretty simple, actually, and is a calculation that is inherent in every carbonation calculator out there. For pressurized ferments, it's actually quite a bit easier because you don't have to worry about supersaturation.

The real ambiguity would be with carbon sequestered in increased yeast mass. So long as pitching rates are roughly constant though, my hunch is that there wouldn't be a huge amount of variation.

Ok. You got me there.
 
I purchased this relief:

http://www.mcmaster.com/#catalog/118/488/=fy0fa3

After seeing it recommended in this thread. Can someone tell me what kind of fittings I need to use this? looks like 1/8' I think standard couplers on sankey's are 1/4. So I need a 1/4 to 1/8 male thread?

Here is how I understand the setup: Take the sankey tap, remove the part that is in the gas in port to allow gas out, on the gas in port attach the tap to a T connection, one has the pressure guage the other has this relief valve? Do I have it right?
 
Yes you'll need an 1/8" to 1/4" hex adapter. That's the one bummer about this PRV.

Here's my solution. It has a 1/4" tee with the 1/4" gauge, a flare to pipe adapter (both 1/4"), and a 1/8" to 1/4" hex adapter. There's an 1/8" to 1/4" barb on the other side of the PRV.

All bought (the fittings, minus the barb one I had) from beverageequipmentco.com for about $20 shipped.

This should fix my contamination problem. Now I can put a hose barb on the on the 1/4" flare fitting and then can take the hose off and flush it (and the valve) after fermentation and they will both dry out well.

IMG_1215.jpg
 
Sanke, can you say more about your contamination issue? Where was it coming from?

My understanding was that you use a 3gal cornie as a water trap between your fermentor and your spunding valve. Gunk from the valve was flowing all the way back up, past the 3 gallon tank?
 
Sure. I had 3 batches in a row contaminate in exactly the same way. They were all great and smelled wonderful (and tasted good as much as a mouth full of yeast can). Right when I went to cold crash they would turn cloudy. Like not just yeast cloudy, opaque dusty cloudy. At this point they would not only taste 'green' but be a little off, but still drinkable. Anyhoo, I didn't find the source until after the 3rd brew.

For beers that I don't want to pressure ferment until the last couple points, I have a habit of taking the valve off of the corny and putting it directly on the primary after high krausen (both my sanke and my corny have corny posts). I did this all 3 times. I would get condensation that formed in the tubing of my PRV assembly during this time, especially when raising fermentation temp at the end to aid diacetyl rest. This condensation would fall back into the primary and contaminate. I wasn't aware that anything but gas was getting in my valve until I cut the tubing open and smelled death.

Now, I'll flush the tubing and sanitize every time. With the PRV on the other side of a length of tubing that is permanently attached, it's a moisture trap. 'Anything' that gets in there is no doubt going to fester. There was no 'look' to the tubing, it was clear and didn't seem to have any visible film in it, but it smelled like hell once I cut it open.

I'd never had a contamination issue until now so it was weird the way it happened and also that it was pretty drinkable. I guess it was contaminating right at the very end before cold crashing as I would put the valve on about 3 or 4 days or so before that.
 
Thanks Sanke, that makes sense.

I'm interested in setting up some kind of grant between my fermentor and my spunding valve...sort of like what you do with the 3gal cornie, but unfortunately I don't have space for that in my fermentation fridge.

Can anyone think of something that would work? Maybe two quarts, sealable and able to hold pressure, input and output...
 
Sure. I had 3 batches in a row contaminate in exactly the same way. They were all great and smelled wonderful (and tasted good as much as a mouth full of yeast can). Right when I went to cold crash they would turn cloudy. Like not just yeast cloudy, opaque dusty cloudy. At this point they would not only taste 'green' but be a little off, but still drinkable. Anyhoo, I didn't find the source until after the 3rd brew.

For beers that I don't want to pressure ferment until the last couple points, I have a habit of taking the valve off of the corny and putting it directly on the primary after high krausen (both my sanke and my corny have corny posts). I did this all 3 times. I would get condensation that formed in the tubing of my PRV assembly during this time, especially when raising fermentation temp at the end to aid diacetyl rest. This condensation would fall back into the primary and contaminate. I wasn't aware that anything but gas was getting in my valve until I cut the tubing open and smelled death.

Now, I'll flush the tubing and sanitize every time. With the PRV on the other side of a length of tubing that is permanently attached, it's a moisture trap. 'Anything' that gets in there is no doubt going to fester. There was no 'look' to the tubing, it was clear and didn't seem to have any visible film in it, but it smelled like hell once I cut it open.

I'd never had a contamination issue until now so it was weird the way it happened and also that it was pretty drinkable. I guess it was contaminating right at the very end before cold crashing as I would put the valve on about 3 or 4 days or so before that.

How are you flushing that setup that you showed?
 
MalFet, its not cheap but a Hop Rocket would fit the bill I think. Or they do make small moisture traps for compressed air systems.

I would think that if you could just pipe the spunding valve so it doens't drain back into the keg, you'd be OK. Mine is in-line to the angle on the ball-lock QD so it drains back, but with a little longer piece of copper tubing I could bend it downward.
 
Thanks Sanke, that makes sense.

I'm interested in setting up some kind of grant between my fermentor and my spunding valve...sort of like what you do with the 3gal cornie, but unfortunately I don't have space for that in my fermentation fridge.

Can anyone think of something that would work? Maybe two quarts, sealable and able to hold pressure, input and output...


I see some people going to town with a water filter housing. Those are definitely rated for pressure. My 3 gal sits right on the compressor hump of my 7.2 cu Magic Chefs chest freezers.


How are you flushing that setup that you showed?

I just put it together, but I'll slap it on my seltzer keg after a brew to rinse it. I'm also gonna sacrifice a 5 gal corny (I got a bunch when they were still $20, back in the day:(...) and fill it with 5 gal distilled water for a long term keep star san solution (with a little gas). Then I can hit the spunding valve with that and disassemble it and hang to dry until the next brew. I bet that will be enough.
 
Thanks Sanke, that makes sense.

I'm interested in setting up some kind of grant between my fermentor and my spunding valve...sort of like what you do with the 3gal cornie, but unfortunately I don't have space for that in my fermentation fridge.

Can anyone think of something that would work? Maybe two quarts, sealable and able to hold pressure, input and output...

IMG_20111230_182417.jpg


Water filter has worked awesome for me! Except the one time that I accidently hooked my SV up to the liquid post instead of gas, its never filled up with krausen and gunk. If you leave it below the top of your fermenter, all moisture should drip down into it.
 
To all those who suggested water filter housings, thanks. I can't believe I didn't think of that, especially since I have one already. Hop rocket sounds like a good idea too for those with a SS fetish.

Lennie said:
I would think that if you could just pipe the spunding valve so it doens't drain back into the keg, you'd be OK. Mine is in-line to the angle on the ball-lock QD so it drains back, but with a little longer piece of copper tubing I could bend it downward.

I imagine that would totally work if all you were trying to avoid is backwash. I'm trying to avoid blowoff getting into my spunding valve, though. I'm not sure if gunk in the McMaster-Carr valves matter, but I'm hoping to set up some electronic controls here in the near future. Those wouldn't respond as well to trub in the line.
 
Yes you'll need an 1/8" to 1/4" hex adapter. That's the one bummer about this PRV.

Here's my solution. It has a 1/4" tee with the 1/4" gauge, a flare to pipe adapter (both 1/4"), and a 1/8" to 1/4" hex adapter. There's an 1/8" to 1/4" barb on the other side of the PRV.

All bought (the fittings, minus the barb one I had) from beverageequipmentco.com for about $20 shipped.

This should fix my contamination problem. Now I can put a hose barb on the on the 1/4" flare fitting and then can take the hose off and flush it (and the valve) after fermentation and they will both dry out well.

Sanke, what's the part numbers from the site you mentioned? I looked, and I didn't see the tee. I just ordered the valve and gauge, now I need to get a sanke tap and the fittings.

Also, anyone got pictures of your setups? I've seen a few throughout the thread, but I'd like to see more pics.
 
-MG- said:
Hi WortMonger!

First, thanks for your great post on pressurized fermentation. I have some questions that I know you can help me with:

After getting in a few of the 1/4" parts for the valve, I realized the gas in on my coupler:

http://rapidswholesale.com/beer/couplers/draught-technologies-single-valve-coupler-red-handle.html

Is not even close to right size for 1/4". It is bigger than 1/2" by just a little bit as it wouldn't fit in my T I have now. Anyone know what plumbing I can get to work. Is it something like 5/8" to 1/4"? It would have to be 5/8" female to 1/4" male.

Can you provide me a link?
The nuts that fit on a tap connector for a Sanke have what is called Beer Thread. I believe it has a British Pipe thread equivalent, but almost everyone that sells the connectors sells the nuts (both regular hex nuts and wing nut styles). I had to use a tailpiece that fit through the beer nut on the gas side to connect to my spunding valve assembly. The tailpiece is 1/4" NPT so it fits nicely into my "T". I honestly would just use the barbed nipple that normally goes with the connector for normal operation and then buy a threaded barbed nipple for the spunding assembly. This way you can add a yeast/crud collector with tubing and keep your spunding valve clean.


I am also confused by the tap you have linked in your first post. You have a wing nut on the top that I don't understand, and the valve on the beer out line.

I was under the impression after removing the plastic and the little ball inside the coupler (this must be that system you talk about that would prevent things from going onl one way). That I connect the spunding valve to the gas in port, and can leave a picnic tap on the beer out. Do I have this right?

Thanks!

Martin
Ok, unsure exactly what pictures you are talking about but... either tap works the same so let me cover that. The top port on the tap is always the beer-out. The port on the side is always the gas-in. I have pictures of two different style tap connectors, one has a twist top.
6533-DSCN1628.JPG


The other is a lever tap.
6533-DSCN1664.JPG


The only wing nuts I use on my connectors are beer thread and that is so I don't have to use a tool to get them on or off. The spunding valve in all my pictures is on the gas-in port with the duck-bill check valve removed. The beer-out port usually has a penny or stopper, or it has a testing spigot. This port has the plastic holder and ball in it to prevent beer from going back into the keg when serving, or in this case testing. Here's a Sanke tap taken apart with all the parts mentioned.
Un-modified_Tap.JPG

Hope that helps.
 
homebeerbrewer said:
And Monger, you mentioned a testing spigot. Do you have one? And can you provide a picture?

No picture but, see where that penny is in the wingnut? Imagine that replaced with a barbed nipple held in with the beer nut>beer line>picnic tap. Just like you were serving beer, only no CO2 bottle attached to the tap.
 
The other is a lever tap.
6533-DSCN1664.JPG


This helped me out a lot! One final question you mentioned a tail piece for your spunding valve. What is the plastic looking connector you are using here?
 
That is a tailpiece I had made since I had a machine shop friend. You can buy a stainless one that fits through the nut and is 1/4" NPT on the side that connects to the brass "T" on the spunding assembly. This one is nylon.
 
Ok, I'm a little confused by the two pictures below. Pankey, how do you connect your setup to Monger's setup?

I don't. Even though I ferment in a Sanke, I have corny posts on top of it, so pretend I ferment in a corny (although I don't let krausen go thru a post/poppit valve, in case you would ask, yikes!)

I hook up the valve to the corny post the same way you would tap a beer in your kegerator, with a quick disconnect and a length of tubing with two flare barbs at each end. That's the difference in what I do now. The flare barb allows me to remove the tubing to the valve and clean both the valve and the tubing and then they be able to dry out.


re: part numbers

on this page
http://beverageequipmentco.com/BEC_Stainless_Steel_fittings_tubing.htm
look for
10852-41 Stainless Steel 1/4" x 1/8 " Male Pipe thread $3.19
10856 1/4" mpt x 1/4" Flare 304 Stainless Steel $2.06
10851- 404 Stainless Steel 'tee' 1/4" x 3 female thread $6.67

Thanks Pankey. I'll be ordering the remaining parts in a couple weeks, I just spent my beer budget yesterday. :drunk:

How did you get a sanke with corny disconnects?
 
That is a flared fitting. That won't go into a "T" with a 1/4" NPT threading. You have to have a tailpiece that has 1/4" NPT (national pipe thread) to have the right size threads. I found one once, let me look again for you.
 
That is a flared fitting. That won't go into a "T" with a 1/4" NPT threading. You have to have a tailpiece that has 1/4" NPT (national pipe thread) to have the right size threads. I found one once, let me look again for you.

Excellent Thanks!

Once I get that. I'll post a parts list so others can just go right off of that for future use.
 
I also have another question. I'm not sure if it's been discussed in this thread - I haven't read all the way through - but how do I disassemble the spear for cleaning? I'm assuming there are tools to take it apart, what and where can I get them?

And, should I cut the spear? If so, how much?
 
I also have another question. I'm not sure if it's been discussed in this thread - I haven't read all the way through - but how do I disassemble the spear for cleaning? I'm assuming there are tools to take it apart, what and where can I get them?

And, should I cut the spear? If so, how much?

After reading through quite a bit of the posts. WortMonger basically says he regrets cutting his spear and would just leave it in tack.

I don't know exactly regarding disasembling the spear itself. or if they are just refering to the whole thing and taking it out and giving it a good soak.
 
Back
Top