Cheap eBIAB Stand W/ Integrated Power Concept

Homebrew Talk - Beer, Wine, Mead, & Cider Brewing Discussion Forum

Help Support Homebrew Talk - Beer, Wine, Mead, & Cider Brewing Discussion Forum:

This site may earn a commission from merchant affiliate links, including eBay, Amazon, and others.

thekraken

Well-Known Member
Joined
Aug 18, 2014
Messages
1,957
Reaction score
449
Location
DFW
I've had this idea nagging me for a little while now, I wanted to see what you guys think:

Normally when we talk about going electric 240v this involves hundreds of dollars to into the thousands in sexy lit up control panels with ever expanding automation and electronics and gadgets and the list goes on...

In the spirit of BIAB, what about a system with the power of 240v but with the simplicity of stove top brewing?

All you really need to do is to safely provide 240 v to a heating element in a pot, and have a knob (just like a stove) to turn the heat up and down. An SSVR with a rheostat. This can be done really super cheaply.

One barrier to entry for a lot of people seems to be getting GFCI to your brew sytem. You might have 240v already wired in your house in your laundry or kitchen, but it doesn't have GFCI. No matter what we do we gotta hire an electrician to come out and spend lots of money. Why not integrate a GFCI panel into the brew stand and supply power to it with an extension cord? This way the brew stand it self is GFCI protected and *relatively* portable.

Take a look at these drawings and let me know what you think of the concept. Do you see any safety issues? Any issues at all?


hzTdOUE.png

fxcspkN.png

sPTCKxf.png

naaXV6R.png

aIyqEDV.png


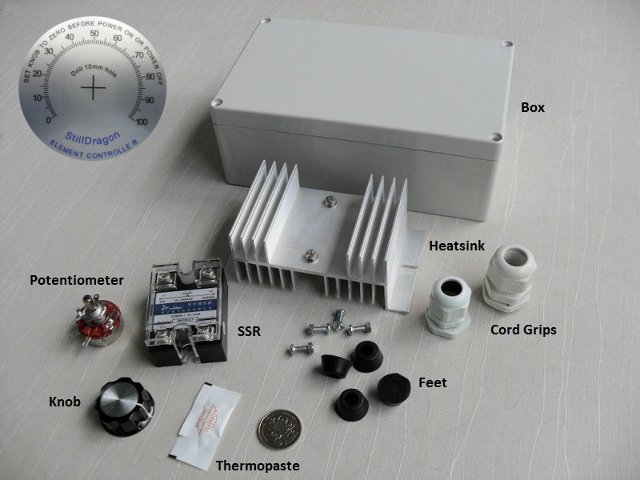
Everything in this stand can be purchased at your local big box store except for the SSVR, heatsink, and a few cord grips. The switches and such are contained in standard weatherproof outlet boxes like these
http://www.homedepot.com/p/BELL-1-G...1-2-in-or-3-4-in-Outlets-PSB37550WH/202284521

http://www.homedepot.com/p/1-Gang-H...xtra-Duty-While-in-Use-Cover-MM420C/100173013

and this for main power cutoff:
http://www.homedepot.com/p/Leviton-...ntal-Vertical-Orientation-Gray-1432/301940702
 
I think it'd be sweet. Ive long considered doing that. There's a thread on Kal's side where a guy built his control panel into a big SS rolling bench that the kettles also sit on. A bit more blingy and all that but it got me thinking. Ended up going a different route for my last build though.
 
No automation...boooo!!!

Kidding! Yes, this idea is sound. I think wood might not be the best material due to weight, etc., but certainly assembly is easy and building the spill area makes sense. Should have casters at a minimum. Would this be a pumpless system?
 
No automation...boooo!!!

Kidding! Yes, this idea is sound. I think wood might not be the best material due to weight, etc., but certainly assembly is easy and building the spill area makes sense. Should have casters at a minimum. Would this be a pumpless system?

Ha! No automation. Though I think I could integrate my arduino/RIMS quite simply, but for now I want to simplify even more.

In regard to the wood being no bueno can you elaborate? I've seen people make wooden control panels in the past and I want to clarify that's not what's going on here, any connections are contained in electrical boxes so I'm thinking arcing/fire hazard shouldn't be any more of an issue than household wiring. The table top edges and holes for outlets would be caulked too.

I have access to welders and plenty of scrap iron, I suppose I could look into that... It would get real heavy real quick.

I've been looking at these
https://www.amazon.com/gp/product/B00MOHS92I/?tag=skimlinks_replacement-20
and these
https://www.amazon.com/dp/B00SX3T2LO/?tag=skimlinks_replacement-20

Those casters are expensive though, and it's more important to me to be able to level the table out than roll it around for sight glass volume reading purposes. I suppose I could make some kind of leveling platform on the table top itself... hmm

Not pumpless, there is one chugger on it. That's what the combo switch/120v outlet on the front is intended for. Also has a cfc. I'm thinking on integrating some plumbing too.
 
Last edited by a moderator:
I think the stand can be made of wood but I don't think electronics should be inside of wood. God forbid an electrical fire occurs, you want the enclosure to be a suppressor, not a fuel.

Well that's what I mean, everything is contained in electrical outlet boxes just like wiring in our walls. It's not just outlet covers over wood.

9zAr4lL.png
 
Well that's what I mean, everything is contained in electrical outlet boxes just like wiring in our walls. It's not just outlet covers over wood.

The wiring in house walls has to be a composite cable, typically referred to as non-metallic cable (i.e. "Romex"). Usually, it's only allowed in residential construction, and the nature of it (each conductor is insulated, cable bundle is wrapped in plastic, and amperages are relatively low) limit the fire risk. You can't run single conductor wires inside the walls and still comply with residential building codes, and commercial building codes almost never allow NM cable.

Given all that, why not put those wires in conduit instead of in a wood box? Much safer and not that hard to do. Things are more accessible for when you inevitably decide to upgrade something. It's what I did on my wood brew rig.

First picture is the whole rig; 2nd shows the electrical boxes for the RIMS and Kettle Heater plugs. 3rd is a view from underneath where the conduit is run + the plug for the pump; 4th is the panel box with the electrical hardware (breakers, terminals, relays, etc.) and main junction box. Overall, it's very similar to what you are proposing.

20161223_131520.jpg


IMG_0785.jpg


IMG_0793.jpg


IMG_0794.jpg
 
Nice rig, I like it.

I hear ya, but I'm not exactly trying to strictly comply with residential building codes in my beer cart. 😉 Though safety is of course rule #1, I'm not forgetting that. Again, I won't have any exposed electrical in the cabinet.

As for accessibility I was thinking the top of the table/box would be on a hinge to open right up, quick and easy access. Kinda like an old school desk.

I do have a bunch of left over conduit, doing as you have was actually my first thought. We're still in design mode. We'll see.
 
Nice rig, I like it.

I hear ya, but I'm not exactly trying to strictly comply with residential building codes in my beer cart. [emoji6] Though safety is of course rule #1, I'm not forgetting that. Again, I won't have any exposed electrical in the cabinet.

As for accessibility I was thinking the top of the table/box would be on a hinge to open right up, quick and easy access. Kinda like an old school desk.

I do have a bunch of left over conduit, doing as you have was actually my first thought. We're still in design mode. We'll see.


Thanks! I chose wood for the ease of construction; I’m not much of a metal worker.

I get where you are coming from regarding code compliance; as an engineer, I can’t advocate that but sometimes codes do go overboard to protect people against themselves. As long as you are careful about securing the wires so the insulation can’t be worn off at the box entrances and cable staples, it should be safe. But...the codes are written the way they are usually because something bad happened. Why take the risk if the safer alternative is not really that much more effort/cost?

I completely agree with Brundog about putting the contactors, relays, SSRs, etc in a metallic enclosure. If anything is going to fail first, it will be those. Do a Google image search for burned contactors or SSRs, and see if you want that happening in a wood box!
 
Guys, I think there is a misunderstanding! I'm talking about using all electrical boxes! This is what I'm talking about, this would be for my chugger pump control:

waMWJUu.jpg


Here is a mockup, the electrical box would go all the way through the wood being flush with the front side
DM3ULLk.jpg


8qVyYcz.jpg


The stilldragon is essentially what I'm doing for boil control:
stilldragon_diy_controller_kit_cover.jpg

attachment.php

except external mount heatsink.
 
Ah, well that’s less complicated that I was thinking. For the pump, that looks pretty workable. How about the heater? You need some kind of off switch in addition to the SSVR. That makes sure the power is 100% off - solid state devices have leakage current even when “off”. Contactors are usually what people use to ensure power is turned off all the way but they do make double pole, 30 amp rated switches that you can buy at Home Depot/Lowe’s relatively cheap - the switch on the left side of my rig is one.

http://www.homedepot.com/p/Leviton...gclsrc=aw.ds&dclid=CNaSisr77tYCFaujswod6n8AFQ

I stand by what I said earlier about securing the wires: make sure you secure them well so the can’t rub on any rough edges which could damage the insulation and lead to a fire.
 
Oops, you posted before I edited my last post, the heating element will simply be ssvr with a knob for some sweet ass analog control! I've discovered it's already been done in the "stilldragon" controller. There are some additional pics in my previous post.

My current controller uses that same 30 amp switch, Ill be salvaging it for this. See the bottom right note here:
hzTdOUE.png

I was thinking I'd cover the switch with one of these: http://www.homedepot.com/p/Leviton-...ntal-Vertical-Orientation-Gray-1432/301940702 (though not a $19 one, sheesh)
 
Oops, you posted before I edited my last post, the heating element will simply be ssvr with a knob for some sweet ass analog control! I've discovered it's already been done in the "stilldragon" controller. There are some additional pics in my previous post.


I think we were both editing our posts at the same time!

I used a weatherproof box for the switch but didn’t bother with the cover. The standard switch cover plate with the weatherproof gasket underneath works fine.

Your setup looks a lot like my first electric rig although I put the SSRV and switch inside a plastic toolbox (probably didn’t meet code :) ) When I went to a BCS and relays, I built my current rig. Version 3 is going to be BruControl and 50 amp. I can’t seem to stop upgrading...

I know exactly how you feel... Looks like I'm probably going to have to make a brundog steam condenser super ejector thingamabob soon.
 
Okay, so let's say I'm contemplating the darkside and incorporating a RIMS tube. How do we feel about this wiring for a SINGLE relay to control TWO different elements (kettle @ 240v and RIMS @ 120v) and using a DPDT to select which element.

YZdJ9e1.png


What about circuit protection here? (obviously input is 30amp gfci) If I just maintain 10awg wire on L2 and N to the 120v rims side there would be no need for fuses/breakers, correct?

(edit)
On second thought if I'm using a ssvr I could probably just wire the RIMS tube at 240v.. hmm. Thoughts?
 
The wiring looks ok. Having the center off position ensures you have a "break before make" condition, and it's rated for 30 amps.

However, it would worry me if I had to turn off everything in a hurry - it might be hard to ensure you are in the middle spot if you are moving quickly.
 
I am not clear on that relay... it says DPDT but it doesn't show the second "throw"... center off is not DT, so yeah. But the concept is sound. I think you need a contactor upstream controlled by your keyswitch or E-stop, etc.
 
Like others have mentioned, casters would definitely make it more portable. You might look at table saw casters. Harbor Frieght has a 300 lbs mobile base for ~$40 (Link).

Also for the top, Assuming this is all wood, You might consider shower wall board, melamine, or a very heavy marine-grade spare urethane to create a water tight tub. You might have to use a trivet to raise the hot pot off. Just thinking with the whole top will need to be water tight to add another layer of protection for the electronics below.
 
I am not clear on that relay... it says DPDT but it doesn't show the second "throw"... center off is not DT, so yeah. But the concept is sound. I think you need a contactor upstream controlled by your keyswitch or E-stop, etc.

It's not a relay Brundog, it's a switch: http://www.hubbellcatalog.com/bryant/datasheet.asp?PN=3025BRN

You shouldn't "need" a contactor, since the switch will break the one connection before the other can be established and it's rated for 30 amps. A contactor may still be a good idea however...
 
Like others have mentioned, casters would definitely make it more portable. You might look at table saw casters. Harbor Frieght has a 300 lbs mobile base for ~$40 (Link).
That's interesting, wish I had seen those before I purchased my leg levelers. Like I mentioned before I'm more concerned about being able to level the surface to keep my sight glass accurate than I am being able to roll it around.

I'm approaching this whole thing like a kitchen appliance. The table and controls integrated like a stove top or oven. I won't necessarily be moving it around a lot, but if I do I just move one table, not a table and a control box and wires and temp probes, etc.


Also for the top, Assuming this is all wood, You might consider shower wall board, melamine, or a very heavy marine-grade spare urethane to create a water tight tub. You might have to use a trivet to raise the hot pot off. Just thinking with the whole top will need to be water tight to add another layer of protection for the electronics below.

I have considered melamine, the problem I see with that is IF the particle board underneath gets wet then the whole things puffs up, crumbles apart and is pretty much ruined. I figured I'd go with 3/4" ply and use several coats of sealant. I figured on deck weather sealant or something, but I'll look into marine grade too. It's not a sink and liquids won't be flooding the surface for any length of time. I do plan to seal all the joints water tight of course. I was looking into 3m 5200, probably just using that instead of wood glue on all my joints.
 
It's not a relay Brundog, it's a switch: http://www.hubbellcatalog.com/bryant/datasheet.asp?PN=3025BRN

You shouldn't "need" a contactor, since the switch will break the one connection before the other can be established and it's rated for 30 amps. A contactor may still be a good idea however...

Where would you put the contactor, for what purpose?

I'd still have the main 30 amp single throw toggle switch that is main power cutoff that we mentioned earlier.
 
Here is a more complete picture of what I'm thinking at the moment:

AtOQCx3.png


I've been debating on how I want to handle the 120 v side in regard to gfci. I've drawn it as using a standard 15a breaker and putting it in the spa panel, and then having a gfci outlet after that. This feels like the most convenient way to do it, but maybe a little more expensive than ordering a fuse and branching off the panel's gfci breaker as is standard.

So obviously the *wire* between the panel and the first component, the gfci outlet, is not protected by gfci. Is this an issue?

@brundog, a little off topic: I know you run a 240v rims, what wattage? Do you run it at 240v during the mash or 120v? And what's your minimum flow rate you shoot for if your mashing at 240v?
 
Sorry... no contactor needed if it is a switch (I thought it was a relay).

I would go the other way as you noted... take your 120V off the 30A GFCI and use a 15A fuse. This keeps everything leaving that box ground fault safe.

I have a 5500W standard foldback. It runs at 120V during the mash, but runs at 240V for strike water heating, mashout, and sparge water heating. I suppose mashout is controversial, but I have had great luck doing that and a flowmeter makes certain the flow rate is acceptable.
 
I have considered melamine, the problem I see with that is IF the particle board underneath gets wet then the whole things puffs up, crumbles apart and is pretty much ruined. I figured I'd go with 3/4" ply and use several coats of sealant. I figured on deck weather sealant or something, but I'll look into marine grade too. It's not a sink and liquids won't be flooding the surface for any length of time. I do plan to seal all the joints water tight of course. I was looking into 3m 5200, probably just using that instead of wood glue on all my joints.


How about ceramic tile for the surface? That can be water tight and act as a heat shield at the same time. For the small area you’d need, I wouldn’t think that would be too expensive. Plus, it would look sweet!
 
I made something like this out of an old stainless BBQ grill with wheels. Took out the cooking part, welded a steel subframe in its place, and put a piece of plywood on top. All the electrical stuff was inside thw grill where the LP tank normally sits. I put the PIDs/switches in the hinged side burner lid. I tried giving the thing away (minus electronics) when I switched to software brew control. Nobody wanted it, so I recycled it.....
 
I have considered melamine, the problem I see with that is IF the particle board underneath gets wet then the whole things puffs up, crumbles apart and is pretty much ruined. I figured I'd go with 3/4" ply and use several coats of sealant. I figured on deck weather sealant or something, but I'll look into marine grade too. It's not a sink and liquids won't be flooding the surface for any length of time. I do plan to seal all the joints water tight of course. I was looking into 3m 5200, probably just using that instead of wood glue on all my joints.

You're right melamine may not be a good option. Plywood if it gets wet can warp and layers separate too. I guess my thought was to make sure that the wood surface is well protected so that an accidental boil over (hopefully never happens), doesn't undo the hard work of the stand or the electricity.

Anytime I've done table tops or bar tops, I've used several coats spar urethane. It creates a thick and durable coating. You should be able to get it to seal over tight joints and seal the top and contain messes.
 
So wait, I could get into electric brewing with a few parts, a standalone GFCI box near my kettle and an extension cord run from my existing dryer plug? The main thing keeping me from electric is that we're selling the house in a few years so I don't want to invest money with little return value in the short term. I could build a setup (have a woodshop with separate service behind the garage so I have panel space) but again, I won't see a return on that investment.

So cord to GFCI box to controller to heating element and drop it into my existing kettle to heat strike and boil away (mashing in a bag in a cooler) gets me off of propane with a minor investment like the design in here?
 
That's the idea. You just need a way to keep it sufficiently protected from liquids.

My idea before this was to make a mobile panel stand of sorts, just mount the spa panel to some 2x4s like this and feed it with sjoow extension cord.

View attachment 1509036283863.jpg
 
That's the idea. You just need a way to keep it sufficiently protected from liquids.

My idea before this was to make a mobile panel stand of sorts, just mount the spa panel to some 2x4s like this and feed it with sjoow extension cord.

Couldn't I also mount the GFCI panel on the wall and run the dryer plug extension cord to that? Then just plug in my 240 heating element into the GFCI box on the wall (basement) and run it down into the kettle? I'd need something to put the kettle on but having the GFCI box on the all reduces the issue of protecting it from spills. I don't need any other plugs close to the kettle. I run an immersion coil chiller, mash in a cooler. I'm just looking for a cheap way to avoid propane (I use it to roast coffee beans but it's a pain in rear to brew in the cold winters in PA).

Conversely, I guess I could run a 120v Hot Rod heat stick from the GFCI outlet near my gas range (on 20amp) and that combined with the range should get me kinda close with 6-7 gallon boils (my range alone does well with 3.5-4 gallon boils in 5 gallon kettles now). But I'm worried I'll spend the money and the find it will take way, way longer to get a decent boil with the range + 120v coil combo so I'm looking for a cheap way into a 240 setup.

Do I need a controller if I'm just worried about getting my wort boiling?

I'm really looking for the easiest and cheapest way to get indoors and off of propane without changing my process (which I enjoy immensely as it is, I do 3-4 brew 8-10 hour brew days for fun lol).
 
If you mount it to the wall you lose the flexibility that the thread is going for. Also, I'll let the electrical engineers chime in with their opinion on that, I think once you attach it to the building you need to follow building codes or something to that effect.

I have seen people mount their 240v outlet inside their spa panel.

Yes, you will need some way to regulate the temperature, a 5 gallon batch at 5500 watts for example would boil way to hard, you could get a smaller element but then it would take longer to get up to temp.

Google search the "Still Dragon" controller, a controller won't get simpler and cheaper than that.

Another option for you is you could put two 120v / 1500 watt elements in your pot and just make sure you use 2 different 120v gfci circuits. This thread would be very helpful https://goo.gl/images/EGy3Fp

Sorry, my bad for the thread drift. It looks like the math says a 1500w element gets me 5115 btus...and with a 5000 btu range (conservative though I will measure), I'm over 10,000 BTUs which would be about the same as two 1500w elements(and should get me tap to strike and strike to boil in a reasonable amount of time).

1 1500w element them should be fine with my range. In any event, from a hardware standpoint (since I'm selling the house) it would be a better return on investment to install a new 10k BTU cooktop than to run a 240 GFCI as the $ is similar short term. When we move though, I may go all-in on electric as it seems like the best choice.


Thanks for the thread link!
 
@brundog, a little off topic: I know you run a 240v rims, what wattage? Do you run it at 240v during the mash or 120v? And what's your minimum flow rate you shoot for if your mashing at 240v?

Now that you've dropped an Arduino into the mix it seems like you might want to move to powered relays instead of the DPDT switch. These SPDT relays always seemed like an inexpensive and attractive option.

If you don't want to add the complexity of relays you could consider a rotary switch in place of that Bryant 3025:
https://www.amazon.com/dp/B009IS7SN2/?tag=skimlinks_replacement-20

It gives the look of the fancy panel selectors without the price and complexity :)
 
Last edited by a moderator:
I do appreciate the suggestion, but I've gone back to the non-rims tube approach. KISS.

I'm only using the arduino because I have a dozen of the $2 Chinese knock offs and esp8266's and pots from ebay laying around and Auber wanted something like another 10 for the rheostat version of their ssvr. That irked me.
 
Back
Top