I've seen a lot of talk in the last ~20 pages about how the Home Depot Rubbermaid 10 gallon coolers must have had their spigot size change from 3/8" to 5/8". I went to Home Depot this past weekend and picked up everything exactly as described in the original post from 6 years ago. After removing the spigot the hole in my 10 gallon rubbermaid cooler indeed measures 5/8", but I noticed that all of the Watts brand 3/8" pieces I picked up measure 5/8" as well. I don't know exactly what their intended use is for but I believe they're designed for 3/8" tubing to be put inside. Their inner diameters all measure about 1/2" and their outer diameters all measure 5/8". I suspect some of the problems people have been having is related to this. For anyone looking to pick up all their pieces I can confirm that the specific Watts brand 3/8" pieces mentioned in the original post will fit the 5/8" spigot hole and utilize the 5/8" washer and o-ring without issue. Perhaps those who have had problems found 3/8" pieces not Watts brand which actually measured 3/8" outer diameter and that's why they haven't fit. If nothing else, while you're at Home Depot (or whichever hardware store) grab a tape measure and measure the spigot hole on the cooler and brass pieces you're picking up.
You are using an out of date browser. It may not display this or other websites correctly.
You should upgrade or use an alternative browser.
You should upgrade or use an alternative browser.
Cheap & Easy 10 Gallon Rubbermaid MLT Conversion
- Thread starter FlyGuy
- Start date

Help Support Homebrew Talk - Beer, Wine, Mead, & Cider Brewing Discussion Forum:
This site may earn a commission from merchant affiliate
links, including eBay, Amazon, and others.
dyqik
Well-Known Member
I've seen a lot of talk in the last ~20 pages about how the Home Depot Rubbermaid 10 gallon coolers must have had their spigot size change from 3/8" to 5/8". I went to Home Depot this past weekend and picked up everything exactly as described in the original post from 6 years ago. After removing the spigot the hole in my 10 gallon rubbermaid cooler indeed measures 5/8", but I noticed that all of the Watts brand 3/8" pieces I picked up measure 5/8" as well. I don't know exactly what their intended use is for but I believe they're designed for 3/8" tubing to be put inside. Their inner diameters all measure about 1/2" and their outer diameters all measure 5/8". I suspect some of the problems people have been having is related to this. For anyone looking to pick up all their pieces I can confirm that the specific Watts brand 3/8" pieces mentioned in the original post will fit the 5/8" spigot hole and utilize the 5/8" washer and o-ring without issue. Perhaps those who have had problems found 3/8" pieces not Watts brand which actually measured 3/8" outer diameter and that's why they haven't fit. If nothing else, while you're at Home Depot (or whichever hardware store) grab a tape measure and measure the spigot hole on the cooler and brass pieces you're picking up.
I just bought and built a 10 gallon round orange mash tun this weekend, to replace my 5 gallon round orange mash tun for bigger brews. The spigot hole on the 10 gallon cooler is smaller than on the 5 gallon cooler. The 5 gallon cooler needs half inch fittings to get a snug fit, but the 10 gallon can only take 3/8" fittings, not the 1/2" stainless fittings I bought to replace the 3/8" fittings I originally tried on the 5 gal cooler. So at least I've found a use for my original 3/8" fittings...
You can tell the difference by the spigot - black rubber push button on the 3/8" 10 gallon cooler, white plastic button on the 1/2" 5 gallon cooler. It's possible that there are both kinds of both size coolers out there.
Oh, and I have 9" and 12" round domed false bottoms for the kettle and mash tun, which is why a rectangular cooler isn't a good idea for me. Changing tun size, I swapped the 12" FB from the kettle to the 10gal mash tun and the 9" FB from the 5gal mash tun to the kettle.
groundchuck
Well-Known Member
I'm not even sure why people are still using these. You can get coleman extreme 50 and 70 quart coolers for the same price or cheaper.
I picked mine up for $30 each at Lowe's. I am guessing they were getting rid of the Red ones and moving to the blue ones with the Lowes logo. Either way I had no problem getting them converted based on the info in this thread. I use one for the HLT and one for the MLT (which has a 12" false bottom).
Thanks to the OP for helping others !


Lurked on this thread for some inpiration and finally got round to making this as part of my gear up to all grain.
I used a 3/8 BSPT barrel nipple, a 3/8 BSP socket and some M16 washers, all A4 stainless! Total cost: about £7 ($11).
I cheated a little and welded the washer on the inside to the nipple so there could be no leaks along the shaft /threads and used a lathe to turn down the outside of the barrel nipple just ever so slightly so an M16 stainless washer could slide the whole way over it! An M16 washer has a small enough outer diameter that it sits down in the little pocket on the front of the 10G rubbermaid cooler and everything tightens up a charm !

abbysdad2006
Well-Known Member
Would the same parts be used for the coleman 50 or 70 qt cooler as the rubbermaid one?
Would the same parts be used for the coleman 50 or 70 qt cooler as the rubbermaid one?
https://www.homebrewtalk.com/f51/mash-lauter-tun-coleman-xtreme-70-quart-cooler-387018/
abbysdad2006
Well-Known Member
CoolYou can buy Kewler Kit conversions that supply you with a pre-build bulkhead and faucet for converting a 10 gallon Rubbermaid beverage cooler into a mash & lauter tun. But off-the-shelf components from your local hardware store work just as well, and cost far less. I got all my parts at my local Home Depot for a fraction of the cost of a Kewler conversion kit, or other commercial products.
Parts List:
Here are the parts you will need for the conversion (see picture, left to right):
- Rubbermaid 10 gallon round beverage cooler
- all stainless steel ¼” hose clamps x 2
- brass square head plug (Watts A-737)
- ½” x 12” (or larger) braided stainless steel supply hose
- 3/8” female barb adapter (Watts A-298)
- 5/8” stainless steel fender washer (sometimes hard to find, but try Fastenal or read this thread if you are stuck)
- 3/8” MIP x 1-1/2” brass nipple (Watts A-786)
- seal from plastic spigot of cooler (shown below)
- Teflon tape (note: everything to the left of the tape in the picture above goes inside the cooler, and everything to the right goes outside)
- 5/8” O-ring (preferably heat resistant, if you can find one)
- 3 x 5/8” fender washers
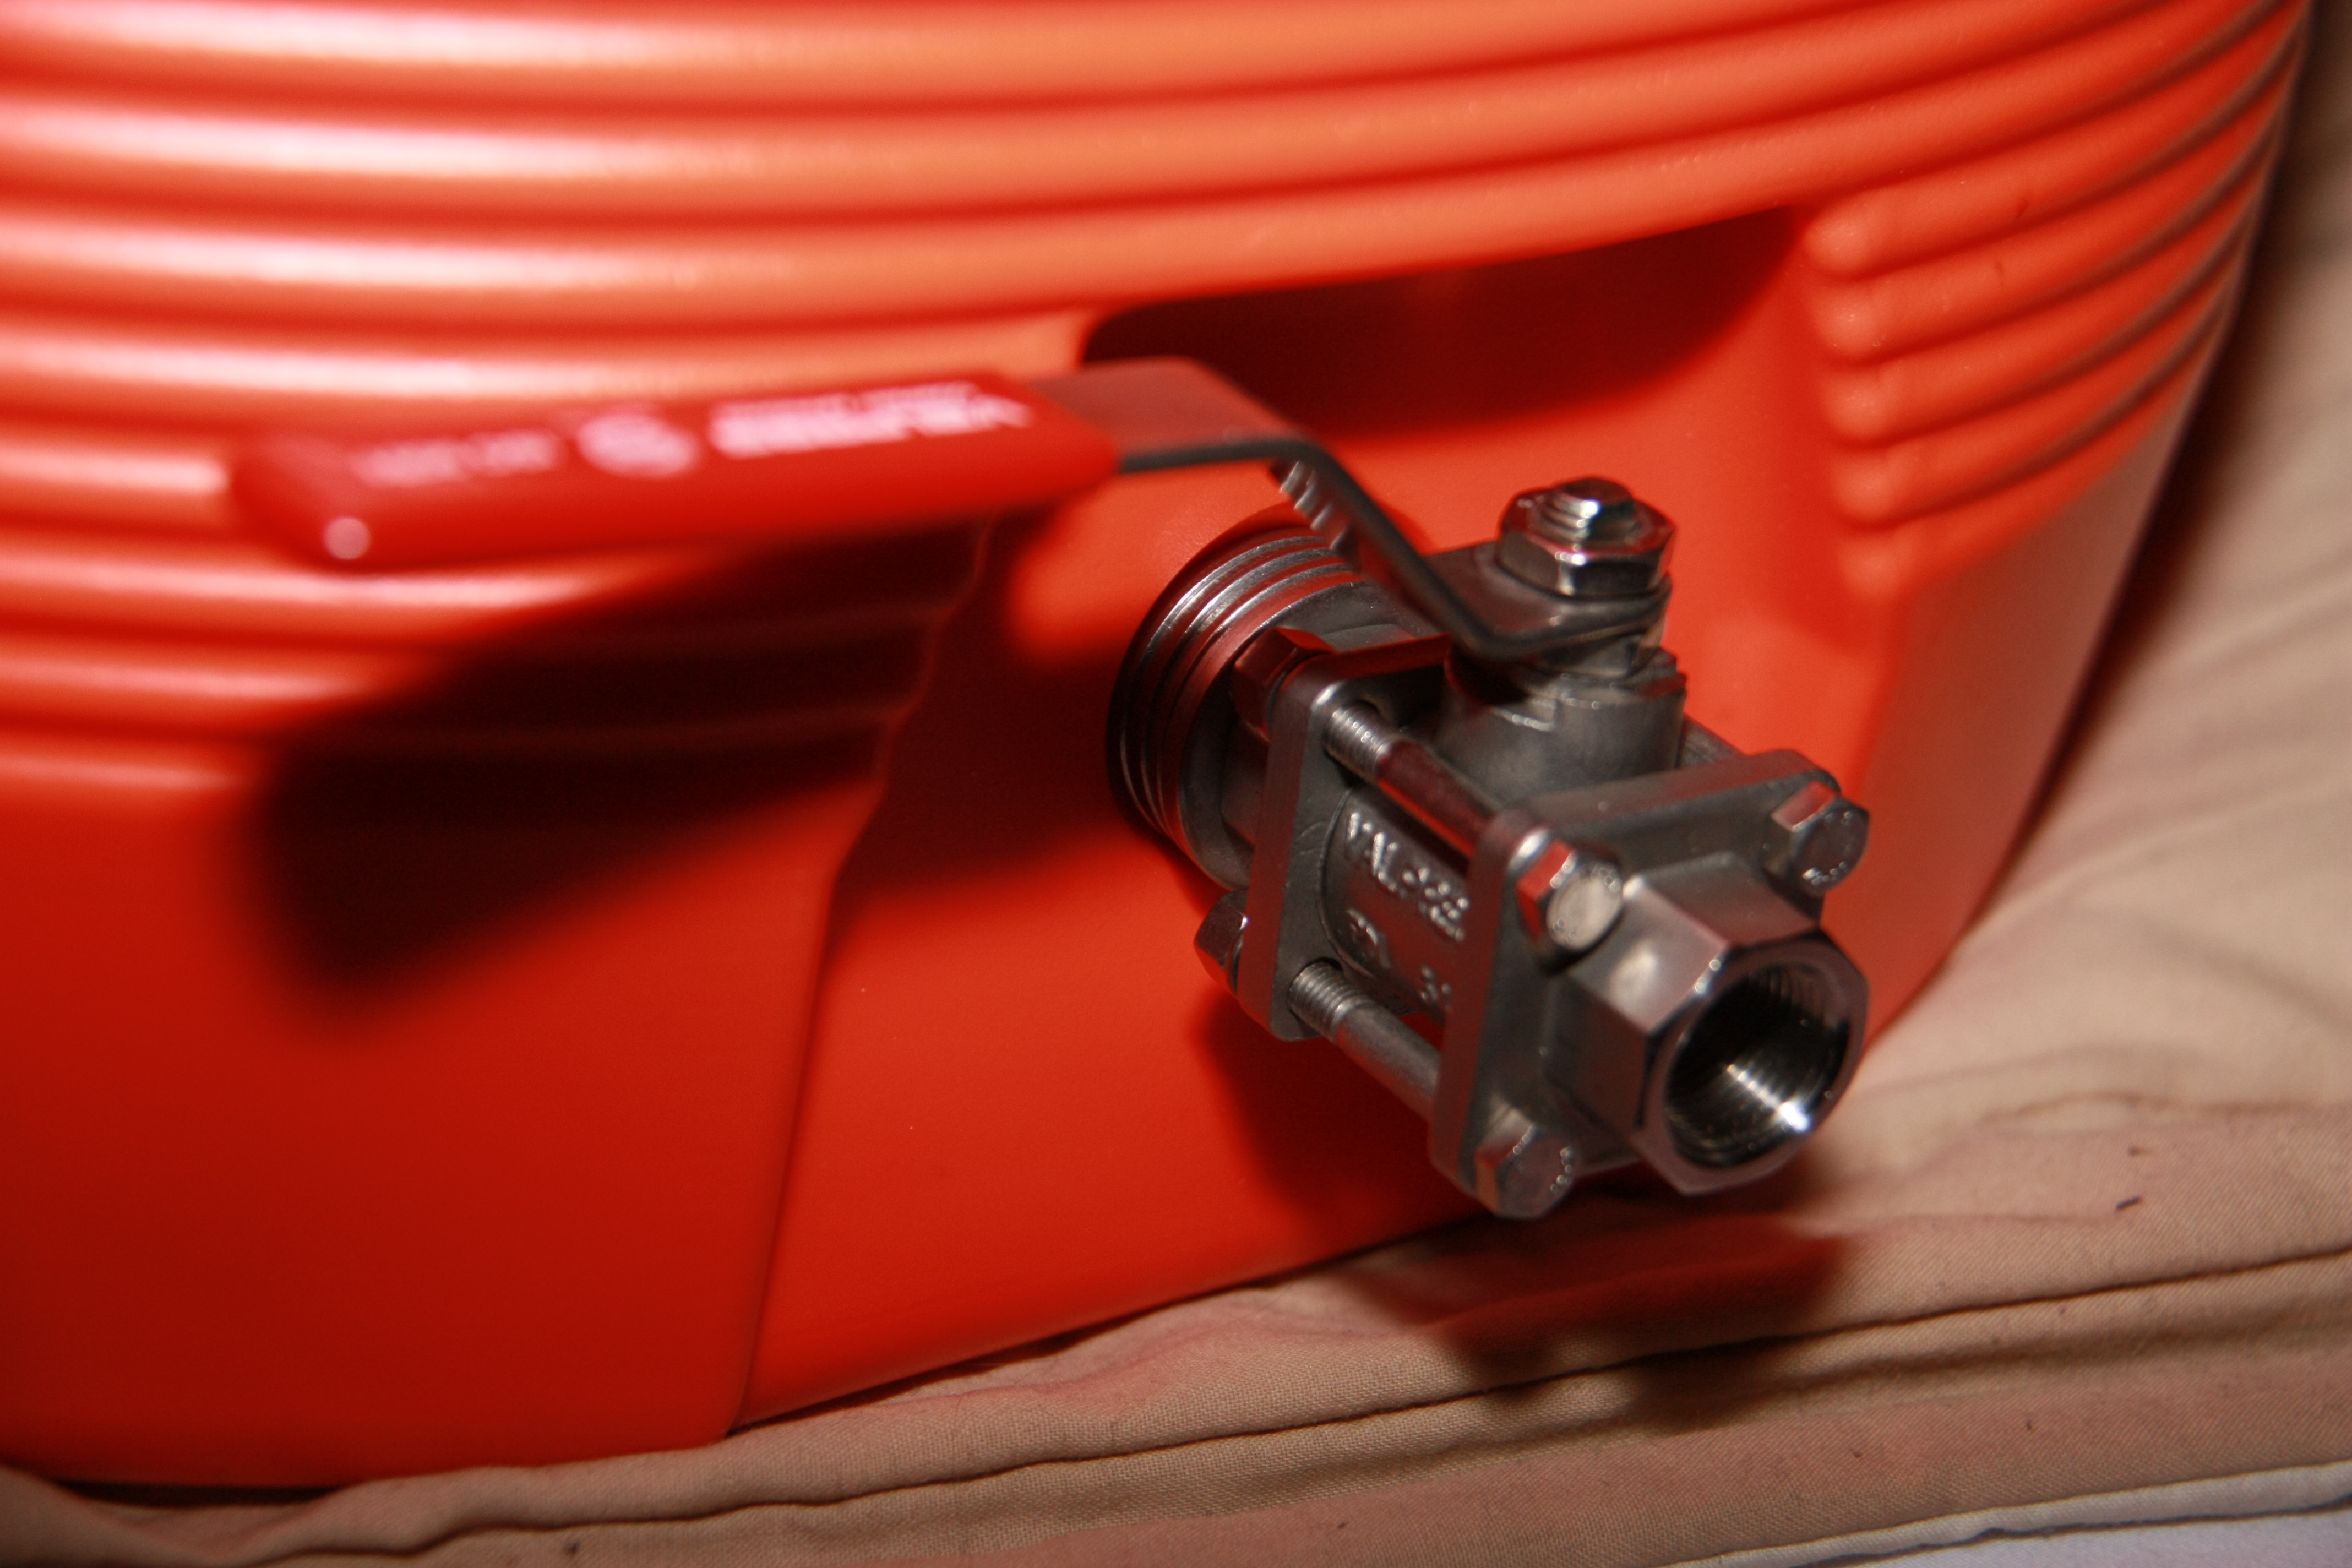
- 3/8” threaded ball valve
- 3/8” male barb adapter (Watts A-294)
Hey guys - I followed the original setup but it is really loose since the pieces dont fit completely down the threads with the tephlon tape and whatnot. Is it cool if I have non-SS washers on the outside? I am going to need a lot more to make it tight. I was also wondering if anyone else used the same technique as the original with the SS threading? I bought an SS connection and cut it as described, and now the ends are all jagged and lots of SS pieces jabbing in all directions. Any advice on filing those down? I decided to buy a T connection for the inside and made a circle with the SS cord and put it in both sides. I am mainly worried about the jagged ends on the SS since I cut it up. Any help is appreciated.
Hey guys - I followed the original setup but it is really loose since the pieces dont fit completely down the threads with the tephlon tape and whatnot. Is it cool if I have non-SS washers on the outside? I am going to need a lot more to make it tight. I was also wondering if anyone else used the same technique as the original with the SS threading? I bought an SS connection and cut it as described, and now the ends are all jagged and lots of SS pieces jabbing in all directions. Any advice on filing those down? I decided to buy a T connection for the inside and made a circle with the SS cord and put it in both sides. I am mainly worried about the jagged ends on the SS since I cut it up. Any help is appreciated.
If you have a lot of jagged ends, then take some sharp scissors and snip off as much as you can to make it cleaner.
Also, regarding outside washers, use what you want as long as you don't mind the look of having a ton of washers. I have seen some people with 1 washer and some with 5 washers on the outside. Cheers.
Cutting SS thread is a nightmare, stainless really is a tough cookie - especially if it's 316/A4. The best approach is to wrap it up good and tight with some strong tape where you want to cut and use a dremel with a mini cutting disk (like the tiny version of an angle grinder).
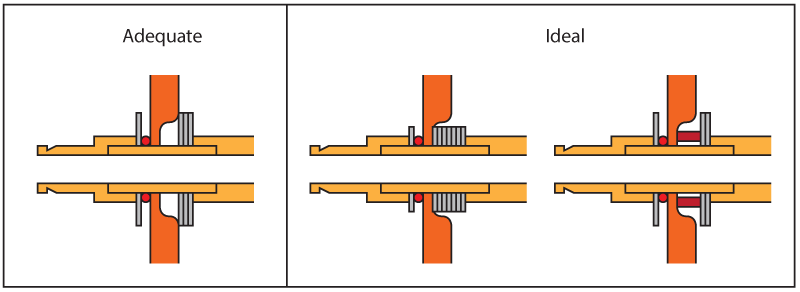
For the washers, what you are trying to achieve is a good squeeze on the o-ring, or original rubber seal depending on which you are using. This clamping force comes from the hose barb on the inside and the valve on the outside and the key point is that there must be enough washers present to stop the thread seating completely i.e. the valve screwing the whole way on. If it screws the whole way on, to the limit of the threads, it may not be clamping down enough on the washers which in turn will not be clamping the o-ring/seal sufficiently.
The other issue is shown below, if you use a washer with a large outer diameter, it is going to contact the cooler outside of the original recess for the tap. So chances are, when you tighten everything up, the o-ring/seal isn't getting enough clamping force because the hollow cooler walls are bending out of shape and not squeezing it sufficiently. I have called this adequate because many, many people have reported success with this method and have no problems. However, I also think this may be the cause of many people's leakage woes. The solution: use washers with a smaller outer diameter, which can be difficult to find, or use a small spacer underneath the larger washers so they do not contact the cooler body. This could be anything like a small cut-off of plastic pipe - it only has to be rigid, able to slide over the barrel nipple and have an outer diameter that fits into the recess on the body. This way, the clamping force is transmitted through the more rigid, thinner section of the cooler walls, closer to where the o-ring/seal is actually located and should provide a much strong seal and overall more rigid assembly.
smyrnaquince
Well-Known Member
You also need to be careful on the inside of the cooler. If the washer is too large, it could contact the curve of the inside of the cooler. I used a hacksaw to narrow my inner (stainless steel) washer on teh left and right so it would overlap the rubber washer, but not contact the sides of the cooler.
Hey guys - I followed the original setup but it is really loose since the pieces dont fit completely down the threads with the tephlon tape and whatnot. Is it cool if I have non-SS washers on the outside? I am going to need a lot more to make it tight. I was also wondering if anyone else used the same technique as the original with the SS threading? I bought an SS connection and cut it as described, and now the ends are all jagged and lots of SS pieces jabbing in all directions. Any advice on filing those down? I decided to buy a T connection for the inside and made a circle with the SS cord and put it in both sides. I am mainly worried about the jagged ends on the SS since I cut it up. Any help is appreciated.
I had the same looseness problem on my first try. I'd accidentally been sent a nipple that was too long--intended for a thicker walled cooler. It unfortunately took me a couple days and emails with the supplier to figure that out. :smack:
Once I got the shorter nipple, I was set. I didn't have to cut anything.
The fender washers generally recommended also solve the problems mentioned above with big washers. They look a bit more like a tire than a disk, in terms of outer diameter to inner diameter ratio.
J-Wood
Member
Sure thing. I'll post them here in the next day or so.
This was the problem I ran into. Do you have a picture of yours? I'd love to see how you set it up.
Sorry that I have not provided you with those pictures. I'll do that and post them up here today.
J-Wood
Member
This was the problem I ran into. Do you have a picture of yours? I'd love to see how you set it up.
NOTE: for some reasons my images are not appearing. I don't know if that's because I use Dropbox to host my images, or because of something on this site. Here is a link to my dropbox folder where you can view all these images: https://www.dropbox.com/sh/h79m8iac65pf10e/ILMhoPCPbY
Here's a picture of it installed:


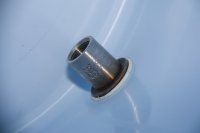
The hole in the Igloo round cooler is also larger than the Home Depot (Rubbermaid) cooler, so I used a #9 o-Ring to fill the space in between the 3/8 ball valve and the spigot hole:


Also notice on the picture above that the nipple is a "close nipple." The wall of the Igloo cooler is thinner where the spigot hole is, so the 1-1/2 nipple is not necessary. Get the "close nipple."
The stainless steel washers were hard to find, but Home Depot has them. You just have to purchase a Create-a-Bolt set. It has about 4-5 SS washers in it:

Here's what it looks like with the SS washers and the O-ring:

Notice that I have two extra thick SS washers on there. I later purchased these because I was going to make another Mash Tun, but using 4 of the SS washers you get in the Create-a-Bolt set works perfectly. 3 of the washers will work for the outside, but 4 washers are preferred, because the handle of the ball valve needs the extra room to open and close.
Here's what the ball valve and nipple look like inside the wall of the spigot hole with the O-ring:

I could not find a rubber washer to fit the nipple, so I purchased a facet washer and cut out the inside to fit around the nipple:


This is the inside barb installed with all parts in place:

Note: I did not use a rubber washer for the outside wall. I simply applied the SS washers directly to the outside wall. The reason I did this is because the rubber washer make the valve unit "wobbly." Since the ball valve was a 3/8 and the spigot hole was larger, this allows for more wiggle space for the ball valve. The only place you really need the rubber washer is for the inside to seal it. The finished product is snug, firm, without leaks. I tested it with 10 gallons of hot water and there were no leaks.
Let me know if this helps you, or if you need anything else!
732Brewer
Well-Known Member
- Joined
- Dec 10, 2013
- Messages
- 110
- Reaction score
- 3
This thread just got way too big - Is anybody selling a rubbermaid conversion kit at a good price or is it a lot more cost effective going to home depot? For a few bucks more plus shipping it would 100% be easier getting all the parts already hand picked.
I looked online and its laughable to see places selling the rubbermaid 10gallons for $80+ when they are being sold for $45 in the store (come on guys - that is what kills the trust in some online stores).
I looked online and its laughable to see places selling the rubbermaid 10gallons for $80+ when they are being sold for $45 in the store (come on guys - that is what kills the trust in some online stores).
732Brewer said:This thread just got way too big - Is anybody selling a rubbermaid conversion kit at a good price or is it a lot more cost effective going to home depot? For a few bucks more plus shipping it would 100% be easier getting all the parts already hand picked.
I looked online and its laughable to see places selling the rubbermaid 10gallons for $80+ when they are being sold for $45 in the store (come on guys - that is what kills the trust in some online stores).
I don't trust any online store for more than what they are used for, a useful cheap way to get products you can't or don't want to build or grow yourself. My conversion was a piece of cake, followed the instructions to a T except I got more than 6 fender washers, my MLT works like a charm, doesn't leak and I used the same concept to convert a free cooler I got, so now I have 2 MLT's at my disposal.
This thread just got way too big - Is anybody selling a rubbermaid conversion kit at a good price or is it a lot more cost effective going to home depot? For a few bucks more plus shipping it would 100% be easier getting all the parts already hand picked.
I looked online and its laughable to see places selling the rubbermaid 10gallons for $80+ when they are being sold for $45 in the store (come on guys - that is what kills the trust in some online stores).
There are a ton of retailers that offer these sorts of kits. They typically charge a bit more for the convenience and customer service that comes with the kits, which is why a lot of people go the DIY route to save a couple bucks.
Below are some examples that were easy for me to find:
http://www.austinhomebrew.com/product_info.php?cPath=178_33_82_89&products_id=11638
http://www.midwestsupplies.com/all-grain-brewing/all-grain-equipment/cooler-conversion-kits.html
http://www.farmhousebrewingsupply.com/bulkhead-fitting/
http://brewhardware.com/valves-69/59-weldless-bulkhead
http://www.homebrewing.org/Brass-and-Stainless-Steel-Ball-Valves_c_346.html
SaguaroMan
Well-Known Member
I picked up the stainless 5/8" Build-A-Bolt set at HD for the SS fender washer on the inside, and just used the zinc plated washers on the outside. I ordered a few of the other parts off Amazon since they were exactly the ones mentioned from Watts
smyrnaquince
Well-Known Member
My local Ace Hardware sells the stainless steel washer individually for a lot less than buying the whole build-a-bolt package. They were in the stainless hardware drawers.
TexasLonghorn
Member
I just built this tonight. I've had five gallons of water sitting in it for four hours and haven't leaked a single drop. I'll add a few notes to the thread after what I've read (after the first five pages, I scanned every twentieth page or so...couldn't make the whole thread). I used the build from the OP except for the braid part, as I'm using a false bottom.
Cooler: I bought a 10 gallon Rubbermaid cooler at Home Depot (the one with the Home Depot logo). It was $47.
Washers: I couldn't find fender washers, so I just bought stainless steel flat washers. The inside diameter is 5/8" and the outer diameter is 1 1/2". I got them at the local Fastenal when I couldn't find them at Home Depot. The guy at Fastenal said the OD of the fender washer would be a larger OD. Frankly, I think the regular flat washers are probably better with the current cooler as any larger OD wouldn't have fit flush on the outside of the cooler. I used seven on the outside - not so much to get the tight fit, but because my ball valve wouldn't fully close (clear the outside of the cooler) with fewer. Also, for those who mentioned the "build a bolt" kit at Home Depot...I checked my Fastenal washers vs. those in the "build a bolt" package, and they are the same ID and OD (not sure about thickness).
O-Ring: I got this at Fastenal. He didn't know if it was heat resistant. They had two thicknesses - the #016 and #114. I used the thicker #114, and I think that was a good move.
Valve/Barbs/Nipple: I couldn't find stainless anywhere other than my LHBS, and they were pricey, so I bought lead-free brass at Home Depot. They were the same part numbers as the OP except they were LFA-### instead of A-###.
Total cost without the false bottom was about $75 (false bottom was $45). All in I spent $120 versus the $150 my LHBS wanted. With the braid, I'd have come in around $80.
On assembly notes, I read several posts talking about free-turning assemblies. Mine is snug. When you push the nipple through, make sure the washer is all the way back against the female barb. Push all the way thought. Load up your washers on the other side and tighten. I used a 3/4" wrench inside and held the ball valve with a 150mm crescent wrench - larger wrenches were too thick to get a bite on the valve. I had to tighten and take off three times to find the right number of washers. Other than that, it was smooth sailing.
HTH and happy brewing!
I picked one of these up for an HLT for my next brew. I have an 18gallon cooler mash tun already, but I'm doing a partigyle brew that will be 23# of grain and my BK isn't big enough for all the water I will need! Should make my regular brew days too so I don't have to try to time when I want I start heating my sparge water. Might as well make it a mash tun as well though
natefrog255
Well-Known Member
- Joined
- Feb 5, 2012
- Messages
- 365
- Reaction score
- 3
What ID hose is best for attaching to the male barb that is attached to the ball valve. I assume 3/8" or 1/2"?
smyrnaquince
Well-Known Member
What ID hose is best for attaching to the male barb that is attached to the ball valve. I assume 3/8" or 1/2"?
It depends on the barb, but it will say on the barb adapter package.
timpoulsen
Mongo
I just got the AIH cooler kit. I didn't totally follow their instructions. I used the original spigot washer and seal on the bulkhead and used the O ring for the clamp down nut going into the false bottom. The stainless pipe and fittings hold down the false bottom tightly so no worries about knocking it out of place during a stir. Takes just a few seconds to put in and just a quick wrench tight on the compression nut to the bulkhead and finger tight to move the clamp down nut to tighten up. Nice setup, they do a good job with this.

I recently got a 10 gallon igloo cooler and I was thinking of just going the super cheap route and making a voile bag to line the cooler. That way I wouldn't need a steel braid/bazooka screen/false bottom.
But I looked at the options for a decent valve and decided to go the whole way. So, I just finished my mash tun build using a water heater supply hose braid and brass ball valve. It probably looks a lot like what other people have done, but I'm going to include pictures anyway.
First, I ground down the washers so they'd actually fit.

Folded over and crimped the end of the braid.

Clamped the braid in place.

Fully installed.


I'd have to say this was pretty damn easy. The only part that was slightly difficult was pulling the rubber hose out of the stainless steel braid. That thing was in there tight and it was like those 'chinese handcuffs' I remember from when I was a kid.
Other than that, this went smoothly and no leaks on the first try.
I do have one question though, and I'll probably do some searching anyway. How often do you all disassemble your screen/valve stuff to clean it? Do you just leave it in place and give it a PBW soak? Do you just hose it down and call it good?
But I looked at the options for a decent valve and decided to go the whole way. So, I just finished my mash tun build using a water heater supply hose braid and brass ball valve. It probably looks a lot like what other people have done, but I'm going to include pictures anyway.
First, I ground down the washers so they'd actually fit.
Folded over and crimped the end of the braid.
Clamped the braid in place.
Fully installed.
I'd have to say this was pretty damn easy. The only part that was slightly difficult was pulling the rubber hose out of the stainless steel braid. That thing was in there tight and it was like those 'chinese handcuffs' I remember from when I was a kid.
Other than that, this went smoothly and no leaks on the first try.
I do have one question though, and I'll probably do some searching anyway. How often do you all disassemble your screen/valve stuff to clean it? Do you just leave it in place and give it a PBW soak? Do you just hose it down and call it good?
I do have one question though, and I'll probably do some searching anyway. How often do you all disassemble your screen/valve stuff to clean it? Do you just leave it in place and give it a PBW soak? Do you just hose it down and call it good?
I use a CPVC manifold, but as for the ballvalve and fittings, I've never removed mine. I just spray it down after use and wash it with a fragrance free dish detergent. The hardest part is dumping the spent grain!

Well done on the build. All-grain is so much more fun than extract!
I recently got a 10 gallon igloo cooler and I was thinking of just going the super cheap route and making a voile bag to line the cooler. That way I wouldn't need a steel braid/bazooka screen/false bottom.
I use a home made voile sleeve over the stainless steel braids in my mash tuns. I secure these at the end with a plastic zip tie. I have never had a stuck mash and the vorlauf stage takes no time. Clear runnings from the very first pull on the tun. Does your system work in a similar way?
I use a CPVC manifold, but as for the ballvalve and fittings, I've never removed mine. I just spray it down after use and wash it with a fragrance free dish detergent. The hardest part is dumping the spent grain!
Well done on the build. All-grain is so much more fun than extract!
Cool. That's what I figured. I mean everything coming out of the mash tun will get boiled before it is consumed, so no need to worry too much about it. And yeah, I'm psyched for the full-on all-grain. I've been doing BIAB for a while, but my equipment limited the amount of grain I could handle.
I use a home made voile sleeve over the stainless steel braids in my mash tuns. I secure these at the end with a plastic zip tie. I have never had a stuck mash and the vorlauf stage takes no time. Clear runnings from the very first pull on the tun. Does your system work in a similar way?
Well, I originally thought of making a voile bag as big as the cooler, so I wouldn't need the steel braid at all. But I decided to go for the more traditional style instead. I'll definitely keep your idea in mind, if I have any issues with stuck sparges. Thanks for the tip.
I have also used a pair of boiled nylon stockings (panty hose) to cover the ss braid before coming up with the idea of the voile cloth cover.
Am I the only person who takes out the false bottom completely after a batch to clean it? I have the perforated stainless steel type, and some grain does get through. I don't want moldy grain hiding in my mashtun, even if I will be boiling wort that goes through it.
I take mine out every single time, I have the 12" domed one connected to the bulkhead/valve with tubing. No other way to clean it unless you like lactobacillus all up in your ****.
"Am I the only person who takes out the false bottom completely after a batch to clean it? I have the perforated stainless steel type, and some grain does get through. I don't want moldy grain hiding in my mashtun, even if I will be boiling wort that goes through"
I usually just spray it out well trying to get all grain out. Clean it maybe twice a year (using detergent and a sanitizing soak for all parts).
I usually just spray it out well trying to get all grain out. Clean it maybe twice a year (using detergent and a sanitizing soak for all parts).
NCbrewsnob
New Member
- Joined
- Jun 20, 2013
- Messages
- 4
- Reaction score
- 0
My local hardware store has 5/8 SS washers and I'm having to buy a pack of 10. Would anyone be interested in the others? I have heard these are hard to come by.
I've seen both the circular style cooler and the rectangle type as examples. Does either one work better than the other. Seems like the rectangle can have more line for filtering the wort by putting a tee fixture in it.
Sent from my SCH-I545 using Home Brew mobile app
Sent from my SCH-I545 using Home Brew mobile app
Do you have Palmer's book? It has lots of info on this project.
In concept, you're talking about a manifold, which is more efficient than a braid, especially with a rectangular cooler.
Sent from my SPH-L520 using Home Brew mobile app
In concept, you're talking about a manifold, which is more efficient than a braid, especially with a rectangular cooler.
Sent from my SPH-L520 using Home Brew mobile app
Similar threads
- Replies
- 0
- Views
- 612
- Replies
- 8
- Views
- 1K
- Replies
- 3
- Views
- 1K

Latest posts
-

-

-
 [BrewUNO] Controlador de Brassagem para BIAB, Single Vessel e Tribloco
- Latest: Leandro Oliveira
-

-
