You are using an out of date browser. It may not display this or other websites correctly.
You should upgrade or use an alternative browser.
You should upgrade or use an alternative browser.
Cheap & Easy 10 Gallon Rubbermaid MLT Conversion
- Thread starter FlyGuy
- Start date

Help Support Homebrew Talk - Beer, Wine, Mead, & Cider Brewing Discussion Forum:
This site may earn a commission from merchant affiliate
links, including eBay, Amazon, and others.
SaguaroMan
Well-Known Member
Just finished my first all grain with this Rubbermaid MLT. Worked like a dream with no leaks whatsoever
Sent from my SCH-I535 using Home Brew mobile app
Sent from my SCH-I535 using Home Brew mobile app
natefrog255
Well-Known Member
- Joined
- Feb 5, 2012
- Messages
- 365
- Reaction score
- 3
Used mine for first time a few weeks ago, seemed to work! I just forgot to pre-heat the tun so didn't get the temps I was hoping.
Anybody have any recommendation on tubing size to attach to ball valve adapter? I'm guessing since its a 3/8" barb that 3/8" ID tubing would be sufficient and I'd want hi-temp tubing. I bought 1/2" ID and it was too big.
Anybody have any recommendation on tubing size to attach to ball valve adapter? I'm guessing since its a 3/8" barb that 3/8" ID tubing would be sufficient and I'd want hi-temp tubing. I bought 1/2" ID and it was too big.
SaguaroMan
Well-Known Member
I use my siphon tubing, which is I believe is 3/8". You'd just need to find 3/8" silicon tubing
Sent from my SCH-I535 using Home Brew mobile app
Sent from my SCH-I535 using Home Brew mobile app
smyrnaquince
Well-Known Member
The vinyl tubing I found at HD was labelled for use up to 180F. I doubt you'll go over that.
natefrog255
Well-Known Member
- Joined
- Feb 5, 2012
- Messages
- 365
- Reaction score
- 3
I think at Menards alot of what I saw was also up to 180 degrees, and yes that is plenty. Generally speaking the temps are going to be in the 140 degree range when I drain into the boil. I'll probably just get silicon unless its a ton more which I don't think it is.
Thanks for the info!
Thanks for the info!
Fordmi
Well-Known Member
I definitely prefer silicone. Especially if you think a pump may factor into your setup at any time. The vinyl gets extremely soft and can cause flow issues.
As far as the id of the tubing. It depends on your ball valve. I run 1/2" 3 piece valves so I use 1/2" tubing. Something else you may want to consider if you're thinking about a pump...
I kinda have a coolers on crack system though...")
As far as the id of the tubing. It depends on your ball valve. I run 1/2" 3 piece valves so I use 1/2" tubing. Something else you may want to consider if you're thinking about a pump...
I kinda have a coolers on crack system though...
I imagine that the answer is burried somewhere in the 268 prious thread pages. I would like to know which 10 gallon beverage cooler seems to make the best mash tun or are all of these about the same? Is Igloo better or worse than Rubbermaid? Is a push lid better or worse than a screw top lid?
smyrnaquince
Well-Known Member
I imagine that the answer is burried somewhere in the 268 prious thread pages. I would like to know which 10 gallon beverage cooler seems to make the best mash tun or are all of these about the same? Is Igloo better or worse than Rubbermaid? Is a push lid better or worse than a screw top lid?
I'm not sure that there is a consensus. I've read strong feelings that Igloo has better quality, others that say that Rubbermaid works just fine. My personal suspicion is that the manufacturers had to cut corners for the cheaper models available at HD, Lowes, Walmart, etc., but that is just my conjecture--I have no proof.
I've read opinions both ways on screw vs. push lids. I read one post that did not like the newer Igloo push lid because of "notches" in the sides instead of tight fit the whole way around. I like the Igloo lid because the bottom is flat, which means that I can do a better job filling it with insulation.
IIRC, the Igloo coolers require 1/2" fittings and the Rubbermaid ones require 3/8" fittings.
Zorotools seems to have the best price for Igloo coolers, with $5 shipping and sometimes coupons available (do an online search).
I'm not sure why one would use the "dancing banana" smily, but I'm eating a banana with my lunch, so here goes:

Thanks for the detailed reply. These two coolers below are the ones I am considering. I have had good luck using an old 5 gallon Rubbermaid cooler with screw lid for smaller brews that I bought at a garage sale but I want to move to something bigger.
http://www.amazon.com/gp/product/B000F6SHTK/?tag=skimlinks_replacement-20
http://www.homedepot.com/s/10+gallon+cooler?NCNI-5
http://www.amazon.com/gp/product/B000F6SHTK/?tag=skimlinks_replacement-20
http://www.homedepot.com/s/10+gallon+cooler?NCNI-5
Last edited by a moderator:
I've heard that the yellow Igloo "industrial" coolers keep the best temps (I think I heard that from the Adventures in Homebrewing site, but I could be way off.
Example: http://www.desmoinesrental.com/product.php?productid=17668
Example: http://www.desmoinesrental.com/product.php?productid=17668
In the online reviews I read via Amazon and Home Depot both lose 1-2 degree or less for an hour of mashing which I think is great. I like to be able to see what I am buying but the local HD does not stock these right now. I have found that HBT members give me the most reliable sources of info.
I've heard that the yellow Igloo "industrial" coolers keep the best temps (I think I heard that from the Adventures in Homebrewing site, but I could be way off.
Example: http://www.desmoinesrental.com/product.php?productid=17668
Like this one? Is this a good price?
http://www.zorotools.com/g/Beverage Coolers and Accessories/00055135/
fwiw, unless Rubbermaid has changed their cooler design, the 10 gallon model will use 1/2" fittings (because that's what I put on mine a few years ago).
No matter what you buy, pay close attention to exactly where the spigot is located. If it's off center relative to the "well" they poke through on the outside it means the hole was drilled off center, which could be a royal pita to work with (I've seen folks on HBT try to deal with that and it wasn't pretty if it worked at all - grinding odd shapes on fender washers, etc)...
Cheers!
Like this one? Is this a good price?
http://www.zorotools.com/g/Beverage Coolers and Accessories/00055135/
I've never seen them in dark green/black, but the yellow ones look to be the correct ones. Personally, I use one of the old 48qt Igloo Ice Cube coolers I got 9 years ago from WalMart for $15. The thing holds temps solid throughout an hour-long mash. I can't imagine the standard Igloos or Rubbermaids being much worse. If it's easier for you to get a hold of the orange coolers, go for it, especially if they're in-store. That way you can get the exact bulkhead parts you need (i.e. 3/8" vs 1/2"). As homebrewers we often like to go EXTREME on DIY projects, but I don't know if it's necessary in this case.
Does anyone using an orange cooler have any comments on how well they hold temp over an entire mash?
[...]Does anyone using an orange cooler have any comments on how well they hold temp over an entire mash?
Properly preheated - and left alone after the mash-in stir! - mine will hold within two degrees for an hour. Otoh, if someone's over on brew days it's damned near impossible for them to leave the lid in place for that long without peeking, and I've lost an extra degree or so on those days.
I finally got that solved though - I laid up a nice thick piece of foam that I stick in a plastic bag and set on top of the bed, so "Nothing to see there, move along" is now the order of the day
Cheers!
Fordmi
Well-Known Member
I have a thermometer on my Home Depot 10gal cooler mash tun. I stir only a time or two after mashing in and I lose a degree at most on the average brew day.
dyqik
Well-Known Member
fwiw, unless Rubbermaid has changed their cooler design, the 10 gallon model will use 1/2" fittings (because that's what I put on mine a few years ago).
No matter what you buy, pay close attention to exactly where the spigot is located. If it's off center relative to the "well" they poke through on the outside it means the hole was drilled off center, which could be a royal pita to work with (I've seen folks on HBT try to deal with that and it wasn't pretty if it worked at all - grinding odd shapes on fender washers, etc)...
Cheers!
The 10 gal orange home depot branded rubbermaid I bought from Home Depot last November only took 3/8" fittings. You can maybe tell the difference among the Home Depot ones from the design of the spigot - the 10 gallon one with a black rubber push button was the 3/8" kind, while the 5 gallon orange ones with the push button the same as the rest of the spigot were 1/2".
I think the more expensive red rubbermaid 5 gallon coolers in that Home Depot had 3/8" spigots though. Best to look carefully at the cooler before buying the hardware (if in store, go and pick up one each of the 1/2" and 3/8" nipples first, and try them).
I finally had a brew day with my new mash tun as well as my new kettle/burner/wort chiller combo.
I set the burner up in the garage (not attached) and had to haul a bunch of stuff back and forth.
AND, I accidentally added an ounce of 15.3% AA Calypso hops at 60 minutes instead of the intended 8.8% AA Cascade. So, it will be a bit more bitter than I intended, but it should still be good. I did a lot of late hopping and I plan on a healthy dry-hopping that should balance the extra bitterness fairly well.
The mash tun worked well. I did have a bit of a stuck sparge, but I figured out how to avoid that. I just needed to not open the valve all the way.
Overall it was a good, fun brew day in the snow.
I just completed this project. I really cranked down and added 2 SS washers on the inside to get it tight. I couldn't get it completely tight but it is tight enough.
I have a couple of questions. I scraped the inside plastic pretty bad with the tools, is this okay(contaminaiton)? When cranking down, I think the washers may have also dug into the inside plastic, you can visually see the plastic bending inward, will this pose a problem?
I have a couple of questions. I scraped the inside plastic pretty bad with the tools, is this okay(contaminaiton)? When cranking down, I think the washers may have also dug into the inside plastic, you can visually see the plastic bending inward, will this pose a problem?
I just completed this project. I really cranked down and added 2 SS washers on the inside to get it tight. I couldn't get it completely tight but it is tight enough.
I have a couple of questions. I scraped the inside plastic pretty bad with the tools, is this okay(contaminaiton)? When cranking down, I think the washers may have also dug into the inside plastic, you can visually see the plastic bending inward, will this pose a problem?
Scratches can harbor infection. But anything coming out of your mashtun is still going to be boiled, which will kill any infection. It is unlikely that anything will be nasty enough to wreck your beer. I would just make sure you surface clean it well, and maybe sanitize it every few batches, if you're worried.
I can't take my false bottom out of my cooler without scraping a little, but if I don't take my false bottom out, I can't make sure the grain husks are all cleaned out. I'm choosing to accept the small amount of scraping.
Awesome, that makes sense. Ill make sure I keep it clean, and sanitize every so often.
Sounds like you have a bit of a Catch-22 with your false bottom. Guess you gotta go with the lesser of 2 evils.
Thanks Trippel-A!
Remmy
Drink First, Ask Questions Later
- Joined
- Mar 6, 2013
- Messages
- 17,672
- Reaction score
- 10,004
It's probably been covered in the other 270 pages of this thread. But make sure you get at least FIVE washers. I used six total. Three on the inside and three on the outside.
With three on the outside and one on the inside, I fought to tighten the fittings as much as possible (and finally did) but I still had a slow, slow leak beneath the ball valve.
With three on the outside and one on the inside, I fought to tighten the fittings as much as possible (and finally did) but I still had a slow, slow leak beneath the ball valve.
gonzoso
Member
I read a lot of this thread and looked on craigslist for 10 gallon water coolers to no avail.
Purchased one for 45$ shipped from amazon. I got an orange Igloo.
I then went to Ace hardware and got a 1/2" ball valve, a 1 1/2" nipple, a 3/8" hose barb, one male, one female, and 4x 3/4" stainless steel washers.
I had to file/dremel out the washers a bit to fit.
I used some o-rings out of a large o ring kit I have. I pickled my 0.25% brass.
The first time it leaked as I used the original o ring that came with the factory fitting. Once I substituted my o ring it stopped leaking.
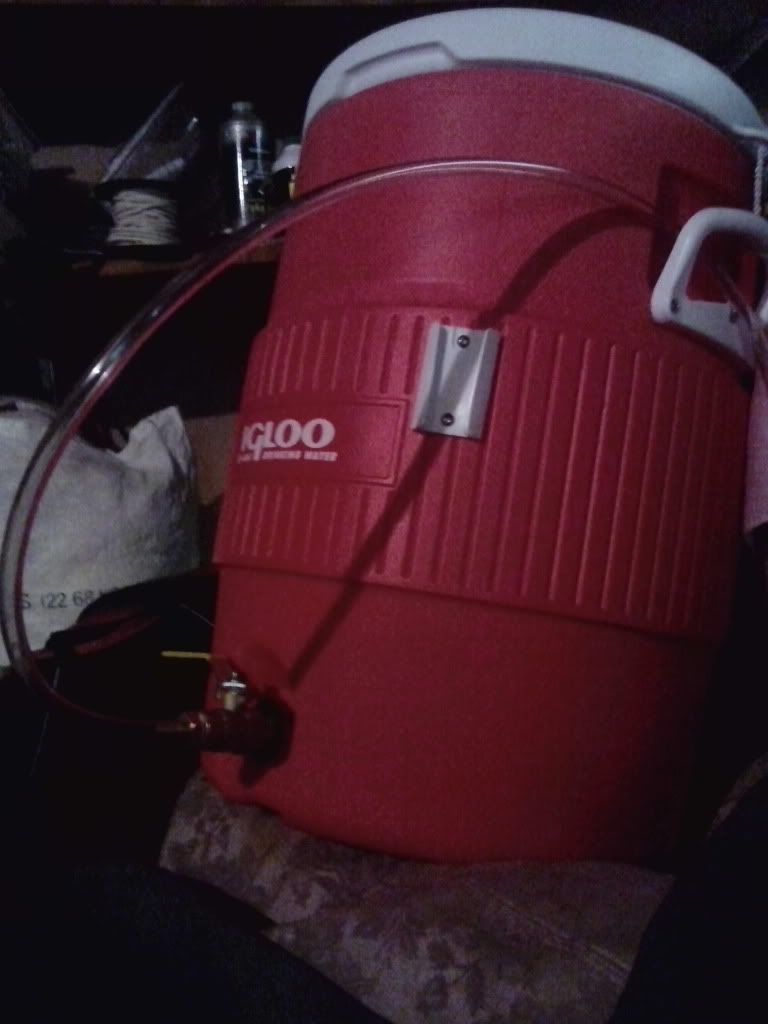
This is the finished mash tun.
However on the inside I did something different. I made a "manifold" out of a 5' piece of 3/8" copper. I bent it to fit and then used a dremel tool and cutoff wheel to cut a bunch of slits in the copper tubing, washed it out, crimped the end and attached it to my fitting.
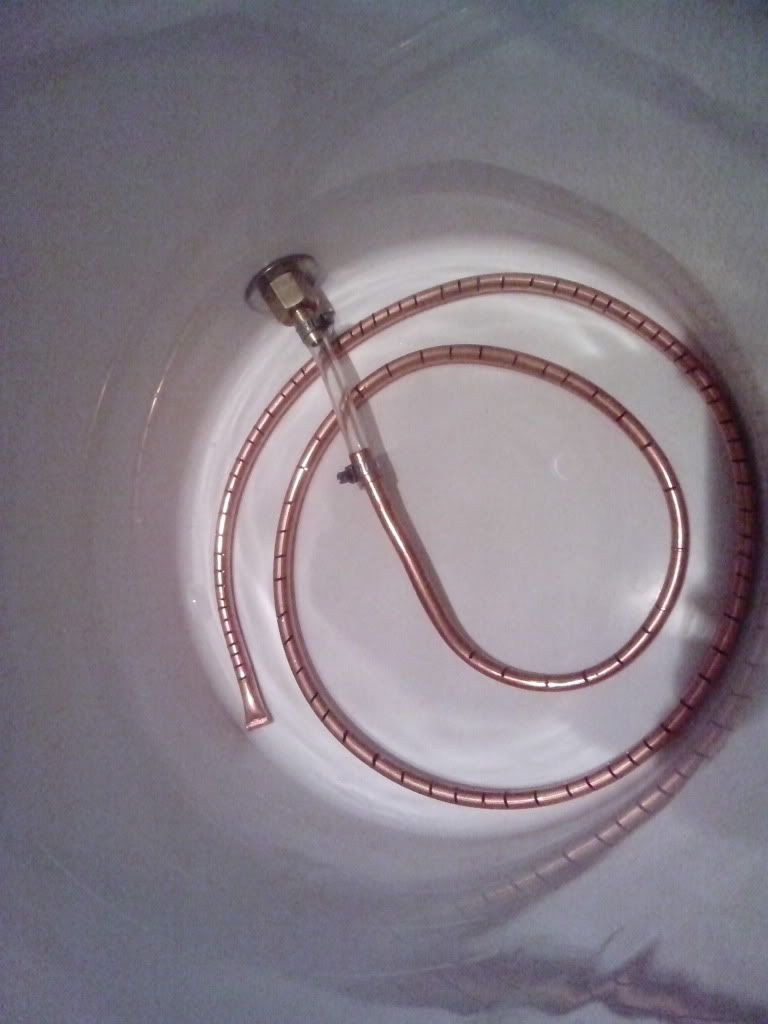
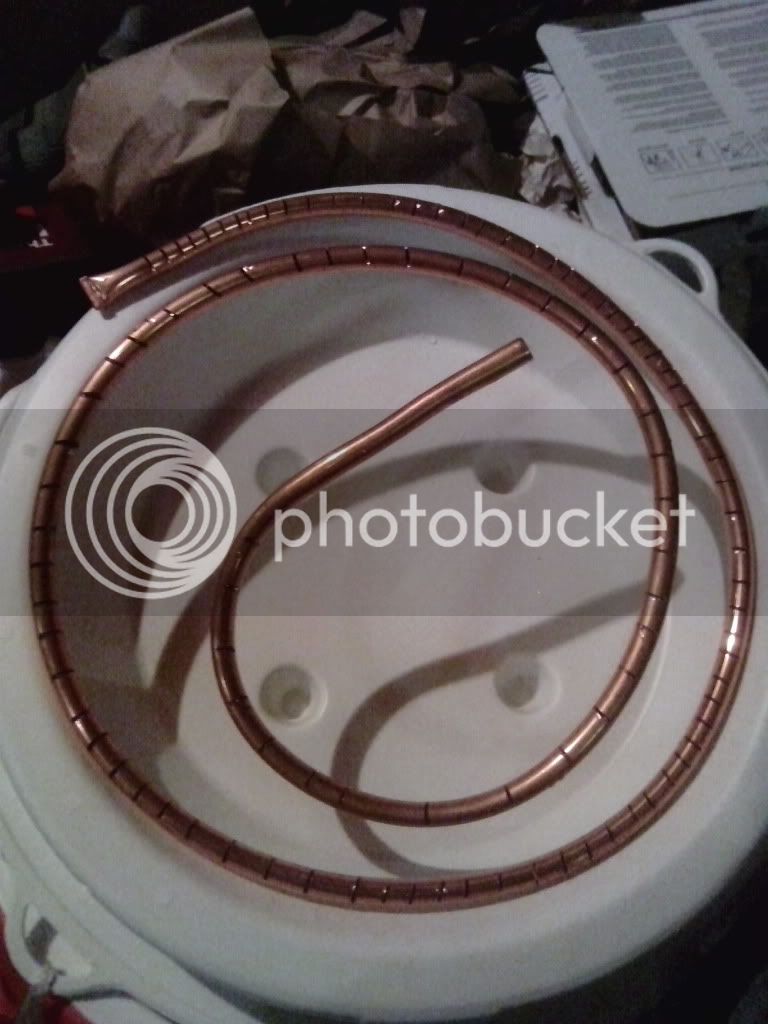
This allowed me a 9$ weld free copper manifold. I put some cuts in the bottom as well as I figured that would help a bit to fight a stuck mash.
- Joined
- Oct 23, 2013
- Messages
- 263
- Reaction score
- 76
I read a lot of this thread and looked on craigslist for 10 gallon water coolers to no avail.
Purchased one for 45$ shipped from amazon. I got an orange Igloo.
I then went to Ace hardware and got a 1/2" ball valve, a 1 1/2" nipple, a 3/8" hose barb, one male, one female, and 4x 3/4" stainless steel washers.
I had to file/dremel out the washers a bit to fit.
I used some o-rings out of a large o ring kit I have. I pickled my 0.25% brass.
The first time it leaked as I used the original o ring that came with the factory fitting. Once I substituted my o ring it stopped leaking.
This is the finished mash tun.
However on the inside I did something different. I made a "manifold" out of a 5' piece of 3/8" copper. I bent it to fit and then used a dremel tool and cutoff wheel to cut a bunch of slits in the copper tubing, washed it out, crimped the end and attached it to my fitting.
This allowed me a 9$ weld free copper manifold. I put some cuts in the bottom as well as I figured that would help a bit to fight a stuck mash.
Have you tried it ? Does it work?
Sent from my iPhone using Home Brew
gonzoso
Member
I'll let you know in a few hours, brewing tonight!
I built mine with a home depot cooler today. It used 3/8" as well. I couldn't imagine a 1/2" fitting in there. The 3/8 was very snug to fit in the rubber washer.
I was a little shocked at the sticker price of this project. I spent a lot more than I expected to get everything I needed.
Cooler - $44.99
Supply hose - $8.99
Ball valve - $7.99
everything else added up to about $10. All said an done, right around $75.
Washers and O-rings didn't come in singles. Had to get the box of 5. Home depot's crafty way of making you spend more i suppose.
Filled up with 10 gallons, not a drop. Hope it holds up to the heat!
The 10 gal orange home depot branded rubbermaid I bought from Home Depot last November only took 3/8" fittings. You can maybe tell the difference among the Home Depot ones from the design of the spigot - the 10 gallon one with a black rubber push button was the 3/8" kind, while the 5 gallon orange ones with the push button the same as the rest of the spigot were 1/2".
I think the more expensive red rubbermaid 5 gallon coolers in that Home Depot had 3/8" spigots though. Best to look carefully at the cooler before buying the hardware (if in store, go and pick up one each of the 1/2" and 3/8" nipples first, and try them).
Remmy
Drink First, Ask Questions Later
- Joined
- Mar 6, 2013
- Messages
- 17,672
- Reaction score
- 10,004
I built mine with a home depot cooler today. It used 3/8" as well. I couldn't imagine a 1/2" fitting in there. The 3/8 was very snug to fit in the rubber washer.
I was a little shocked at the sticker price of this project. I spent a lot more than I expected to get everything I needed.
Cooler - $44.99
Supply hose - $8.99
Ball valve - $7.99
everything else added up to about $10. All said an done, right around $75.
Washers and O-rings didn't come in singles. Had to get the box of 5. Home depot's crafty way of making you spend more i suppose.
Filled up with 10 gallons, not a drop. Hope it holds up to the heat!
Better than the same MLT at the LHBS for $190.
Josephbrew
Active Member
You can buy Kewler Kit conversions that supply you with a pre-build bulkhead and faucet for converting a 10 gallon Rubbermaid beverage cooler into a mash & lauter tun. But off-the-shelf components from your local hardware store work just as well, and cost far less. I got all my parts at my local Home Depot for a fraction of the cost of a Kewler conversion kit, or other commercial products.

Parts List:

Here are the parts you will need for the conversion (see picture, left to right):
- Rubbermaid 10 gallon round beverage cooler
- all stainless steel ¼” hose clamps x 2
- brass square head plug (Watts A-737)
- ½” x 12” (or larger) braided stainless steel supply hose
- 3/8” female barb adapter (Watts A-298)
- 5/8” stainless steel fender washer (sometimes hard to find, but try Fastenal or read this thread if you are stuck)
- 3/8” MIP x 1-1/2” brass nipple (Watts A-786)
- seal from plastic spigot of cooler (shown below)
- Teflon tape (note: everything to the left of the tape in the picture above goes inside the cooler, and everything to the right goes outside)
- 5/8” O-ring (preferably heat resistant, if you can find one)
- 3 x 5/8” fender washers
- 3/8” threaded ball valve
- 3/8” male barb adapter (Watts A-294)
I have the parts for this but in 1/2". What size braid can be use with a 1/2" female barb fitting that goes inside. Can you force the barb fitting in the 1/2" x 20" hose or the diameter is too little? . Need some help please.
Thanks. It just seems to me that the 3/8" barb fitting is used a lot with the 1/2" ss braided hose; and there's no info on braid size when going with 1/2" fittings.
JonGrafto
Well-Known Member
I have the parts for this but in 1/2". What size braid can be use with a 1/2" female barb fitting that goes inside. Can you force the barb fitting in the 1/2" x 20" hose or the diameter is too little? . Need some help please.
Thanks. It just seems to me that the 3/8" barb fitting is used a lot with the 1/2" ss braided hose; and there's no info on braid size when going with 1/2" fittings.
The 1/2" will work with the standard SS braid. You end up taking the pastic out of the braid and you can enlarge it to fit over the 1/2" barb fitting. It fits onto the barb with a SS worm clamp so no problems there.
In this case, size doesn't matter a whole lot.. he he
Josephbrew
Active Member
The 1/2" will work with the standard SS braid. You end up taking the pastic out of the braid and you can enlarge it to fit over the 1/2" barb fitting. It fits onto the barb with a SS worm clamp so no problems there.
In this case, size doesn't matter a whole lot.. he he
Thanks a lot for your help . Will get going to finish the cooler.

skogarr
Member
I just did this nice little project today. I'm wondering if anyone else noticed a little movement in the assembly. I tightened it as much as I felt comfortable doing and there is movement. I assume it is from the flex in the plastic.
I just did this nice little project today. I'm wondering if anyone else noticed a little movement in the assembly. I tightened it as much as I felt comfortable doing and there is movement. I assume it is from the flex in the plastic.
The bulkheads in mine spin pretty freely, especially when hot water has been in there. Just not much friction to prevent it. But they don't leak.
LJvermonster
Well-Known Member
Well, these are Canadian dollars, but here goes:
- Rubbermaid 10 gallon round beverage cooler - $34.99
- all stainless steel ¼ hose clamps x 2 - $0.66/ea
- brass square head plug (Watts A-737) - $1.09
- ½ x 12 (or larger) braided stainless steel supply hose - $4.99
- 3/8 female barb adapter (Watts A-298) - $1.72
- 5/8 stainless steel fender washer - $0.39
- 3/8 MIP x 1-1/2 brass nipple (Watts A-786) - $1.49
- 5/8 O-ring (preferably heat resistant, if you can find one) - $0.59
- 3 x 5/8 fender washers - $.29/ea
- 3/8 threaded ball valve - $6.89
- 3/8 male barb adapter (Watts A-294) - $1.89
Total cost: $56.23 CDN, which is about $8 USD.
No seriously, it would be about $46 US.
If you buy something similar from places like morebeer.com, it would be over $100. It took all of about 5 minutes to assemble everything (although I did do a few trips to Home Depot to find the parts to make it all work).
So, I just went to home depot yesterday and made this with a T in the bucket, an extra 3/8 Female barb connector, and a 30" 1/2" braided flex pipe (more surface area to filter the mash). The total cost was $95 after tax. The cooler itself was $44 and all the fittings added up REAL quick. I am excited to use it however!
Has anyone tried this with the 75-quart cooler from Home Depot, or even a larger cooler than the 10-gallon? I want to make a cooler mash tun but I'd like to be able to do larger batches in the future. Even if you haven't done it, your opinions are welcome.
Questions:
1) Would you guys recommend a copper manifold rather than the supply hose for a rectangular, 75-qt cooler?
2) I'm assuming the fittings would be different on the larger cooler, so I'd have to play around with that...unless someone has tried and it has worked?
3) If I happen upon a cooler that doesn't have a spigot, would drilling the hole myself work, or do you think that might be more prone to leaks?
Thanks!
Has anyone tried this with the 75-quart cooler from Home Depot, or even a larger cooler than the 10-gallon? I want to make a cooler mash tun but I'd like to be able to do larger batches in the future. Even if you haven't done it, your opinions are welcome.
Questions:
1) Would you guys recommend a copper manifold rather than the supply hose for a rectangular, 75-qt cooler?
2) I'm assuming the fittings would be different on the larger cooler, so I'd have to play around with that...unless someone has tried and it has worked?
3) If I happen upon a cooler that doesn't have a spigot, would drilling the hole myself work, or do you think that might be more prone to leaks?
Thanks!
1) I opted for a CPVC manifold, but copper is fine. I think the main purpose for manifold vs. braid is sparge method. General consensus is if you're batch sparging, it really doesn't matter. If you're fly sparging, a properly designed manifold can get you more efficiency.
2) The fittings would only be bigger/smaller if the hole in your cooler is bigger/smaller than the one shown here. I personally converted my 48qt Ice Cube cooler with 1/2" fittings. Undo your current spout and see what size nipple fitting fits in there. Most homebrew fittings are 1/2" NPT, so that's why I went that route.
3) Drilling it yourself is fine, just make sure you have a good seal on the INSIDE of your cooler. Don't rely on a gasket or o-ring on the outer seal as you'll leak wort into your cooler and make a nasty mess. Bargain Fittings and BrewHardware both have a cooler conversion kit if you want to drill it yourself and want a bulkhead made specifically for that method.
Awesome, thanks for the help. I think I'd do batch sparges, but would also like the option of both in the future. I'm going to start this project tomorrow probably. Thanks again!
Similar threads
- Replies
- 0
- Views
- 590
- Replies
- 8
- Views
- 1K
- Replies
- 3
- Views
- 1K

Latest posts
-

-
 question on the differences between tripels and dubbels
- Latest: CascadesBrewer
-

-

-

-

-
